#
enrich時可以發起一個子流程,取得結果后再設置回當前的對象中。
package org.springframework.integration.stackoverflow.enricher;
import java.util.List;
import java.util.Map;
import java.util.function.Function;
import java.util.stream.Collectors;
import org.springframework.boot.SpringApplication;
import org.springframework.boot.autoconfigure.SpringBootApplication;
import org.springframework.context.annotation.Bean;
import org.springframework.http.HttpMethod;
import org.springframework.integration.dsl.IntegrationFlow;
import org.springframework.integration.dsl.IntegrationFlows;
import org.springframework.integration.dsl.Transformers;
import org.springframework.integration.http.dsl.Http;
import org.springframework.web.client.RestTemplate;
@SpringBootApplication
public class SpringIntegrationEnricherApplication {
public static void main(String[] args) {
SpringApplication.run(SpringIntegrationEnricherApplication.class, args);
}
@Bean
public IntegrationFlow jsonEnricherFlow(RestTemplate restTemplate) {
return IntegrationFlows.from(Function.class)
.transform(Transformers.fromJson(Map.class))
.enrich((enricher) -> enricher
.<Map<String, ?>>requestPayload((message) ->
((List<?>) message.getPayload().get("attributeIds"))
.stream()
.map(Object::toString)
.collect(Collectors.joining(",")))
.requestSubFlow((subFlow) ->
subFlow.handle(
Http.outboundGateway("/attributes?id={ids}", restTemplate)
.httpMethod(HttpMethod.GET)
.expectedResponseType(Map.class)
.uriVariable("ids", "payload")))
.propertyExpression("attributes", "payload.attributes"))
.<Map<String, ?>, Map<String, ?>>transform(
(payload) -> {
payload.remove("attributeIds");
return payload;
})
.transform(Transformers.toJson())
.get();
}
}
https://stackoverflow.com/questions/58205432/spring-integration-enrich-transform-message-using-rest-callhttps://www.tabnine.com/web/assistant/code/rs/5c781b6ae70f87000197ab9f#L312
Java9之HttpClientAPI實戰詳解
https://blog.csdn.net/u014042066/article/details/78153653
Java 9 揭秘(14. HTTP/2 Client API)
https://www.cnblogs.com/IcanFixIt/p/7229611.html
Java JDK11(Java11)中設置HttpClient允許不安全的HTTPS連接
https://www.cjavapy.com/article/84/
通常如果rest服務支持https,需申請收費的ssl證書,但也可自制這種證書。
httpClient進行鏈接時要進行相應的設置, 主要是設置SSLContext中的
TrustSelfSignedStrategy:
import java.security.KeyManagementException;
import java.security.KeyStoreException;
import java.security.NoSuchAlgorithmException;
import java.util.concurrent.TimeUnit;
import javax.net.ssl.SSLContext;
import org.apache.http.client.config.RequestConfig;
import org.apache.http.conn.ssl.TrustSelfSignedStrategy;
import org.apache.http.impl.client.CloseableHttpClient;
import org.apache.http.impl.client.HttpClients;
import org.apache.http.impl.conn.PoolingHttpClientConnectionManager;
import org.apache.http.ssl.SSLContexts;
import org.springframework.context.annotation.Bean;
import org.springframework.context.annotation.Configuration;
@Configuration
public class HttpClientConfiguration {
@Bean
public PoolingHttpClientConnectionManager poolingHttpClientConnectionManager(AbstractProperties kycProperties) {
PoolingHttpClientConnectionManager result =
new PoolingHttpClientConnectionManager(
kycProperties.getHttpConnectionTimeToLiveMinu(),
TimeUnit.MINUTES
);
result.setMaxTotal(200);
result.setDefaultMaxPerRoute(20);
return result;
}
@Bean
public RequestConfig requestConfig(AbstractProperties kycProperties) {
return RequestConfig
.custom()
.setConnectionRequestTimeout(kycProperties.getHttpConnectionTimeout())
.setConnectTimeout(kycProperties.getHttpConnectionTimeout())
.setSocketTimeout(kycProperties.getHttpConnectionTimeout())
.build();
}
@Bean
public SSLContext sslContext() throws KeyManagementException, NoSuchAlgorithmException, KeyStoreException {
return SSLContexts
.custom()
.loadTrustMaterial(null, new TrustSelfSignedStrategy())
.build()
;
}
@Bean
public CloseableHttpClient httpClient(AbstractProperties kycProperties) throws KeyManagementException, NoSuchAlgorithmException, KeyStoreException {
return HttpClients
.custom()
// .setConnectionManager(poolingHttpClientConnectionManager(null))
.setDefaultRequestConfig(requestConfig(null))
.setKeepAliveStrategy(
new MyConnectionKeepAliveStrategy(
kycProperties.getHttpConnectionTimeToLiveMinu(),
TimeUnit.MINUTES
)
)
.setMaxConnTotal(200)
.setMaxConnPerRoute(20)
// .setConnectionTimeToLive(
// kycProperties.getHttpConnectionTimeToLiveMinu(),
// TimeUnit.MINUTES
// )
.setSSLContext(sslContext())
.build();
}
}
相應設置
http-connection-timeout: 30000
http-connection-time-to-live-minu: 5
一系列參數存于文本文件,需在LINUX下循環讀取,之后以此參數進行CURL遠程API調用,同時需記錄每次CURL的總時間
參數文件,test1.json
{"ADDRESS_FREE":"XXX","NAME":{"SURNAME":"XXX","FIRST_NAME":"XXX"}}
{"ADDRESS_FREE":"XXX","NAME":{"SURNAME":"XXX","FIRST_NAME":"XXX"}}
{"ADDRESS_FREE":"XXX","NAME":{"SURNAME":"XXX","FIRST_NAME":"XXX"}}
test1.sh
#! /bin/bash
RESULT_FILE="result.csv"
echo "" > $RESULT_FILE
i=1
while read line || [[ "$line" ]] #In case the file has an incomplete (missing newline) last line, you could use this alternative:
do
echo "$i"
printf "$i;$line;" >> $RESULT_FILE
curl -w %{time_total} -o /dev/null -X POST -H "Content-Type:application/json" -d "$line" http://ip:port >> $RESULT_FILE
#printf "\n\r" >> $RESULT_FILE
echo "" >> $RESULT_FILE
#i=$(( $i + 1 ))
(( i++ ))
done < test1.json
Reference:
https://stackoverflow.com/questions/30988586/creating-an-array-from-a-text-file-in-bash
當使用httpOutBoundGateway時,有時會碰到網絡抖動問題而出現連接異常,這時應該有個重試機制,如隔多少秒重試,重試多少次后放棄等。
默認是重試3次,每次重試間隔是20秒。
@SpringBootApplication
public class SpringIntegrationDslHttpRetryApplication {
@SuppressWarnings("unchecked")
public static void main(String[] args) {
ConfigurableApplicationContext applicationContext =
SpringApplication.run(SpringIntegrationDslHttpRetryApplication.class, args);
Function<Object, Object> function = applicationContext.getBean(Function.class);
function.apply("foo");
}
@Bean
public IntegrationFlow httpRetryFlow() {
return IntegrationFlows.from(Function.class)
.handle(Http.outboundGateway("http://localhost:11111")
.httpMethod(HttpMethod.GET)
.expectedResponseType(String.class),
e -> e.advice(retryAdvice()))
.get();
}
@Bean
public RequestHandlerRetryAdvice retryAdvice() {
return new RequestHandlerRetryAdvice();
}
}
#打印日志
logging.level.org.springframework.retry=debug
Reference:
https://docs.spring.io/spring-integration/reference/html/handler-advice.html#retry-advice
https://stackoverflow.com/questions/49784360/configure-error-handling-and-retry-for-http-outboundgateway-spring-dsl
https://stackoverflow.com/questions/50262862/requesthandlerretryadvice-with-httprequestexecutingmessagehandler-not-working
https://stackoverflow.com/questions/63689856/spring-integration-http-outbound-gateway-retry-based-on-reply-content
https://blog.csdn.net/cunfen8879/article/details/112552420
git的世界里有后悔藥嗎?
有的。不僅有,還不止一種:Reset 和 Revert。它們有什么區別呢?先說結論吧。
|
Reset | Revert |
| 作用 |
將某個commit之后的push全部回滾 |
將某個指定的commit回滾 |
| 歷史記錄(軌跡) |
無 |
有 |
| 是否可作用于單個文件 |
否(都是作用于commit,與文件無關) |
否 |
下面來說說具體例子。
Revert
試驗步驟如下:
- 新建兩個空白文件 Revert.txt 和 Common.txt,然后commit&push。
- 修改 Revert.txt 文件,內容為“commit 1”,然后commit&push,提交的備注為“commit 1 of Revert”
- 修改 Common.txt 文件,內容為“update for Revert(by commit 2)”
- 修改 Revert.txt 文件,新增一行,內容為“commit 2”
- 3 和 4的修改一起commit&push,提交備注為“commit 2 of Revert(Revert.txt + Common.txt)”
效果如下:
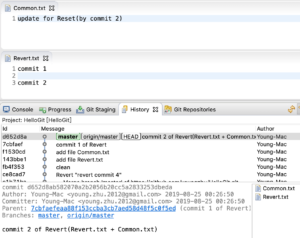
圖1-revert之前
目的
保留3的修改,回滾4的修改。
操作
選中“ Revert.txt ”文件,然后在 History 里選中 “commit 2 of Revert…”,右鍵,找到“Revert Commit”菜單,如圖:
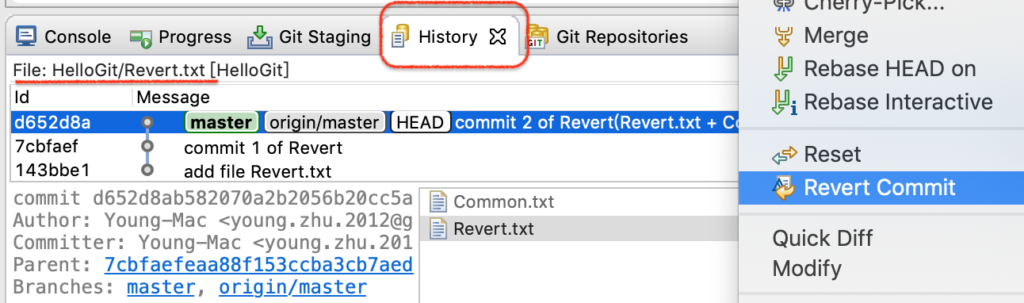
圖2-revert操作
點擊后,效果如圖:
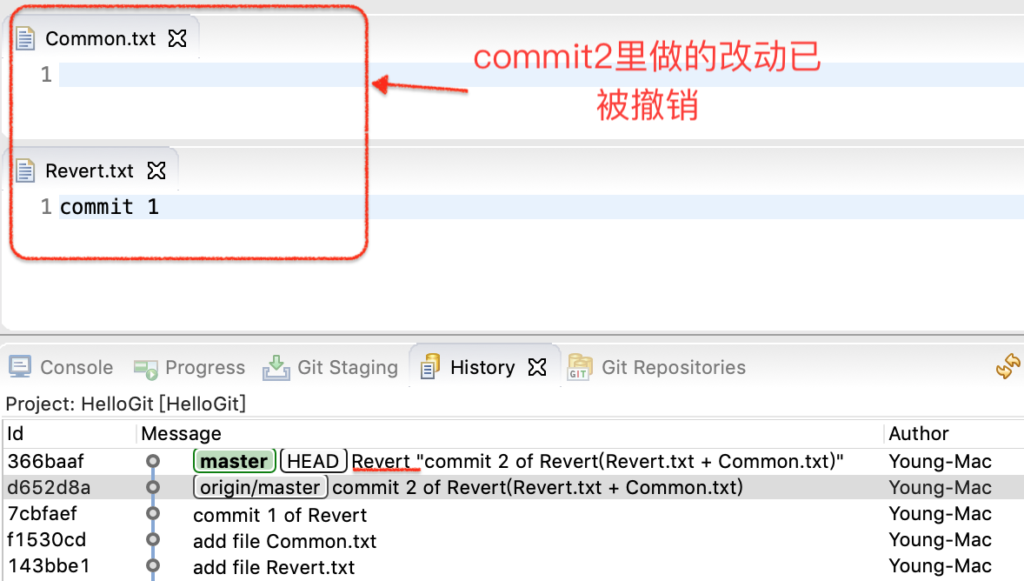
圖3-revert之后
最后,push即可。
結果
未能達到預期效果,Revert.txt 和 Common.txt的修改都被撤銷了。Revert的作用范圍是一個commit(原子),跟文件的個數無關。
注:對最后一個commit做revert比較簡單,兩步:一,revert;二,push就可以了。對于較早的commit,因為中間間隔了其他的commit,文件會有沖突,需要處理完沖突才可以commit&push。
Reset
試驗步驟如下:
- 新建空白文件 Reset.txt,然后commit&push。
- 修改 Reset.txt 文件,內容為“commit 1”
- 修改 Common.txt 文件,內容為“update for Reset(commit 1)”
- 2和3的修改一起commit&push,提交的備注為“commit 1 of Reset”
- 修改 Reset.txt 文件,新增一行,內容為“commit 2”,然后commit&push,提交的備注為“commit 2 of Reset”
- 修改 Reset.txt 文件,內容為“commit 3”
- 修改 Common.txt 文件,內容為“update for Reset(commit 3)”
- 6和7的修改一起commit&push,提交的備注為“commit 3 of Reset”
效果如下:
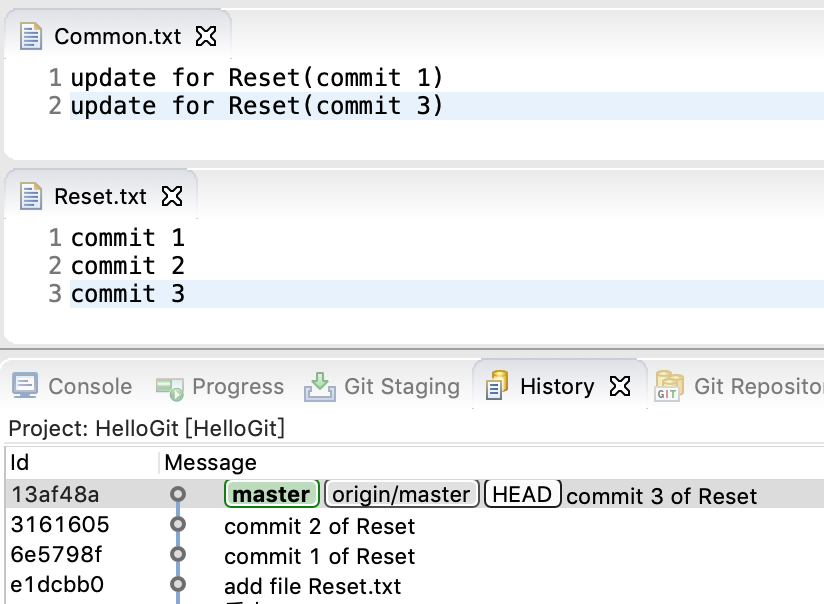
圖4-reset之前
目的
將commit 1 之后的(即commit 2 和 3)改動全部回滾。
操作
在 History 里找到“commit 1”,選中后,右鍵,找到 Reset 菜單,選擇 Hard 模式。
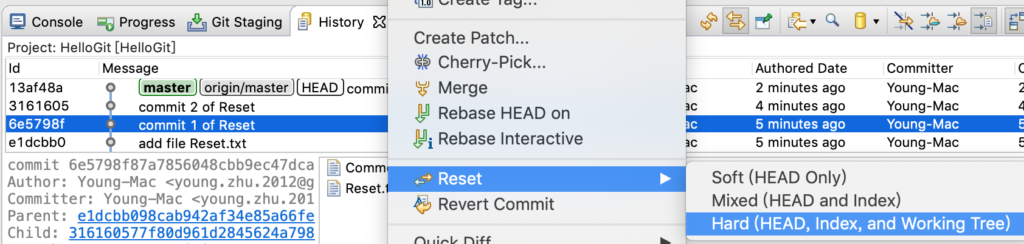
圖5-reset
執行后,如下圖所示,HEAD 已經指向里 commit 1,Common.txt 和 Reset.txt 的內容也已改變。注意左側的項目欄,它已落后了服務器(GitHub)2個commit。怎么提交到服務器上呢?直接push,它會提示不是最新的,操作失敗。這里要用到 push 的 force 屬性。
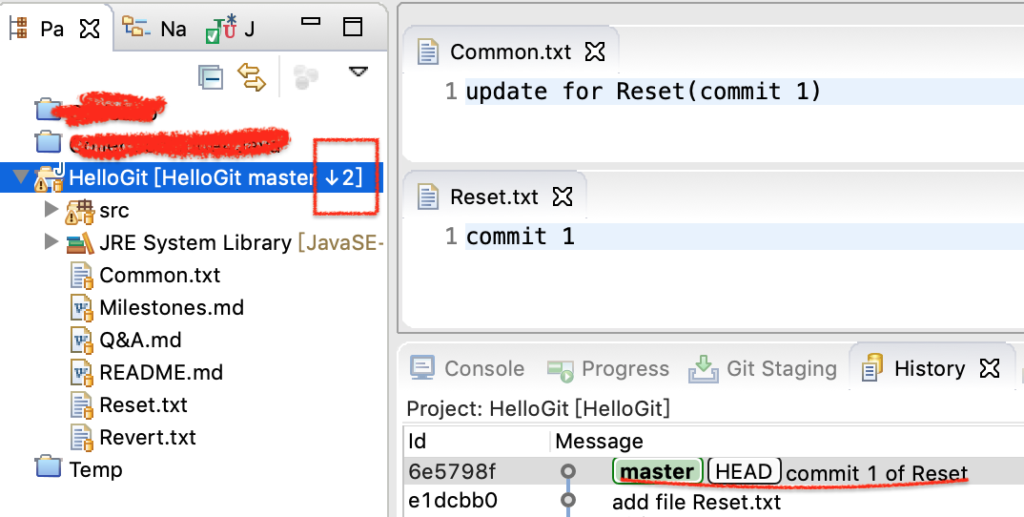
圖6-reset之后
選中 項目,右鍵 – Team – Remote – Configure Push to Upstream,在打開的小窗口中找到 Advanced,如下圖所示,這里的 Force Update 要勾上,表示強制覆蓋。
重新push,就可以跟服務器保持同步了。
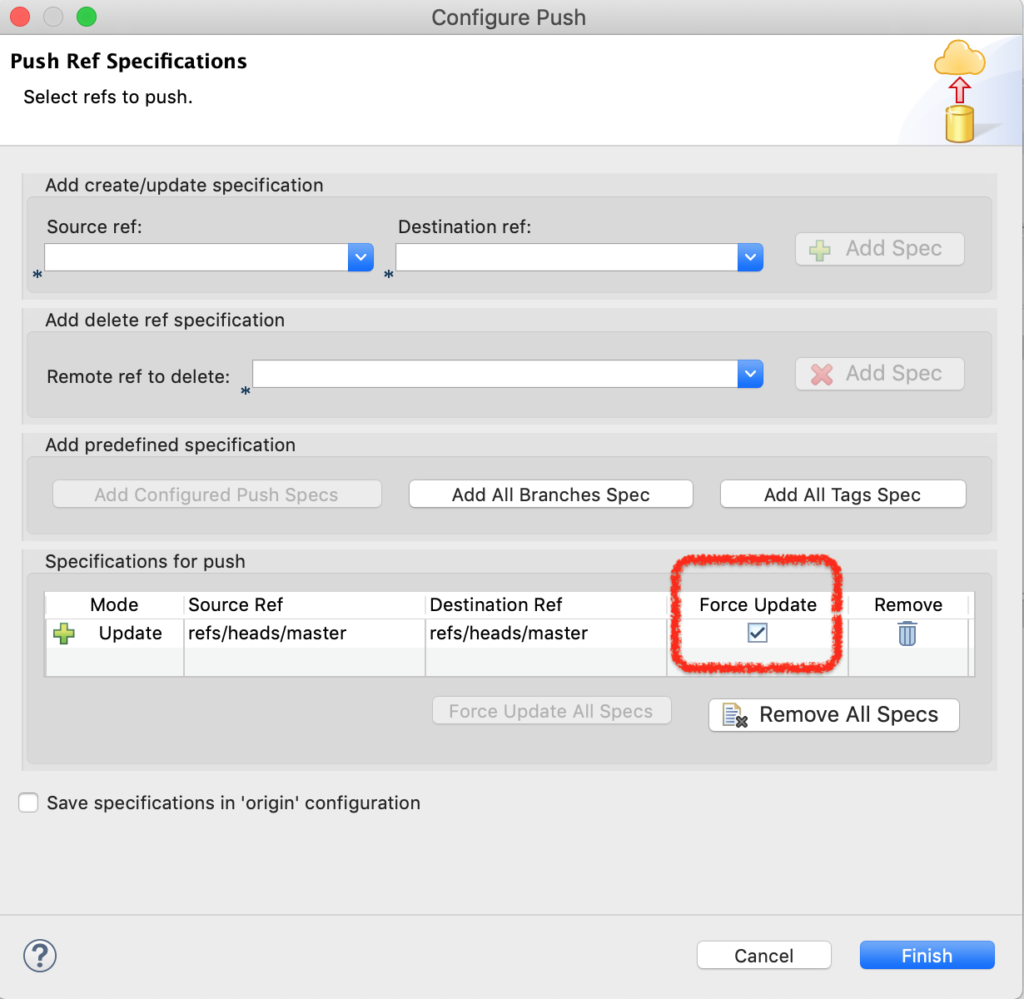
圖7-push-force
要特別注意的是,Reset慎用,跟Linux的“rm -rf /”有異曲同工之妙。
http://www.youngzy.com/blog/2019/08/git-difference-between-reset-and-revert-using-eclipse/