#
/**
*
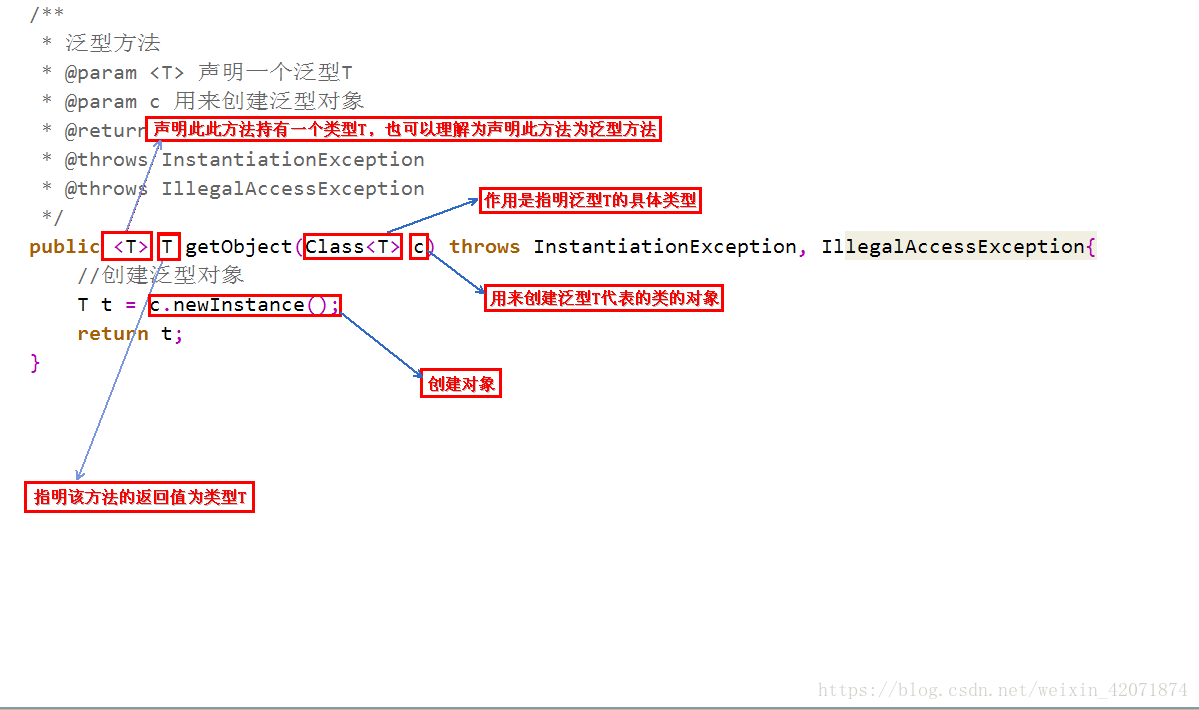
* @param <T>聲明此方法持有一個類型T,也可以理解為聲明此方法為泛型方法
* @param clazz 作用是指明泛型T的具體類型
* @return 指明該方法的返回值為類型T
* @throws InstantiationException
* @throws IllegalAccessException
*/
public <T> T getObject(Class<T> clazz) throws InstantiationException, IllegalAccessException {
T t = clazz.newInstance();//創建對象
return t;
}
方法返回值前的<T>的左右是告訴編譯器,當前的方法的值傳入類型可以和類初始化的泛型類不同,也就是該方法的泛型類可以自定義,不需要跟類初始化的泛型類相同
領域驅動(DDD,Domain Driven Design)為軟件設計提供了一套完整的理論指導和落地實踐,通過戰略設計和戰術設計,將技術實現與業務邏輯分離,來應對復雜的軟件系統。本系列文章準備以實戰的角度來介紹 DDD,首先編寫領域驅動的代碼模型,然后再基于代碼模型,引入 DDD 的各項概念,先介紹戰術設計,再介紹戰略設計。
> DDD 實戰1 - 基礎代碼模型
> DDD 實戰2 - 集成限界上下文(Rest & Dubbo)
> DDD 實戰3 - 集成限界上下文(消息模式)
> DDD 實戰4 - 領域事件的設計與使用
> DDD 實戰5 - 實體與值對象
> DDD 實戰6 - 聚合的設計
> DDD 實戰7 - 領域工廠與領域資源庫
> DDD 實戰8 - 領域服務與應用服務
> DDD 實戰9 - 架構設計
> DDD 實戰10 - 戰略設計
@Past @Future只針對Date類型的驗證,如果是String類型的驗證,則不適用。
其實可以新加一個方法返回Date類型,再配合@Future@Past 進行驗證。
@Future(message = "Invalid CN_ID_INFO.EXPIRE_DATE.")
private LocalDate getValidExpireDate() {
try {
return LocalDate.parse(this.dateString, DateTimeFormatter.ofPattern("yyyy-MM-dd"));
} catch (Exception e) {
return null;
}
}
此方法對dateString進行解釋,返回LocalDate,如果dateString為空或格式錯誤,則返回空,再配合@Future 進行是否未來日期的驗證。
bean validation的注釋是針對單個變量的,如果要針對多個變量的聯動,則不行,需要用到這個注釋。
這種方法避免了自定義校驗器而增加類。
https://www.chkui.com/article/java/java_bean_validation
@AssertTrue(message = "Missing BANK_CARD_IMG_INFO.IMG")
private Boolean getValidImg() {
if(YNEnum.Y.code.equals(super.getNeedChecked())) {
return StringUtils.hasText(this.img);
}
return null;//igore checking.
}
這個是當needChecked為Y的時候才執行檢查img變量是否為空。
有幾點注意:
- 方法名稱要以get開頭
- 返回類型用Boolean,而不用boolean
- 返回值有三種:true,false,null如果是null則當成通過,與true的結果一樣
SPRING BOOT單元測試中,因為測試時可能對應的服務器地址不同于SIT等別的環境,通常會將這些地址放于application-sit.yaml中。
在單元測試的代碼中用這個標簽指定用哪個profile,如
@ActiveProfiles({"embedded-mongodb","test"})
但這樣做法,由于@ActiveProfiles這個標簽是final的,如果要測試別的profile,只能復制另一份單元測試代碼,再改此標簽。
比較靈活的做法是用default profile,default profile是如果沒指定任何profile,則會默認用這個。在application-default.yaml中再指定需激活的profile。
spring:
profiles:
active: test,embedded-mongodb
如果要測試別的profile,可以指定環境變量的方式覆蓋:
-Dspring.profiles.active=error,embedded-mongodb
為了安全起見,將application-default.yaml放在測試目錄中:src\test\resources。
Setting default Spring profile for tests with override option
https://blog.inspeerity.com/spring/setting-default-spring-profile-for-tests-with-override-option/
接收數據的JAVA BEAN通常需要驗證其中字段的正確性,如不準為空,符合EMAIL格式等。
JSR-303 Bean Validation則提供了這樣的便捷。
只要在JAVA BEAN中需要驗證的字段加@NotNull這種標簽,然后在SERVISE中的輸入參數中加@Valid標簽,則就激活驗證流程。
也可以編程的方式自己驗證:
@MessageEndpoint
//@Validated
public class MqMessageCcdValidator {
private static final Logger LOGGER = LoggerFactory.getLogger(MqMessageCcdValidator.class);
@Autowired
private Validator validator;
@ServiceActivator
public MqMessage<CcdRequest> validate(/* @Valid */ Message<MqMessage<CcdRequest>> requestMessage) {
Set<ConstraintViolation<MqMessage<CcdRequest>>> set = validator.validate(requestMessage.getPayload());
if(CollectionUtils.isNotEmpty(set)) {
CompositeException compositeException = new CompositeException();
set.forEach(
constraintViolation -> {
LOGGER.info("{}", constraintViolation);
ReqInfoValidationException exception =
new ReqInfoValidationException(constraintViolation.getMessage());
compositeException.addException(exception);
}
);
throw new MessageHandlingException(requestMessage, compositeException);
}
return requestMessage.getPayload();
}
}
自定義驗證規則
可用標簽來做,以下為驗證手機號的規則:
import static java.lang.annotation.RetentionPolicy.RUNTIME;
import java.lang.annotation.ElementType;
import java.lang.annotation.Retention;
import java.lang.annotation.Target;
import javax.validation.Constraint;
import javax.validation.Payload;
import javax.validation.ReportAsSingleViolation;
import javax.validation.constraints.Pattern;
@Retention(RUNTIME)
@Target(value = { ElementType.FIELD, ElementType.PARAMETER, ElementType.ANNOTATION_TYPE })
@Constraint(validatedBy = {})
@ReportAsSingleViolation
@Pattern(regexp = "^1[3-9]\\d{9}$")
public @interface ChinaPhone {
String message() default "Invalid Chinese mobile No.";
Class<?>[] groups() default {};
Class<? extends Payload>[] payload() default {};
}
如果比較復雜的驗證規則,則參見:
https://reflectoring.io/bean-validation-with-spring-boot/#implementing-a-custom-validatorHow to use Java Bean Validation in Spring Boot
https://nullbeans.com/how-to-use-java-bean-validation-in-spring-boot/Complete Guide to Validation With Spring Boot
https://reflectoring.io/bean-validation-with-spring-boot/Spring JMS Validate Messages using JSR-303 Bean Validation
https://memorynotfound.com/spring-jms-validate-messages-jsr-303-bean-validation/Spring REST Validation Example
https://mkyong.com/spring-boot/spring-rest-validation-example/
Spring Boot 整合 Bean Validation 校驗數據
https://blog.csdn.net/wangzhihao1994/article/details/108403732
場景,餐廳:
- 食客下單,有飲品、食物、甜點
- 侍應接單,傳送給廚房
- 廚房分三個子流程處理,即飲品、食物、甜點子流程
- 等待三個子流程處理完,合并成一份交付
- 如果廚房發現某食物欠缺,會通知侍應,展開錯誤處理,即通知食客更改食物,再交給廚房
- 侍應將交付品傳送給食客
有一個主流程、三個子流程和一個聚合流程,聚合流程會聚合三個子流程的產物,通知主流程,再往下走。
并且主流程會感知子流程的錯誤,并會交給相應錯誤處理流程處理,且將結果再交給聚合流程。
對應SPRING INTEGRATION 的SCATTERGATHER模式:
@Bean
public IntegrationFlow scatterGatherAndExecutorChannelSubFlow(TaskExecutor taskExecutor) {
return f -> f
.scatterGather(
scatterer -> scatterer
.applySequence(true)
.recipientFlow(f1 -> f1.transform(p -> "Sub-flow#1"))
.recipientFlow(f2 -> f2
.channel(c -> c.executor(taskExecutor))
.transform(p -> {
throw new RuntimeException("Sub-flow#2");
})),
null,
s -> s.errorChannel("scatterGatherErrorChannel"));
}
@ServiceActivator(inputChannel = "scatterGatherErrorChannel")
public Message<?> processAsyncScatterError(MessagingException payload) {
return MessageBuilder.withPayload(payload.getCause().getCause())
.copyHeaders(payload.getFailedMessage().getHeaders())
.build();
}
https://github.com/adnanmamajiwala/spring-integration-sample/tree/master/dsl-scatter-gather/src/main/java/com/si/dsl/scattergatherhttps://docs.spring.io/spring-integration/docs/5.1.x/reference/html/#scatter-gather
當需要調用第三方HTTP接口時,別人的接口還沒完成,可先根據接口定義文檔,返回適當的數據,以便開發。
在LINUX上的部署結構為:
├── boot
│ ├── moco-runner-1.1.0-standalone.jar
│ └── .version
├── foo.json
├── logs
│ ├── back
│ └── moco.log
├── moco.sh
└── startup-moco.sh
.version文件:
/path/to/boot/moco-runner-1.1.0-standalone.jar 1.1.0
moco.sh
#!/usr/bin/env bash
# Ensure this file is executable via `chmod a+x moco`, then place it
# somewhere on your $PATH, like ~/bin. The rest of moco will be
# installed upon first run into the ~/.moco directory.
if [ `id -u` -eq 0 ] && [ "$MOCO_ROOT" = "" ]; then
echo "WARNING: You're currently running as root; probably by accident."
echo "Press control-C to abort or Enter to continue as root."
echo "Set MOCO_ROOT to disable this warning."
read _
fi
echo $*
#export MOCO_HOME="${
MOCO_HOME:
-"$HOME/.moco"}
"
export MOCO_HOME=$(cd `dirname $0`; cd boot; pwd)
VERSION_LOG_FILE="$MOCO_HOME/.version"
# Determine the Java command to use to start the JVM.
if [ -n "$JAVA_HOME" ] ; then
if [ -x "$JAVA_HOME/jre/sh/java" ] ; then
# IBM's JDK on AIX uses strange locations for the executables
JAVACMD="$JAVA_HOME/jre/sh/java"
else
JAVACMD="$JAVA_HOME/bin/java"
fi
if [ ! -x "$JAVACMD" ] ; then
die "ERROR: JAVA_HOME is set to an invalid directory: $JAVA_HOME
Please set the JAVA_HOME variable in your environment to match the
location of your Java installation."
fi
else
JAVACMD="java"
which java >/dev/null 2>&1 || die "ERROR: JAVA_HOME is not set and no 'java' command could be found in your PATH.
Please set the JAVA_HOME variable in your environment to match the
location of your Java installation."
fi
if [ "$HTTP_CLIENT" = "" ]; then
if type -p curl >/dev/null 2>&1; then
if [ "$https_proxy" != "" ]; then
CURL_PROXY="-x $https_proxy"
fi
HTTP_CLIENT="curl $CURL_PROXY -f -L -o"
else
HTTP_CLIENT="wget -O"
fi
fi
function download_failed_message {
echo "Failed to download $1"
echo "It's possible your HTTP client's certificate store does not have the"
echo "correct certificate authority needed. This is often caused by an"
echo "out-of-date version of libssl. Either upgrade it or set HTTP_CLIENT"
echo "to turn off certificate checks:
"
echo " export HTTP_CLIENT=\"wget --no-check-certificate -O\" # or"
echo " export HTTP_CLIENT=\"curl --insecure -f -L -o\""
echo "It's also possible that you're behind a firewall haven't yet"
echo "set HTTP_PROXY and HTTPS_PROXY."
}
function download {
$HTTP_CLIENT "$2.pending" "$1"
if [ $? == 0 ]; then
# TODO:
checksum
mv -f "$2.pending" "$2"
else
rm "$2.pending" 2> /dev/null
download_failed_message "$1"
exit 1
fi
}
function parse_tag {
tag_value=`grep "<$2>.*<.$2>" $1 | sed -e "s/^.*<$2/<$2/" | cut -f2 -d">"| cut -f1 -d"<"`
}
function parse_maven_metadata {
MOCO_METADATA_URL="http:
//repo1.maven.org/maven2/com/github/dreamhead/moco-runner/maven-metadata.xml"
MOCO_METADATA="/tmp/maven-metadata.xml"
download $MOCO_METADATA_URL $MOCO_METADATA
parse_tag $MOCO_METADATA latest
LATEST_VERSION=$tag_value
}
function parse_standalone_latest_url {
parse_maven_metadata
VERSION=${LATEST_VERSION%}
LATEST_MOCO_STANDALONE_JAR="moco-runner-$VERSION-standalone.jar"
MOCO_STANDLONE_URL="http://repo1.maven.org/maven2/com/github/dreamhead/moco-runner/$LATEST_VERSION/$LATEST_MOCO_STANDALONE_JAR"
}
function install {
echo "Install moco"
echo "Parse the latest version of moco"
parse_standalone_latest_url
echo "Download the latest moco:
$LATEST_VERSION"
MOCO_STANDALONE="$MOCO_HOME/$LATEST_MOCO_STANDALONE_JAR"
echo "$MOCO_STANDALONE $LATEST_VERSION" >> $VERSION_LOG_FILE
download $MOCO_STANDLONE_URL $MOCO_STANDALONE
}
function load_current_version {
read MOCO_STANDALONE CURRENT_VERSION < $VERSION_LOG_FILE
if [[ "$(uname)" -ne "Darwin" && "$(expr substr $(uname -s) 2 6)" == "CYGWIN" ]];then
MOCO_STANDALONE=`cygpath -m "$MOCO_STANDALONE"`
fi
}
function usage {
printf "
options:
help show help
start start server, e.g. moco start -p 12306 -c configfile.json
shutdown shutdown moco server
upgrade upgrade moco
"
}
if [ ! -e "$MOCO_HOME" ]
then
mkdir "$MOCO_HOME"
install
fi
if [ "$1" = "start" ]; then
echo "Starting "
"
load_current_version
exec "$JAVACMD" -jar "$MOCO_STANDALONE" $*
elif [ "$1" = "http" ]; then
echo "Starting HTTP server"
load_current_version
exec "$JAVACMD" -jar "$MOCO_STANDALONE" $*
elif [ "$1" = "https" ]; then
echo "Starting HTTPS server"
load_current_version
exec "$JAVACMD" -jar "$MOCO_STANDALONE" $*
elif [ "$1" = "socket" ]; then
echo "Starting Socket server"
load_current_version
exec "$JAVACMD" -jar "$MOCO_STANDALONE" $*
elif [ "$1" = "shutdown" ]; then
echo "Shutting down server"
load_current_version
exec "$JAVACMD" -jar "$MOCO_STANDALONE" $*
elif [ "$1" = "upgrade" ]; then
echo "Check the new version"
parse_maven_metadata
load_current_version
if [ "$LATEST_VERSION" = "$CURRENT_VERSION" ]; then
echo "The current version of moco is the latest"
else
echo "Upgrading"
rm $VERSION_LOG_FILE
install
fi
elif [ "$1" = "version" ]; then
load_current_version
echo "Moco version: $CURRENT_VERSION"
elif [ "$1" = "help" ]; then
usage
else
usage
fi
這是根據GIT上的原始文件作的修改。
startup-moco.sh
CMD_PATH=$(cd `dirname $0`; pwd)
# 項目日志輸出絕對路徑
LOG_DIR=${CMD_PATH}"/logs"
LOG_FILE="moco.log"
LOG_PATH="${LOG_DIR}/${LOG_FILE}"
# 當前時間
NOW=`date +'%Y-%m-%m-%H-%M-%S'`
NOW_PRETTY=`date +'%Y-%m-%m %H:%M:%S'`
# 啟動日志
STARTUP_LOG="================================================ ${NOW_PRETTY} ================================================\n"
# 日志備份目錄
LOG_BACK_DIR="${LOG_DIR}/back/"
# 如果logs文件夾不存在,則創建文件夾
if [[ ! -d "${LOG_DIR}" ]]; then
mkdir "${LOG_DIR}"
fi
# 如果logs/back文件夾不存在,則創建文件夾
if [[ ! -d "${LOG_BACK_DIR}" ]]; then
mkdir "${LOG_BACK_DIR}"
fi
# 如果項目運行日志存在,則重命名備份
if [[ -f "${LOG_PATH}" ]]; then
mv ${LOG_PATH} "${LOG_BACK_DIR}/${APPLICATION}_back_${NOW}.log"
fi
# 創建新的項目運行日志
echo "" > ${LOG_PATH}
# 可支持多個json配置文件
$CMD_PATH/moco.sh http -p 8088 -g "${CMD_PATH}/root.json" > ${LOG_PATH} 2>&1 &
# 打印啟動日志
echo -e ${STARTUP_LOG}
root.json
[
{
"context": "/service-a",
"include": "foo.json"
},
{
"context": "/service-b",
"include": "bar.json"
}
]
foo.json
[
{
"request": {
"method": "post",
"forms": {
"method": "uploadKycInfo"
}
},
"response": {
"json": {
"response": {
"subcode": "10000",
"submsg": "Success",
"sndDt": "20210121101800",
"remark": "上傳驗證基本信息",
"msgBody": {
"merOrdrNo": "A00120210121654321",
"retCode": "00000",
"retMsg": "成功/處理完成",
"remark": "上傳詳情或上傳信息的簡要描述"
}
},
"code": "0000",
"msg": "處理完成",
"sign": "DF2659FE3EB8184561135D9F55F5EF5"
}
}
}
]
訪問路徑:
http://ip:port/service-a/
https://github.com/dreamhead/moco/blob/master/moco-doc/apis.md
https://zhuanlan.zhihu.com/p/60076337 https://www.programmersought.com/article/68272293688/
有幾個項目中,都需要將圖片或者數字證書的文件轉為Base64,昨天寫代碼的時候,發現在jdk8中本就含有關于Base64的API。
從此后不再需要其他的jar包來轉換Base64了!!!
據說是JDK8加入的。
先是將文件轉為Base64:
public String encryptToBase64(String filePath) {
if (filePath == null) {
return null;
}
try {
byte[] b = Files.readAllBytes(Paths.get(filePath));
return Base64.getEncoder().encodeToString(b);
} catch (IOException e) {
e.printStackTrace();
}
return null;
}
Files、Paths類是JDK7里加入的,讀取文件不再需要調用IO包里的FileInputStream,簡單便捷。
字符串參數filePath是文件的路徑。
首先是將文件讀成二進制碼,然后通過Base64.getEncoder().encodeToString()方法將二進制碼轉換為Base64值。
然后是將Base64轉為文件:
public String decryptByBase64(String base64, String filePath) {
if (base64 == null && filePath == null) {
return "生成文件失敗,請給出相應的數據。";
}
try {
Files.write(Paths.get(filePath), Base64.getDecoder().decode(base64),StandardOpenOption.CREATE);
} catch (IOException e) {
e.printStackTrace();
}
return "指定路徑下生成文件成功!";
}
字符串參數base64指的是文件的Base64值,filePath是指的文件將要保存的位置。
通過Files.write()方法輕松將文件寫入指定位置,不再調用FileOutStream方法。
第三個參數StandardOpenOption.CREATE是處理文件的方式,我設置的是不管路徑下有或沒有,都創建這個文件,有則覆蓋。
在StandardOpenOption類中有很多參數可調用,不再累贅。