摘要: 2020年是最近歷史上前所未有的一年。在過去的一百年中,人類沒有經(jīng)歷過像COVID-19這樣的全球性大流行。它影響了我們星球上的所有國家,部門和幾乎所有個人。
好消息是,我們已經(jīng)準(zhǔn)備好疫苗,終于可以充滿樂觀和希望,迎接新的一年2021年。
2020年對于軟件開發(fā)行業(yè)來說是重要的一年,在許多領(lǐng)域都取得了明顯的突破。COVID-19大大加快了數(shù)字化轉(zhuǎn)型,到2021年這種趨勢將更加明顯。
在軟...
閱讀全文
HTTP1.1的鏈接,默認(rèn)是長鏈接,不會主動關(guān)閉。
LINUX會默認(rèn)保留鏈接5天再關(guān)閉。
建立HTTP鏈接其實也是調(diào)用TCL的協(xié)議去建立,包括開始的時候有三次握手,關(guān)閉的時候有四次握手。關(guān)閉鏈接雙方都可以發(fā)起。
但這些鏈接可能會被防火墻關(guān)掉而不通知建立鏈接的雙方,因此設(shè)置需設(shè)置鏈接的存活期。
使用httpClient的鏈接池時,要設(shè)置池中的鏈接存活期或設(shè)置存活策略。
檢測存活期只在每次發(fā)送數(shù)據(jù)時,才檢測取出的鏈接是否超過存活期,如超過則關(guān)閉。
設(shè)置存活期的策略:
import java.util.concurrent.TimeUnit;
import org.apache.http.HeaderElement;
import org.apache.http.HeaderElementIterator;
import org.apache.http.HttpResponse;
import org.apache.http.conn.ConnectionKeepAliveStrategy;
import org.apache.http.message.BasicHeaderElementIterator;
import org.apache.http.protocol.HTTP;
import org.apache.http.protocol.HttpContext;
import org.apache.http.util.Args;
public class MyConnectionKeepAliveStrategy implements ConnectionKeepAliveStrategy{
private int timeToLive;
private TimeUnit timeUnit;
public MyConnectionKeepAliveStrategy(int timeToLive, TimeUnit timeUnit) {
this.timeToLive = timeToLive;
this.timeUnit = timeUnit;
}
@Override
public long getKeepAliveDuration(final HttpResponse response, final HttpContext context) {
Args.notNull(response, "HTTP response");
final HeaderElementIterator it = new BasicHeaderElementIterator(
response.headerIterator(HTTP.CONN_KEEP_ALIVE));
while (it.hasNext()) {
final HeaderElement he = it.nextElement();
final String param = he.getName();
final String value = he.getValue();
if (value != null && param.equalsIgnoreCase("timeout")) {
try {
return Long.parseLong(value) * 1000;
} catch(final NumberFormatException ignore) {
//do nothing
}
}
}
return timeUnit.toMillis(timeToLive);
}
}
《HttpClient官方文檔》2.6 連接維持存活策略
http://ifeve.com/httpclient-2-6/httpclient連接池管理,你用對了?
http://ifeve.com/http-connection-pool/HttpClient連接池的一些思考
https://zhuanlan.zhihu.com/p/85524697HTTP協(xié)議的Keep-Alive 模式
https://www.jianshu.com/p/49551bda6619
通常要用到取某個時間段內(nèi)的數(shù)據(jù),那么時間段要如何定義?
取2020-12-01這天的數(shù)據(jù),"2020-12-01 00:00:00" <= time < "2020-12-02 00:00:00"。
apache common3中提供了相應(yīng)的方法:
startDate = DateUtils.parseDate(startDateStr, DATE_PATTERN);
String endDateStr = args.getOptionValues(END_DATE).get(0);
endDate = DateUtils.parseDate(endDateStr, DATE_PATTERN);
//清零開始日期,返回類似2020-12-01 00:00:00
startDate = DateUtils.truncate(startDate, Calendar.DATE);
//取結(jié)束日期的上限,返回隔天的時間,2020-12-02 00:00:00
endDate = DateUtils.ceiling(endDate, Calendar.DATE);"。
apache common3中提供了相應(yīng)的方法:
https://dev.twsiyuan.com/2017/09/tcp-states.html
在開發(fā)基於 HTTP 的網(wǎng)路應(yīng)用服務(wù)時,當(dāng)有大量連線要求,或是與長連線 (Persistent connection) 要求時,常常遇到底層 TCP 的連線斷線錯誤,導(dǎo)致服務(wù)不穩(wěn)定。因此研究了解 TCP 的連線狀態(tài)機制,並嘗試用自己的方式整理筆記,希望能從基礎(chǔ)知識中找到解決錯誤的線索,或是任何能更進一步優(yōu)化服務(wù)的手段。
僅紀(jì)錄 TCP 連線狀態(tài)以及建立或是斷開連線流程,關(guān)於進一步的 TCP 封包協(xié)定可參考 Reference 連線。
TCP 建立連線 (Open)
通常的 TCP 連線建立流程與狀態(tài),需要三次的訊息交換來建立連線 (three-way handshaking):
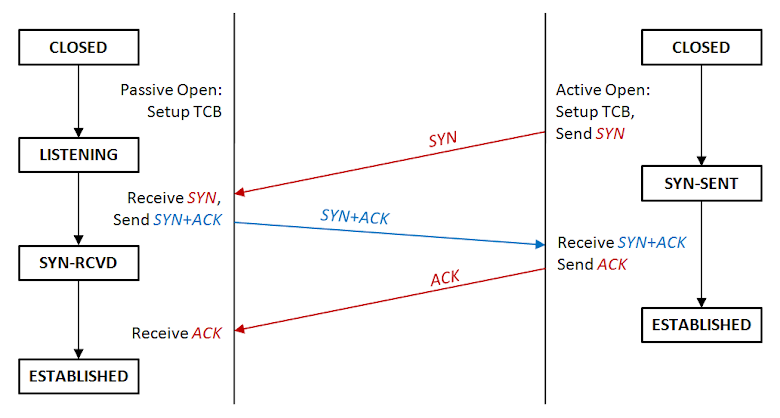
TCP 建立連線流程圖
其中左邊通常為 server,右邊則為 client,文字流程描述:
- Server 建立 TCB,開啟監(jiān)聽連線,進入狀態(tài) LISTENING
- Client 發(fā)出連線要求 SYN,進入狀態(tài) SYN-SENT,等待回應(yīng)
- Server 收到 SYN 要求,回應(yīng)連線傳送 SYN+ACK,並進入狀態(tài) SYN-RCVD (SYN-RECEIVED)
- Client 收到 SYN+ACK 確認(rèn)完成連線進入狀態(tài) ESTABLISHED,並送出 ACK
- Server 收到 ACK 確認(rèn)連線完成,也進入狀態(tài) ESTABLISHED
- 雙方開始傳送交換資料
該些名詞與狀態(tài)說明:
- CLOSED:連線關(guān)閉狀態(tài)
- LISTENING:監(jiān)聽狀態(tài),被動等待連線
- SYN-SENT:主動送出連線要求 SYN,並等待對方回應(yīng)
- SYN-RCVD:收到連線要求 SYN,送出己方的 SYN+ACK 後,等待對方回應(yīng)
- ESTABLISHED:確定完成連線,可開始傳輸資料
- TCB:Transmission Control Block,see wiki
- SYN:Synchronous,表示與對方建立連線的同步符號
- ACK:Acknowledgement,表示發(fā)送的數(shù)據(jù)已收到無誤
在建立連線時,可能會發(fā)生雙方同步建立連線的情形 (Simultaneous open),常見於 P2P 的應(yīng)用中,其 TCP 建立連線的流程不太一樣:
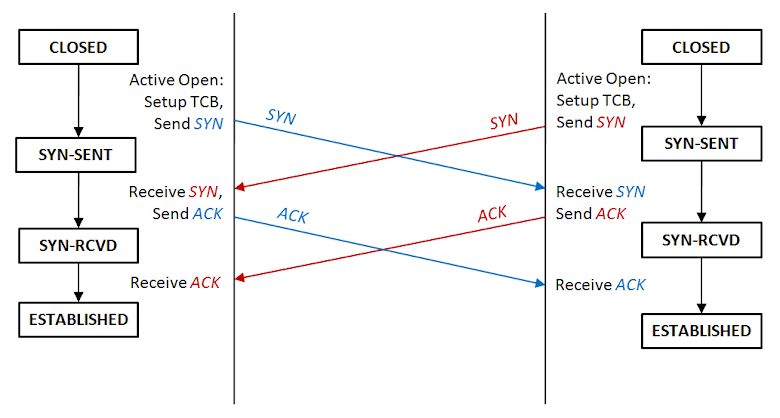
TCP 同步建立連線流程圖
畫成 TCP 狀態(tài)流程圖會是這樣:
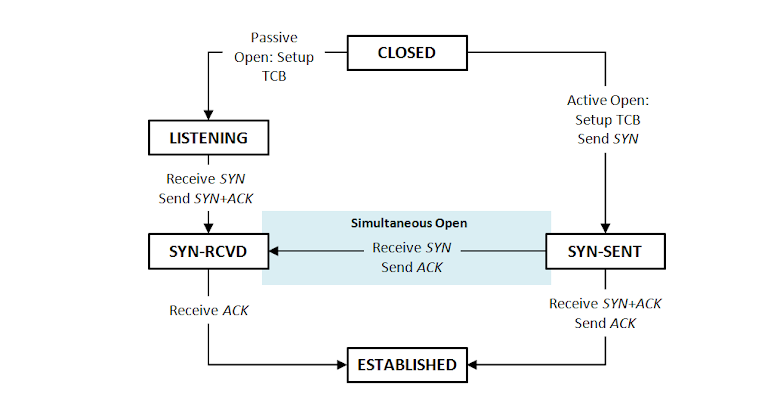
TCP Open 狀態(tài)圖
TCP 斷開連線 (Close)
TCP 關(guān)閉流程如下,比建立連線還要複雜一些,需要經(jīng)過四次的訊息交換 (four-way handshaking),要注意的是可以是由 server 發(fā)起主動關(guān)閉,抑或是 client 發(fā)起主動關(guān)閉:
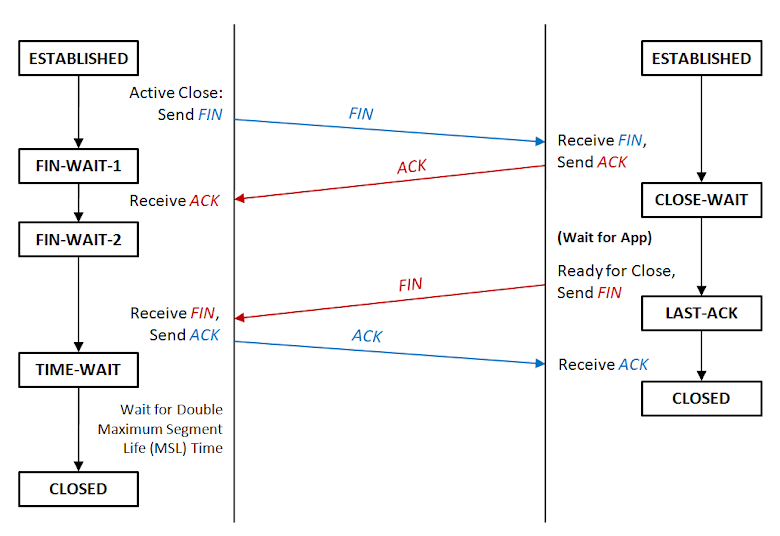
TCP 關(guān)閉連線流程圖
其中左邊通常為 client 狀態(tài) (由 client 主動發(fā)起關(guān)閉連線),右邊則為 server 狀態(tài),文字流程描述:
- Client 準(zhǔn)備關(guān)閉連線,發(fā)出 FIN,進入狀態(tài) FIN-WAIT-1
- Server 收到 FIN,發(fā)回收到的 ACK,進入狀態(tài) CLOSE-WAIT,並通知 App 準(zhǔn)備斷線
- Client 收到 ACK,進入狀態(tài) FIN-WAIT-2,等待 server 發(fā)出 FIN
- Server 確認(rèn) App 處理完斷線請求,發(fā)出 FIN,並進入狀態(tài) LAST-ACK
- Client 收到 FIN,並回傳確認(rèn)的 ACK,進入狀態(tài) TIME-WAIT,等待時間過後正式關(guān)閉連線
- Server 收到 ACK,便直接關(guān)閉連線
該些名詞與狀態(tài)說明:
- ESTABLISHED:連線開啟狀態(tài)
- CLOSE-WAIT:等待連線關(guān)閉狀態(tài),等待 App 回應(yīng)
- LAST-ACK:等待連線關(guān)閉狀態(tài),等待遠(yuǎn)端回應(yīng) ACK 後,便關(guān)閉連線
- FIN-WAIT-1:等待連線關(guān)閉狀態(tài),等待遠(yuǎn)端回應(yīng) ACK
- FIN-WAIT-2:等待連線關(guān)閉狀態(tài),等待遠(yuǎn)端回應(yīng) FIN
- TIME-WAIT:等待連線關(guān)閉狀態(tài),等段一段時候,保證遠(yuǎn)端有收到其 ACK 關(guān)閉連線 (網(wǎng)路延遲問題)
- CLOSED:連線關(guān)閉狀態(tài)
- FIN:表示關(guān)閉連線的同步符號
- ACK:Acknowledgement,表示發(fā)送的數(shù)據(jù)已收到無誤
有可能連線的雙方同時發(fā)起關(guān)閉,雖然機率還蠻低的:
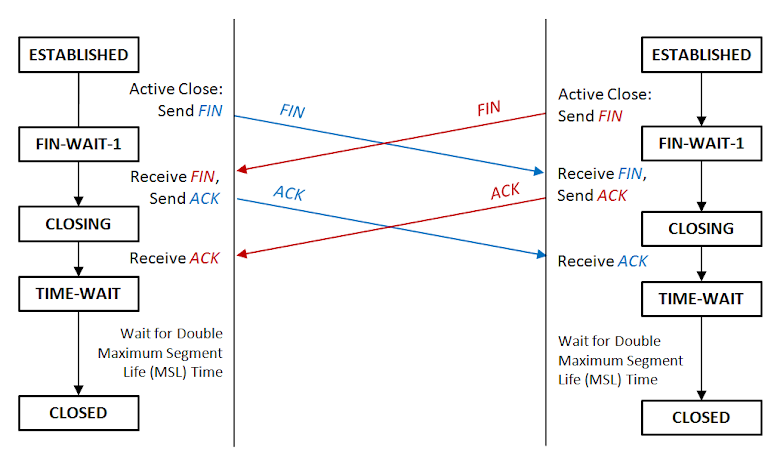
TCP 同步關(guān)閉連線流程圖
這邊多一個狀態(tài):
- CLOSING:等待連線關(guān)閉狀態(tài),等待遠(yuǎn)端回應(yīng) ACK
畫成 TCP 狀態(tài)流程圖會是這樣:
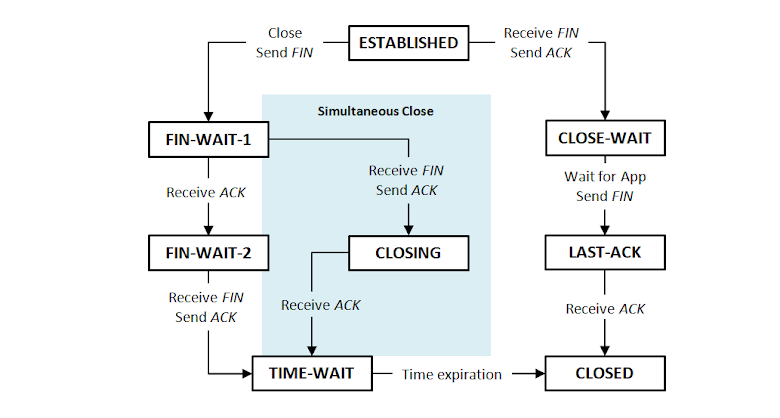
TCP Close 狀態(tài)圖
查詢現(xiàn)在電腦的 TCP 狀態(tài)
查詢目前所有的連線狀態(tài) (Windows & Linux):
netstat -a
Reference
import java.util.concurrent.TimeUnit;
import org.apache.http.client.config.RequestConfig;
import org.apache.http.impl.client.CloseableHttpClient;
import org.apache.http.impl.client.HttpClients;
import org.apache.http.impl.conn.PoolingHttpClientConnectionManager;
import org.springframework.context.annotation.Bean;
import org.springframework.context.annotation.Configuration;
@Configuration
public class HttpClientConfiguration {
@Bean
public PoolingHttpClientConnectionManager poolingHttpClientConnectionManager() {
PoolingHttpClientConnectionManager result =
new PoolingHttpClientConnectionManager(5, TimeUnit.MINUTES);
result.setMaxTotal(20);
result.setDefaultMaxPerRoute(20);
return result;
}
@Bean
public RequestConfig requestConfig(KycProperties kycProperties) {
return RequestConfig
.custom()
.setConnectionRequestTimeout(kycProperties.getHttpConnectionTimeout())
.setConnectTimeout(kycProperties.getHttpConnectionTimeout())
.setSocketTimeout(kycProperties.getHttpConnectionTimeout())
.build();
}
@Bean
public CloseableHttpClient httpClient(PoolingHttpClientConnectionManager poolingHttpClientConnectionManager, RequestConfig requestConfig) {
return HttpClients
.custom()
.setConnectionManager(poolingHttpClientConnectionManager)
.setDefaultRequestConfig(requestConfig)
.build();
}
}
Troubleshooting Spring's RestTemplate Requests Timeout
https://tech.asimio.net/2016/12/27/Troubleshooting-Spring-RestTemplate-Requests-Timeout.html
a
httpclient超時重試記錄
https://blog.csdn.net/wanghao112956/article/details/102967930
A/pom.xml:
<groupId>com.dummy.bla</groupId>
<artifactId>parent</artifactId>
<version>0.1-SNAPSHOT</version>
<packaging>pom</packaging>
B/pom.xml
<parent>
<groupId>com.dummy.bla</groupId>
<artifactId>parent</artifactId>
<version>0.1-SNAPSHOT</version>
</parent>
<groupId>com.dummy.bla.sub</groupId>
<artifactId>kid</artifactId>
B/pom.xml中需要顯式注明父pom的版本號,但從MAVEN3.5之后,可以用變量表示了:
A/pom.xml:
<groupId>com.dummy.bla</groupId>
<artifactId>parent</artifactId>
<version>${revision}</version>
<packaging>pom</packaging>
<properties>
<revision>0.1-SNAPSHOT</revision>
</properties>
B/pom.xml
<parent>
<groupId>com.dummy.bla</groupId>
<artifactId>parent</artifactId>
<version>${revision}</version>
</parent>
<groupId>com.dummy.bla.sub</groupId>
<artifactId>kid</artifactId>
https://stackoverflow.com/questions/10582054/maven-project-version-inheritance-do-i-have-to-specify-the-parent-version/51969067#51969067
https://maven.apache.org/maven-ci-friendly.html
緣起
今天在看一個bug,之前一個分支的版本是正常的,在新的分支上上加了很多日志沒找到原因,希望回溯到之前的版本,確定下從哪個提交引入的問題,但是還不想把現(xiàn)在的修改提交,也不希望在Git上看到當(dāng)前修改的版本(帶有大量日志和調(diào)試信息)。因此呢,查查Git有沒有提供類似功能,就找到了git stash的命令。
綜合下網(wǎng)上的介紹和資料,git stash(git儲藏)可用于以下情形:
- 發(fā)現(xiàn)有一個類是多余的,想刪掉它又擔(dān)心以后需要查看它的代碼,想保存它但又不想增加一個臟的提交。這時就可以考慮
git stash。 - 使用git的時候,我們往往使用分支(branch)解決任務(wù)切換問題,例如,我們往往會建一個自己的分支去修改和調(diào)試代碼, 如果別人或者自己發(fā)現(xiàn)原有的分支上有個不得不修改的bug,我們往往會把完成一半的代碼
commit提交到本地倉庫,然后切換分支去修改bug,改好之后再切換回來。這樣的話往往log上會有大量不必要的記錄。其實如果我們不想提交完成一半或者不完善的代碼,但是卻不得不去修改一個緊急Bug,那么使用git stash就可以將你當(dāng)前未提交到本地(和服務(wù)器)的代碼推入到Git的棧中,這時候你的工作區(qū)間和上一次提交的內(nèi)容是完全一樣的,所以你可以放心的修Bug,等到修完Bug,提交到服務(wù)器上后,再使用git stash apply將以前一半的工作應(yīng)用回來。 - 經(jīng)常有這樣的事情發(fā)生,當(dāng)你正在進行項目中某一部分的工作,里面的東西處于一個比較雜亂的狀態(tài),而你想轉(zhuǎn)到其他分支上進行一些工作。問題是,你不想提交進行了一半的工作,否則以后你無法回到這個工作點。解決這個問題的辦法就是
git stash命令。儲藏(stash)可以獲取你工作目錄的中間狀態(tài)——也就是你修改過的被追蹤的文件和暫存的變更——并將它保存到一個未完結(jié)變更的堆棧中,隨時可以重新應(yīng)用。
git stash用法
1. stash當(dāng)前修改
git stash會把所有未提交的修改(包括暫存的和非暫存的)都保存起來,用于后續(xù)恢復(fù)當(dāng)前工作目錄。
比如下面的中間狀態(tài),通過git stash命令推送一個新的儲藏,當(dāng)前的工作目錄就干凈了。
$ git status
On branch master
Changes to be committed:

new file:   style.css

Changes not staged for commit:

modified:   index.html

$ git stash Saved working directory and index state WIP on master: 5002d47 our new homepage
HEAD is now at 5002d47 our new homepage

$ git status
On branch master nothing to commit, working tree clean
需要說明一點,stash是本地的,不會通過git push命令上傳到git server上。
實際應(yīng)用中推薦給每個stash加一個message,用于記錄版本,使用git stash save取代git stash命令。示例如下:
$ git stash save "test-cmd-stash"
Saved working directory and index state On autoswitch: test-cmd-stash
HEAD 現(xiàn)在位于 296e8d4 remove unnecessary postion reset in onResume function
$ git stash list
stash@{0}: On autoswitch: test-cmd-stash
2. 重新應(yīng)用緩存的stash
可以通過git stash pop命令恢復(fù)之前緩存的工作目錄,輸出如下:
$ git status
On branch master
nothing to commit, working tree clean
$ git stash pop
On branch master
Changes to be committed:
     new file:   style.css

Changes not staged for commit:
      modified:   index.html
Dropped refs/stash@{0} (32b3aa1d185dfe6d57b3c3cc3b32cbf3e380cc6a)
這個指令將緩存堆棧中的第一個stash刪除,并將對應(yīng)修改應(yīng)用到當(dāng)前的工作目錄下。
你也可以使用git stash apply命令,將緩存堆棧中的stash多次應(yīng)用到工作目錄中,但并不刪除stash拷貝。命令輸出如下:
$ git stash apply
On branch master
Changes to be committed:
      new file:   style.css
Changes not staged for commit:
      modified:   index.html
3. 查看現(xiàn)有stash
可以使用git stash list命令,一個典型的輸出如下:
$ git stash list
stash@{0}: WIP on master: 049d078 added the index file
stash@{1}: WIP on master: c264051 Revert "added file_size"
stash@{2}: WIP on master: 21d80a5 added number to log
在使用git stash apply命令時可以通過名字指定使用哪個stash,默認(rèn)使用最近的stash(即stash@{0})。
4. 移除stash
可以使用git stash drop命令,后面可以跟著stash名字。下面是一個示例:
$ git stash list
stash@{0}: WIP on master: 049d078 added the index file
stash@{1}: WIP on master: c264051 Revert "added file_size"
stash@{2}: WIP on master: 21d80a5 added number to log
$ git stash drop stash@{0}
Dropped stash@{0} (364e91f3f268f0900bc3ee613f9f733e82aaed43)
或者使用git stash clear命令,刪除所有緩存的stash。
5. 查看指定stash的diff
可以使用git stash show命令,后面可以跟著stash名字。示例如下:
$ git stash show
  index.html | 1 +
  style.css | 3 +++
  2 files changed, 4 insertions(+)
在該命令后面添加-p或--patch可以查看特定stash的全部diff,如下:
$ git stash show -p
diff --git a/style.css b/style.css
new file mode 100644
index 0000000..d92368b
--- /dev/null
+++ b/style.css @@ -0,0 +1,3 @@
+* {
+  text-decoration: blink;
+}
diff --git a/index.html b/index.html
index 9daeafb..ebdcbd2 100644
--- a/index.html
+++ b/index.html
@@ -1 +1,2 @@
+<link rel="stylesheet" href="style.css"/>
6. 從stash創(chuàng)建分支
如果你儲藏了一些工作,暫時不去理會,然后繼續(xù)在你儲藏工作的分支上工作,你在重新應(yīng)用工作時可能會碰到一些問題。如果嘗試應(yīng)用的變更是針對一個你那之后修改過的文件,你會碰到一個歸并沖突并且必須去化解它。如果你想用更方便的方法來重新檢驗?zāi)銉Σ氐淖兏憧梢赃\行 git stash branch,這會創(chuàng)建一個新的分支,檢出你儲藏工作時的所處的提交,重新應(yīng)用你的工作,如果成功,將會丟棄儲藏。
$ git stash branch testchanges
Switched to a new branch "testchanges"
# On branch testchanges
# Changes to be committed:
#   (use "git reset HEAD <file>..." to unstage)
#
#      modified:   index.html
#
# Changes not staged for commit:
#   (use "git add <file>..." to update what will be committed)
#
#      modified:   lib/simplegit.rb
#
Dropped refs/stash@{0} (f0dfc4d5dc332d1cee34a634182e168c4efc3359)
這是一個很棒的捷徑來恢復(fù)儲藏的工作然后在新的分支上繼續(xù)當(dāng)時的工作。
7. 暫存未跟蹤或忽略的文件
默認(rèn)情況下,git stash會緩存下列文件:
- 添加到暫存區(qū)的修改(staged changes)
- Git跟蹤的但并未添加到暫存區(qū)的修改(unstaged changes)
但不會緩存一下文件:
- 在工作目錄中新的文件(untracked files)
- 被忽略的文件(ignored files)
git stash命令提供了參數(shù)用于緩存上面兩種類型的文件。使用-u或者--include-untracked可以stash untracked文件。使用-a或者--all命令可以stash當(dāng)前目錄下的所有修改。
至于git stash的其他命令建議參考Git manual。
小結(jié)
git提供的工具很多,恰好用到就可以深入了解下。更方便的開發(fā)與工作的。
參考資料
- 6.3 Git工具-儲藏(Stashing)
- Git Stash 歷險記
- Git Stash用法
- Git Stash
https://stackoverflow.com/questions/35312677/how-to-use-month-using-aggregation-in-spring-data-mongo-dbAggregation agg = newAggregation(
project("id")
.andExpression("month(createdDate)").as("month_joined")
.andExpression("year(createdDate)").as("year"),
match(Criteria.where("year").is(2016)),
group("month_joined").count().as("number"),
project("number").and("month_joined").previousOperation(),
sort(ASC, "number")
);
AggregationResults<JoinCount> results = mongoTemplate.aggregate(agg,
"collectionName", JoinCount.class);
List<JoinCount> joinCount = results.getMappedResults();


