This article assumes that you have a running Jenkins instance on your Linux machine with a valid domain (not localhost), GitLab and that you are familiar with the Angular framework.
For Jenkins, please install the GitLab and NodeJS plugins. For simplicity’s sake, this article is going to use simple shell commands to run automated tests and to deploy an app to production.
***Note. If you can’t decide where to test all this, there is an article I wrote that might help you: CI/CD Cloud Voyage with Jenkins.
Configuring Gitlab and Jenkins
Jenkins: Access Rights to GitLab
In order to use GitLab with Jenkins, you’ll need to generate an access token in GitLab, which you can do in User menu > Settings > Access tokens
and configure GitLab Connection on Jenkins by adding the newly generated token.
In Jenkins, go to Manage Jenkins > Configure system and find the GitLab section.
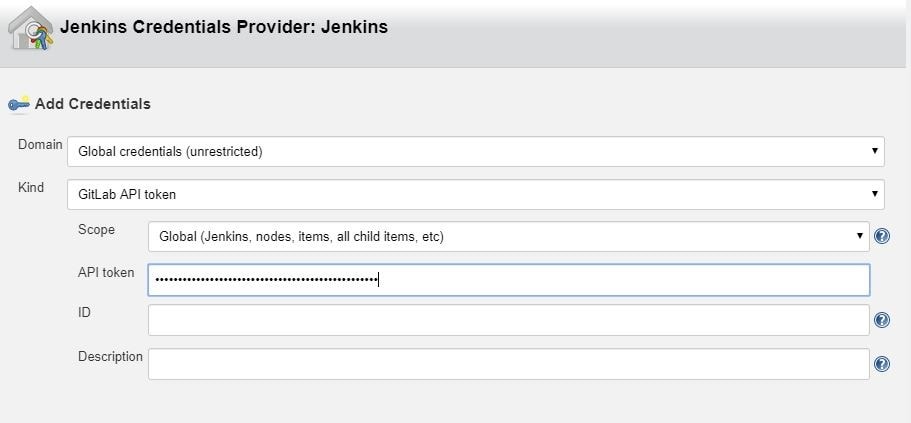
To add a token that you previously generated, click on Add by the Credentials input and choose Jenkins. In the credentials dialog, choose GitLab API token in the Kind input and paste your token from GitLab into the API token input field.
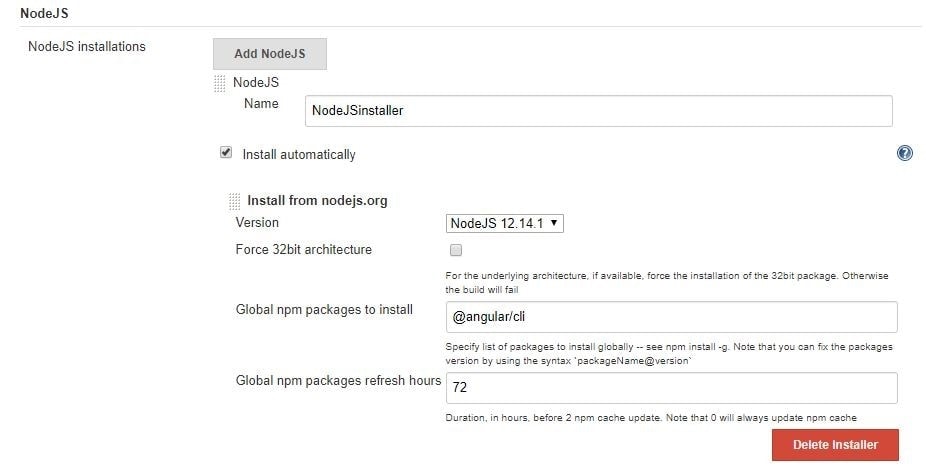
Jenkins: Configure NodeJSInstaller
In order to be able to run npm scripts, it is necessary to configure NodeJSInstaller. In Jenkins, go to Manage Jenkins > Global Tool Configuration > NodeJS installations.
Jenkins: Create CI build for Angular
In order to be able to run Angular tests and check your code style in Jenkins on the created merge request in GitLab you’ll have to:
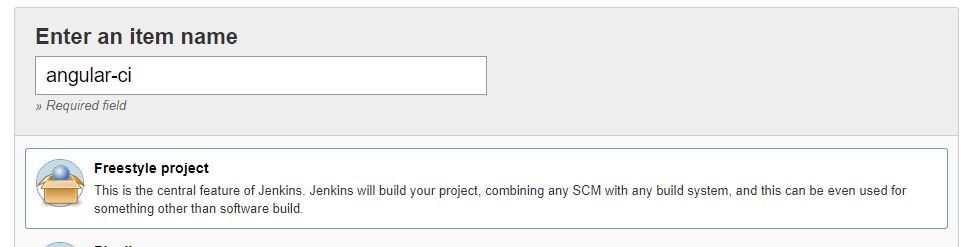
1. Click on the New item link in the Jenkins dashboard
2. Enter a job name and choose Freestyle project
3. Choose the GitLab Connection that we’ve just created in the Gitlab Connection section.

4. Choose Git as your source code management. Enter your repository URL. Create new credentials on Jenkins. These credentials are for cloning the project. You use them to log in to Gitlab.

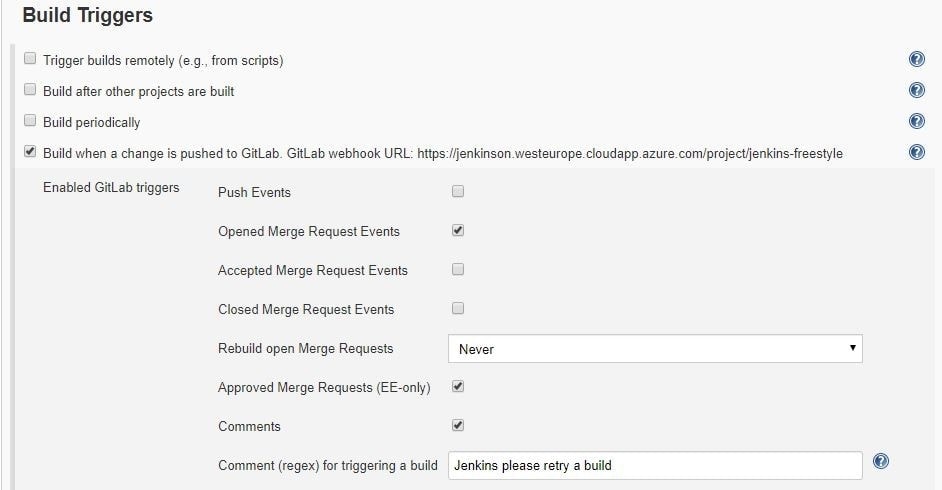
5. Next, configure build triggers, i.e. on which GitLab event to run a build. In this particular example, angular-ci-build is going to trigger when a new merge request gets created.

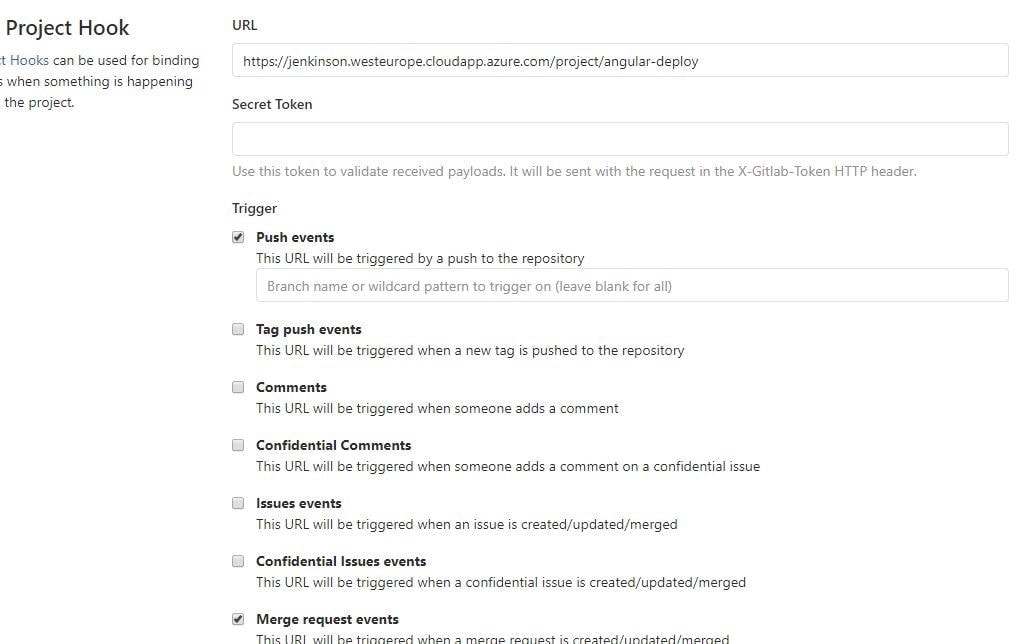
In this step, we need to go back to GitLab and create a hook that will trigger this build under Settings > Integrations. Copy the URL provided by Jenkins and paste it into the project hook form and finally click Add webhook.

6. Provide the configured NodeJsInstaller in the global configuration to be able to run npm commands.

7. And finally, in the Build section choose Add build step > Execute shell. Write shell scripts to test the Angular app code and run tests.

Click Save and we are good to go. At this point everything should work.
When you create a new merge request, GitLab should trigger angular-ci-build on Jenkins and you should see status pending on that particular merge request page.
When Jenkins is done, the status on GitLab should automatically be updated. Depending on whether the build passed or not, the merge button will change color.
Jenkins: Create CD Build for Angular
In order to be able to deploy Angular to another Linux machine, we need to:
Repeat steps 1–4 from Jenkins: Create CI Build for Angular, changing only the name of the build. This time, it can be angular-deploy.
5. For step five, we now choose a different configuration for deployment. We are going to run this build when a merge request gets accepted.
Just like for the CI build, we have to create a new GitLab hook that will hit the Jenkins build endpoint.
6. This step is also the same as in CI; we need to provide the NodeJSInstaller we already configured globally.
7. This step is different from CI; this time we don’t have to test and check linting, but only build the application and copy-paste it to another machine with ssh.

If we are going to do it with ssh like in the example, we need to create a private and public key pair for the Jenkins user on the machine Jenkins is running on. The private key needs to stay on the Jenkins machine, and the public key needs to be copied to the remote machine.
With the scp command we simply copy our build to the remote machine. In this case, Jenkins does not have permission to put it anywhere but in the user folder. In the last step, we need to ssh into the remote machine and move our files (in this case to /var/www/html).
Voila, our app is deployed to the production server when the merge request is accepted via Jenkins.
Angular: Karma Unit Test Runner Configuration
To run Angular tests on Jenkins, we need to configure some parts of the karma.conf file. Below is the configuration that adds a custom launcher that runs ChromeHeadles.
module.exports = function(config) { config.set({ basePath: "", frameworks: ["jasmine", "@angular-devkit/build-angular"], plugins: [ require("karma-jasmine"), require("karma-chrome-launcher"), require("karma-jasmine-html-reporter"), require("karma-coverage-istanbul-reporter"), require("@angular-devkit/build-angular/plugins/karma") ], client: { clearContext: false // leave Jasmine Spec Runner output visible in browser }, coverageIstanbulReporter: { dir: require("path").join(__dirname, "../coverage/jenkins-test-app"), reports: ["html", "lcovonly", "text-summary"], fixWebpackSourcePaths: true }, reporters: ["progress", "kjhtml"], port: 9876, colors: true, logLevel: config.LOG_INFO, autoWatch: true, browsers: ["Chrome", "ChromeHeadless"], singleRun: false, restartOnFileChange: true, customLaunchers: { ChromeHeadless: { base: "Chrome", flags: [ "--headless", "--disable-gpu", "--no-sandbox", "--remote-debugging-port=9222" ], }, } }); };
We can then simply store our command in the package.json scripts property.
On Jenkins, we would now run our tests with npm run test:ci.
"scripts": { "ng": "ng", "start": "ng serve", "build": "ng build", "test": "ng test", "test:ci": "ng test --browsers=ChromeHeadless --watch=false", "lint": "ng lint", "e2e": "ng e2e" },
I hope you enjoyed this article and that it was helpful in your quest for automating angular deployment and testing.