#
Using a command
Option 1
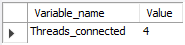
show status where variable_name = 'threads_connected';
Columns
- Variable_name - Name of the variable shown
- Value - Number of active connections
Rows
- One row: Only one row is displayed
Sample results
Option 2
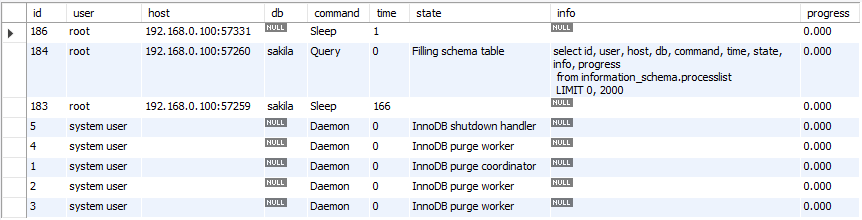
show processlist;
Columns
- Id - The connection identifier
- User - The MariaDB user who issued the statement
- Host - Host name and client port of the client issuing the statement
- db - The default database (schema), if one is selected, otherwise NULL
- Command - The type of command the thread is executing
- Time - The time in seconds that the thread has been in its current state
- State - An action, event, or state that indicates what the thread is doing
- Info - The statement the thread is executing, or NULL if it is not executing any statement
- Progress - The total progress of the process (0-100%)
Rows
- One row: represents one active connection
- Scope of rows: total of active connections
Sample results

Using a query
Option 3
select id, user, host, db, command, time, state,
info, progress from information_schema.processlist;
Columns
- Id - The connection identifier
- User - The MariaDB user who issued the statement
- Host - Host name and client port of the client issuing the statement
- db - The default database (schema), if one is selected, otherwise NULL
- Command - The type of command the thread is executing
- Time - The time in seconds that the thread has been in its current state
- State - An action, event, or state that indicates what the thread is doing
- Info - The statement the thread is executing, or NULL if it is not executing any statement
- Progress - The total progress of the process (0-100%)
- memory_used - Amount of memory used by the active connection
Rows
- One row: represents one active connection
- Scope of rows: total of active connections
Sample results
Using the GUI
Option 4
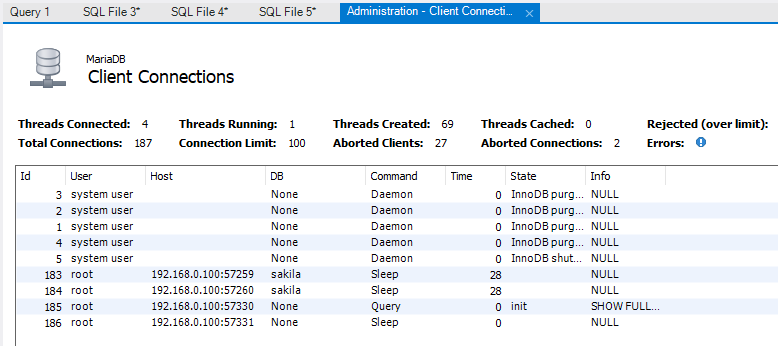
Click on the Client Connections option of the Management tab (left navigation pane)
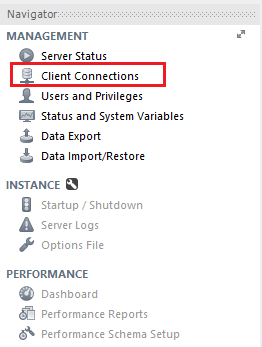
This action will show the Client Connections screen containing the current active connections
Database Profiling
MongoDB Profiler is a db profiling system that can help identify inefficient
or slow queries and operations.
Levels of profiles available are:
Level | Setting |
0 | Off. & No profiling |
1 | On & only includes slow operations |
2 | On & Includes all operations |
We can enable it by setting the Profile level value using the following
command in mongo shell :
"db.setProfilingLevel(1)"
By default, mongod records slow queries to its log, as defined by slowOpThresholdMs.
NOTE
Enabling database profiler puts negative impact on MongoDB’s performance.
It’s better to enable it for specific intervals & minimal on Production Servers.
We can enable profiling on a mongod basis but This setting will not propagate
across a replica set and sharded cluster.
We can view the output in the system.profile collection in mongo shell using show profile command, or using following:
db.system.profile.find( { millis : { $gt : 200 } } )
Command returns operations that took longer than 200 ms. Similarly we
can change the values as per our need.
Enabling profile for an entire mongod instance.
For the purpose of development in testing, we can enable database profiling/settings for an
entire mongod instance. The profiling level will be applied to all databases.
NOTE:
We can't enable the profiling settings on a mongos instance. To enable the profiling in
shard clusters, we have to enable/start profiling for each mongod instance in cluster.
Query for the recent 10 entries
db.system.profile.find().limit(10).sort( { ts : 1 } ).pretty()
Collection with the slowest queries(No. Of queries)
db.system.profile.group({key: {ns: true}, initial: {count: 0}, reduce: function(obj,prev){ prev.count++;}})
Collection with the slowest queries(No. Of millis spent)
db.system.profile.group({key: {ns: true}, initial: {millis: 0}, reduce: function(obj, prev){ prev.millis += obj.millis;}})
Most recent slow query
db.system.profile.find().sort({$natural: -1}).limit(1)
Single slowest query(Right now)
db.system.profile.find().sort({millis: -1}).limit(1)
基于LINUX的,也就是用yum install就可以使用。
1.echo "mount -t nfs -o nolock ${IP}:${remote_dir} ${local_dir}" >> /etc/rc.local
2.echo "${IP}:/home/logs /home/logs nfs defaults 0 0" >> /etc/fstab
關(guān)于/etc/rc.local
rc.local也是我經(jīng)常使用的一個(gè)腳本。該腳本是在系統(tǒng)初始化級(jí)別腳本運(yùn)行之后再執(zhí)行的,因此可以安全地在里面添加你想在系統(tǒng)啟動(dòng)之后執(zhí)行的腳本。常見(jiàn)的情況是你可以再里面添加nfs掛載/mount腳本。此外,你也可以在里面添加一些調(diào)試用的腳本命令。例如,我就碰到過(guò)這種情況:samba服務(wù)總是無(wú)法正常運(yùn)行,而檢查發(fā)現(xiàn),samba是在系統(tǒng)啟動(dòng)過(guò)程中就該啟動(dòng)執(zhí)行的,也就是說(shuō),samba守護(hù)程序配置保證了這種功能本應(yīng)該正確執(zhí)行。碰到這種類(lèi)似情況,一般我也懶得花大量時(shí)間去查為什么,我只需要簡(jiǎn)單的在/etc/rc.local腳本里加上這么一行:
/etc/init.d/samba start
這樣就成功的解決了samba服務(wù)異常的問(wèn)題。
使用自定義CONNECTION FACTORY,這樣會(huì)覆蓋SPRING 的AUTO CONFIGURATION。
ActiveMQConnectionFactoryFactory.java
import java.lang.reflect.InvocationTargetException;
import java.util.Collections;
import java.util.List;
import org.apache.activemq.ActiveMQConnectionFactory;
import org.springframework.boot.autoconfigure.jms.activemq.ActiveMQConnectionFactoryCustomizer;
import org.springframework.boot.autoconfigure.jms.activemq.ActiveMQProperties;
import org.springframework.boot.autoconfigure.jms.activemq.ActiveMQProperties.Packages;
import org.springframework.util.Assert;
import org.springframework.util.StringUtils;
/**
* Factory to create a {@link ActiveMQConnectionFactory} instance from properties defined
* in {@link SecondaryActiveMQProperties}.
*
* @author Phillip Webb
* @author Venil Noronha
*/
class ActiveMQConnectionFactoryFactory {
private static final String DEFAULT_EMBEDDED_BROKER_URL = "vm://localhost?broker.persistent=false";
private static final String DEFAULT_NETWORK_BROKER_URL = "tcp://localhost:61616";
private final ActiveMQProperties properties;
private final List<ActiveMQConnectionFactoryCustomizer> factoryCustomizers;
ActiveMQConnectionFactoryFactory(ActiveMQProperties properties,
List<ActiveMQConnectionFactoryCustomizer> factoryCustomizers) {
Assert.notNull(properties, "Properties must not be null");
this.properties = properties;
this.factoryCustomizers = (factoryCustomizers != null) ? factoryCustomizers : Collections.emptyList();
}
public <T extends ActiveMQConnectionFactory> T createConnectionFactory(Class<T> factoryClass) {
try {
return doCreateConnectionFactory(factoryClass);
}
catch (Exception ex) {
throw new IllegalStateException("Unable to create " + "ActiveMQConnectionFactory", ex);
}
}
private <T extends ActiveMQConnectionFactory> T doCreateConnectionFactory(Class<T> factoryClass) throws Exception {
T factory = createConnectionFactoryInstance(factoryClass);
if (this.properties.getCloseTimeout() != null) {
factory.setCloseTimeout((int) this.properties.getCloseTimeout().toMillis());
}
factory.setNonBlockingRedelivery(this.properties.isNonBlockingRedelivery());
if (this.properties.getSendTimeout() != null) {
factory.setSendTimeout((int) this.properties.getSendTimeout().toMillis());
}
Packages packages = this.properties.getPackages();
if (packages.getTrustAll() != null) {
factory.setTrustAllPackages(packages.getTrustAll());
}
if (!packages.getTrusted().isEmpty()) {
factory.setTrustedPackages(packages.getTrusted());
}
customize(factory);
return factory;
}
private <T extends ActiveMQConnectionFactory> T createConnectionFactoryInstance(Class<T> factoryClass)
throws InstantiationException, IllegalAccessException, InvocationTargetException, NoSuchMethodException {
String brokerUrl = determineBrokerUrl();
String user = this.properties.getUser();
String password = this.properties.getPassword();
if (StringUtils.hasLength(user) && StringUtils.hasLength(password)) {
return factoryClass.getConstructor(String.class, String.class, String.class).newInstance(user, password,
brokerUrl);
}
return factoryClass.getConstructor(String.class).newInstance(brokerUrl);
}
private void customize(ActiveMQConnectionFactory connectionFactory) {
for (ActiveMQConnectionFactoryCustomizer factoryCustomizer : this.factoryCustomizers) {
factoryCustomizer.customize(connectionFactory);
}
}
String determineBrokerUrl() {
if (this.properties.getBrokerUrl() != null) {
return this.properties.getBrokerUrl();
}
if (this.properties.isInMemory()) {
return DEFAULT_EMBEDDED_BROKER_URL;
}
return DEFAULT_NETWORK_BROKER_URL;
}
}
TwinJmsConnectionFactoryConfiguration.java
import java.util.stream.Collectors;
import org.apache.activemq.ActiveMQConnectionFactory;
import org.messaginghub.pooled.jms.JmsPoolConnectionFactory;
import org.springframework.beans.factory.ObjectProvider;
import org.springframework.boot.autoconfigure.condition.ConditionalOnProperty;
import org.springframework.boot.autoconfigure.jms.JmsPoolConnectionFactoryFactory;
import org.springframework.boot.autoconfigure.jms.activemq.ActiveMQConnectionFactoryCustomizer;
import org.springframework.boot.autoconfigure.jms.activemq.ActiveMQProperties;
import org.springframework.boot.context.properties.ConfigurationProperties;
import org.springframework.context.annotation.Bean;
import org.springframework.context.annotation.Configuration;
import org.springframework.context.annotation.Primary;
import org.springframework.context.annotation.Profile;
@Configuration
@Profile({"local"})
public class TwinJmsConnectionFactoryConfiguration {
@Bean
@ConfigurationProperties(prefix = "spring.activemq.primary")
public ActiveMQProperties primaryActiveMQProperties() {
return new ActiveMQProperties();
}
@Bean(destroyMethod = "stop")
@Primary
@ConditionalOnProperty(prefix = "spring.activemq.pool", name = "enabled", havingValue = "true")
public JmsPoolConnectionFactory connectionFactory(ActiveMQProperties primaryActiveMQProperties,
ObjectProvider<ActiveMQConnectionFactoryCustomizer> factoryCustomizers) {
ActiveMQConnectionFactory connectionFactory = new ActiveMQConnectionFactoryFactory(primaryActiveMQProperties,
factoryCustomizers.orderedStream().collect(Collectors.toList()))
.createConnectionFactory(ActiveMQConnectionFactory.class);
return new JmsPoolConnectionFactoryFactory(primaryActiveMQProperties.getPool())
.createPooledConnectionFactory(connectionFactory);
}
////////////////////////////////////////////////////////////////////////////////
@Bean
@ConfigurationProperties(prefix = "spring.activemq.sescond")
public ActiveMQProperties sescondActiveMQProperties() {
return new ActiveMQProperties();
}
@Bean(destroyMethod = "stop")
@ConditionalOnProperty(prefix = "spring.activemq.pool", name = "enabled", havingValue = "true")
public JmsPoolConnectionFactory sescondPooledJmsConnectionFactory(ActiveMQProperties sescondActiveMQProperties,
ObjectProvider<ActiveMQConnectionFactoryCustomizer> factoryCustomizers) {
ActiveMQConnectionFactory connectionFactory = new ActiveMQConnectionFactoryFactory(sescondActiveMQProperties,
factoryCustomizers.orderedStream().collect(Collectors.toList()))
.createConnectionFactory(ActiveMQConnectionFactory.class);
return new JmsPoolConnectionFactoryFactory(sescondActiveMQProperties.getPool())
.createPooledConnectionFactory(connectionFactory);
}
}
From here:
The difference between the PooledConnectionFactory and the CachingConnectionFactory is a difference in implementation. Below are some of the characteristics that differ between them:
Although both the PooledConnectionFactory and the CachingConnectionFactory state that they each pool connections, sessions and producers, the PooledConnectionFactory does not actually create a cache of multiple producers. It simply uses a singleton pattern to hand out a single cached producer when one is requested. Whereas the CachingConnectionFactory actually creates a cache containing multiple producers and hands out one producer from the cache when one is requested.
The PooledConnectionFactory is built on top of the Apache Commons Pool project for pooling JMS sessions. This allows some additional control over the pool because there are features in Commons Pool that are not being used by the PooledConnectionFactory. These additional features include growing the pool size instead of blocking, throwing an exception when the pool is exhausted, etc. You can utilize these features by creating your own Commons Pool GenericObjectPool using your own customized settings and then handing that object to the PooledConnectionFactory via the setPoolFactory method. See the following for additional info: http://commons.apache.org/pool/api-1.4/org/apache/commons/pool/impl/GenericObjectPoolFactory.html
The CachingConnectionFactory has the ability to also cache consumers. Just need to take care when using this feature so that you know the consumers are cached according to the rules noted in the blog post.
But most importantly, the CachingConnectionFactory will work with any JMS compliant MOM. It only requires a JMS connection factory. This is important if you are using more than one MOM vendor which is very common in enterprise organizations (this is mainly due to legacy and existing projects). The important point is that the CachingConnectionFactory works very well with many different MOM implementations, not only ActiveMQ.
From here:
If you have clustered ActiveMQs, and use failover transport it has been reported that CachingConnectionFactory is not a right choice.
The problem I’m having is that if one box goes down, we should start sending messages on the other, but it seems to still be using the old connection (every send times out). If I restart the program, it’ll connect again and everything works. Source: Autoreconnect problem with ActiveMQ and CachingConnectionFactory
The problem is that cached connections to the failed ActiveMQ was still in use and that created the problem for the user. Now, the choice for this scenario is PooledConnectionFactory.
If you’re using ActiveMQ today, and chances are that you may switch to some other broker (JBoss MQ, WebSphere MQ) in future, do not use PooledConnectionFactory, as it tightly couples your code to ActiveMQ.
正好做Mongodb主從復(fù)制嘗試使用Spring Boot Data Mongodb Starter插件鏈接訪問(wèn)Mongodb數(shù)據(jù)庫(kù)集群。
遇到的坑:
- spring.data.mongodb.host和spring.data.mongodb.port形式不適合集群配置,會(huì)報(bào)host無(wú)法識(shí)別異常
- spring.data.mongodb.uri中經(jīng)常拋出authentication failed異常
解決辦法:
- 對(duì)于第一個(gè)坑,請(qǐng)使用spring.data.mongodb.uri。如果使用了uri,則其余的host/username/password/db/auth-db這些全部無(wú)效。
- 對(duì)于第二個(gè)坑,請(qǐng)?jiān)趕pring.data.mongodb.uri中指定replicaSet和authsource,另外記得把所有集群節(jié)點(diǎn)服務(wù)器地址都列全。
如果auth-db和db是同一個(gè),則無(wú)需加authsource,如果不同,則加authsource=admin
我沒(méi)有把a(bǔ)uthsource指定,所以一直報(bào)authentication failed異常。然后只好一點(diǎn)點(diǎn)去發(fā)掘問(wèn)題點(diǎn),最后查到在com.mongodb.ConnectionString類(lèi)中的createCredentials中
private MongoCredential createCredentials(final Map<String, List<String>> optionsMap, final String userName,
final char[] password) {
AuthenticationMechanism mechanism = null;
String authSource = (database == null) ? "admin" : database;
String gssapiServiceName = null;
String authMechanismProperties = null;
for (final String key : AUTH_KEYS) {
String value = getLastValue(optionsMap, key);
if (value == null) {
continue;
}
if (key.equals("authmechanism")) {
mechanism = AuthenticationMechanism.fromMechanismName(value);
} else if (key.equals("authsource")) {
authSource = value;
} else if (key.equals("gssapiservicename")) {
gssapiServiceName = value;
} else if (key.equals("authmechanismproperties")) {
authMechanismProperties = value;
}
}
MongoCredential credential = null;
if (mechanism != null) {
switch (mechanism) {
case GSSAPI:
credential = MongoCredential.createGSSAPICredential(userName);
if (gssapiServiceName != null) {
credential = credential.withMechanismProperty("SERVICE_NAME", gssapiServiceName);
}
break;
case PLAIN:
credential = MongoCredential.createPlainCredential(userName, authSource, password);
break;
case MONGODB_CR:
credential = MongoCredential.createMongoCRCredential(userName, authSource, password);
break;
case MONGODB_X509:
credential = MongoCredential.createMongoX509Credential(userName);
break;
case SCRAM_SHA_1:
credential = MongoCredential.createScramSha1Credential(userName, authSource, password);
break;
default:
throw new UnsupportedOperationException(format("The connection string contains an invalid authentication mechanism'. "
+ "'%s' is not a supported authentication mechanism",
mechanism));
}
} else if (userName != null) {
credential = MongoCredential.createCredential(userName, authSource, password);
}
if (credential != null && authMechanismProperties != null) {
for (String part : authMechanismProperties.split(",")) {
String[] mechanismPropertyKeyValue = part.split(":");
if (mechanismPropertyKeyValue.length != 2) {
throw new IllegalArgumentException(format("The connection string contains invalid authentication properties. "
+ "'%s' is not a key value pair", part));
}
String key = mechanismPropertyKeyValue[0].trim().toLowerCase();
String value = mechanismPropertyKeyValue[1].trim();
if (key.equals("canonicalize_host_name")) {
credential = credential.withMechanismProperty(key, Boolean.valueOf(value));
} else {
credential = credential.withMechanismProperty(key, value);
}
}
}
return credential;
}
authSource默認(rèn)會(huì)指向我們目標(biāo)數(shù)據(jù)的數(shù)據(jù)庫(kù)。然而在身份驗(yàn)證機(jī)制中我們通常需要指向admin。(非常想報(bào)粗口,代碼作者在這里腦袋被men擠了么)。所以需要強(qiáng)制指定authSource中指定。具體指定方式如下:
mongodb://{用戶(hù)名}:{密碼}@{host1}:27017,{host2}:27017,{host3}:27017/{目標(biāo)數(shù)據(jù)庫(kù)}?replicaSet={復(fù)制集名稱(chēng)}&write=1&readPreference=primary&authsource={授權(quán)數(shù)據(jù)庫(kù)}
這時(shí)發(fā)現(xiàn)如果處理總數(shù)足夠大時(shí),被處理的ITEMS總數(shù)會(huì)少于應(yīng)該處理的總數(shù)。
+------------+--------------+-------------+-----------------+------------------+--------------------+----------------+-----------+-------------------------
| READ_COUNT | FILTER_COUNT | WRITE_COUNT | READ_SKIP_COUNT | WRITE_SKIP_COUNT | PROCESS_SKIP_COUNT | ROLLBACK_COUNT | EXIT_CODE | EXIT_MESSAGE
-+------------+--------------+-------------+-----------------+------------------+--------------------+----------------+-----------+-------------------------
| 1 | 0 | 1 | 0 | 0 | 0 | 0 | COMPLETED |
| 30006 | 0 | 29947 | 0 | 59 | 0 | 61 | COMPLETED | Waited for 101 results.
To see how many connections are configured for your DB to use:
select @@max_connections;
To change it:
set global max_connections = 200;
To see how many are connected at the current time:
show processlist;
vi /etc/my.cnf
[mysqld]
max_connections = 500