序
本文介紹了文章作者從事了幾年android應用的開發,經歷2次架構變革,第一次集成了RxJava第二次集成了MVP,并將RxJava與MVP完美結合,實現了低耦合,代碼簡單,測試方便的架構。
其實我們在開發中也遇到過,Android入門門檻較低,如果前期對APP規劃不清晰,Coder們對未來變化把握不準,技術架構經驗不夠強大,最終導致就是一個Activity幾千行,里面寫了大量的Private方法,拆成幾個Fragment、封裝出來幾個類都是無法解決,結果就是看Activity難受的要死,糾結,看了不爽改也不是不改也不是,嚴重影響看的人的心情。并且怨天尤人這個是產品人員規劃App不好,沒有前瞻性,改來改去。。。
這篇文章就是使用新的結構解決該問題。
安卓APP架構
Android Application Architecture
Our journey from standard Activities and AsyncTasks to a modern MVP-based architecture powered by RxJava.
這篇文章主要目的是講述如何將傳統的Activities 與 AsyncTasks 模式向目前主流的MVP架構基礎的響應式編程框架過度。

Different parts of a software codebase should be independent, yet perfectly work together like a well-oiled machine — photo by Chester Alvarez.
先暢享一下:~~~如果松耦合架構,分工明確,然后完美的組合在一起工作是一個很吊的事情。
(轉個圖片還要寫明白誰拍的,版權意識真強)
The Android dev ecosystem moves very quickly. Every week new tools are created, libraries are updated, blog posts are written and talks are given. If you go on holiday for a month, by the time you come back there will be a new version of the support library and/or Play Services.
最近幾年Android的生態鏈變化非常迅速,從底層的Android Api到應用層的各種開源的類庫、工具更新非常迅速。一不留神就落后了。
I’ve been making Android apps with the ribot team for over three years. During this time, the architecture and technologies we’ve used to build Android apps have been continuously evolving. This article will take you through this journey by explaining our learnings, mistakes and the reasoning behind these architectural changes.
我在Ribot團隊從事Android應用開發工作三年多,伴隨著公司技術的不斷創新,積累了很多經驗、錯誤以及在技術選型背后的故事。
舊的應用架構
The old times
Back in 2012 our codebases used to follow a basic structure. We didn’t use any networking library and AsyncTasks were still our friends. The diagram below shows approximately how the architecture was.
2012年那個時候,我們的代碼都是用的原生Android,沒有使用任何的網絡請求框架,而是基于AsyncTasks書寫。
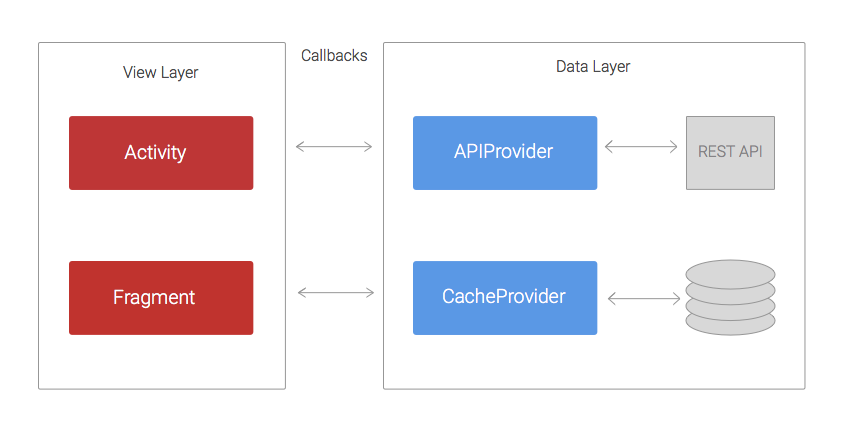 >The code was structured in two layers: the data layer that was in charge of retrieving/saving data from REST APIs and persistent data stores; and the view layer, whose responsibility was handling and displaying the data on the UI.
The APIProvider provides methods to enable Activities and Fragments to easily interact with the REST API. These methods use URLConnection and AsyncTasks to perform network calls in a separate thread and return the result to the Activities via callbacks.
代碼分為兩層,Data與View,Data層主要是用來從API獲取數據,保存到持久化的db當中。View層主要就是把Data的數據顯示到UI上。APIProvider提供方法出來,用于在Activity或者Fragment中方便的進行控制與交互。技術上將,使用URLConnection與AsyncTasks實現了一個異步的網絡請求并將結果返回到調用的回調方法里面。
In a similar way, the CacheProvider contains methods that retrieve and store data from SharedPreferences or a SQLite database. It also uses callbacks to pass the result back to the Activities.
相同的原理CacheProvider提供一系列方法,將SharedPreferences或者SQLite的數據取出來,并且返回給到Activity
問題
The problems
The main issue with this approach was that the View layer had too many responsibilities. Imagine a simple common scenario where the application has to load a list of blog posts, cache them in a SQLite database and finally display them on a ListView. The Activity would have to do the following:
主要問題是View層有太多的累贅,以一個博客列表為例來講述,比如博客需要顯示一個ListView,從SQLite讀取數據,Activity需要做到以下幾點:
- Call a method loadPosts(callback) in the APIProvider
- Wait for the APIProvider success callback and then call savePosts(callback) in the CacheProvider.
- Wait for the CacheProvider success callback and then display the posts on the ListView.
- Separately handle the two potential errors callback from the APIProvider and CacheProvider.
- 執行APIProvider里面的loadPosts的方法,里面傳入回調參數內容。
- 等待loadPosts執行成功后,執行回調里面的CacheProvider中的savePosts方法,savePosts也要傳入回調參數。
- 等待savePosts執行成功后,執行回調里面的方法刷新ListView
- 分別書寫代碼處理2 3 兩步的錯誤回調內容。
This is a very simple example. In a real case scenario the REST API will probably not return the data like the view needs it. Therefore, the Activity will have to somehow transform or filter the data before showing it. Another common case is when the loadPosts() method takes a parameter that needs to be fetched from somewhere else, for example an email address provided by the Play Services SDK. It’s likely that the SDK will return the email asynchronously using a callback, meaning that we now have three levels of nested callbacks. If we keep adding complexity, this approach will result into what is known as callback hell.
這還是一個比較簡單的例子,在一些真實的場景中,遠程的API可能沒有返回程序的必須值,但是activity必須把數據處理完成之后才能顯示結果。再一個例子就是如果loadPosts方法需要借助一些其他地方的返回參數時,類似用多線程去實現同步請求,為保證數據正常請求,意味著必須做一個三層的回調,如果再復雜一些,想理清楚這些回調就是很蛋疼的事情。
In summary:
Activities and Fragments become very large and difficult to maintain
Too many nested callbacks means the code is ugly and difficult to understand so painful to make changes or add new features.
Unit testing becomes challenging, if not impossible, because a lot of the logic lives within the Activities or Fragments that are arduous to unit test.
總之,回調多了之后,Activity與Fragment會亂的要死,并且一般人無法直視。
牛逼的新架構出來了
A new architecture driven by RxJava
We followed the previous approach for about two years. During that time, we made several improvements that slightly mitigated the problems described above. For example, we added several helper classes to reduce the code in Activities and Fragments and we started using Volley in the APIProvider. Despite these changes, our application code wasn’t yet test-friendly and the callback hell issue was still happening too often.
我們在蛋疼的架構中煎熬了2年,當然也嘗試過很多方式,最終也只能是緩和一下亂的問題。我們在APIProvider使用了Volley,代替了AsyncHttpClient,但是其實是一個吊樣。
It wasn’t until 2014 when we started reading about RxJava. After trying it on a few sample projects, we realised that this could finally be the solution to the nested callback problem. If you are not familiar with reactive programming you can read this introduction. In short, RxJava allows you to manage data via asynchronous streams and gives you many operators that you can apply to the stream in order to transform, filter or combine the data.
不到2014年我們就開始進行RxJava的預研,然后嘗試了一批簡單的項目,感覺RxJava的方式是解決我們嵌套回調的終極解決辦法。簡單的說,RxJava允許你通過異步流的方式管理你的數據,并且還可以通過操作符(Operators)對Observable對象的變換
Taking into account the pains we experienced in previous years, we started to think about how the architecture of a new app would look. So we came up with this.
我們用了幾年的經驗痛定思痛,搞了下面這么個東西,新的APP的架構圖
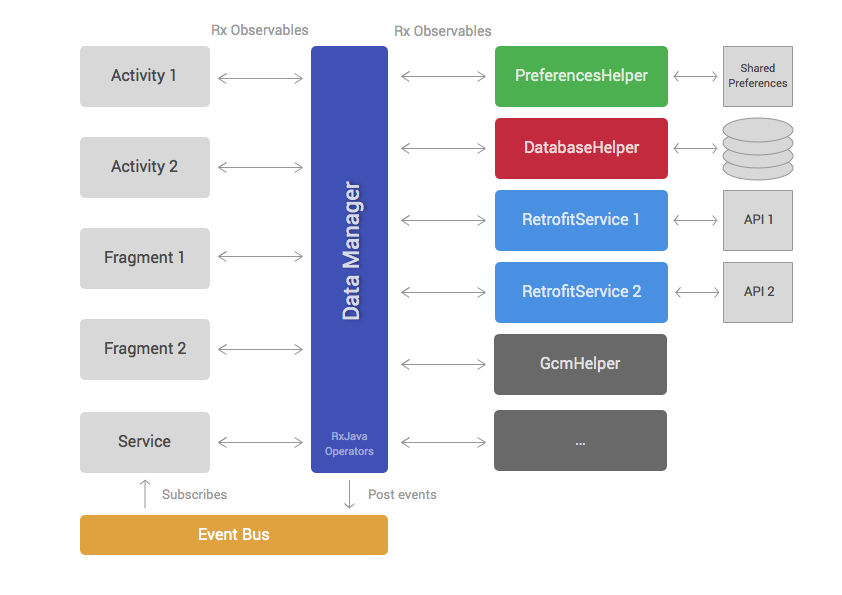
Similar to the first approach, this architecture can be separated into a data and view layer. The data layer contains the DataManager and a set of helpers. The view layer is formed by Android framework components like Fragments, Activities, ViewGroups, etc.
與第一種方法相似,這個架構也是分為Data層與View層,Data層包含DataManager與一堆Helper;View層是包含Fragments, Activities, ViewGroups等。
Helper classes (third column on diagram) have very specific responsibilities and implement them in a concise manner. For example, most projects have helpers for accessing REST APIs, reading data from databases or interacting with third party SDKs. Different applications will have a different number of helpers but the most common ones are:
Helper主要是集成第三方的類庫,以便于在代碼中幾行代碼就可以清晰的實現某個功能,比如請求API,訪問數據庫等,雖然不同的應用程序都有不同的類庫,但是他們無非就是以下這些內容:
- PreferencesHelper: reads and saves data in SharedPreferences.
- DatabaseHelper: handles accessing SQLite databases.
- Retrofit services: perform calls to REST APIs. We started using Retrofit instead of Volley because it provides support for RxJava. It’s also nicer to use.
- 從SharedPreferences中讀取或者寫入數據
- 讀寫SQLite數據庫
- 類似與square的Retrofit服務,也就是Http Client,我們用Restrofit替代了Volley因為他支持Rxjava,并且更吊。
Most of the public methods inside helper classes will return RxJava Observables.
The DataManager is the brain of the architecture. It extensively uses RxJava operators to combine, filter and transform data retrieved from helper classes. The aim of the DataManager is to reduce the amount of work that Activities and Fragments have to do by providing data that is ready to display and won’t usually need any transformation.
RxJava最核心的兩個東西是Observables(被觀察者,事件源)和Subscribers(觀察者),在Helper類中的Public方法,一般都會返回一個RxJava的Observables;DataManager是整個架構的大腦,他大量的使用Rxjava的operators對Helper返回來的數據進行的整合過濾、二次處理。
The code below shows what a DataManager method would look like. This sample method works as follows:
下面用一個例子來說明DataManager是做什么的:
- Call the Retrofit service to load a list of blog posts from a REST API
- Save the posts in a local database for caching purposes using the DatabaseHelper.
- Filter the blog posts written today because those are the only ones the view layer wants to display.
- 調用Retrofit的服務,去請求一個博客列表的API
- 用DatabaseHelper保存這些數據到數據庫
- 過濾出這些BLOG哪些是今天寫的,然后顯示到UI界面上。
Components in the view layer such as Activities or Fragments would simply call this method and subscribe to the returned Observable. Once the subscription finishes, the different Posts emitted by the Observable can be directly added to an Adapter in order to be displayed on a RecyclerView or similar.
Observables發出一系列事件,Subscribers(例如 Activities or Fragments)處理這些事件,可以直接將數據顯示到一些可以回收、重用的View上面。
【BTW:如果一個Observerble沒有任何的的Subscriber,那么這個Observable是不會發出任何事件的】
The last element of this architecture is the event bus. The event bus allows us to broadcast events that happen in the data layer, so that multiple components in the view layer can subscribe to these events. For example, a signOut() method in the DataManager can post an event when the Observable completes so that multiple Activities that are subscribed to this event can change their UI to show a signed out state.
這個架構的另外一個模塊是event bus,event bus可以讓我們在Data層發出廣播(不是Android的Broadcast)然后不同的模塊去注冊并接收不同的廣播事件
Why was this approach better?
RxJava Observables and operators remove the need for having nested callbacks.

為什么這個方式這么牛逼,是因為Observables與operators可以去掉那一堆必須的回調方法
The DataManager takes over responsibilities that were previously part of the view layer. Hence, it makes Activities and Fragments more lightweight.
Moving code from Activities and Fragments to the DataManager and helpers means that writing unit tests becomes easier.
DataManager替代了傳統架構中很多代碼,從而使得Activity與Fragment變得更加輕量級。并且使得單元測試變得更加簡單。
Clear separation of responsibilities and having the DataManager as the only point of interaction with the data layer, makes this architecture test-friendly. Helper classes or the DataManager can be easily mocked.
DataManager成為了唯一的數據交互部分,這樣清晰的架構使得更方便進行代碼自測。
What problems did we still have?
For large and very complex projects the DataManager can become too bloated and difficult to maintain.
Although view layer components such as Activities and Fragments became more lightweight, they still have to handle a considerable amount of logic around managing RxJava subscriptions, analysing errors, etc.
我們還有什么問題?
- 如果對于非常龐大并且復雜的項目來說,DataManger也會變得非常臃腫并且難以維護。
- 盡管Activity與Fragment已經變得更加輕量級,但是對于錯誤異常的處理還是要在subscriptions的地方去書寫。
一體化的MVP模式
Integrating Model View Presenter
In the past year, several architectural patterns such as MVP or MVVM have been gaining popularity within the Android community. After exploring these patterns on a sample project and article, we found that MVP could bring very valuable improvements to our existing approach. Because our current architecture was divided in two layers (view and data), adding MVP felt natural. We simply had to add a new layer of presenters and move part of the code from the view to presenters.
前幾年開始,很多類似MVP與MVVM在Android的一些社區比較流行,經過研究之后,我們發現MVP模式是對我們目前的方案最有價值的改動。我們的兩層架構View-Data與MVP的 Model-View架構天然融合,理念一致。我們只需要增加一個presenters層,然后把之前在view實現的代碼移到上面就可以了。
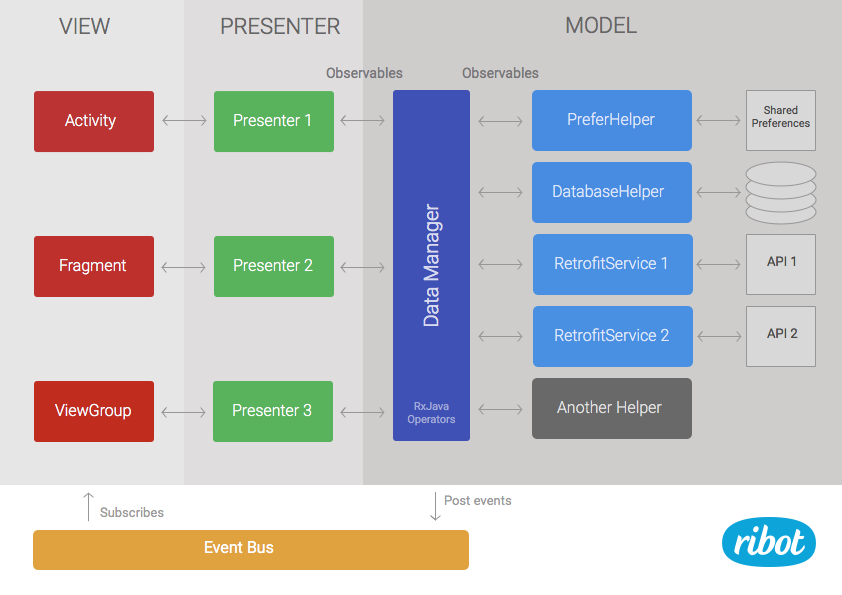
The data layer remains as it was but it’s now called model to be more consistent with the name of the pattern.
Presenters are in charge of loading data from the model and calling the right method in the view when the result is ready. They subscribe to Observables returned by the data manager. Therefore, they have to handle things like schedulers and subscriptions. Moreover, they can analyse error codes or apply extra operations to the data stream if needed. For example, if we need to filter some data and this same filter is not likely to be reused anywhere else, it may make more sense to implement it in the presenter rather than in the data manager.
之前的Data層就是現在的MVP中的Model,Presenter現在負責從Model中加載數據,加載完成后后再去調用左邊的在Activity、ViewGroup中的方法。Presenters的subscribe去接收data manager中的Observables廣播出來的數據。
舉例說明,如果我們需要增加數據的過濾操作但是并不是所有地方都需要的那種,那就可以在presenter里面寫這些代碼,而不用寫在公共的datamanager里面。
Below you can see what a public method in the presenter would look like. This code subscribes to the Observable returned by the dataManager.loadTodayPosts() method we defined in the previous section.
我們定義的dataManager.loadTodayPosts()會廣播出數據給到對應的subscribes
The mMvpView is the view component that this presenter is assisting. Usually the MVP view is an instance of an Activity, Fragment or ViewGroup.
MVP的View并不是指的Android的View,而是一個界面組件的的實例,例如Activity, Fragment , ViewGroup 在注冊presenter的時候,需要把自己當前的實例傳遞進去。
// Activity onCreate 中的代碼段 if (presenter == null) presenter = new Presenter1(); presenter.onTakeView(this);
Like the previous architecture, the view layer contains standard framework components like ViewGroups, Fragments or Activities. The main difference is that these components don’t subscribe directly to Observables. They instead implement an MvpView interface and provide a list of concise methods such as showError() or showProgressIndicator(). The view components are also in charge of handling user interactions such as click events and act accordingly by calling the right method in the presenter. For example, if we have a button that loads the list of posts, our Activity would call presenter.loadTodayPosts() from the onClick listener.
這個架構與上一個架構不同的是,ViewLayer 也就是Activity這些,不會直接去訂閱接收Observables發出的這些事件。而是只在Activity實現幾個簡單的顯示錯誤、顯示進度的方法(用接口interface來規范統一),然后把當前實例以參數形式傳遞給到對應事件的Presenter,由Presenter去執行這些顯示錯誤、顯示進度的方法。
當然對于用戶交互部分的按鈕點擊事件還是要在Activity中進行處理。
If you want to see a full working sample of this MVP-based architecture, you can check out our Android Boilerplate project on GitHub. You can also read more about it in the ribot’s architecture guidelines.
關于MVP的文章可以自行百度一下,MVP Android 關鍵詞
Why is this approach better?
為什么這個又最吊
- Activities and Fragments become very lightweight. Their only responsibilities are to set up/update the UI and handle user events. Therefore, they become easier to maintain.
- We can now easily write unit tests for the presenters by mocking the view layer. Before, this code was part of the view layer so we couldn’t unit test it. The whole architecture becomes very test-friendly.
- If the data manager is becoming bloated, we can mitigate this problem by moving some code to the presenters.
- Activity與Fragment代碼量大大降低,邏輯代碼全部都丟給了Presenter,結果就是Activity只需要負責UI交互的按鈕等代碼。
- 對于Presenter可以寫單獨的單元測試代碼,只需要對Presenter提供的方法測試即可
- 如果DataManager變得臃腫龐大了,我們可以分離這些代碼到各自的Presenter中去。
What problems do we still have?
現在還有遺留什么問題
Having a single data manager can still be an issue when the codebase becomes very large and complex. We haven’t reached the point where this is a real problem but we are aware that it could happen.
只有一個DataManager仍舊是一個問題,尤其是當代碼項目比較龐大的時候,當然我們還沒有到達這個龐大的地步,盡管我們知道這個將來某天會發生。
It’s important to mention that this is not the perfect architecture. In fact, it’d be naive to think there is a unique and perfect one that will solve all your problems forever. The Android ecosystem will keep evolving at a fast pace and we have to keep up by exploring, reading and experimenting so that we can find better ways to continue building excellent Android apps.
如果想有個完美的架構解決你所有問題是不可能的。TMD Android的整個生態圈變化太快,又TM的不標準,就導致我們不斷的去探索探索。。。以致于去找到更吊的方法去做Android apps。
I hope you enjoyed this article and you found it useful. If so, don’t forget to click the recommend button. Also, I’d love to hear your thoughts about our latest approach.
希望讀了之后對我們的最新解決方案能有些建議想法。
【本文翻譯的目的是在閑暇時間,研究新技術,用通俗技術語言寫給自己看,便于日后方便查閱為目】
原文:https://medium.com/ribot-labs/android-application-architecture-8b6e34acda65
MVP介紹:http://www.jcodecraeer.com/a/anzhuokaifa/androidkaifa/2015/0425/2782.html
RxAndroid:https://github.com/ReactiveX/RxAndroid
Eventbus:https://github.com/greenrobot/EventBus
MONGODB中,由于刪除大量記錄會十分耗時,一般推薦由MONGODB自己在后臺處理,只需在某個字段設一個索引的標簽即可。
@Indexed(expireAfterSeconds=180)
private Date deletedAt;
以上代碼,如果字段deletedAt有值,那么將在180秒后被MONGODB刪除,如果沒值不會被刪除。批量新增,小批量更新,防止讀取超時
private <T> void insertAll(List<T> list) {
if (null != list) {
int total = list.size();
int count = (total + 50000 -1) / 50000;
for (int i = 0; i < count; i++) {
int toIndex = ((i +1) * 50000 > total) ? total : ((i +1) * 50000);
log.info("toIndex = " + toIndex);
mongoTemplate1.insertAll(list.subList(i * 50000, toIndex));
}
}
}
批量更改
import java.util.Date;
import org.springframework.beans.factory.annotation.Autowired;
import org.springframework.data.mongodb.core.MongoTemplate;
import org.springframework.data.mongodb.core.query.Criteria;
import org.springframework.data.mongodb.core.query.Query;
import org.springframework.data.mongodb.core.query.Update;
import com.tcl.project7.boss.gameapplication.yearendactivities.bigwheelgame.valueobject.SingleUseRedeemCode;
public class SingleUseRedeemCodeRepositoryImpl implements SingleUseRedeemCodeRepositoryCustom{
@Autowired
private MongoTemplate mongoTemplate1;
public void batchUpdateSingleUseRedeemCodeList(String bigWheelGameAwardId) {
Query query = new Query();
query.addCriteria(Criteria.where("bigwheelgameawardid").is(bigWheelGameAwardId));
mongoTemplate1.updateMulti(
query,
new Update().set("bigwheelgameawardid", "-1")
.set("deletedat", new Date()),
SingleUseRedeemCode.class);
}
}
Expire Data from Collections by Setting TTL
This document provides an introduction to MongoDB’s “time to live” or TTL collection feature. TTL collections make it possible to store data in MongoDB and have the mongod automatically remove data after a specified number of seconds or at a specific clock time.
Data expiration is useful for some classes of information, including machine generated event data, logs, and session information that only need to persist for a limited period of time.
A special TTL index property supports the implementation of TTL collections. The TTL feature relies on a background thread in mongod that reads the date-typed values in the index and removes expired documentsfrom the collection.
Procedures
To create a TTL index, use the db.collection.createIndex() method with theexpireAfterSeconds option on a field whose value is either a date or an array that contains date values.
NOTE
The TTL index is a single field index. Compound indexes do not support the TTL property. For more information on TTL indexes, see TTL Indexes.
Expire Documents after a Specified Number of Seconds
To expire data after a specified number of seconds has passed since the indexed field, create a TTL index on a field that holds values of BSON date type or an array of BSON date-typed objects and specify a positive non-zero value in the expireAfterSeconds field. A document will expire when the number of seconds in the expireAfterSeconds field has passed since the time specified in its indexed field. [1]
For example, the following operation creates an index on the log_events collection’s createdAt field and specifies the expireAfterSeconds value of 3600 to set the expiration time to be one hour after the time specified by createdAt.
db.log_events.createIndex( { "createdAt": 1 }, { expireAfterSeconds: 3600 } ) When adding documents to the log_events collection, set the createdAt field to the current time:
db.log_events.insert( { "createdAt": new Date(), "logEvent": 2, "logMessage": "Success!" } ) MongoDB will automatically delete documents from the log_events collection when the document’screatedAt value [1] is older than the number of seconds specified in expireAfterSeconds.
| [1] | (1, 2) If the field contains an array of BSON date-typed objects, data expires if at least one of BSON date-typed object is older than the number of seconds specified in expireAfterSeconds. |
Expire Documents at a Specific Clock Time
To expire documents at a specific clock time, begin by creating a TTL index on a field that holds values of BSON date type or an array of BSON date-typed objects and specify an expireAfterSeconds value of0. For each document in the collection, set the indexed date field to a value corresponding to the time the document should expire. If the indexed date field contains a date in the past, MongoDB considers the document expired.
For example, the following operation creates an index on the log_events collection’s expireAt field and specifies the expireAfterSeconds value of 0:
db.log_events.createIndex( { "expireAt": 1 }, { expireAfterSeconds: 0 } ) For each document, set the value of expireAt to correspond to the time the document should expire. For instance, the following insert() operation adds a document that should expire at July 22, 201314:00:00.
db.log_events.insert( { "expireAt": new Date('July 22, 2013 14:00:00'), "logEvent": 2, "logMessage": "Success!" } ) MongoDB will automatically delete documents from the log_events collection when the documents’expireAt value is older than the number of seconds specified in expireAfterSeconds, i.e. 0 seconds older in this case. As such, the data expires at the specified expireAt value.
We have a db collection that is around 30 million documents, and I need to trim it down, to only keeping the documents created on the last month.
One approach would be use the remove command with a condition on the created_at field (the collection already have an index on this field):
db.my_collection.remove({created_at: {$lte: new Date("11/01/2012")}});But this approach will be very slow, instead of that, a better way to do it is rename the current collection (for instance to “old_collection”) using renameCollection. Then performing a query-and-insert from the “old_collection” into “my_collection”:
db.my_collection.renameCollection("old_collection");
db.createCollection("my_collection");
db.my_collection.createIndex(...); // recreate the indexes for the collection
// copy docs from old collection into the new collection
db.old_collection.find(
{created_at: {$gte: new Date("11/01/2012")}}   ).sort({_id: -1}).forEach(
function(row) { db.my_collection.insert(row); }   );  // drop old collection db.old_collection.drop();
This approach is typically faster than running a bunch of removes on your data
MongoDB 固定集合(Capped Collections)是性能出色且有著固定大小的集合,對于大小固定,我們可以想象其就像一個環形隊列,當集合空間用完后,再插入的元素就會覆蓋最初始的頭部的元素!
創建固定集合
我們通過createCollection來創建一個固定集合,且capped選項設置為true:
>db.createCollection("cappedLogCollection",{capped:true,size:10000})
還可以指定文檔個數,加上max:1000屬性:
>db.createCollection("cappedLogCollection",{capped:true,size:10000,max:1000})
判斷集合是否為固定集合:
>db.cappedLogCollection.isCapped()
如果需要將已存在的集合轉換為固定集合可以使用以下命令:
>db.runCommand({"convertToCapped":"posts",size:10000})
以上代碼將我們已存在的 posts 集合轉換為固定集合。
固定集合查詢
固定集合文檔按照插入順序儲存的,默認情況下查詢就是按照插入順序返回的,也可以使用$natural調整返回順序。
>db.cappedLogCollection.find().sort({$natural:-1})
固定集合的功能特點
可以插入及更新,但更新不能超出collection的大小,否則更新失敗,不允許刪除,但是可以調用drop()刪除集合中的所有行,但是drop后需要顯式地重建集合。
在32位機子上一個cappped collection的最大值約為482.5M,64位上只受系統文件大小的限制。
固定集合屬性及用法
屬性
- 屬性1:對固定集合進行插入速度極快
- 屬性2:按照插入順序的查詢輸出速度極快
- 屬性3:能夠在插入最新數據時,淘汰最早的數據
用法
http://www.runoob.com/mongodb/mongodb-aggregate.html
MongoDB中聚合(aggregate)主要用于處理數據(諸如統計平均值,求和等),并返回計算后的數據結果。有點類似sql語句中的 count(*)。
aggregate() 方法
MongoDB中聚合的方法使用aggregate()。
語法
aggregate() 方法的基本語法格式如下所示:
>db.COLLECTION_NAME.aggregate(AGGREGATE_OPERATION)
實例
集合中的數據如下:
{ _id: ObjectId(7df78ad8902c) title: 'MongoDB Overview', description: 'MongoDB is no sql database', by_user: 'w3cschool.cc', url: 'http://www.w3cschool.cc', tags: ['mongodb', 'database', 'NoSQL'], likes: 100 }, { _id: ObjectId(7df78ad8902d) title: 'NoSQL Overview', description: 'No sql database is very fast', by_user: 'w3cschool.cc', url: 'http://www.w3cschool.cc', tags: ['mongodb', 'database', 'NoSQL'], likes: 10 }, { _id: ObjectId(7df78ad8902e) title: 'Neo4j Overview', description: 'Neo4j is no sql database', by_user: 'Neo4j', url: 'http://www.neo4j.com', tags: ['neo4j', 'database', 'NoSQL'], likes: 750 },現在我們通過以上集合計算每個作者所寫的文章數,使用aggregate()計算結果如下:
> db.mycol.aggregate([{$group : {_id : "$by_user", num_tutorial : {$sum : 1}}}]) { "result" : [ { "_id" : "w3cschool.cc", "num_tutorial" : 2 }, { "_id" : "Neo4j", "num_tutorial" : 1 } ], "ok" : 1 } >以上實例類似sql語句: select by_user, count(*) from mycol group by by_user
在上面的例子中,我們通過字段by_user字段對數據進行分組,并計算by_user字段相同值的總和。
下表展示了一些聚合的表達式:
| 表達式 | 描述 | 實例 |
|---|
| $sum | 計算總和。 | db.mycol.aggregate([{$group : {_id : "$by_user", num_tutorial : {$sum : "$likes"}}}]) |
| $avg | 計算平均值 | db.mycol.aggregate([{$group : {_id : "$by_user", num_tutorial : {$avg : "$likes"}}}]) |
| $min | 獲取集合中所有文檔對應值得最小值。 | db.mycol.aggregate([{$group : {_id : "$by_user", num_tutorial : {$min : "$likes"}}}]) |
| $max | 獲取集合中所有文檔對應值得最大值。 | db.mycol.aggregate([{$group : {_id : "$by_user", num_tutorial : {$max : "$likes"}}}]) |
| $push | 在結果文檔中插入值到一個數組中。 | db.mycol.aggregate([{$group : {_id : "$by_user", url : {$push: "$url"}}}]) |
| $addToSet | 在結果文檔中插入值到一個數組中,但不創建副本。 | db.mycol.aggregate([{$group : {_id : "$by_user", url : {$addToSet : "$url"}}}]) |
| $first | 根據資源文檔的排序獲取第一個文檔數據。 | db.mycol.aggregate([{$group : {_id : "$by_user", first_url : {$first : "$url"}}}]) |
| $last | 根據資源文檔的排序獲取最后一個文檔數據 | db.mycol.aggregate([{$group : {_id : "$by_user", last_url : {$last : "$url"}}}]) |
管道的概念
管道在Unix和Linux中一般用于將當前命令的輸出結果作為下一個命令的參數。
MongoDB的聚合管道將MongoDB文檔在一個管道處理完畢后將結果傳遞給下一個管道處理。管道操作是可以重復的。
表達式:處理輸入文檔并輸出。表達式是無狀態的,只能用于計算當前聚合管道的文檔,不能處理其它的文檔。
這里我們介紹一下聚合框架中常用的幾個操作:
- $project:修改輸入文檔的結構。可以用來重命名、增加或刪除域,也可以用于創建計算結果以及嵌套文檔。
- $match:用于過濾數據,只輸出符合條件的文檔。$match使用MongoDB的標準查詢操作。
- $limit:用來限制MongoDB聚合管道返回的文檔數。
- $skip:在聚合管道中跳過指定數量的文檔,并返回余下的文檔。
- $unwind:將文檔中的某一個數組類型字段拆分成多條,每條包含數組中的一個值。
- $group:將集合中的文檔分組,可用于統計結果。
- $sort:將輸入文檔排序后輸出。
- $geoNear:輸出接近某一地理位置的有序文檔。
管道操作符實例
1、$project實例
db.article.aggregate( { $project : { title : 1 , author : 1 , }} );這樣的話結果中就只還有_id,tilte和author三個字段了,默認情況下_id字段是被包含的,如果要想不包含_id話可以這樣:
db.article.aggregate( { $project : { _id : 0 , title : 1 , author : 1 }});2.$match實例
db.articles.aggregate( [ { $match : { score : { $gt : 70, $lte : 90 } } }, { $group: { _id: null, count: { $sum: 1 } } } ] );$match用于獲取分數大于70小于或等于90記錄,然后將符合條件的記錄送到下一階段$group管道操作符進行處理。
3.$skip實例
db.article.aggregate( { $skip : 5 }); 經過$skip管道操作符處理后,前五個文檔被"過濾"掉。
如何醫治牙齦出血啊。。。謝謝啊,狂急!!!!
懸賞分:0 - 解決時間:2005-11-22 12:37
提問者: 小哈納斯 - 魔法學徒 一級
http://www.234.com.tw/perio/topicList.cfm?kid=61
最佳答案
這里是我以前答復兩個患者的資料,對你有作用:
一 關于青年人牙齦出血
⑴ 我想你是牙齦出血。若是其它原因出血,你肯定早住醫院而不會在這里輕松發貼了。
⑵ 這個臭味是來自血的腐敗。既然牙齦會出血,也表明你有牙周的問題,這些滲血部位的牙垢及食物殘渣也會發出難聞的氣味。
⑶ 治療一般應到專門的口腔門診。看來你是第一次涉及口腔的保健,治療的流程應該是這樣的:
先消除炎癥:常規是口服利菌沙,滅滴靈,維生素C,維生素K。治療約1周后,牙齦炎癥消除,就應著手解決根本問題了。
再清除牙垢:這是引起牙周炎的原因。牙垢很硬,堆積在牙齦周圍,不斷地刺激和損傷著牙齦,使成創面出血。而出血又可進一步形成牙垢,如此成惡性循環。
⑷ 在我們三甲醫院,這個費用偏高些,約100元。它包括消炎和約兩次的除垢(洗牙)。在縣市級的醫院應該便宜些。
⑸ 消炎7天加除垢2天。若同時治療齲齒,還加2天。
⑹ 當然,你也可只做消炎一步,除垢待以后有時間再做。如此,你到大的藥房去,買前3種藥自己服。買3-5天的量。約花20元。
⑹ 這3-5天內,你要睡眠良好,盡量避免感冒發熱,那會引起血管通透性趨增,使出血嚴重一些,不利于治療消炎。
⑺ 平時多食富含維生素C的水果蔬菜很重要!!!
好,暫就說這么多。對頑固性的牙齦出血(例如出了多年血),或是這樣治療仍不見效,請再設問,我們來為你確定新的治療方案。
二 關于老是治不好的牙齦出血(先用一法!!!!)
樓上解釋的對。但我要教你最重要的東西,就是怎樣解決這個問題。當然,解決之后,你要補我的專家號,呵呵。(我有個熟人有40年牙齦出血的經歷,可是它近年突然好了。你想知道原因嗎?我給了他一個新招。)
⑴ 連服維生素C7天,每天100-300mg。(這個量不算多,意義你明白。)
⑵ 這7天內保持好睡眠,目的是調節好人的生理狀態,使不容易感冒什么的,避免因發燒造成的微血管通透性能趨增,使容易出血。
⑶ 本條最重要:去藥房買“阿奇霉素分散片”,買大廠出的,我建議買天津藥業悅來牌的。每盒6片×0.25g,請單次口服4片,并詳細閱讀一下說明書。記住:只吃一次即可。若有嚴重的不良反應(極少有!!),帶著這個藥的說明書去看門診,醫生會處置。如果沒有不良反應,可在48小時后把另2片吃了,僅此而已。
該藥是目前極有名的藥,4年前從國外進來現已完全本土化,真的是國外科學家對人類的大貢獻!也不算貴,約20-30元1盒6片。主要用途是對付非淋菌性性病。
它是廣譜抗菌藥,更是☆靶向制劑☆。你明白這個嗎?我說個白話以便你能聽懂:這個藥可跟隨人的巨嗜細胞走。而巨嗜細胞又跟著炎癥走,所以療效顯著。
⑷ 一般的牙科醫生,都會建議你用利君沙和滅滴靈,外加維生素C和K。但我想你是老牙齦出血,這種藥用過多次,不會太奏效,阿奇霉素毒副作用比上述兩種都小,更重要的是你沒用過,致病菌沒有抗藥性。
⑸ 炎癥消除、出血停止之后,建議你去做一次牙垢清除。多年的出血肯定會導致牙根周圍有比較多的牙垢,這些牙垢年復一年刺激著周圍的牙齦,不但是細菌的溫床,也使牙齦面持續受到創傷,牙齦出血還會卷土重來。
⑹ 此次牙齦炎癥消除之后,口腔氣味也會比以前好轉,但牙根的一部分將暴露的比以前利害(以前被腫脹的牙齦包裹),產生齲齒的可能性將增加。因此要注意好口腔清潔。
回答者: ccd2093 - 舉人 四級 11-14 08:51
提問者對于答案的評價:
非常感謝~~