grid

          grid

            BlogJava :: 首頁 :: 聯系 :: 聚合  :: 管理
            78 Posts :: 0 Stories :: 62 Comments :: 0 Trackbacks

          #

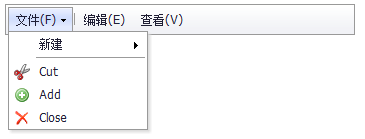
          菜單         
                             
          參考示例菜單


          創建菜單         

          <ul id="menu1" class="mini-menubar" style="width:100%;" 
              url="../data/listMenu.txt" idField="id" parentField="pid">
          </ul>


          url數據格式

          [
              { id: "1", text: "文件(F)"},        
              '-',
              { id: "2", text: "新建", iconCls: "icon-new", pid: "1"},    
              { id: "3", text: "文件", pid: "2"},
              { id: "4", text: "文件夾", pid: "2"},        
              { id: "5", text: "打開", iconCls: "icon-folderopen", pid: "1"},
              { id: "6", text: "保存", pid: "1"},
              { id: "7", text: "關閉", pid: "1"},
                  
              { id: "8", text: "編輯(E)"},
              { id: "9", text: "剪切", iconCls: "icon-cut", pid: "8"},
              { id: "10", text: "復制", pid: "8"},
              { id: "11", text: "粘貼", pid: "8"},
                  
              { id: "12", text: "查看(V)"},
              { id: "13", text: "幫助(H)", iconCls: "icon-help"}
          ]
          
                  
          posted @ 2012-12-19 16:25 nikofan 閱讀(1596) | 評論 (0)編輯 收藏

          ToolBar:工具欄           
                                     

          參考示例ToolBar:工具欄
                             

          創建工具欄      

          <div class="mini-toolbar">
              <a class="mini-button" iconCls="icon-add">增加</a>
              <a class="mini-button" iconCls="icon-edit">修改</a>
              <a class="mini-button" iconCls="icon-remove">刪除</a>
              <span class="separator"></span>
              <a class="mini-button" plain="true">增加</a>
              <a class="mini-button" plain="true">修改</a>
              <a class="mini-button" plain="true">刪除</a>
              <span class="separator"></span>
              <input class="mini-textbox" />   
              <a class="mini-button" plain="true">查詢</a>
          </div>


          復雜工具欄

          <div id="toolbar1" class="mini-toolbar" style="padding:2px;">
              <table style="width:100%;">
                  <tr>
                  <td style="width:100%;">
                      <a class="mini-menubutton" plain="true" menu="#popupMenu">文件</a>
                      <a class="mini-button" iconCls="icon-addfolder" plain="true" enabled="false">增加</a>
                      <a class="mini-button" iconCls="icon-edit" plain="true">修改</a>
                      <a class="mini-button" iconCls="icon-remove" plain="true">刪除</a>
                      <span class="separator"></span>
                      <a class="mini-button" iconCls="icon-reload" plain="true">刷新</a>
                      <a class="mini-button" iconCls="icon-download" plain="true">下載</a>
                  </td>
                  <td style="white-space:nowrap;"><label style="font-family:Verdana;">Filter by: </label>
                      <input class="mini-textbox" />
                      </td>
                  </tr>
              </table>
          </div>
          
          posted @ 2012-12-18 17:03 nikofan 閱讀(2745) | 評論 (0)編輯 收藏

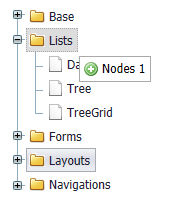
          TreeGrid:節點拖拽


          參考示例: TreeGrid:節點拖拽    
                          

          創建代碼    

          <div id="treegrid1" class="mini-treegrid" style="width:600px;height:280px;"     
              url="../data/tasks.txt" showTreeIcon="true" 
              treeColumn="taskname" idField="UID" parentField="ParentTaskUID" resultAsTree="false"
              allowDrag="true" allowDrop="true">
              <div property="columns">
                  <div type="indexcolumn"></div>
                  <div name="taskname" field="Name" width="200">任務名稱</div>
                  <div field="Duration" width="100">工期</div>
                  <div field="Start" width="100" dateFormat="yyyy-MM-dd">開始日期</div>
                  <div field="Finish" width="100" dateFormat="yyyy-MM-dd">完成日期</div>
              </div>
          </div>                     
          • allowDrag:允許拖拽節點               
          • allowDrop:允許投放節點
          posted @ 2012-12-17 20:27 nikofan 閱讀(1660) | 評論 (0)編輯 收藏

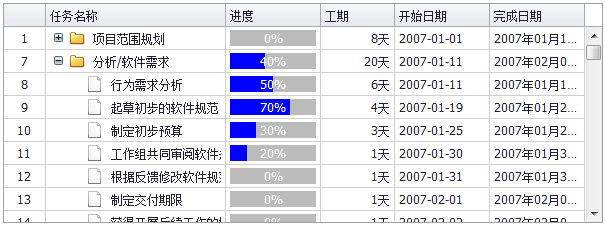
          TreeGrid:繪制單元格
                      
                      
          參考示例: TreeGrid:繪制單元格    


          監聽處理"drawcell"事件         

          使用"drawcell"事件,可以自定義單元格內容、樣式、行樣式等。

          function onDrawCell(e){
              var node = e.node,
                  column = e.column,
                  field = e.field,
                  value = e.value;
          
              //格式化日期
              if (field == "Finish") {
                  if (mini.isDate(value)) e.cellHtml = mini.formatDate(value, "yyyy年MM月dd日");
              }
              //工期
              if (field == "Duration") {
                  e.cellHtml = value + "天";
              }
              //進度
              if (field == "PercentComplete") {
                  e.cellHtml = '<div class="progressbar">'
                                  + '<div class="progressbar-percent" style="width:' + value + '%;"></div>'
                                  + '<div class="progressbar-label">' + value + '%</div>'
                              +'</div>';
              }
          };
          posted @ 2012-12-14 15:58 nikofan 閱讀(2746) | 評論 (2)編輯 收藏

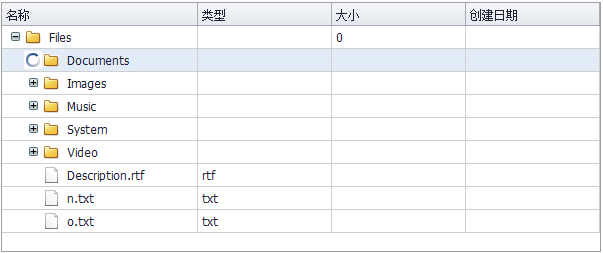
          TreeGrid:懶加載
                      
                      
          參考示例TreeGrid:懶加載    
                                     

          創建代碼

          <div id="treegrid1" class="mini-treegrid" style="width:600px;height:250px;"     
              url="../data/TreeService.aspx?method=LoadNodes" showTreeIcon="true" textField="text" idField="id" 
              treeColumn="filename" onbeforeload="onBeforeTreeLoad">
              <div property="columns">
                  <div name="filename" field="name" width="150">名稱</div>
                  <div field="type" width="100">類型</div>
                  <div field="size" width="100" dateFormat="yyyy-MM-dd">大小</div>
                  <div field="createdate" width="100" dateFormat="yyyy-MM-dd">創建日期</div>
              </div>
          </div>


          服務端返回數據

          [{
              id: "form",
              text: "Form",
              ......
              isLeaf: false,                            //是否葉子節點:+和-號
              expanded: false                            //節點處于收縮狀態
          },
          ......
          ]
          
          其中,isLeft 說明此節點是否有下一級節點。expanded 表示此節點處于折疊狀態。


          懶加載事件         

          當用戶點擊"+"圖標時,會自動加載下一級節點,此時會把當前節點id傳遞到后臺,也可以攔截加載事件,增加額外屬性:

          function onBeforeTreeLoad(e) {
              var tree = e.sender;    //樹控件
              var node = e.node;      //當前節點
              var params = e.params;  //參數對象
          
              //可以傳遞自定義的屬性
              params.myField = "123"; //后臺:request對象獲取"myField"
          }


          服務端處理          

          服務端通過request獲取"id"屬性后,加載此節點的下一級節點數組,并通過JSON返回。

          String id = Request["id"];
          if (String.IsNullOrEmpty(id)) id = "-1";
          
          //獲取下一級節點
          String sql = "select * from plus_file where pid = '" + id + "' order by updatedate";
          ArrayList folders = DBUtil.Select(sql);
          
          //判斷節點,是否有子節點。如果有,則處理isLeaf和expanded。
          for (int i = 0, l = folders.Count; i < l; i++)
          {
              Hashtable node = (Hashtable)folders[i];
              String nodeId = node["id"].ToString();
          
              String sql2 = "select * from plus_file where pid = '" + nodeId + "' order by updatedate";
              ArrayList nodes = DBUtil.Select(sql2);
          
              if (nodes.Count > 0)
              {
                  node["isLeaf"] = false;
                  node["expanded"] = false;
              }
          
          }
          
          //返回JSON
          String json = PluSoft.Utils.JSON.Encode(folders);
          Response.Write(json);
          
          posted @ 2012-12-13 16:56 nikofan 閱讀(2833) | 評論 (0)編輯 收藏

               摘要: 普加甘特圖是WEB甘特圖首選解決方案。適用于構建項目管理、生產排程等進度計劃管理軟件。支持任意開發平臺和數據庫。它是JavaScript開發的,無需安裝插件,跨瀏覽器運行。  閱讀全文
          posted @ 2012-12-13 10:01 nikofan 閱讀(5171) | 評論 (1)編輯 收藏

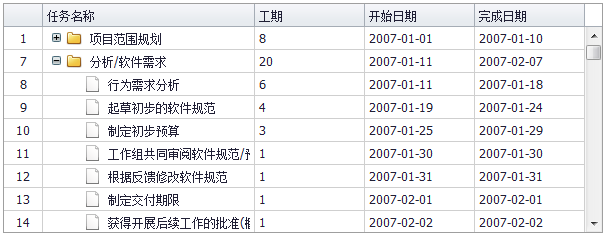
          TreeGrid
                      
                      
          參考示例: TreeGrid    


          創建TreeGrid

          <div id="treegrid1" class="mini-treegrid" style="width:600px;height:280px;"     
              url="../data/tasks.txt" showTreeIcon="true" 
              treeColumn="taskname" idField="UID" parentField="ParentTaskUID" resultAsTree="false">
              <div property="columns">
                  <div type="indexcolumn"></div>
                  <div name="taskname" field="Name" width="200">任務名稱</div>
                  <div field="Duration" width="100">工期</div>
                  <div field="Start" width="100" dateFormat="yyyy-MM-dd">開始日期</div>
                  <div field="Finish" width="100" dateFormat="yyyy-MM-dd">完成日期</div>
              </div>
          </div>           

          注意:idField、parentField、resultAsTree屬性。


          數據結構:列表         

          通過url返回的數據結構如下:

          [
              {id: "base", text: "Base", expanded: false},    
              {id: "ajax", text: "Ajax", pid: "base"},
              {id: "json", text: "JSON", pid: "base"},
              ......
          ]
          
          其中,id和pid對應父子關系。
                     

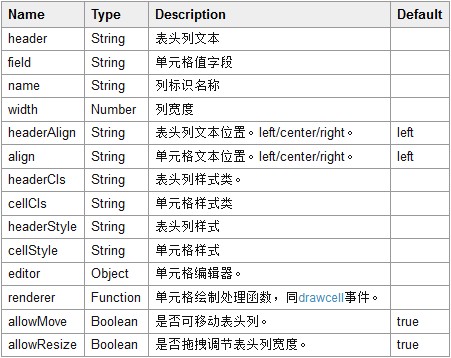
          Columns列配置         

          TreeGrid的列配置,跟DataGrid類似。參考如下:

          posted @ 2012-12-12 17:04 nikofan 閱讀(3822) | 評論 (0)編輯 收藏

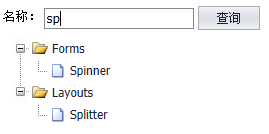
          過濾樹           
                             

          參考示過濾樹


          filter節點過濾          

          tree.filter(function (node) {
              var text = node.text ? node.text.toLowerCase() : "";
              if (text.indexOf(key) != -1) {
                  return true;
              }
          });


          clearFilter取消過濾         

          tree.clearFilter();
          
          posted @ 2012-12-11 16:02 nikofan 閱讀(1605) | 評論 (0)編輯 收藏

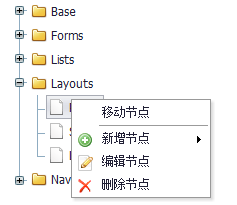
          樹右鍵菜單
                             

          參考示例樹右鍵菜單


          一:創建ContextMenu     

          <ul id="treeMenu" class="mini-contextmenu"  onbeforeopen="onBeforeOpen">        
              <li iconCls="icon-move" onclick="onMoveNode">移動節點</li>
              <li class="separator"></li>
              <li>
                  <span iconCls="icon-add">新增節點</span>
                  <ul>
                      <li onclick="onAddBefore">插入節點前</li>                
                      <li onclick="onAddAfter">插入節點后</li>    
                      <li onclick="onAddNode">插入子節點</li>                 
                  </ul>
              </li>
              <li name="edit" iconCls="icon-edit" onclick="onEditNode">編輯節點</li>
              <li name="remove" iconCls="icon-remove" onclick="onRemoveNode">刪除節點</li>        
          </ul>


          二:設置contextmenu   

          <ul id="tree1" class="mini-tree" url="../data/tree.txt" style="width:200px;padding:5px;" 
              showTreeIcon="true" textField="text" idField="id" 
              contextMenu="#treeMenu">        
          </ul>


          三:監聽beforeopen事件   

          function onBeforeOpen(e) {
              var menu = e.sender;
              var tree = mini.get("tree1");
          
              var node = tree.getSelectedNode();
              if (!node) {
                  e.cancel = true;
              }
              if (node && node.text == "Base") {
                  e.cancel = true;
                  //阻止瀏覽器默認右鍵菜單
                  e.htmlEvent.preventDefault();
                  return;
              }
          
              ////////////////////////////////
              var editItem = mini.getbyName("edit", menu);
              var removeItem = mini.getbyName("remove", menu);
              editItem.show();
              removeItem.enable();
          
              if (node.id == "forms") {
                  editItem.hide();
              }
              if (node.id == "lists") {
                  removeItem.disable();
              }
          }


          posted @ 2012-12-10 16:24 nikofan 閱讀(2257) | 評論 (0)編輯 收藏

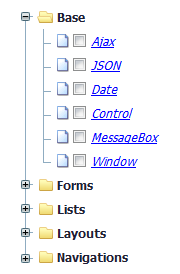
          自定義節點
                                 

          參考示例自定義節點


          創建代碼         

          <ul id="tree1" class="mini-tree" url="../data/tree.txt" style="width:200px;padding:5px;" 
              showTreeIcon="true" textField="text" idField="id" 
              ondrawnode="onDrawNode" showCheckBox="true">        
          </ul>           

          此時,我們監聽了“drawnode”事件。


          drawnode 事件         

          function onDrawNode(e) {
              var tree = e.sender;
              var node = e.node;
          
              var hasChildren = tree.hasChildren(node);
          
              //所有子節點加上超鏈接
              if (hasChildren == false) {
                  e.nodeHtml = '<a  + node.id + '.html" target="_blank">' + node.text + '</a>';
              }
          
              //父節點高亮顯示;子節點斜線、藍色、下劃線顯示
              if (hasChildren == true) {
                  e.nodeStyle = 'font-weight:bold;';
              } else {
                  e.nodeStyle = "font-style:italic;"; //nodeStyle
                  e.nodeCls = "blueColor";            //nodeCls
              }
          
              //修改默認的父子節點圖標
              if (hasChildren == true) {
                  e.iconCls = "folder";
              } else {
                  e.iconCls = "file";
              }
          
              //父節點的CheckBox全部隱藏
              if (hasChildren == true) {
                  e.showCheckBox = false;
              }
          }


          Note:   
          1. 文本內容(nodeHtml):所有子節點加上超鏈接   
          2. 節點樣式(nodeStyle/nodeCls):父節點高亮顯示;子節點斜線、藍色、下劃線顯示     
          3. 節點圖片(iconCls):修改默認的父子節點圖標           
          4. 隱藏CheckBox(showCheckBox):父節點的CheckBox全部隱藏           
          5. 開發者可以擴展節點判斷條件,對文本、樣式、圖標、CheckBox等做任意自定義.
          posted @ 2012-12-07 16:21 nikofan 閱讀(2780) | 評論 (0)編輯 收藏

          僅列出標題
          共8頁: 上一頁 1 2 3 4 5 6 7 8 下一頁 
          主站蜘蛛池模板: 万全县| 广汉市| 砀山县| 辽阳县| 绵阳市| 满城县| 巴青县| 文登市| 沾化县| 郯城县| 土默特右旗| 台安县| 乡宁县| 大兴区| 城口县| 名山县| 郧西县| 泊头市| 两当县| 枣阳市| 丹凤县| 峡江县| 镇安县| 阿拉善右旗| 陇南市| 锦州市| 永康市| 奉新县| 桂林市| 四子王旗| 中卫市| 西宁市| 板桥市| 鸡东县| 德庆县| 冕宁县| 昭觉县| 郑州市| 朝阳县| 永靖县| 商城县|