Posted on 2011-07-29 16:28
TWaver 閱讀(2088)
評論(1) 編輯 收藏

在TWaver的各個使用手冊,文檔和Demo中我們可以看到,TWaver提供了Layer的概念,就是圖層,這與一些制圖軟件也有幾分相似。在實際應用中也是比較的多。比如TWaver的Demo中有TWaver水印的字樣,就是通過使用的TWaver層,將帶有水印文字的圖層自于最上方并不可選中。
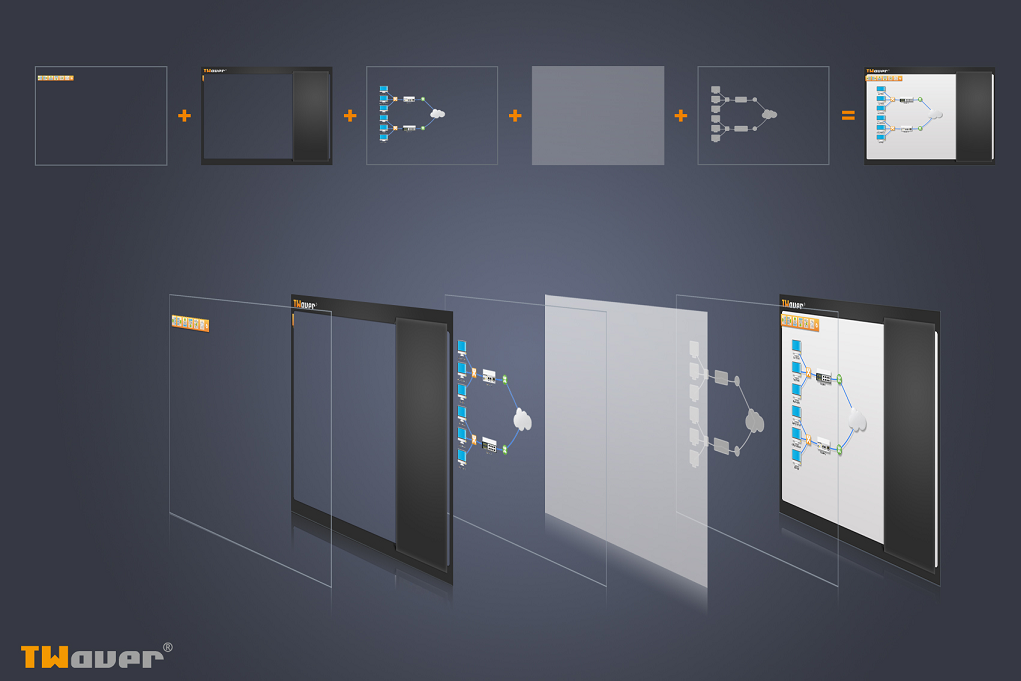
下面我們再通過一個實際的例子具體來看看TWaver Layer的疊加效果,先上最終效果圖:

這是一個使用TWaver Java制作的自動布局的例子,有人能看得出這里使用了多少個圖層合并而成的嗎?
呵呵,我們先來看看整體的一個布局:首先frame中添加了一個LayeroutPanel,panel中放了一個network,network中間部分是用于存放網元,連線,右半部分是scrollPanel

。
一. Network的疊加
我們先來看看中間這個network的圖層是如何疊加的
1.陰影層
首先是在network的Cushion上添加了一個網元陰影層,cushion在TWaver的定義中是處于所有圖層之下的一層。
 network.addCanvasCushion(new ShadowCushion(this));
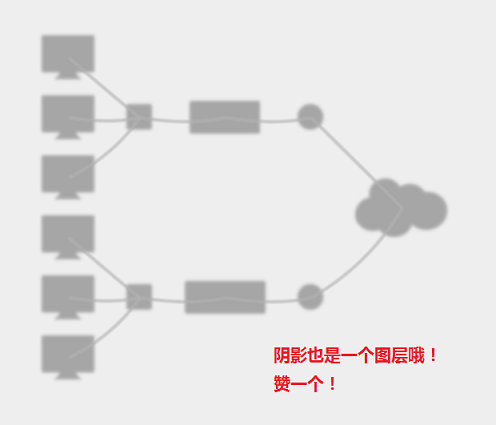
陰影也可以這樣添加。
2.網元層
在默認圖層上添加布局的網元
1this.cloud = this.createNode("/demo/layout/images/cloud.png");
2this.center1 = this.createNode("/demo/layout/images/center.png");
3this.center2 = this.createNode("/demo/layout/images/center.png");
4this.gather1 = this.createNode("/demo/layout/images/gather.png");
5this.gather2 = this.createNode("/demo/layout/images/gather.png");
6this.router1 = this.createNode("/demo/layout/images/router1.png", 0, "Router 1");
7this.router2 = this.createNode("/demo/layout/images/router2.png", 1, "Router 2");
8this.server1 = this.createNode("/demo/layout/images/pc.png", 2, "Spring Layout");
9this.server2 = this.createNode("/demo/layout/images/pc.png", 3, "Office Network");
10this.server3 = this.createNode("/demo/layout/images/pc.png", 4, "US Map");
11this.client1 = this.createNode("/demo/layout/images/pc.png", 5, "Bar Chart");
12this.client2 = this.createNode("/demo/layout/images/pc.png", 6, "Tag Cloud");
13this.client3 = this.createNode("/demo/layout/images/pc.png", 7, "Bus Layout");
14this.createLink(gather1, client1);
15this.createLink(gather1, client2);
16this.createLink(gather1, client3);
17this.createLink(gather2, server1);
18this.createLink(gather2, server2);
19this.createLink(gather2, server3);
20this.createLink(cloud, center1);
21this.createLink(cloud, center2);
22this.createLink(router1, center1);
23this.createLink(router2, center2);
24this.createLink(router1, gather1);
25this.createLink(router2, gather2);
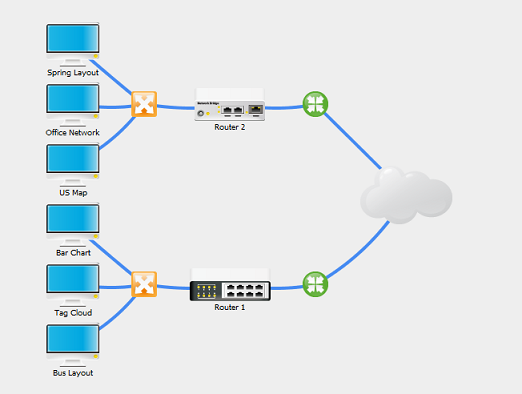
TWaver提供了多種布局的效果,這是一個左樹形布局,下面的toolbar上提供了更多的布局方式。
3.背景層
設置network背景圖片,背景層也是處于所有數據層之下的一層,但是在cushion層之上
1this.setImageBackground("/demo/layout/images/bottom.png");

4.頂層
添加top的圖層節點,并設置圖層為1
1this.top = this.createNode("/demo/layout/images/top.png");
2this.top.setLayerID("top");
3Layer topLayer = new Layer("top");
4topLayer.setMovable(false);
5topLayer.setSelectable(false);
6this.getDataBox().getLayerModel().addLayer(1, topLayer);
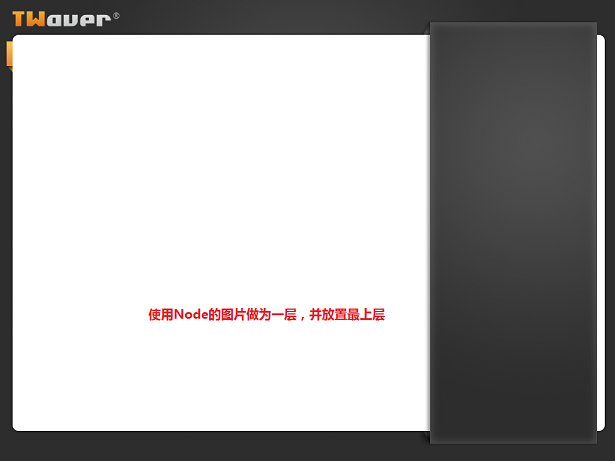
使用一個Node最為最上層的圖片,哈哈,這也是TWaver中的一個使用技巧。
5.工具條層
添加toolbar圖層并設置為1,這樣toolbar的圖層會在top層之上
this.toolbar = this.createNode("/demo/layout/images/toolbar.png");
this.toolbar.setLocation(21, 68);
this.toolbar.setLayerID("toolbar");
Layer toolbarLayer = new Layer("toolbar");
toolbarLayer.setMovable(false);
toolbarLayer.setSelectable(false);
this.getDataBox().getLayerModel().addLayer(1, toolbarLayer);

工具條也是一張圖片哦,哈哈,沒想到吧!
工具條的動畫效果
從上面分解中可以看出,工具條是疊加在top層之上的,這其中還有一個動畫的效果,當鼠標移動到工具條所有的區域范圍時,才會出現,移出并會隱藏。
1
 this.getCanvas().addMouseMotionListener(new MouseMotionAdapter()
  {
{
2
 public void mouseMoved(MouseEvent e) {
3 if(isAdjustingToolbar){
4 return;
5 }
}
6 if(toolbarBounds.contains(e.getPoint())){
7 if(!toolbar.isVisible()){
8 isAdjustingToolbar = true;
9 toolbar.setVisible(true);
10 TWaverUtil.animateMove(toolbar, toolbar.getWidth(), 0, new Runnable(){
11 public void run() {
12 isAdjustingToolbar = false;
13 }
14 });
15 }
16 }else{
17 if(toolbar.isVisible()){
18 isAdjustingToolbar = true;
19 TWaverUtil.animateMove(toolbar, -toolbar.getWidth(), 0, new Runnable(){
20 public void run() {
21 toolbar.setVisible(false);
22 isAdjustingToolbar = false;
23 }
24 });
25 }
26 }
27 }
28 });
});
6.最終合并效果
最后twaver根據添加的這些圖層順序,就會在network上疊加出一個左半部分的效果,如下:
二. ScrollPanel的疊加
看完network中間部分的疊加效果,我們再來看看這張圖的右半部分scrollerPanel是如何疊加的
1. 組件層
這是最重要的放置內容面板的一層,里面放置了24個獨立的組件。通過設置邊框的范圍讓其只顯示中間部分,每個獨立的組件都可以單獨操作:選中,移動,染色,tooltip…都可以呈現。
1for(int i=0; i<24; i++){
2JComponent component = null;
3int index = i % 8;
4if(index == 0){
5 component = new Router1();
6}
7
8if(component != null){
9 component.setPreferredSize(CARDSIZE);
10 component.setMaximumSize(CARDSIZE);
11 component.setMinimumSize(CARDSIZE);
12 component.setBounds(XGAP, i*CARDSIZE.height+YGAP, CARDSIZE.width-XGAP*2, CARDSIZE.height-YGAP*2);
13 this.add(component);
14 }
15
16}

2.相框層
這是一個給每個組件設置相框的一個圖層,首先我們需要相框圖片
設置成透明效果,將其放置每個組件之上(除了最中間的component之外),最中間的再通過畫筆畫上上左下右的邊框,這樣這個相框就完成了
1Rectangle rect = new Rectangle(0, i*CARDSIZE.height, CARDSIZE.width, CARDSIZE.height);
2 if(i != (this.currentIndex + 8)){
3 g2.drawImage(CARDIMAGE, rect.x, rect.y, rect.width, rect.height, null);
4 }else{
5 rect.grow(-XGAP+4, -YGAP+4);
6 g2.setColor(Color.white);
7 g2.setStroke(TWaverConst.BASIC_STROKE);
8
9 int d = 8;
10 g2.drawLine(rect.x, rect.y, rect.x+d*2, rect.y);
11 g2.drawLine(rect.x, rect.y, rect.x, rect.y+d);
12
13 g2.drawLine(rect.x+rect.width, rect.y+rect.height, rect.x+rect.width-d*2, rect.y+rect.height);
14 g2.drawLine(rect.x+rect.width, rect.y+rect.height, rect.x+rect.width, rect.y+rect.height-d);
15 }
3.蒙版層
這是最上邊的類似于蒙版的一層,通過兩張上下透明的圖片將其放置在scrollerPane的最上邊一層
1if(top){
2 image = TWaverUtil.getImageIcon("/demo/layout/images/mist1.png");
3}else{
4 image = TWaverUtil.getImageIcon("/demo/layout/images/mist2.png");
5}
6JComponent canvas = new JComponent(){
7 public void paintComponent(Graphics g) {
8 super.paintComponent(g);
9 g.drawImage(image.getImage(), 0, 0, image.getIconWidth(), image.getIconHeight(), null);
10 }
11};
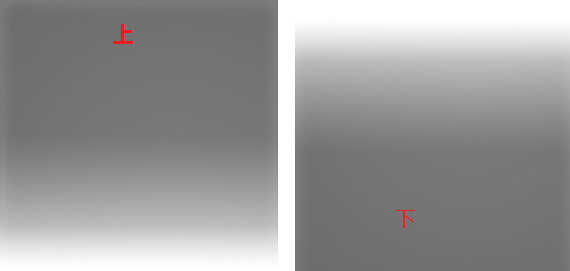
蒙版層上也是有動畫效果的,當鼠標點擊上或下的蒙版,組件面板會自動上移或下移一個
4.最終疊加效果
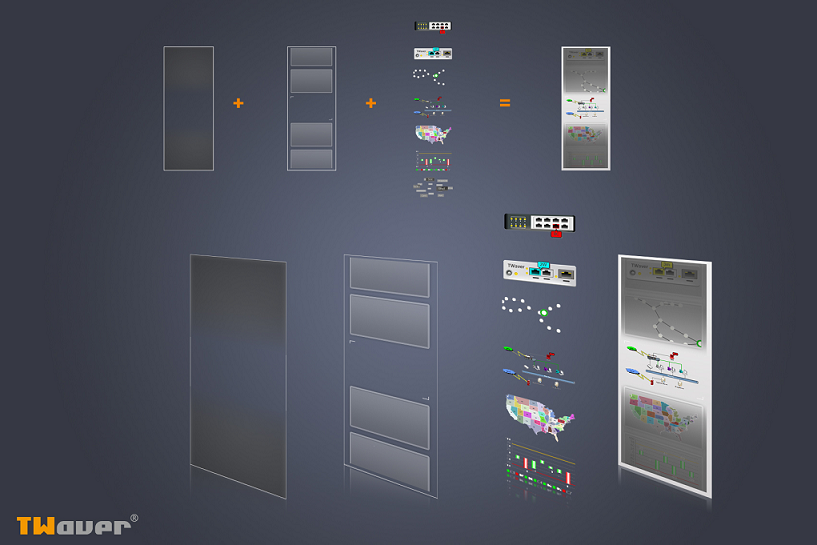
這樣兩張圖片一疊加就可以得到我們最開始提供的那種圖了。

視頻
http://v.youku.com/v_show/id_XMjA0MjM3NDky.html
PS:這是一個網元圖層的例子,在實際應用中,用戶可以將網元設置在不同的layer上,由此來控制網元上下顯示順序。對于同一層上的圖元,被選中的網元會處于其他網元之上。
附上源代碼供大家學習分享:TopoDemo