最新心血來潮的想學一門新的東西,聽說用ROR的開發效率會很高,所以就選擇了ruby on rails,安裝的時候真是不順心,這里把自己的安裝心得記下來:
1) 安裝ruby
下載安裝包:http://rubyforge.org/frs/?group_id=167,我下載的是rubyinstaller-1.8.7-p302.exe
裝完后,可以用ruby -v 測試是否安裝成功,如圖,要是出現了版本 就說明安裝成功了
2)安裝rubygems
Rubygems是ruby的包管理器工具,它使得ruby包的安裝十分簡單,只需要一條命令就可以從遠程服務器上下載相應的包,如果相應的應用包含其他擴展,rubygems 也會提示你從遠程安裝所依賴的擴展。安裝后 rubygems 會運行相應的程序生成 rdoc 幫助文檔(類似于 javadoc )。目前已經成為 ruby 事實上的包管理器標準了。
下載地址:http://rubyforge.org/projects/rubygems/,
我下載的是rubygems-1.3.7,解壓后執行目錄下的setup.rb,安裝完成以后,用如下命令檢查:
gem –v
3、安裝rails
a)遠程安裝:gem install rails –remote
下面來自于網上的說明我沒有采用這種方式安裝,因為我家 的網速太慢了。
然后會自動輸出:
Install required dependency activerecord?
Install required dependency actionpack?
Install required dependency actionmailer?
Install required dependency activeresource?
依次yes依賴文件,然后顯示:
Successfully installed rails-2.1.0
Successfully installed activerecord-2.1.0
Successfully installed actionpack-2.1.0
Successfully installed actionmailer-2.1.0
Successfully installed activeresource-2.1.0
Installing ri documentation for activerecord-2.1.0...
Installing ri documentation for actionpack-2.1.0...
Installing ri documentation for actionmailer-2.1.0...
Installing ri documentation for activeresource-2.1.0...
Installing RDoc documentation for activerecord-2.1.0...
Installing RDoc documentation for actionpack-2.1.0...
Installing RDoc documentation for actionmailer-2.1.0...
Installing RDoc documentation for activeresource-2.1.0...
看看版本:rails -v
輸出:Rails 2.1.0
搞定
b)本地手動安裝:
需要下載
activesupport
http://files.rubyforge.vm.bytemark.co.uk/activesupport/activesupport-2.2.3.gem
activerecord
http://files.rubyforge.vm.bytemark.co.uk/activerecord/activerecord-2.2.3.gem
actionpack
http://files.rubyforge.vm.bytemark.co.uk/actionpack/actionpack-2.2.3.gem
actionmailer
http://rubyforge.org/frs/download.php/64424/actionmailer-2.2.3.gem
rake
http://files.rubyforge.vm.bytemark.co.uk/rake/rake-0.8.7.gemactiveresource
http://rubyforge.org/frs/download.php/64419/activeresource-2.2.3.gem
rails http://rubyforge.org/frs/download.php/64426/rails-2.2.3.gem
下載完成之后將所有文件放在同一個文件夾下面依次安裝:(eg:D:\ruby)
然后執行命令
(D: --> D:\>cd D:\ruby)
gem install activesupport
gem install activerecord
gem install actionpack
gem install actionmailer
gem install rake
gem install rails
成功安裝之后檢查命令
rails –v
證明安裝成功
4、創建Web應用
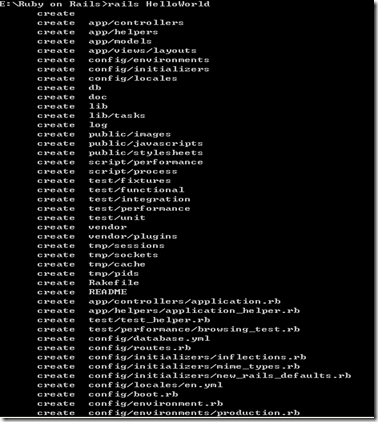
在命令行下輸入 rails HelloWorld,比如當前的路徑是 E:\Ruby on Rails>rails HelloWorld,便會在E:\Ruby on Rails下創建一個HelloWorld文件夾。
如果需要指定路徑可以rails C://test,具體可以看官方API:http://api.rubyonrails.org/
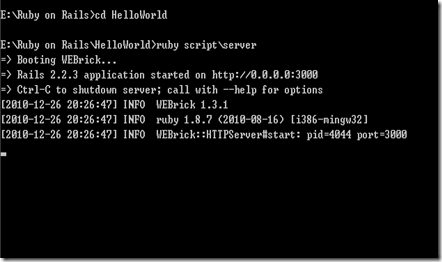
5、在當前目錄(HelloWorld)下,運行 ruby script\server 啟動服務,關于webrick服務器更多的信息可以訪問http://www.webrick.org/
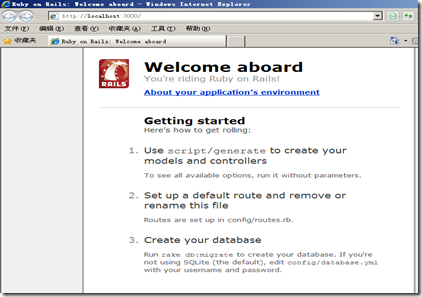
6、瀏覽器中輸入http://localhost:3000/,如果看到以下頁面,說明OK
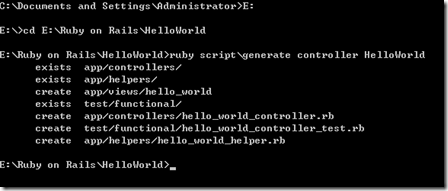
7、寫一個HelloWorld的Web程序,ruby script\generate controller HelloWorld命令
然后找到hello_world_controller.rb
-
- class HelloWorldController < ApplicationController
- def index
- render:text=>"hello world"
- end
- end
- 如果未啟動服務需要重啟第五步操作。
輸入以下代碼,保存
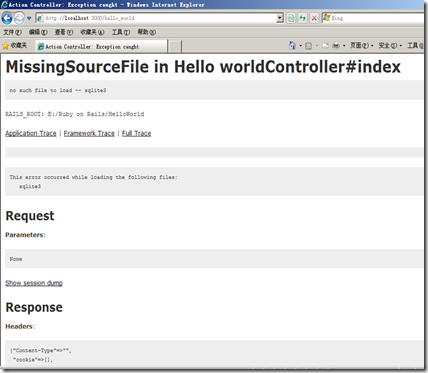
在瀏覽器中打開http://localhost:3000/hello_world,就會看見結果,但我這里出現一個錯誤:
在網上看到一個解決方法:
這是由于沒有裝sqlite3數據庫,http://files.cnblogs.com/geek007/sqlite3.rar 這里下載,
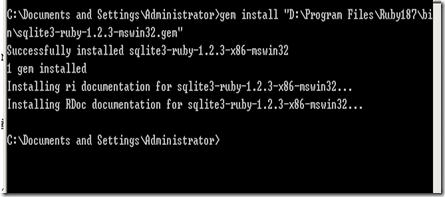
然后解壓到ruby的bin目錄:D:\ruby\bin,命令行執行:gem install "D:\Program Files\Ruby187\bin\sqlite3-ruby-1.2.3-mswin32.gem"
安裝成功后,按照第五步重啟服務器,在瀏覽器中訪問
http://localhost:3000/hello_World
Ok,大功告成~呵呵,開心~~~
PS: 手工安裝非常麻煩,可以從 http://instantrails.rubyforge.org/ 下載InstantRails,全部搞定。
參考資源:
- #!/bin/sh
- case "$1" in
- start)
- /usr/local/lighttpd/sbin/lighttpd -f /etc/lighttpd/lighttpd.conf > /dev/null 2>&1
- ;;
- stop)
- killall lighttpd
- ;;
- restart)
- $0 stop
- sleep 1
- $0 start
- ;;
- *)
- echo "Usage: lighttpd.sh {start|stop|restart}"
- ;;
- esac
- exit 0
在zope實例所采用的python的路徑中,找到site-packages目錄,在此目錄中建立一個sitecustomize.py文件,設置相應的權限。文件的內容如下:
import sys
sys.setdefaultencoding("utf-8")
重啟zope實例,這樣將解決很多unicodedecodeerror錯誤。
=========================================
#for python2.7 on ubuntu
/etc/python2.7/sitecustomize.py
#for python2.6 on centOS
/usr/local/lib/python2.6/site-packages/sitecustomize.py
=========================================
http://www.grabner-online.de/div_into/html/ch09s04s03.html
# sitecustomize.py
# this file can be anywhere in your Python path,
# but it usually goes in ${pythondir}/lib/site-packages/
import sys
sys.setdefaultencoding('iso-8859-1')
sitecustomize.py is a special script; Python will try to import it on startup, so any code in it will be run automatically. As the comment mentions, it can go anywhere (as long as import can find it), but it usually goes in the site-packages directory within your Python lib directory.
setdefaultencoding function sets, well, the default encoding. This is the encoding scheme that Python will try to use whenever it needs to auto-coerce a unicode string into a regular string.
Wiki我選擇了用Python的MoinMoin,一定程度上受CPYUG社區 ZoomQuiet 大媽的推薦影響,首次試用感覺非常impresive,所以就定了。再加上 GraphViz 工具的支持,實在的強大。
在vps上服務,肯定是無視apache的,內存有限。之前架設過用來上Twitter奶瓶腿,是Nginx + php-cgi的方案,nginx是必須的。
Python跟web前端的架構方式有太多選擇了,五花八門,MoinMoin的發行包里面都提供了moin.cgi moin.scgi moin.ajp moin.fcgi moin.wsgi等多種啟動方式。MoinMoin里面全部通過內置的flup作為中間件提供這些接口,目前我僅嘗試使用了fastcgi和wsgi。
雖然解壓了moin的源碼包就可以直接運行里面的wikiserver.py來本地訪問了,但在服務器上通常是由nginx/lighttpd等服務來綜合轉發。php的話是通過spawn-fcgi啟動一些php-cgi的進程,服務器接受到動態的請求就通過本地socket跟php-cgi通訊,返回的結果展現回給客戶。php-cgi是使用FastCGI協議的。
MoinMoin 源碼當中wiki/server/moin.fcgi就是一個類似php-cgi功能的fastcgi服務,類似地可以使用spawn-fcgi來啟動moin.fcgi,作為后端的處理進程。
Running MoinMoin Wiki with Nginx via FastCGI and Flup該文章很形象解釋了fastcgi的角色,以及提供了一段很方便的服務腳本來啟動spawn-fcgi。
Client ----> Nginx Web Frontend -----------+ | fastcgi_pass \|/ +-------------------------+ moin.fcgi | spawn-fcgi-moin.socket | spawn-fcgi ---------------> | or | | localhost:port | +-------------------------+
但是文章當中的nginx配置不完整,而且復雜了,這是我的配置:
當然那文章中的配置有考慮對靜態文件直接由nginx服務,不通過flup這一層,有一定優化,這里省去了這些。其實增多一個/moin_static193(據版本號不同而不同)的location即可,可參考后面使用uwsgi做服務時候的配置。
文章還提到wikiconfig.py里面一個fix_script_name變量,是1.9版本新加入的,需要xxx.com/wiki這樣訪問的童鞋就不用像以前版本那樣要在nginx配置里面寫一大堆東西了。
Fastcgi就這么多,不算太復雜。Fastcgi雖然很流行,但弊端不少,首先是速度,在一臺虛擬機上測試,用ab居然跑出每秒20個請求的速度……雖然平均下來還是有5、60次,但真的,唉。php-cgi還支持產生多個工作進程以并行和均衡請求,提高效率,fastcgi似乎就沒這樣的東西了。
剛好這天observer專欄雜記寫了一篇配置Nginx+uwsgi更方便地部署python應用,當中也提到fcgi和 mod_python的各種不便,然后介紹了uwgi,高性能、多應用。
uwgi充當了python解析器的角色,使用wsgi的接口和Python程序交互,這個過程中做了優化,和上層nginx之間則設計了更加輕量的協議。nginx0.8.40以后官方默認帶了uwgi的協議模塊,所以使用很方便。
uwgi的文檔有些簡略,但是重點都是在wiki/Example里面了。 MoinMoin在uwgi的配置在其中一句帶過:
uwgi的-w參數是把某個py文件作為module,import使用,但是wsgi文件不被認識,所以新版里面多了這么個--wsgi-file參數。但是如果是多站點呢!
nginx配置的虛擬主機里面的uwsgi_param UWSGI_SCRIPT參數會讓uwgi按模塊導入名稱,相當于命令行里面的-w,但是moinmoin的moin.wsgi文件,不是py結尾,只能用--wsgi-file參數。掃了一圈uwgi的wiki/Example和RunOnNginx,都沒提到這個問題,倒是在這里提到在舊版的uwgi當中沒有--wsgi-file參數,需要把wsgi文件改名成py結尾來導入,好吧,確實那樣成功了。
至于性能,一開始我發現uwgi占的內存也不少,一個worker時候就占了20M多的內存,所以沒開更多的工作進程;Fastcgi也差不多,然后用Apache Benchmark測試,好像兩者區別不大。于是看了下fcgi vs. gunicorn vs. uWSGI的測評,才發現uwgi要開多個worker進程才有性能!于是開了8個,性能出來了,秒請求馬上就上千! 顯然是uwgi打開了多個進程,充分利用了機器的CPU,還做了均衡請求。
最后,我的Wiki使用uwgi后的nginx配置:
完整配置指南:
tags: fastcgi, moinmoin, nginx, Python, uwgi, wiki
posted in Python, Unix/Linux by BOYPT
Follow comments via the RSS Feed | Leave a comment | Trackback URL
之前一直使用Nginx+Fastcgi來搭建python web服務器,本文介紹Nginx+UWSGI組合來實現。uWSGI 是一個快速的、純C語言開發的、自維護的、對開發者友好的WSGI服務器,旨在提供專業的 Python web應用發布和開發。它更符合python web的標準協議,速度要比Fastcgi要快、性能更加穩定。
一、安裝平臺
1、安裝pcre
cd /home
mkdir -p /home/install/nginx && cd /home/install/nginx
wget http://ftp.exim.llorien.org/pcre/pcre-8.00.tar.gz
tar -zxvf pcre-8.00.tar.gz
cd pcre-8.00
./configure
make && make install
cd ..
2、安裝Nginx
wget http://nginx.org/download/nginx-0.8.50.tar.gz
tar -zxvf nginx-0.8.50.tar.gz
cd nginx-0.8.50/
./configure --user=nobody --group=nobody --prefix=/usr/local/nginx --with-http_stub_status_module --with-cc-opt='-O3' --with-cpu-opt=opteron
make && make install
cd ..
3、安裝python&Mysql-python
wget http://www.python.org/ftp/python/2.5.1/Python-2.5.1.tgz
tar -zxvf Python-2.5.1.tgz
cd Python-2.5.1
./configure && make && make install
echo "export PATH=/$PATH:/usr/local/bin" >> /etc/profile
source /etc/profile
4、安裝MySql-python
cd ../
wget http://downloads.sourceforge.net/project/mysql-python/mysql-python/1.2.2/MySQL-python-1.2.2.tar.gz?r=&ts=1285248455&use_mirror=nchc
cd MySQL-python-1.2.2
python setup.py install
5、安裝Django
wget http://www.djangoproject.com/download/1.2.3/tarball/
tar -zxvf Django-1.2.3.tar.gz
cd Django-1.2.3
python setup.py install
cd ..
6、安裝uWSGI
wget http://projects.unbit.it/downloads/uwsgi-0.9.6.2.tar.gz
tar -zxvf uwsgi-0.9.6.2.tar.gz
cd uwsgi-0.9.6.2
make
cp uwsgi /usr/bin
二、平臺配置
1、平臺環境說明
1.1、項目位置:/opt/www/Purgesys
創建項目方法:
cd /opt/www
django-admin.py startproject Purgesys
1.2、查看項目(出現以下文件結構說明項目已創建成功)
#tree Purgesys
Purgesys
|-- __init__.py
|-- manage.py
|-- settings.py
`-- urls.py
2、Nginx相關配置
#cd /usr/local/nginx/conf
#vi django_uwsgi.conf
# Django project
server {
listen 80;
server_name purgesys.domain.com;
location / {
uwsgi_pass 127.0.0.1:9000;
include uwsgi_params;
access_log off;
}
location ^~ /static {
root /opt/www/Purgesys;
}
location ^~ /admin/ {
uwsgi_pass 127.0.0.1:9000;
include uwsgi_params;
access_log off;
}
location ~* ^.+/.(mpg|avi|mp3|swf|zip|tgz|gz|rar|bz2|doc|xls|exe|ppt|txt|tar|mid|midi|wav|rtf|mpeg)$ {
root /opt/www/Purgesys/static;
access_log off;
}
}
*Nginx-0.8.50默認已添加uwsgi輸出頭支持
include uwsgi_params;
#vi nginx.conf
追加子配置文件django_uwsgi.conf
http{
........
include django_uwsgi.conf;
}
3、UWSGI配置
#mkdir -p /home/uwsgi;cd /home/uwsgi
#mkdir -p /opt/www/logs
#vi uwsgi.xml
<socket>127.0.0.1:9000</socket>
<listen>200</listen>
<master>true</master>
<pidfile>/usr/local/nginx/uwsgi.pid</pidfile>
<processes>8</processes>
<pythonpath>/opt/www/Purgesys</pythonpath>
<pythonpath>/opt/www/</pythonpath>
<module>django_wsgi</module>
<profiler>true</profiler>
<memory-report>true</memory-report>
<enable-threads>true</enable-threads>
<logdate>true</logdate>
<limit-as>6048</limit-as>
<daemonize>/opt/www/logs/django.log</daemonize>
</uwsgi>
4、創建應用模塊
cd /opt/www/Purgesys
vi django_wsgi.py
import os
os.environ['DJANGO_SETTINGS_MODULE'] = 'Purgesys.settings'
import django.core.handlers.wsgi
application = django.core.handlers.wsgi.WSGIHandler()
5、啟動服務
#/usr/bin/uwsgi -x /home/uwsgi/uwsgi.xml
#/usr/local/nginx/sbin/nginx
6、查看進程
#[liuts@webserver nginx]# ps -ef|grep uwsgi|grep -v grep
root 21652 1 0 17:12 ? 00:00:00 /usr/bin/uwsgi -x /home/uwsgi/uwsgi.xml
root 21653 21652 0 17:12 ? 00:00:00 /usr/bin/uwsgi -x /home/uwsgi/uwsgi.xml
root 21654 21652 0 17:12 ? 00:00:00 /usr/bin/uwsgi -x /home/uwsgi/uwsgi.xml
root 21655 21652 0 17:12 ? 00:00:00 /usr/bin/uwsgi -x /home/uwsgi/uwsgi.xml
root 21656 21652 0 17:12 ? 00:00:00 /usr/bin/uwsgi -x /home/uwsgi/uwsgi.xml
root 21657 21652 0 17:12 ? 00:00:00 /usr/bin/uwsgi -x /home/uwsgi/uwsgi.xml
root 21658 21652 0 17:12 ? 00:00:00 /usr/bin/uwsgi -x /home/uwsgi/uwsgi.xml
root 21659 21652 0 17:12 ? 00:00:00 /usr/bin/uwsgi -x /home/uwsgi/uwsgi.xml
root 21660 21652 0 17:12 ? 00:00:00 /usr/bin/uwsgi -x /home/uwsgi/uwsgi.xml
7、監聽端口
#[liuts@webserver nginx]# netstat -an|grep 9000
tcp 0 127.0.0.1:9000 0.0.0.0:* LISTEN
8、訪問測試
輸入http://serverip/

大功告成!
*附uwsgi啟動腳本
#cd /home/uwsgi
#vi uwsgiserver.sh
#!/bin/bash
if [ $1 = start ];then
psid=`ps aux|grep "uwsgi"|grep -v "grep"|wc -l`
if [ $psid -gt 2 ];then
echo "uwsgi is running!"
exit 0
else
/usr/bin/uwsgi -x /home/uwsgi/uwsgi.xml
fi
echo "Start uwsgi service [OK]"
elif [ $1 = stop ];then
killall -9 uwsgi
echo "Stop uwsgi service [OK]"
elif [ $1 = restart ];then
killall -9 uwsgi
/usr/bin/uwsgi -x /home/uwsgi/uwsgi.xml
echo "Restart uwsgi service [OK]"
else
echo "Usages: sh uwsgiserver.sh [start|stop|restart]"
fi
#sh uwsgiserver.sh start
[uWSGI] parsing config file /home/uwsgi/uwsgi.xml
Start uwsgi service [OK]
簡介:
這是一套運行在nginx + perl環境下的的web框架,可以像java的servlet那樣的寫服務或簡單網頁。
入門步驟:
- 安裝nginx時增加perl模塊參數,使nginx支持perl模塊。
- nginx.conf里配置一個perl的模塊路徑,配置npweb服務入口。
- 寫一個helloworld,即完成了npweb的試用。
- 具體操作請看相關文章。
適用業務:
- 可以用來做memcache的web接口
- 可以用來做mysql數據庫的web接口
- 可以用來做ajax數據接口
- 可以用來做xml接口
- 一切簡單的高效的接口都可以用這個來開發
----------------------------------------------------------------------------------------------------------------------
Npweb入門示例
如果按步驟來做并且不出問題,那么你將體驗到npweb的樂趣。
第一步:安裝nginx,以下是安裝腳本,如果安裝正常就進入第二步。
# 準備目錄 mkdir -p /opt/src/nginx mkdir -p /opt/modules/nginx-0.7.65 cd /opt/src/nginx
# 準備依賴包 yum install gcc -y yum install pcre-devel -y yum install openssl-devel -y yum install zlib-devel -y
# 準備依賴程序 wget http://github.com/gnosek/nginx-upstream-fair/tarball/master tar -xzvf gnosek-nginx-upstream-fair-2131c73.tar.gz mv gnosek-nginx-upstream-fair-2131c73 /opt/modules/
# 下載nginx wget http://nginx.org/download/nginx-0.7.65.tar.gz tar -xzvf nginx-0.7.65.tar.gz cd nginx-0.7.65
# 配置 ./configure --prefix=/opt/modules/nginx-0.7.65 \ --with-http_stub_status_module \ --with-http_perl_module \ --with-http_addition_module \ --with-http_realip_module \ --with-http_sub_module \ --add-module=/opt/modules/gnosek-nginx-upstream-fair-2131c73
# 安裝 make make install |
第二步:部署npweb框架
Npweb框架非常簡潔,只有一個文件(Action.pm),只要將這個文件置于一個能讓nginx有權限訪問內部文件的文件夾即可。
這里我們將框架部署到/opt/npweb。
第三步:編寫hello.pm,并將文件放置在/opt/npweb_app目錄下。
/opt/npweb_app目錄是你開發的web程序的目錄,其中需要放置一個lib目錄以保存自定義的一些pm模塊,在示例中的RequestUtil就是其中的一個模塊。
文件內容如下:
package hello; # 此處很關鍵,一定要與文件名保持一致!!!!!!!! use RequestUtil; # 此處引入了一個外部模塊
sub doExecute { ($r) = @_; $r->send_http_header("text/html");
# 取得參數的 Map------------------------------------------------------ my %param = RequestUtil::params( $r->args );
# 獲得具體參數 my $w = $param{'w'};
# 回顯 $r->print("hellow " . $w); } # 文件結尾必需加這個,perl語法規定的。 1; |
第四步:配置nginx.conf,這一步是很關鍵的,主要是將框架和webapp配置到nginx下,以達到訪問功能的作用。
#user nobody; #worker_processes 1; worker_processes 2;
#error_log logs/error.log; #error_log logs/error.log notice; #error_log logs/error.log info;
#pid logs/nginx.pid;
worker_rlimit_nofile 65535; events { use epoll; worker_connections 65535; }
http {
include mime.types; default_type application/octet-stream;
server_names_hash_bucket_size 128; client_header_buffer_size 32k; large_client_header_buffers 4 32k; client_max_body_size 8m;
#log_format main '$remote_addr - $remote_user [$time_local] "$request" ' # '$status $body_bytes_sent "$http_referer" ' # '"$http_user_agent" "$http_x_forwarded_for"';
#access_log logs/access.log main;
sendfile on; tcp_nopush on;
keepalive_timeout 0;
gzip on; gzip_min_length 1k; gzip_buffers 4 16k; gzip_http_version 1.0; gzip_comp_level 2; gzip_types text/plain application/x-javascript text/css application/xml; gzip_vary on; # 此處開始配置 perl_modules /opt/npweb; #框架的目錄 perl_require Action.pm; #框架的入口
server{ # 此處配置框架的設置 set $CONTEXT_PATH '/perl'; # uri的訪問路徑,如:http:// test.perl.nginx /perl set $APPLICATION_PATH '/opt/npweb_app/'; # web服務的路徑,在該路徑下需要放置一個lib目錄,以放置一些自自定模塊。
listen 80;
server_name test.perl.nginx; location /perl { # 此處需與$CONTEXT_PATH保持一致 perl Action::execute; # 此處如此配置,不用更改 } }
} |
第五步:訪問http://test.perl.nginx/perl/hello?w=world,如果網頁上回顯了您輸入的參數,那么恭喜您,您的第一個npweb程序成功了。
針對第五步的補充:需要將test.perl.nginx指向你所部署的服務器IP。推薦使用Windows Hosts Editor。

淘寶網現在已經將其服務器平臺軟件Tengine 開源,Tengine基于Nginx,針對大流量網站需求增加了很多功能特性和性能優化。以下沿引項目主頁上的特性介紹:
- 繼承Nginx-1.0.10的所有特性;
- 組合多個CSS、JavaScript文件的訪問請求變成一個請求;
- 支持管道和syslog形式的日志和抽樣;
- 自動根據CPU數目設置親緣性;
- 監控系統的負載和資源占用從而對系統進行保護;
- 顯示對運維人員更友好的出錯信息,便于定位出錯機器;
- 更強大的訪問速度限制模塊;
- backtrace模塊,程序崩潰的時候可以顯示出錯的調用棧
![]()
Nginx(發音同 engine x)是一款輕量級的Web 服務器/反向代理服務器及電子郵件(IMAP/POP3)代理服務器,并在一個BSD-like 協議下發行。由俄羅斯的程序設計師Igor Sysoev所開發,最初供俄國大型的入口網站及搜尋引擎Rambler(俄文:Рамблер)使用。 其特點是占有內存少,并發能力強,事實上nginx的并發能力確實在同類型的網頁伺服器中表現較好.目前使用nginx網站用戶有:新浪、網易、 騰訊,另外知名的微網志Plurk也使用nginx。
今天在兩臺服務器同步備份在用戶權限上糾結了很多,主要關于這個問題網上的配置方法不一,源自rsync版本不一致。
Rsync 版本
[root@mail video]# rsync –version
rsync version 3.0.6 protocol version 30
Copyright (C) 1996-2009 by Andrew Tridgell, Wayne Davison, and others.
Web site: rsync.samba.org
Capabilities:
64-bit files, 64-bit inums, 64-bit timestamps, 64-bit long ints,
socketpairs, hardlinks, symlinks, IPv6, batchfiles, inplace,
append, ACLs, xattrs, iconv, no symtimes
rsync comes with ABSOLUTELY NO WARRANTY. This is free software, and you
are welcome to redistribute it under certain conditions. See the GNU
General Public Licence for details.
服務器同步任務需求
- 服務器A與服務器B同步備份,這里只說明服務器A同步到服務器B,服務器B還原到服務器A。
- 考慮安全因素,使用普通用戶進行同步。
- 使用cronjob,定時同步。
錯誤提示
錯誤發生在rsync 3.0.6版本,64位 CentOS5.5 系統。
首頁這篇文章主要解決的錯誤是以下:
@ERROR: auth failed on module ***
rsync error: error starting client-server protocol (code 5) at main.c(1503) [receiver=3.0.6]
*** 是你/etc/rsyncd.conf 中配置的模塊,我這里用
password file must not be other-accessible
continuing without password file
Password:
@ERROR: auth failed on module ***
rsync error: error starting client-server protocol (code 5) at main.c(1503) [receiver=3.0.6]
Rsync 配置
#vi /etc/rsyncd.conf
uid = nobody
gid = nobody
max connections = 4
read only = true
#hosts allow = 202.207.177.180
hosts allow = *
transfer logging = true
log format = %h %o %f %l %b
log file = /var/log/rsyncd.log
slp refresh = 300
log file = /var/log/rsyncd.log
pid file = /var/run/rsyncd.pid
lock file = /var/run/rsyncd.lock[web]
path = /home/admin/public_html
comment = Mirror to Hk server
read only = true
list = false
auth users = lixiphp[test]
path = /home/admin/domains/test
read only = false
auth users = lixiphp
secrets file = /etc/rsyncd.secrets
配置普通用戶密碼
[root@mail video]# vi /etc/rsyncd.secrets
格式為: username:password
rsync_user:rsyncofpass
設置權限為只讀:
chmod 600 /etc/rsyncd.secrets
首次啟動rsync
rsync –daemon –config=/etc/rsyncd.conf
如果提示
failed to create pid file /var/run/rsyncd.pid: File exists
使用指令
rm -rf /var/run/rsyncd.pid
重啟已經在運行的rsync
[root@mail video]# ps -ef | grep rsync
root 27284 1 0 10:26 ? 00:00:00 rsync –daemon –config=/etc/rsyncd.conf
root 30516 29986 0 18:35 pts/3 00:00:00 grep rsync
[root@mail video]# kill -9 27284
[root@mail video]# rsync –daemon –config=/etc/rsyncd.conf
這樣服務器A配置成功!
服務器B配置
一般錯誤都會發生在服務器B,注意這部分的講解!
通過CentOS yum install rsync,安裝rsync服務。
在rsync安裝之后,運行以下指令同步備份:
rsync -vzrtopg –progress –delete –password-file=/home/admin/admin_backups/password.rsync rsync://lixiphp@203.171.237.245/test /home/admin/admin_backups/test
地址rsync://lixiphp@203.171.237.245/test,lixiphp為服務器A用戶,203.171.237.245服務器A IP地址或者域名 test為服務器A配置模塊
密碼存放在/home/admin/admin_backups/password.rsync,這里存放位置,可自由安排。
password.rsync內容格式為: password
rsyncofpass
設置權限為只讀:
chmod 600 /home/admin/admin_backups/password.rsync
解決錯誤
用戶密碼錯誤
@ERROR: auth failed on module test
rsync error: error starting client-server protocol (code 5) at main.c(1503) [receiver=3.0.6]
檢查服務器A存儲密碼文件和服務器B密碼文件。
- 服務器A密碼文件 /etc/rsyncd.secrets 格式為: username:password
- 服務器B密碼文件 password.rsync 格式為:password
文件權限錯誤
password file must not be other-accessible
continuing without password file
Password:
@ERROR: auth failed on module ***
rsync error: error starting client-server protocol (code 5) at main.c(1503) [receiver=3.0.6]
檢查服務器A存儲密碼文件和服務器B密碼文件。
- 服務器A密碼文件 /etc/rsyncd.secrets 權限為600: chmod 600 /etc/rsyncd.secrets
- 服務器B密碼文件 password.rsync 權限為600:chmod 600 password.rsync
定時任務
[root@hk admin_backups]# vi backup.sh
內容如下:
#/bin/sh
rsync -vzrtopg –progress –delete –password-file=/home/admin/admin_backups/password.rsync rsync://lixiphp@203.171.237.245/test /home/admin/admin_backups/test
添加定時任務:
[root@hk admin_backups]# crontab –e
添加以下內容:
*/1 * * * * /home/admin/admin_backups/backup.sh > /dev/null 2>&1
每個一分鐘從服務器A同步到服務器B!
服務器B向下備份到服務器A
rsync -vzrtopg –progress –delete –password-file=/home/admin/admin_backups/password.rsync /home/admin/admin_backups/test rsync://lixiphp@203.171.237.245/test
請確保服務器A同步用戶lixiphp,對模塊test所在目錄有讀、寫、執行的權限。


