|
2018年1月4日
#
摘要: 前陣子從支付寶轉賬1萬塊錢到余額寶,這是日常生活的一件普通小事,但作為互聯網研發人員的職業病,我就思考支付寶扣除1萬之后,如果系統掛掉怎么辦,這時余額寶賬戶并沒有增加1萬,數據就會出現不一致狀況了。上述場景在各個類型的系統中都能找到相似影子,比如在電商系統中,當有用戶下單后,除了在訂單表插入一條記錄外,對應商品表的這個商品數量必須減1吧,怎么保證?!在搜索廣告系統中,當用戶點擊某廣告后,除了在點擊... 閱讀全文
2017年12月31日
#
微服務架構采用Scale Cube方法設計應用架構,將應用服務按功能拆分成一組相互協作的服務。每個服務負責一組特定、相關的功能。每個服務可以有自己獨立的數據庫,從而保證與其他服務解耦。 微服務優點 1、通過分解巨大單體式應用為多個服務方法解決了復雜性問題,每個微服務相對較小 2、每個單體應用不局限于固定的技術棧,開發者可以自由選擇開發技術,提供API服務。 3、每個微服務獨立的開發,部署 4、單一職責功能,每個服務都很簡單,只關注于一個業務功能 5、易于規模化開發,多個開發團隊可以并行開發,每個團隊負責一項服務 6、改善故障隔離。一個服務宕機不會影響其他的服務 微服務缺點: 1.開發者需要應對創建分布式系統所產生的額外的復雜因素 l 目前的IDE主要面對的是單體工程程序,無法顯示支持分布式應用的開發 l 測試工作更加困難 l 需要采用服務間的通訊機制 l 很難在不采用分布式事務的情況下跨服務實現功能 l 跨服務實現要求功能要求團隊之間的緊密協作 2.部署復雜 3.內存占用量更高
2017年12月24日
#
JDK 的 HashMap 中使用了一個 hash 方法來做 bit shifting,在注釋中說明是為了防止一些實現比較差的hashCode() 方法,請問原理是什么?JDK 的源碼參見:GrepCode: java.util.HashMap (.java) /** * Applies a supplemental hash function to a given hashCode, which * defends against poor quality hash functions. This is critical * because HashMap uses power-of-two length hash tables, that * otherwise encounter collisions for hashCodes that do not differ * in lower bits. Note: Null keys always map to hash 0, thus index 0. */ static int hash(int h) { // This function ensures that hashCodes that differ only by // constant multiples at each bit position have a bounded // number of collisions (approximately 8 at default load factor). h ^= (h >>> 20) ^ (h >>> 12); return h ^ (h >>> 7) ^ (h >>> 4); } PS:網上看見有人說作者本人說原理需要參見圣經《計算機程序設計藝術》的 Vol.3 里頭的介紹,不過木有看過神書,求達人介紹 這段代碼叫“擾動函數”。 題主貼的是Java 7的HashMap的源碼,Java 8中這步已經簡化了,只做一次16位右位移異或混合,而不是四次,但原理是不變的。下面以Java 8的源碼為例解釋, //Java 8中的散列值優化函數staticfinalinthash(Objectkey){inth;return(key==null)?0:(h=key.hashCode())^(h>>>16);//key.hashCode()為哈希算法,返回初始哈希值} 大家都知道上面代碼里的key.hashCode()函數調用的是key鍵值類型自帶的哈希函數,返回int型散列值。理論上散列值是一個int型,如果直接拿散列值作為下標訪問HashMap主數組的話,考慮到2進制32位帶符號的int表值范圍從-2147483648到2147483648。前后加起來大概40億的映射空間。只要哈希函數映射得比較均勻松散,一般應用是很難出現碰撞的。但問題是一個40億長度的數組,內存是放不下的。你想,HashMap擴容之前的數組初始大小才16。所以這個散列值是不能直接拿來用的。用之前還要先做對數組的長度取模運算,得到的余數才能用來訪問數組下標。源碼中模運算是在這個indexFor( )函數里完成的。 bucketIndex = indexFor(hash, table.length);indexFor的代碼也很簡單,就是把散列值和數組長度做一個"與"操作, static int indexFor(int h, int length) { return h & (length-1);}順便說一下,這也正好解釋了為什么HashMap的數組長度要取2的整次冪。因為這樣(數組長度-1)正好相當于一個“低位掩碼”。“與”操作的結果就是散列值的高位全部歸零,只保留低位值,用來做數組下標訪問。以初始長度16為例,16-1=15。2進制表示是00000000 00000000 00001111。和某散列值做“與”操作如下,結果就是截取了最低的四位值。 10100101 11000100 00100101& 00000000 00000000 00001111---------------------------------- 00000000 00000000 00000101 //高位全部歸零,只保留末四位 但這時候問題就來了,這樣就算我的散列值分布再松散,要是只取最后幾位的話,碰撞也會很嚴重。更要命的是如果散列本身做得不好,分布上成等差數列的漏洞,恰好使最后幾個低位呈現規律性重復,就無比蛋疼。這時候“擾動函數”的價值就體現出來了,說到這里大家應該猜出來了。看下面這個圖, 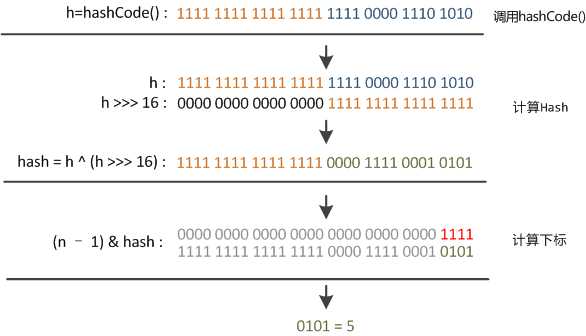 右位移16位,正好是32bit的一半,自己的高半區和低半區做異或,就是為了混合原始哈希碼的高位和低位,以此來加大低位的隨機性。而且混合后的低位摻雜了高位的部分特征,這樣高位的信息也被變相保留下來。最后我們來看一下PeterLawley的一篇專欄文章《An introduction to optimising a hashing strategy》里的的一個實驗:他隨機選取了352個字符串,在他們散列值完全沒有沖突的前提下,對它們做低位掩碼,取數組下標。 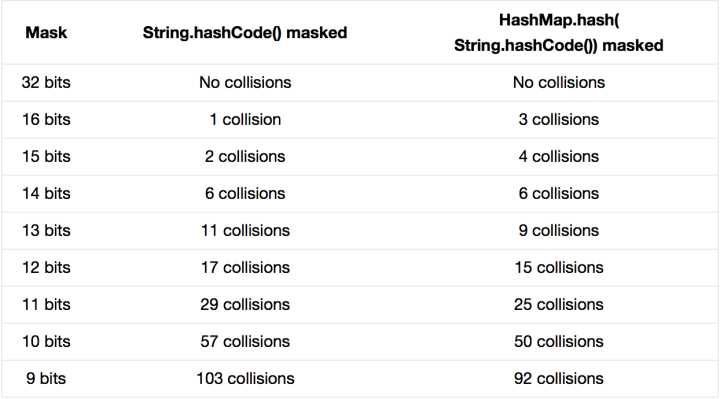 結果顯示,當HashMap數組長度為512的時候,也就是用掩碼取低9位的時候,在沒有擾動函數的情況下,發生了103次碰撞,接近30%。而在使用了擾動函數之后只有92次碰撞。碰撞減少了將近10%。看來擾動函數確實還是有功效的。但明顯Java 8覺得擾動做一次就夠了,做4次的話,多了可能邊際效用也不大,所謂為了效率考慮就改成一次了。 ------------------------------------------------------ https://www.zhihu.com/question/20733617
2017年8月3日
#
Go語言沒有沿襲傳統面向對象編程中的諸多概念,比如繼承、虛函數、構造函數和析構函數、隱藏的this指針等。 方法 Go 語言中同時有函數和方法。方法就是一個包含了接受者(receiver)的函數,receiver可以是內置類型或者結構體類型的一個值或者是一個指針。所有給定類型的方法屬于該類型的方法集。
如下面的這個例子,定義了一個新類型Integer,它和int一樣,只是為它內置的int類型增加了個新方法Less() type Integer int func (a Integer) Less(b Integer) bool { return a < b } func main() { var a Integer = 1 if a.Less(2) { fmt.Println("less then 2") } } 可以看出,Go語言在自定義類型的對象中沒有C++/Java那種隱藏的this指針,而是在定義成員方法時顯式聲明了其所屬的對象。 method的語法如下: func (r ReceiverType) funcName(parameters) (results) 當調用method時,會將receiver作為函數的第一個參數: 所以,receiver是值類型還是指針類型要看method的作用。如果要修改對象的值,就需要傳遞對象的指針。 指針作為Receiver會對實例對象的內容發生操作,而普通類型作為Receiver僅僅是以副本作為操作對象,并不對原實例對象發生操作。 func (a *Ingeger) Add(b Integer) { *a += b } func main() { var a Integer = 1 a.Add(3) fmt.Println("a =", a) // a = 4 } 如果Add方法不使用指針,則a返回的結果不變,這是因為Go語言函數的參數也是基于值傳遞。 注意:當方法的接受者是指針時,即使用值類型調用那么方法內部也是對指針的操作。 之前說過,Go語言沒有構造函數的概念,通常使用一個全局函數來完成。例如: func NewRect(x, y, width, height float64) *Rect { return &Rect{x, y, width, height} } func main() { rect1 := NewRect(1,2,10,20) fmt.Println(rect1.width) }
匿名組合 Go語言提供了繼承,但是采用了組合的語法,我們將其稱為匿名組合,例如: type Base struct { name string } func (base *Base) Set(myname string) { base.name = myname } func (base *Base) Get() string { return base.name } type Derived struct { Base age int } func (derived *Derived) Get() (nm string, ag int) { return derived.name, derived.age } func main() { b := &Derived{} b.Set("sina") fmt.Println(b.Get()) } 例子中,在Base類型定義了get()和set()兩個方法,而Derived類型繼承了Base類,并改寫了Get()方法,在Derived對象調用Set()方法,會加載基類對應的方法;而調用Get()方法時,加載派生類改寫的方法。 組合的類型和被組合的類型包含同名成員時, 會不會有問題呢?可以參考下面的例子: type Base struct { name string age int } func (base *Base) Set(myname string, myage int) { base.name = myname base.age = myage } type Derived struct { Base name string } func main() { b := &Derived{} b.Set("sina", 30) fmt.Println("b.name =",b.name, "\tb.Base.name =", b.Base.name) fmt.Println("b.age =",b.age, "\tb.Base.age =", b.Base.age) }
值語義和引用語義 值語義和引用語義的差別在于賦值,比如 如果b的修改不會影響a的值,那么此類型屬于值類型;如果會影響a的值,那么此類型是引用類型。 Go語言中的大多數類型都基于值語義,包括: - 基本類型,如byte、int、bool、float32、string等;
- 復合類型,如arry、struct、pointer等;
C語言中的數組比較特別,通過函數傳遞一個數組的時候基于引用語義,但是在結構體定義數組變量的時候基于值語義。而在Go語言中,數組和基本類型沒有區別,是很純粹的值類型,例如: var a = [3] int{1,2,3} var b = a b[1]++ fmt.Println(a, b) // [1 2 3] [1 3 3] 從結果看,b=a賦值語句是數組內容的完整復制,要想表達引用,需要用指針: var a = [3] int{1,2,3} var b = &a // 引用語義 b[1]++ fmt.Println(a, b) // [1 3 3] [1 3 3]
接口 Interface 是一組抽象方法(未具體實現的方法/僅包含方法名參數返回值的方法)的集合,如果實現了 interface 中的所有方法,即該類/對象就實現了該接口。 Interface 的聲明格式: type interfaceName interface { //方法列表 } Interface 可以被任意對象實現,一個類型/對象也可以實現多個 interface;
interface的變量可以持有任意實現該interface類型的對象。 如下面的例子:  package main import "fmt" type Human struct { name string age int phone string } type Student struct { Human //匿名字段 school string loan float32 } type Employee struct { Human //匿名字段 company string money float32 } //Human實現SayHi方法 func (h Human) SayHi() { fmt.Printf("Hi, I am %s you can call me on %s\n", h.name, h.phone) } //Human實現Sing方法 func (h Human) Sing(lyrics string) { fmt.Println("La la la la...", lyrics) } //Employee重載Human的SayHi方法 func (e Employee) SayHi() { fmt.Printf("Hi, I am %s, I work at %s. Call me on %s\n", e.name, e.company, e.phone) } // Interface Men被Human,Student和Employee實現 // 因為這三個類型都實現了這兩個方法 type Men interface { SayHi() Sing(lyrics string) } func main() { mike := Student{Human{"Mike", 25, "222-222-XXX"}, "MIT", 0.00} paul := Student{Human{"Paul", 26, "111-222-XXX"}, "Harvard", 100} sam := Employee{Human{"Sam", 36, "444-222-XXX"}, "Golang Inc.", 1000} tom := Employee{Human{"Tom", 37, "222-444-XXX"}, "Things Ltd.", 5000} //定義Men類型的變量i var i Men //i能存儲Student i = mike fmt.Println("This is Mike, a Student:") i.SayHi() i.Sing("November rain") //i也能存儲Employee i = tom fmt.Println("This is tom, an Employee:") i.SayHi() i.Sing("Born to be wild") //定義了slice Men fmt.Println("Let's use a slice of Men and see what happens") x := make([]Men, 3) //這三個都是不同類型的元素,但是他們實現了interface同一個接口 x[0], x[1], x[2] = paul, sam, mike for _, value := range x{ value.SayHi() } } 空接口 空interface(interface{})不包含任何的method,正因為如此,所有的類型都實現了空interface。空interface對于描述起不到任何的作用(因為它不包含任何的method),但是空interface在我們需要存儲任意類型的數值的時候相當有用,因為它可以存儲任意類型的數值。它有點類似于C語言的void*類型。 // 定義a為空接口 var a interface{} var i int = 5 s := "Hello world" // a可以存儲任意類型的數值 a = i a = s interface的變量里面可以存儲任意類型的數值(該類型實現了interface),那么我們怎么反向知道這個interface變量里面實際保存了的是哪個類型的對象呢?目前常用的有兩種方法:switch測試、Comma-ok斷言。 switch測試如下: type Element interface{} type List [] Element type Person struct { name string age int } //打印 func (p Person) String() string { return "(name: " + p.name + " - age: "+strconv.Itoa(p.age)+ " years)" } func main() { list := make(List, 3) list[0] = 1 //an int list[1] = "Hello" //a string list[2] = Person{"Dennis", 70} for index, element := range list{ switch value := element.(type) { case int: fmt.Printf("list[%d] is an int and its value is %d\n", index, value) case string: fmt.Printf("list[%d] is a string and its value is %s\n", index, value) case Person: fmt.Printf("list[%d] is a Person and its value is %s\n", index, value) default: fmt.Println("list[%d] is of a different type", index) } } } 如果使用Comma-ok斷言的話: func main() { list := make(List, 3) list[0] = 1 // an int list[1] = "Hello" // a string list[2] = Person{"Dennis", 70} for index, element := range list { if value, ok := element.(int); ok { fmt.Printf("list[%d] is an int and its value is %d\n", index, value) } else if value, ok := element.(string); ok { fmt.Printf("list[%d] is a string and its value is %s\n", index, value) } else if value, ok := element.(Person); ok { fmt.Printf("list[%d] is a Person and its value is %s\n", index, value) } else { fmt.Printf("list[%d] is of a different type\n", index) } } } 嵌入接口 正如struct類型可以包含一個匿名字段,interface也可以嵌套另外一個接口。 如果一個interface1作為interface2的一個嵌入字段,那么interface2隱式的包含了interface1里面的method。 反射 所謂反射(reflect)就是能檢查程序在運行時的狀態。 使用reflect一般分成三步,下面簡要的講解一下:要去反射是一個類型的值(這些值都實現了空interface),首先需要把它轉化成reflect對象(reflect.Type或者reflect.Value,根據不同的情況調用不同的函數)。這兩種獲取方式如下: t := reflect.TypeOf(i) //得到類型的元數據,通過t我們能獲取類型定義里面的所有元素 v := reflect.ValueOf(i) //得到實際的值,通過v我們獲取存儲在里面的值,還可以去改變值 轉化為reflect對象之后我們就可以進行一些操作了,也就是將reflect對象轉化成相應的值,例如 tag := t.Elem().Field(0).Tag //獲取定義在struct里面的標簽 name := v.Elem().Field(0).String() //獲取存儲在第一個字段里面的值 獲取反射值能返回相應的類型和數值 var x float64 = 3.4 v := reflect.ValueOf(x) fmt.Println("type:", v.Type()) fmt.Println("kind is float64:", v.Kind() == reflect.Float64) fmt.Println("value:", v.Float()) 最后,反射的話,那么反射的字段必須是可修改的,我們前面學習過傳值和傳引用,這個里面也是一樣的道理。反射的字段必須是可讀寫的意思是,如果下面這樣寫,那么會發生錯誤 var x float64 = 3.4 v := reflect.ValueOf(x) v.SetFloat(7.1) 如果要修改相應的值,必須這樣寫 var x float64 = 3.4 p := reflect.ValueOf(&x) v := p.Elem() v.SetFloat(7.1) 上面只是對反射的簡單介紹,更深入的理解還需要自己在編程中不斷的實踐。 參考文檔: http://se77en.cc/2014/05/05/methods-interfaces-and-embedded-types-in-golang/ http://se77en.cc/2014/05/04/choose-whether-to-use-a-value-or-pointer-receiver-on-methods/
http://www.cnblogs.com/chenny7/p/4497969.html
2017年8月2日
#
不可或缺的函數,在Go中定義函數的方式如下: func (p myType ) funcName ( a, b int , c string ) ( r , s int ) { return }
通過函數定義,我們可以看到Go中函數和其他語言中的共性和特性 共性- 關鍵字——func
- 方法名——funcName
- 入參——— a,b int,b string
- 返回值—— r,s int
- 函數體—— {}
特性Go中函數的特性是非常酷的,給我們帶來不一樣的編程體驗。 為特定類型定義函數,即為類型對象定義方法在Go中通過給函數標明所屬類型,來給該類型定義方法,上面的 p myType 即表示給myType聲明了一個方法, p myType 不是必須的。如果沒有,則純粹是一個函數,通過包名稱訪問。packageName.funcationName 如: //定義新的類型double,主要目的是給float64類型擴充方法 type double float64 //判斷a是否等于b func (a double) IsEqual(b double) bool { var r = a - b if r == 0.0 { return true } else if r < 0.0 { return r > -0.0001 } return r < 0.0001 } //判斷a是否等于b func IsEqual(a, b float64) bool { var r = a - b if r == 0.0 { return true } else if r < 0.0 { return r > -0.0001 } return r < 0.0001 } func main() { var a double = 1.999999 var b double = 1.9999998 fmt.Println(a.IsEqual(b)) fmt.Println(a.IsEqual(3)) fmt.Println( IsEqual( (float64)(a), (float64)(b) ) ) }
上述示例為 float64 基本類型擴充了方法IsEqual,該方法主要是解決精度問題。 其方法調用方式為: a.IsEqual(double) ,如果不擴充方法,我們只能使用函數IsEqual(a, b float64) 入參中,如果連續的參數類型一致,則可以省略連續多個參數的類型,只保留最后一個類型聲明。如 func IsEqual(a, b float64) bool 這個方法就只保留了一個類型聲明,此時入參a和b均是float64數據類型。 這樣也是可以的: func IsEqual(a, b float64, accuracy int) bool 變參:入參支持變參,即可接受不確定數量的同一類型的參數如 func Sum(args ...int) 參數args是的slice,其元素類型為int 。經常使用的fmt.Printf就是一個接受任意個數參數的函數 fmt.Printf(format string, args ...interface{}) 支持多返回值前面我們定義函數時返回值有兩個r,s 。這是非常有用的,我在寫C#代碼時,常常為了從已有函數中獲得更多的信息,需要修改函數簽名,使用out ,ref 等方式去獲得更多返回結果。而現在使用Go時則很簡單,直接在返回值后面添加返回參數即可。 如,在C#中一個字符串轉換為int類型時邏輯代碼 int v=0; if ( int.TryPase("123456",out v) ) { //code }
而在Go中,則可以這樣實現,邏輯精簡而明確 if v,isOk :=int.TryPase("123456") ; isOk { //code }
同時在Go中很多函數充分利用了多返回值 - func (file *File) Write(b []byte) (n int, err error)
- func Sincos(x float64) (sin, cos float64)
那么如果我只需要某一個返回值,而不關心其他返回值的話,我該如何辦呢? 這時可以簡單的使用符號下劃線”_“ 來忽略不關心的返回值。如: _, cos = math.Sincos(3.1415) //只需要cos計算的值
命名返回值前面我們說了函數可以有多個返回值,這里我還要說的是,在函數定義時可以給所有的返回值分別命名,這樣就能在函數中任意位置給不同返回值復制,而不需要在return語句中才指定返回值。同時也能增強可讀性,也提高godoc所生成文檔的可讀性 如果不支持命名返回值,我可能會是這樣做的 func ReadFull(r Reader, buf []byte) (int, error) { var n int var err error for len(buf) > 0 { var nr int nr, err = r.Read(buf) n += nr if err !=nil { return n,err } buf = buf[nr:] } return n,err }
但支持給返回值命名后,實際上就是省略了變量的聲明,return時無需寫成return n,err 而是將直接將值返回 func ReadFull(r Reader, buf []byte) (n int, err error) { for len(buf) > 0 && err == nil { var nr int nr, err = r.Read(buf) n += nr buf = buf[nr:] } return }
函數也是“值”和Go中其他東西一樣,函數也是值,這樣就可以聲明一個函數類型的變量,將函數作為參數傳遞。 聲明函數為值的變量(匿名函數:可賦值個變量,也可直接執行) //賦值 fc := func(msg string) { fmt.Println("you say :", msg) } fmt.Printf("%T \n", fc) fc("hello,my love") //直接執行 func(msg string) { fmt.Println("say :", msg) }("I love to code")
輸出結果如下,這里表明fc 的類型為:func(string) func(string) you say : hello,my love say : I love to code
將函數作為入參(回調函數),能帶來便利。如日志處理,為了統一處理,將信息均通過指定函數去記錄日志,且是否記錄日志還有開關 func Log(title string, getMsg func() string) { //如果開啟日志記錄,則記錄日志 if true { fmt.Println(title, ":", getMsg()) } } //---------調用-------------- count := 0 msg := func() string { count++ return "您沒有即使提醒我,已觸犯法律" } Log("error", msg) Log("warring", msg) Log("info", msg) fmt.Println(count)
這里輸出結果如下,count 也發生了變化 error : 您沒有即使提醒我,已觸犯法律 warring : 您沒有即使提醒我,已觸犯法律 info : 您沒有即使提醒我,已觸犯法律 3
函數也是“類型”你有沒有注意到上面示例中的 fc := func(msg string)... ,既然匿名函數可以賦值給一個變量,同時我們經常這樣給int賦值 value := 2 ,是否我們可以聲明func(string) 類型 呢,當然是可以的。 //一個記錄日志的類型:func(string) type saveLog func(msg string) //將字符串轉換為int64,如果轉換失敗調用saveLog func stringToInt(s string, log saveLog) int64 { if value, err := strconv.ParseInt(s, 0, 0); err != nil { log(err.Error()) return 0 } else { return value } } //記錄日志消息的具體實現 func myLog(msg string) { fmt.Println("Find Error:", msg) } func main() { stringToInt("123", myLog) //轉換時將調用mylog記錄日志 stringToInt("s", myLog) }
這里我們定義了一個類型,專門用作記錄日志的標準接口。在stringToInt函數中如果轉換失敗則調用我自己定義的接口函數進行日志處理,至于最終執行的哪個函數,則無需關心。 defer 延遲函數defer 又是一個創新,它的作用是:延遲執行,在聲明時不會立即執行,而是在函數return后時按照后進先出的原則依次執行每一個defer。這樣帶來的好處是,能確保我們定義的函數能百分之百能夠被執行到,這樣就能做很多我們想做的事,如釋放資源,清理數據,記錄日志等 這里我們重點來說明下defer的執行順序 func deferFunc() int { index := 0 fc := func() { fmt.Println(index, "匿名函數1") index++ defer func() { fmt.Println(index, "匿名函數1-1") index++ }() } defer func() { fmt.Println(index, "匿名函數2") index++ }() defer fc() return func() int { fmt.Println(index, "匿名函數3") index++ return index }() } func main() { deferFunc() }
這里輸出結果如下, 0 匿名函數3 1 匿名函數1 2 匿名函數1-1 3 匿名函數2
有如下結論: - defer 是在執行完return 后執行
- defer 后進先執行
另外,我們常使用defer去關閉IO,在正常打開文件后,就立刻聲明一個defer,這樣就不會忘記關閉文件,也能保證在出現異常等不可預料的情況下也能關閉文件。而不像其他語言:try-catch 或者 using() 方式進行處理。 file , err :=os.Open(file) if err != nil { return err } defer file.Close() //dosomething with file
后續,我將討論: 作用域、傳值和傳指針 以及 保留函數init(),main() 本筆記中所寫代碼存儲位置:
2016年8月18日
#
以前關注的數據存儲過程不太懂其中奧妙,最近遇到跨數據庫,同時對多個表進行CURD(Create增、Update改、Read讀、Delete刪),怎么才能讓繁瑣的數據CURD同步變得更容易呢?相信很多人會首先想到了MySQL存儲過程、觸發器,這種想法確實不錯。于是饒有興趣地親自寫了CUD(增、改、刪)觸發器的實例,用觸發器實現多表數據同步更新。  定義: 何為MySQL觸發器? 在MySQL Server里面也就是對某一個表的一定的操作,觸發某種條件(Insert,Update,Delete 等),從而自動執行的一段程序。從這種意義上講觸發器是一個特殊的存儲過程。下面通過MySQL觸發器實例,來了解一下觸發器的工作過程吧! 一、創建MySQL實例數據表: 在mysql的默認的測試test數據庫下,創建兩個表t_a與t_b:
/*Table structure for table `t_a` */
DROP TABLE IF EXISTS `t_a`;
CREATE TABLE `t_a` (
`id` smallint(1) unsigned NOT NULL AUTO_INCREMENT,
`username` varchar(20) DEFAULT NULL,
`groupid` mediumint(8) unsigned NOT NULL DEFAULT '0',
PRIMARY KEY (`id`)
) ENGINE=MyISAM AUTO_INCREMENT=16 DEFAULT CHARSET=latin1;
/*Data for the table `t_a` */
LOCK TABLES `t_a` WRITE;
UNLOCK TABLES;
/*Table structure for table `t_b` */
DROP TABLE IF EXISTS `t_b`;
CREATE TABLE `t_b` (
`id` smallint(1) unsigned NOT NULL AUTO_INCREMENT,
`username` varchar(20) DEFAULT NULL,
`groupid` mediumint(8) unsigned NOT NULL DEFAULT '0',
PRIMARY KEY (`id`)
) ENGINE=MyISAM AUTO_INCREMENT=57 DEFAULT CHARSET=latin1;
/*Data for the table `t_b` */
LOCK TABLES `t_b` WRITE;
UNLOCK TABLES;
在t_a表上分創建一個CUD(增、改、刪)3個觸發器,將t_a的表數據與t_b同步實現CUD,注意創建觸發器每個表同類事件有且僅有一個對應觸發器,為什么只能對一個觸發器,不解釋啦,看MYSQL的說明幫助文檔吧。 二、創建MySQL實例觸發器: 在實例數據表t_a上依次按照下面步驟創建tr_a_insert、tr_a_update、tr_a_delete三個觸發器 1、創建INSERT觸發器trigger_a_insert:
DELIMITER $$
USE `test`$$
--判斷數據庫中是否存在tr_a_insert觸發器
DROP TRIGGER /*!50032 IF EXISTS */ `tr_a_insert`$$
--不存在tr_a_insert觸發器,開始創建觸發器
--Trigger觸發條件為insert成功后進行觸發
CREATE
/*!50017 DEFINER = 'root'@'localhost' */
TRIGGER `tr_a_insert` AFTER INSERT ON `t_a`
FOR EACH ROW BEGIN
--Trigger觸發后,同時對t_b新增同步一條數據
INSERT INTO `t_b` SET username = NEW.username, groupid=NEW.groupid;
END;
$$
DELIMITER;
2、創建UPDATE觸發器trigger_a_update:
DELIMITER $$
USE `test`$$
--判斷數據庫中是否存在tr_a_update觸發器
DROP TRIGGER /*!50032 IF EXISTS */ `tr_a_update`$$
--不存在tr_a_update觸發器,開始創建觸發器
--Trigger觸發條件為update成功后進行觸發
CREATE
/*!50017 DEFINER = 'root'@'localhost' */
TRIGGER `tr_a_update` AFTER UPDATE ON `t_a`
FOR EACH ROW BEGIN
--Trigger觸發后,當t_a表groupid,username數據有更改時,對t_b表同步一條更新后的數據
IF new.groupid != old.groupid OR old.username != new.username THEN
UPDATE `t_b` SET groupid=NEW.groupid,username=NEW.username WHEREusername=OLD.username AND groupid=OLD.groupid;
END IF;
END;
$$
DELIMITER ;
3、創建DELETE觸發器trigger_a_delete:
DELIMITER $$
USE `test`$$
--判斷數據庫中是否存在tr_a_delete觸發器
DROP TRIGGER /*!50032 IF EXISTS */ `tr_a_delete`$$
--不存在tr_a_delete觸發器,開始創建觸發器
--Trigger觸發條件為delete成功后進行觸發
CREATE
/*!50017 DEFINER = 'root'@'localhost' */
TRIGGER `tr_a_delete` AFTER DELETE ON `t_a`
FOR EACH ROW BEGIN
--t_a表數據刪除后,t_b表關聯條件相同的數據也同步刪除
DELETE FROM `t_b` WHERE username=Old.username AND groupid=OLD.groupid;
END;
$$
DELIMITER ;
三、測試MySQL實例觸發器: 分別測試實現t_a與t_b實現數據同步CUD(增、改、刪)3個Triggers 1、測試MySQL的實例tr_a_insert觸發器: 在t_a表中新增一條數據,然后分別查詢t_a/t_b表的數據是否數據同步,測試觸發器成功標志,t_a表無論在何種情況下,新增了一條或多條記錄集時,沒有t_b表做任何數據insert操作,它同時新增了一樣的多條記錄集。 下面來進行MySQL觸發器實例測試:
--t_a表新增一條記錄集
INSERT INTO `t_a` (username,groupid) VALUES ('sky54.net',123)
--查詢t_a表
SELECT id,username,groupid FROM `t_a`
--查詢t_b表
SELECT id,username,groupid FROM `t_b`
2、測試MySQL的實例tr_a_update、tr_a_delete觸發器: 這兩個MySQL觸發器測試原理、步驟與tr_a_insert觸發器一樣的,先修改/刪除一條數據,然后分別查看t_a、t_b表的數據變化情況,數據變化同步說明Trigger實例成功,否則需要逐步排查錯誤原因。 世界上任何一種事物都其其優點和缺點,優點與缺點是自身一個相對立的面。當然這里不是強調“世界非黑即白”式的“二元論”,“存在即合理”嘛。當然 MySQL觸發器的優點不說了,說一下不足之處,MySQL Trigger沒有很好的調試、管理環境,難于在各種系統環境下測試,測試比MySQL存儲過程要難,所以建議在生成環境下,盡量用存儲過程來代替 MySQL觸發器。 本篇結束前再強調一下,支持觸發器的MySQL版本需要5.0以上,5.0以前版本的MySQL升級到5.0以后版本方可使用觸發器哦! http://blog.csdn.net/hireboy/article/details/18079183
2016年6月14日
#
摘要: 在開發高并發系統時有三把利器用來保護系統:緩存、降級和限流。緩存的目的是提升系統訪問速度和增大系統能處理的容量,可謂是抗高并發流量的銀彈;而降級是當服務出問題或者影響到核心流程的性能則需要暫時屏蔽掉,待高峰或者問題解決后再打開;而有些場景并不能用緩存和降級來解決,比如稀缺資源(秒殺、搶購)、寫服務(如評論、下單)、頻繁的復雜查詢(評論的最后幾頁),因此需有一種手段來限制這些場景的并發/請求量,即限... 閱讀全文
2016年5月13日
#
Install the Command Line ClientIf you prefer command line client, then you can install it on your Linux with the following command. Debiansudo apt-get install python-pip sudo pip install shadowsocks UbuntuYes, you can use the above commands to install shadowsocks client on ubuntu. But it will install it under ~/.local/bin/ directory and it causes loads of trouble. So I suggest using su to become root first and then issue the following two commands. apt-get install python-pip pip install shadowsocks Fedora/Centossudo yum install python-setuptools or sudo dnf install python-setuptools sudo easy_install pip sudo pip install shadowsocks OpenSUSEsudo zypper install python-pip sudo pip install shadowsocks Archlinuxsudo pacman -S python-pip sudo pip install shadowsocks As you can see the command of installing shadowsocks client is the same to the command of installing shadowsocks server, because the above command will install both the client and the server. You can verify this by looking at the installation script output Downloading/unpacking shadowsocks Downloading shadowsocks-2.8.2.tar.gz Running setup.py (path:/tmp/pip-build-PQIgUg/shadowsocks/setup.py) egg_info for package shadowsocks Installing collected packages: shadowsocks Running setup.py install for shadowsocks Installing sslocal script to /usr/local/bin Installing ssserver script to /usr/local/bin Successfully installed shadowsocks Cleaning up... sslocal is the client software and ssserver is the server software. On some Linux distros such as ubuntu, the shadowsocks client sslocal is installed under /usr/local/bin. On Others such as Archsslocal is installed under /usr/bin/. Your can use whereis command to find the exact location. user@debian:~$ whereis sslocal sslocal: /usr/local/bin/sslocal Create a Configuration Filewe will create a configuration file under /etc/ sudo vi /etc/shadowsocks.json Put the following text in the file. Replace server-ip with your actual IP and set a password. {
"server":"server-ip",
"server_port":8000,
"local_address": "127.0.0.1",
"local_port":1080,
"password":"your-password",
"timeout":600,
"method":"aes-256-cfb"
}Save and close the file. Next start the client using command line sslocal -c /etc/shadowsocks.json To run in the backgroundsudo sslocal -c /etc/shadowsocks.json -d start Auto Start the Client on System BootEdit /etc/rc.local file sudo vi /etc/rc.local Put the following line above the exit 0 line: sudo sslocal -c /etc/shadowsocks.json -d start Save and close the file. Next time you start your computer, shadowsocks client will automatically start and connect to your shadowsocks server. Check if It WorksAfter you rebooted your computer, enter the following command in terminal: sudo systemctl status rc-local.service If your sslocal command works then you will get this ouput: ● rc-local.service - /etc/rc.local
Compatibility Loaded: loaded (/etc/systemd/system/rc-local.service; enabled; vendor preset: enabled)
Active: active (running) since Fri 2015-11-27 03:19:25 CST; 2min 39s ago
Process: 881 ExecStart=/etc/rc.local start (code=exited, status=0/SUCCESS)
CGroup: /system.slice/rc-local.service
├─ 887 watch -n 60 su matrix -c ibam
└─1112 /usr/bin/python /usr/local/bin/sslocal -c /etc/shadowsocks.... As you can see from the last line, the sslocal command created a process whose pid is 1112 on my machine. It means shadowsocks client is running smoothly. And of course you can tell your browser to connect through your shadowsocks client to see if everything goes well. If for some reason your /etc/rc.local script won’t run, then check the following post to find the solution. If you prefer command line client, then you can install it on your Linux with the following command. Debiansudo apt-get install python-pip
sudo pip install shadowsocks
UbuntuYes, you can use the above commands to install shadowsocks client on ubuntu. But it will install it under ~/.local/bin/ directory and it causes loads of trouble. So I suggest using su to become root first and then issue the following two commands. apt-get install python-pip
pip install shadowsocks Fedora/Centossudo yum install python-setuptools or sudo dnf install python-setuptools
sudo easy_install pip
sudo pip install shadowsocks
OpenSUSEsudo zypper install python-pip
sudo pip install shadowsocks
Archlinuxsudo pacman -S python-pip
sudo pip install shadowsocks
As you can see the command of installing shadowsocks client is the same to the command of installing shadowsocks server, because the above command will install both the client and the server. You can verify this by looking at the installation script output Downloading/unpacking shadowsocks
Downloading shadowsocks-2.8.2.tar.gz
Running setup.py (path:/tmp/pip-build-PQIgUg/shadowsocks/setup.py) egg_info for package shadowsocks
Installing collected packages: shadowsocks
Running setup.py install for shadowsocks
Installing sslocal script to /usr/local/bin
Installing ssserver script to /usr/local/bin
Successfully installed shadowsocks
Cleaning up... sslocal is the client software and ssserver is the server software. On some Linux distros such as ubuntu, the shadowsocks client sslocal is installed under /usr/local/bin. On Others such as Archsslocal is installed under /usr/bin/. Your can use whereis command to find the exact location. user@debian:~$ whereis sslocal
sslocal: /usr/local/bin/sslocal Create a Configuration Filewe will create a configuration file under /etc/ sudo vi /etc/shadowsocks.json Put the following text in the file. Replace server-ip with your actual IP and set a password. {
"server":"server-ip",
"server_port":8000,
"local_address": "127.0.0.1",
"local_port":1080,
"password":"your-password",
"timeout":600,
"method":"aes-256-cfb"
}Save and close the file. Next start the client using command line sslocal -c /etc/shadowsocks.json To run in the backgroundsudo sslocal -c /etc/shadowsocks.json -d start
Auto Start the Client on System BootEdit /etc/rc.local file sudo vi /etc/rc.local Put the following line above the exit 0 line: sudo sslocal -c /etc/shadowsocks.json -d start Save and close the file. Next time you start your computer, shadowsocks client will automatically start and connect to your shadowsocks server. Check if It WorksAfter you rebooted your computer, enter the following command in terminal: sudo systemctl status rc-local.service If your sslocal command works then you will get this ouput: ● rc-local.service - /etc/rc.local Compatibility
Loaded: loaded (/etc/systemd/system/rc-local.service; enabled; vendor preset: enabled)
Active: active (running) since Fri 2015-11-27 03:19:25 CST; 2min 39s ago
Process: 881 ExecStart=/etc/rc.local start (code=exited, status=0/SUCCESS)
CGroup: /system.slice/rc-local.service
├─ 887 watch -n 60 su matrix -c ibam
└─1112 /usr/bin/python /usr/local/bin/sslocal -c /etc/shadowsocks.... As you can see from the last line, the sslocal command created a process whose pid is 1112 on my machine. It means shadowsocks client is running smoothly. And of course you can tell your browser to connect through your shadowsocks client to see if everything goes well. If for some reason your /etc/rc.local script won’t run, then check the following post to find the solution. How to enable /etc/rc.local with Systemd
2016年4月27日
#
廢話少說,直接上代碼,以前都是調用別人寫好的,現在有時間自己弄下,具體功能如下: 1、httpClient+http+線程池: 2、httpClient+https(單向不驗證證書)+線程池: https在%TOMCAT_HOME%/conf/server.xml里面的配置文件 <Connector port="8443" protocol="HTTP/1.1" SSLEnabled="true" maxThreads="150" scheme="https" secure="true" clientAuth="false" keystoreFile="D:/tomcat.keystore" keystorePass="heikaim" sslProtocol="TLS" executor="tomcatThreadPool"/> 其中 clientAuth="false"表示不開啟證書驗證,只是單存的走https package com.abin.lee.util;
import org.apache.commons.collections4.MapUtils;
import org.apache.commons.lang3.StringUtils;
import org.apache.http.*;
import org.apache.http.client.HttpRequestRetryHandler;
import org.apache.http.client.config.CookieSpecs;
import org.apache.http.client.config.RequestConfig;
import org.apache.http.client.entity.UrlEncodedFormEntity;
import org.apache.http.client.methods.CloseableHttpResponse;
import org.apache.http.client.methods.HttpGet;
import org.apache.http.client.methods.HttpPost;
import org.apache.http.client.protocol.HttpClientContext;
import org.apache.http.config.Registry;
import org.apache.http.config.RegistryBuilder;
import org.apache.http.conn.ConnectTimeoutException;
import org.apache.http.conn.socket.ConnectionSocketFactory;
import org.apache.http.conn.socket.PlainConnectionSocketFactory;
import org.apache.http.conn.ssl.NoopHostnameVerifier;
import org.apache.http.conn.ssl.SSLConnectionSocketFactory;
import org.apache.http.entity.StringEntity;
import org.apache.http.impl.client.CloseableHttpClient;
import org.apache.http.impl.client.HttpClients;
import org.apache.http.impl.conn.PoolingHttpClientConnectionManager;
import org.apache.http.message.BasicHeader;
import org.apache.http.message.BasicNameValuePair;
import org.apache.http.protocol.HttpContext;
import org.apache.http.util.EntityUtils;
import javax.net.ssl.*;
import java.io.IOException;
import java.io.InterruptedIOException;
import java.net.UnknownHostException;
import java.nio.charset.Charset;
import java.security.cert.CertificateException;
import java.security.cert.X509Certificate;
import java.util.*;
/**
* Created with IntelliJ IDEA.
* User: abin
* Date: 16-4-18
* Time: 上午10:24
* To change this template use File | Settings | File Templates.
*/
public class HttpClientUtil {
private static CloseableHttpClient httpsClient = null;
private static CloseableHttpClient httpClient = null;
static {
httpClient = getHttpClient();
httpsClient = getHttpsClient();
}
public static CloseableHttpClient getHttpClient() {
try {
httpClient = HttpClients.custom()
.setConnectionManager(PoolManager.getHttpPoolInstance())
.setConnectionManagerShared(true)
.setDefaultRequestConfig(requestConfig())
.setRetryHandler(retryHandler())
.build();
} catch (Exception e) {
e.printStackTrace();
}
return httpClient;
}
public static CloseableHttpClient getHttpsClient() {
try {
//Secure Protocol implementation.
SSLContext ctx = SSLContext.getInstance("SSL");
//Implementation of a trust manager for X509 certificates
TrustManager x509TrustManager = new X509TrustManager() {
public void checkClientTrusted(X509Certificate[] xcs,
String string) throws CertificateException {
}
public void checkServerTrusted(X509Certificate[] xcs,
String string) throws CertificateException {
}
public X509Certificate[] getAcceptedIssuers() {
return null;
}
};
ctx.init(null, new TrustManager[]{x509TrustManager}, null);
//首先設置全局的標準cookie策略
// RequestConfig requestConfig = RequestConfig.custom().setCookieSpec(CookieSpecs.STANDARD_STRICT).build();
ConnectionSocketFactory connectionSocketFactory = new SSLConnectionSocketFactory(ctx, hostnameVerifier);
Registry<ConnectionSocketFactory> socketFactoryRegistry = RegistryBuilder.<ConnectionSocketFactory>create()
.register("http", PlainConnectionSocketFactory.INSTANCE)
.register("https", connectionSocketFactory).build();
// 設置連接池
httpsClient = HttpClients.custom()
.setConnectionManager(PoolsManager.getHttpsPoolInstance(socketFactoryRegistry))
.setConnectionManagerShared(true)
.setDefaultRequestConfig(requestConfig())
.setRetryHandler(retryHandler())
.build();
} catch (Exception e) {
e.printStackTrace();
}
return httpsClient;
}
// 配置請求的超時設置
//首先設置全局的標準cookie策略
public static RequestConfig requestConfig(){
RequestConfig requestConfig = RequestConfig.custom()
.setCookieSpec(CookieSpecs.STANDARD_STRICT)
.setConnectionRequestTimeout(20000)
.setConnectTimeout(20000)
.setSocketTimeout(20000)
.build();
return requestConfig;
}
public static HttpRequestRetryHandler retryHandler(){
//請求重試處理
HttpRequestRetryHandler httpRequestRetryHandler = new HttpRequestRetryHandler() {
public boolean retryRequest(IOException exception,int executionCount, HttpContext context) {
if (executionCount >= 5) {// 如果已經重試了5次,就放棄
return false;
}
if (exception instanceof NoHttpResponseException) {// 如果服務器丟掉了連接,那么就重試
return true;
}
if (exception instanceof SSLHandshakeException) {// 不要重試SSL握手異常
return false;
}
if (exception instanceof InterruptedIOException) {// 超時
return false;
}
if (exception instanceof UnknownHostException) {// 目標服務器不可達
return false;
}
if (exception instanceof ConnectTimeoutException) {// 連接被拒絕
return false;
}
if (exception instanceof SSLException) {// ssl握手異常
return false;
}
HttpClientContext clientContext = HttpClientContext.adapt(context);
HttpRequest request = clientContext.getRequest();
// 如果請求是冪等的,就再次嘗試
if (!(request instanceof HttpEntityEnclosingRequest)) {
return true;
}
return false;
}
};
return httpRequestRetryHandler;
}
//創建HostnameVerifier
//用于解決javax.net.ssl.SSLException: hostname in certificate didn't match: <123.125.97.66> != <123.125.97.241>
static HostnameVerifier hostnameVerifier = new NoopHostnameVerifier(){
@Override
public boolean verify(String s, SSLSession sslSession) {
return super.verify(s, sslSession);
}
};
public static class PoolManager {
public static PoolingHttpClientConnectionManager clientConnectionManager = null;
private static int maxTotal = 200;
private static int defaultMaxPerRoute = 100;
private PoolManager(){
clientConnectionManager.setMaxTotal(maxTotal);
clientConnectionManager.setDefaultMaxPerRoute(defaultMaxPerRoute);
}
private static class PoolManagerHolder{
public static PoolManager instance = new PoolManager();
}
public static PoolManager getInstance() {
if(null == clientConnectionManager)
clientConnectionManager = new PoolingHttpClientConnectionManager();
return PoolManagerHolder.instance;
}
public static PoolingHttpClientConnectionManager getHttpPoolInstance() {
PoolManager.getInstance();
// System.out.println("getAvailable=" + clientConnectionManager.getTotalStats().getAvailable());
// System.out.println("getLeased=" + clientConnectionManager.getTotalStats().getLeased());
// System.out.println("getMax=" + clientConnectionManager.getTotalStats().getMax());
// System.out.println("getPending="+clientConnectionManager.getTotalStats().getPending());
return PoolManager.clientConnectionManager;
}
}
public static class PoolsManager {
public static PoolingHttpClientConnectionManager clientConnectionManager = null;
private static int maxTotal = 200;
private static int defaultMaxPerRoute = 100;
private PoolsManager(){
clientConnectionManager.setMaxTotal(maxTotal);
clientConnectionManager.setDefaultMaxPerRoute(defaultMaxPerRoute);
}
private static class PoolsManagerHolder{
public static PoolsManager instance = new PoolsManager();
}
public static PoolsManager getInstance(Registry<ConnectionSocketFactory> socketFactoryRegistry) {
if(null == clientConnectionManager)
clientConnectionManager = new PoolingHttpClientConnectionManager(socketFactoryRegistry);
return PoolsManagerHolder.instance;
}
public static PoolingHttpClientConnectionManager getHttpsPoolInstance(Registry<ConnectionSocketFactory> socketFactoryRegistry) {
PoolsManager.getInstance(socketFactoryRegistry);
// System.out.println("getAvailable=" + clientConnectionManager.getTotalStats().getAvailable());
// System.out.println("getLeased=" + clientConnectionManager.getTotalStats().getLeased());
// System.out.println("getMax=" + clientConnectionManager.getTotalStats().getMax());
// System.out.println("getPending="+clientConnectionManager.getTotalStats().getPending());
return PoolsManager.clientConnectionManager;
}
}
public static String httpPost(Map<String, String> request, String httpUrl){
String result = "";
CloseableHttpClient httpClient = getHttpClient();
try {
if(MapUtils.isEmpty(request))
throw new Exception("請求參數不能為空");
HttpPost httpPost = new HttpPost(httpUrl);
List<NameValuePair> nvps = new ArrayList<NameValuePair>();
for(Iterator<Map.Entry<String, String>> iterator=request.entrySet().iterator(); iterator.hasNext();){
Map.Entry<String, String> entry = iterator.next();
nvps.add(new BasicNameValuePair(entry.getKey(), entry.getValue()));
}
httpPost.setEntity(new UrlEncodedFormEntity(nvps, Consts.UTF_8));
System.out.println("Executing request: " + httpPost.getRequestLine());
CloseableHttpResponse response = httpClient.execute(httpPost);
result = EntityUtils.toString(response.getEntity());
System.out.println("Executing response: "+ result);
} catch (Exception e) {
throw new RuntimeException(e);
} finally {
try {
httpClient.close();
} catch (IOException e) {
e.printStackTrace();
}
}
return result;
}
public static String httpPost(String json, String httpUrl, Map<String, String> headers){
String result = "";
CloseableHttpClient httpClient = getHttpClient();
try {
if(StringUtils.isBlank(json))
throw new Exception("請求參數不能為空");
HttpPost httpPost = new HttpPost(httpUrl);
for(Iterator<Map.Entry<String, String>> iterator=headers.entrySet().iterator();iterator.hasNext();){
Map.Entry<String, String> entry = iterator.next();
Header header = new BasicHeader(entry.getKey(), entry.getValue());
httpPost.setHeader(header);
}
httpPost.setEntity(new StringEntity(json, Charset.forName("UTF-8")));
System.out.println("Executing request: " + httpPost.getRequestLine());
CloseableHttpResponse response = httpClient.execute(httpPost);
result = EntityUtils.toString(response.getEntity());
System.out.println("Executing response: "+ result);
} catch (Exception e) {
throw new RuntimeException(e);
} finally {
try {
httpClient.close();
} catch (IOException e) {
e.printStackTrace();
}
}
return result;
}
public static String httpGet(String httpUrl, Map<String, String> headers) {
String result = "";
CloseableHttpClient httpClient = getHttpClient();
try {
HttpGet httpGet = new HttpGet(httpUrl);
System.out.println("Executing request: " + httpGet.getRequestLine());
for(Iterator<Map.Entry<String, String>> iterator=headers.entrySet().iterator();iterator.hasNext();){
Map.Entry<String, String> entry = iterator.next();
Header header = new BasicHeader(entry.getKey(), entry.getValue());
httpGet.setHeader(header);
}
CloseableHttpResponse response = httpClient.execute(httpGet);
result = EntityUtils.toString(response.getEntity());
System.out.println("Executing response: "+ result);
} catch (Exception e) {
throw new RuntimeException(e);
} finally {
try {
httpClient.close();
} catch (IOException e) {
e.printStackTrace();
}
}
return result;
}
public static String httpGet(String httpUrl) {
String result = "";
CloseableHttpClient httpClient = getHttpClient();
try {
HttpGet httpGet = new HttpGet(httpUrl);
System.out.println("Executing request: " + httpGet.getRequestLine());
CloseableHttpResponse response = httpClient.execute(httpGet);
result = EntityUtils.toString(response.getEntity());
System.out.println("Executing response: "+ result);
} catch (Exception e) {
throw new RuntimeException(e);
} finally {
try {
httpClient.close();
} catch (IOException e) {
e.printStackTrace();
}
}
return result;
}
maven依賴: <!--httpclient--> <dependency> <groupId>org.apache.httpcomponents</groupId> <artifactId>httpclient</artifactId> <version>4.5.2</version> </dependency> <dependency> <groupId>org.apache.httpcomponents</groupId> <artifactId>httpcore</artifactId> <version>4.4.4</version> </dependency> <dependency> <groupId>org.apache.httpcomponents</groupId> <artifactId>httpmime</artifactId> <version>4.5.2</version> </dependency> <dependency>
<groupId>org.apache.commons</groupId>
<artifactId>commons-collections4</artifactId>
<version>4.1</version>
</dependency>
2015年11月3日
#
1、twemproxy explore 當我們有大量 Redis 或 Memcached 的時候,通常只能通過客戶端的一些數據分配算法(比如一致性哈希),來實現集群存儲的特性。雖然Redis 2.6版本已經發布Redis Cluster,但還不是很成熟適用正式生產環境。 Redis 的 Cluster 方案還沒有正式推出之前,我們通過 Proxy 的方式來實現集群存儲。 Twitter,世界最大的Redis集群之一部署在Twitter用于為用戶提供時間軸數據。Twitter Open Source部門提供了Twemproxy。 Twemproxy,也叫nutcraker。是一個twtter開源的一個redis和memcache代理服務器。 redis作為一個高效的緩存服務器,非常具有應用價值。但是當使用比較多的時候,就希望可以通過某種方式 統一進行管理。避免每個應用每個客戶端管理連接的松散性。同時在一定程度上變得可以控制。 Twemproxy是一個快速的單線程代理程序,支持Memcached ASCII協議和更新的Redis協議: 它全部用C寫成,使用Apache 2.0 License授權。項目在Linux上可以工作,而在OSX上無法編譯,因為它依賴了epoll API. Twemproxy 通過引入一個代理層,可以將其后端的多臺 Redis 或 Memcached 實例進行統一管理與分配,使應用程序只需要在 Twemproxy 上進行操作,而不用關心后面具體有多少個真實的 Redis 或 Memcached 存儲。 2、twemproxy特性: 另外可以修改redis的源代碼,抽取出redis中的前半部分,作為一個中間代理層。最終都是通過linux下的epoll 事件機制提高并發效率,其中nutcraker本身也是使用epoll的事件機制。并且在性能測試上的表現非常出色。 3、twemproxy問題與不足
Twemproxy 由于其自身原理限制,有一些不足之處,如: - 不支持針對多個值的操作,比如取sets的子交并補等(MGET 和 DEL 除外)
- 不支持Redis的事務操作
- 出錯提示還不夠完善
- 也不支持select操作
4、安裝與配置 Twemproxy 的安裝,主要命令如下: apt-get install automake
apt-get install libtool
git clone git://github.com/twitter/twemproxy.git
cd twemproxy
autoreconf -fvi
./configure --enable-debug=log
make
src/nutcracker -h
通過上面的命令就算安裝好了,然后是具體的配置,下面是一個典型的配置 redis1:
listen: 127.0.0.1:6379 #使用哪個端口啟動Twemproxy
redis: true #是否是Redis的proxy
hash: fnv1a_64 #指定具體的hash函數
distribution: ketama #具體的hash算法
auto_eject_hosts: true #是否在結點無法響應的時候臨時摘除結點
timeout: 400 #超時時間(毫秒)
server_retry_timeout: 2000 #重試的時間(毫秒)
server_failure_limit: 1 #結點故障多少次就算摘除掉
servers: #下面表示所有的Redis節點(IP:端口號:權重)
- 127.0.0.1:6380:1
- 127.0.0.1:6381:1
- 127.0.0.1:6382:1
redis2:
listen: 0.0.0.0:10000
redis: true
hash: fnv1a_64
distribution: ketama
auto_eject_hosts: false
timeout: 400
servers:
- 127.0.0.1:6379:1
- 127.0.0.1:6380:1
- 127.0.0.1:6381:1
- 127.0.0.1:6382:1 你可以同時開啟多個 Twemproxy 實例,它們都可以進行讀寫,這樣你的應用程序就可以完全避免所謂的單點故障。
http://blog.csdn.net/hguisu/article/details/9174459/
|