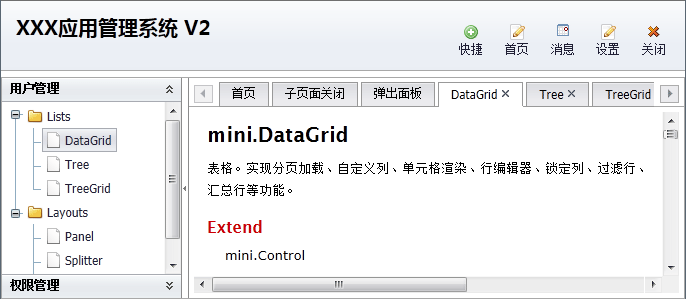
主框架布局之:OutlookTree

參考示例:主框架布局之:OutlookTree
一:創建界面布局
<!--Layout-->
<div id="layout1" class="mini-layout" style="width:100%;height:100%;">
    <div class="header" region="north" height="70" showSplit="false" showHeader="false">
    </div>
    <div title="south" region="south" showSplit="false" showHeader="false" height="30" >
    </div>
    <div title="center" region="center" bodyStyle="overflow:hidden;">
        <!--Splitter-->
        <div class="mini-splitter" style="width:100%;height:100%;" borderStyle="border:0;">
            <div size="180" maxSize="250" minSize="100" showCollapseButton="true">

            </div>
            <div showCollapseButton="false">

            </div>
        </div>
    </div>
</div>
其中,Layout實現上、中、下布局;Splitter實現左、右折疊布局。
二:創建OutlookTree
創建OutlookTree控件,放入Splitter左側區域,作為功能操作樹。
<!--OutlookTree-->
<div id="leftTree" class="mini-outlooktree" url="../data/outlooktree.txt" onnodeselect="onNodeSelect"
    textField="text" idField="id" parentField="pid">
</div>
url從服務端返回JSON格式如下:
[
    {id: "user", text: "用戶管理"},
    {id: "lists", text: "Lists", pid: "user" },
    {id: "datagrid", text: "DataGrid", pid: "lists"},
    {id: "tree", text: "Tree" , pid: "lists"},
    ......
]
通過 "id" 和 "pid" 組成樹形結構,在創建OutlookTree時注意設置 "idField" 和 "parentField" 。三:創建Tabs
創建Tabs控件,放入Splitter右側區域,作為主操作區域。
<!--Tabs-->
<div id="mainTabs" class="mini-tabs bg-toolbar" activeIndex="0" style="width:100%;height:100%;"
    bodyStyle="border:0;background:white;">
    <div title="首頁" url="../../docs/api/overview.html" >
    </div>
</div>
四:監聽處理"nodeselect"事件
function showTab(node) {
    var tabs = mini.get("mainTabs");
    var id = "tab$" + node.id;
    var tab = tabs.getTab(id);
    if (!tab) {
        tab = {};
        tab.name = id;
        tab.title = node.text;
        tab.showCloseButton = true;
        tab.url = node.url;
        tabs.addTab(tab);
    }
    tabs.activeTab(tab);
}

function onNodeSelect(e) {
    var node = e.node;
    var isLeaf = e.isLeaf;

    if (isLeaf) {
        showTab(node);
    }
}


