兩畝三分地

            BlogJava :: 首頁 :: 新隨筆 :: 聯系 :: 聚合  :: 管理 ::
            17 隨筆 :: 20 文章 :: 2 評論 :: 0 Trackbacks

          #

          昨晚中刀了,系統不得不重裝,好在Netbeans啊,MySQL, Tomcat之類的東西裝在其他盤符,所以損失不大。

          一早重灌系統后,試試Netbeans。Tomcat啟動正常,MySQL倒是有點問題。
          Services - Databases - Register MySQL database
          因為MySQL安裝目錄什么都沒有改變,所以MySQL Server Properties 安照之前配置;
          但是配置完畢后MySQL Server at localhost:3306 顯示not connected。
          想想大概是重裝系統后,沒有添加服務的關系,于是在系統里添加路徑,
          然后在Start- command -cmd Dos窗口里直接輸入
          mysqld-nt --install MySQL50 --defaults-file="I:\Program Files\MySQL\MySQL Server 5.0\my.ini" (MySQL安裝在I:\Program Files\MySQL\MySQL Server 5.0\)
          提示Service installed。但是運行service提示:
          ERROR 2003: Can't connect to MySQL server on 'localhost' (10061)
          開始考慮到是不是防火墻關系,關閉防火墻問題依舊,并發現同樣使用localhost的Java DB運行ok,
          想來不是localhost的問題,檢查services 發現MySQL50的服務并沒有運行,再看MySQL服務屬性
          Path to executable的設置上,mysqld-nt的位置被設置在C:\了,問題就在這里,原來服務裝錯了。

          發現問題了,可是如何刪除(修改)服務又成了新問題,在dos窗口想用mysql-nt -remove來刪除服務,提示服務沒有安裝。
          最后只能直接在注冊表里修改的方法:
          Start - command - regedit
          \HKEY_LOCAL_MACHINE\SYSTEM\CurrentControlSet\Services、MySQL50
          ImagePath 將錯誤的路徑改成 
          "I:\Program Files\MySQL\MySQL Server 5.0\bin\mysqld-nt"--defaults-file="I:\Program Files\MySQL\MySQL Server 5.0\my.ini"
           MySQL50
          完了,服務里啟動MySQL50 服務,Netbeans里MySQL連接測試ok!

          總結: 所謂的ERROR 2003: Can't connect to MySQL server on 'localhost' (10061) 估計應該是MySQL服務沒有正常運行造成的,
          所以只要重新正確啟動MySQL服務,問題就迎刃而解了!
          posted @ 2008-08-30 14:02 Chucky 閱讀(11528) | 評論 (0)編輯 收藏

          I have been using Netbeans to write code, draw UML for one and half years. During the period, I can see the functions it provides are getting more and more powerful and the servers and frameworks it supports also become more and more.Rightnow I started to learn framework, since there are much tutorials about using frameworks to develop Web & J2EE applications. I decided to use Netbeans as IDE to learn frameworks. So the first thing I should face to is to install database and server.

          I don't need to spend time on introducing Netbeans. Of course, comparing to Eclipse, Netbeans still has lots spaces need to improve. But to me, Netbeans is no doubted a good and powerful tool for me. The latest version is 6.5 beta, but I think 6.1 Final is enough for studying purpose.


          To MySQL, there is a MySQL GlassFish Bundle Netbeans  on the web. Certainly, we can manually install MySQL community edition.  There is a windows installation pack and zip pack, and we can google many articles about how to install MySQL, normally about how to add MySQL to windows Services.  MySQL GUI Tools is also necessary. About MySQL Java Connector, it is essential as well. But I think Netbeans provides MySQL JDBC Driver - mysql-connector-java-5.1.5-bin.jar already.

          If choose to install 
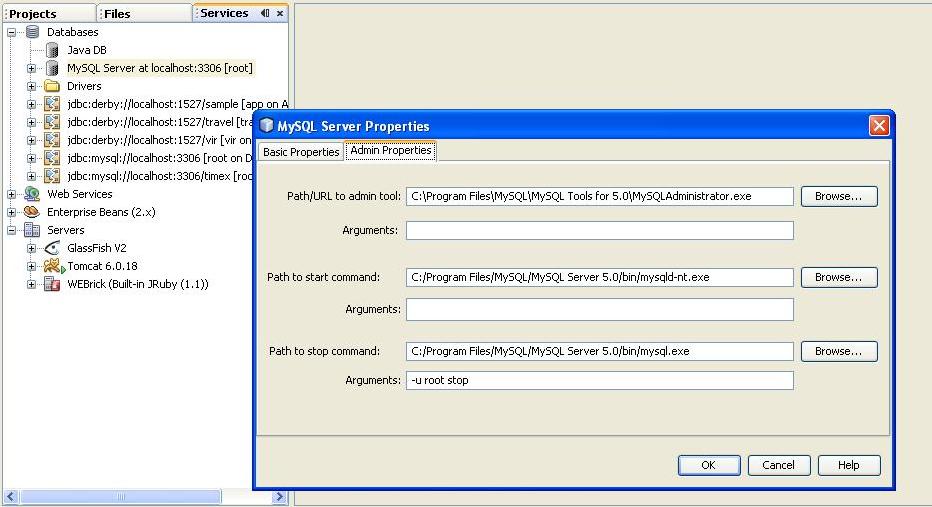
MySQL GlassFish Bundle edition,, we don't need to configure any more but to setup MySQL GUI Tools, as following figure. If manually install MySQL, we need to setup the path of start command and stop command which also can reference to following figure.

          mysql configuration

          Comparing to install MySQL, I think Tomcat is much easier to install.  The  full pack or Web & Java EE Pack Netbeans 6.1 Final edition already had bundled Tomcat 6.0.16。Manual installation is not hard either, and the latest version is Tomcat 6.x . The thing we should notice is that we have better not to install windows installation pack, since the pack missed some batch files. During the configuring server in Netbeans, there would be some warning display. I suggest downloading the zip pack to install. 

          Step by step for configuring server.

          Select Services - Servers - Add Server..  In Add Server Instance window, choose Tomcat 6.0, and  give the name for server then press Next button


          Installation and Login Details dialog window, in Catalina Home field, specify the path of Tomcat and setup user and password. After that, press Finish button to finish the configuration.
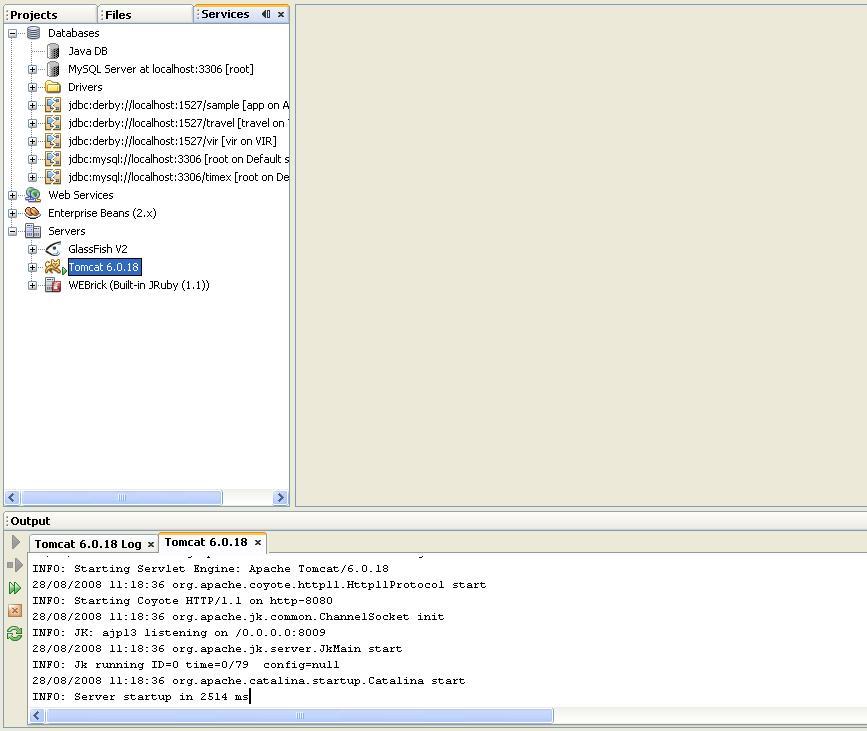

          select Tomcat Server, right-click Start, the information displayed in output window shows the server start successfully.


          Alright, everything is done! How easy it is! Then let's start coding!
          posted @ 2008-08-28 21:40 Chucky 閱讀(605) | 評論 (0)編輯 收藏

          用Netbeans已經一年半了吧,反正一直沒辦法習慣用Eclipse。 這netbeans一直在不停的開發,功能也越來越強大;對不同server 和framework的支持也越來越好。 因為開始學習framework的關系,因為netbeans社區有不少相關的tutorials,所以還是決定用netbeans作為學習用的IDE,自然一上來就是安裝數據庫和Server。大概是Netbeans的普及程度遠不及Eclipse,或者是Netbeans整合的太好了,相對配置實在太簡單了,所以相對Eclipse,和Netbeans相關的配置文章實在太少了。

          Netbeans目前最新版本是6.5beta,一般開發的話6.1 Final很好用了~

          MySQL的話,Netbeans提供了MySQL GlassFish Bundle的版本,當然也可以自己安裝,Windows安裝版的話很好用,zip手動安裝包的話,google上面相關的文章不少,無非就是將 MySQL添加到windows的服務中去。MySQL GUI Tools也是不可以少的。嗯MySQL Java Connector的話,也是需要的。Netbeans里好像已經有這個MySQL JDBC Driver - mysql-connector-java-5.1.5- bin.jar這個lib了。
          如果安裝,配置什么基本沒有什么, 只是在最后要配置一下 MySQL GUI Tools,如圖;手動安裝MySQL的話,MySQL啟動和停止的命令也可以是按照這個配置。
          mysql configuration

          相對MySQL,感覺Tomcat還是很好安裝的,首先6.1 Final的完全包和Web &  Java EE Pack中已經直接綁定了 Tomcat 6.0.16了。當然手動安裝也是可以的,最新版本Tomcat 6.x 。值得注意的是,在下載的時候建議不要選擇windows安裝版本。因為windows安裝版本缺少幾個batch file,在配置 netbeans的時候會被warning的,本著盡量省心省力的原則,多一事不如少一事。

          選中Services - Servers - Add Server..  在Add Server Instance 對話框中 選擇Tomcat 6.0后,填寫Server的名字,按 Next


          Installation and Login Details 對話框, Catalina Home 指定Tomcat的安裝目錄,Login Details設置用戶及密碼。按Finish完成配置。

          選中Tomcat Server,右鍵start; Output windows 顯示Server Start 正常!

          好了,Server和MySQL已經搞定了,后面就是framework的學習了~
          posted @ 2008-08-28 16:09 Chucky 閱讀(433) | 評論 (0)編輯 收藏

          僅列出標題
          共4頁: 上一頁 1 2 3 4 
          主站蜘蛛池模板: 宜良县| 荔波县| 清河县| 威海市| 中阳县| 温宿县| 南昌县| 松潘县| 清河县| 长春市| 东宁县| 将乐县| 德保县| 大悟县| 汉寿县| 井冈山市| 邹城市| 青岛市| 资溪县| 封丘县| 天台县| 镇巴县| 崇州市| 肥城市| 恭城| 淮滨县| 鞍山市| 甘肃省| 台山市| 突泉县| 温宿县| 杭锦旗| 惠来县| 乌鲁木齐县| 栾城县| 垣曲县| 仪征市| 高邮市| 涟水县| 图们市| 浦江县|