TestNG環(huán)境搭建以及框架初識
TestNG的英文為Test Next Generation, 聽上去好像下一代測試框架已經(jīng)無法正常命名了的樣子,哈哈,言歸正傳,啥是TestNG呢,它是一套測試框架,在原來的Junit框架的思想基礎(chǔ)上開發(fā)的新一代測試框架,既然這么牛b,那果斷弄來試試。本文主要從安裝步驟-->第一個測試?yán)?->再多一點(diǎn)例子-->框架分析-->suite文件的書寫-->總結(jié)結(jié)束。
安裝步驟:
1. 第一步,當(dāng)然首先是在你的java sdk, eclipse ide, system environment,都已經(jīng)配置好了的情況下進(jìn)行, 這些本人早就搭建好了,為了體現(xiàn)手把手教學(xué),這里附加上本人的開發(fā)環(huán)境參數(shù):os: win 8, java_version: 1.7, path: (added), eclipse_version: 4.3.1, 好了,其實只要裝好這些就行了,版本么,再說,哈哈,開工
2. 第二步,去官網(wǎng)download一個TestNG插件,這個工作在eclipse內(nèi)完成,點(diǎn)擊help->install new software,緊接著填上http://beust.com/eclipse
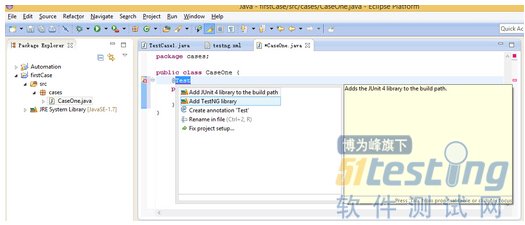
然后一路next到finish。好了TestNG插件裝上了,為了check一下是否正常工作,新建一個空的工程,然后再新建一個一個TestNG類試一下,如果能夠正常建立,那么就成功了,步驟:file->new->Other,會看到
如果這個看到了,那么okay,恭喜你,可以開工寫測試的case了,至此,環(huán)境搭建完成。
第一個測試?yán)樱?/strong>
點(diǎn)擊src包上右擊,新建一個類,->new->class,包名就叫cases吧,類名就叫CaseOne吧不要main方法,然后finish
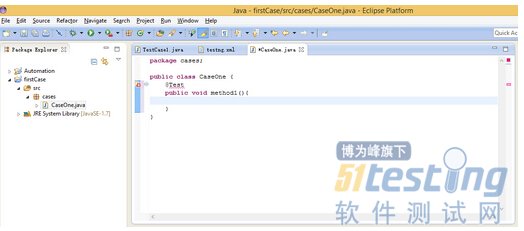
寫第一個TestNG的帶有@Test的方法如圖

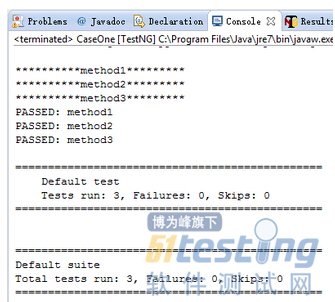
這樣前面的case沒通過,后面的當(dāng)然也不會過,比如將注釋掉的那句代碼去掉就不會通過執(zhí)行后面兩case了。
我們還可以對method進(jìn)行分組,如
@Test(groups={"group1"})
這樣就不用像方法3那樣倚賴寫一大串了,只需要一個group的名字便可以了。
框架分析
再來看看別的annotation吧!上代碼
package cases; import org.testng.annotations.AfterClass; import org.testng.annotations.AfterMethod; import org.testng.annotations.AfterTest; import org.testng.annotations.BeforeClass; import org.testng.annotations.BeforeMethod; import org.testng.annotations.BeforeTest; import org.testng.annotations.Test; public class TestCase2 { @BeforeTest public void setUp(){ System.out.println("*******before********"); } @BeforeMethod public void beforeMethod(){ System.out.println("*******beforeMethod********"); } @AfterMethod public void afterMethod(){ System.out.println("*******aftermethod********"); } @Test public void t1(){ System.out.println("*********t1**********"); } @Test public void t2(){ System.out.println("*********t2**********"); } @BeforeClass public void beforeClass(){ System.out.println("*****beforeClass*****"); } @AfterClass public void afterClass(){ System.out.println("*****afterClass*****"); } @AfterTest public void finish(){ System.out.println("*******finish********"); } } |
運(yùn)行得到結(jié)果如下
*******before******** *****beforeClass***** *******beforeMethod******** *********t1********** *******aftermethod******** *******beforeMethod******** *********t2********** *******aftermethod******** *****afterClass***** *******finish******** PASSED: t1 PASSED: t2 =============================================== Default test Tests run: 2, Failures: 0, Skips: 0 =============================================== |
這樣一來咱們就大概的知道了不同的annotation下的方法的執(zhí)行順序了。基本上是@BeforeTest->@BeforeClass->(@BeforeMethod->@Test->@AfterTest)->...重復(fù)()內(nèi)內(nèi)容...->@AfterClass->@AfterTest.好了,框架基本如下,
再多一點(diǎn)例子:
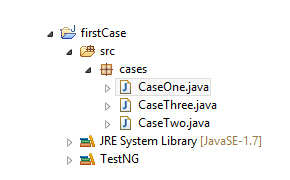
同時建立多個Class,如
如果全部選中,當(dāng)然會從上當(dāng)下的執(zhí)行,但是萬一有些文件我們不想執(zhí)行呢,比如CaseOne中的method1我們想跳過去,那就得寫一個控制文件了,在TestNG中使用xml來控制,在頂級目錄下建一個build.xml文件,內(nèi)容如下
<?xml version="1.0" encoding="UTF-8"?> <!DOCTYPE suite SYSTEM "http://testng.org/testng-1.0.dtd"> <suite name="My Sample Suite"> <test name="First test"> <classes> <class name="cases.CaseOne"></class> </classes> </test> <test name="Second test"> <classes> <class name="cases.CaseTwo"></class> </classes> </test> <test name="Third test"> <classes> <class name="cases.CaseThree"></class> </classes> </test> </suite> 這是按類寫的,當(dāng)然你可以寫的更詳細(xì),指定方法 <?xml version="1.0" encoding="UTF-8"?> <!DOCTYPE suite SYSTEM "http://testng.org/testng-1.0.dtd"> <suite name="My Sample Suite"> <test name="First test"> <classes> <class name="cases.CaseOne"></class> <methods> <include name="method1"/> <include name="method2"/> </methods> </classes> </test> <test name="Second test"> <classes> <class name="cases.CaseTwo"></class> </classes> </test> <test name="Third test"> <classes> <class name="cases.CaseThree"></class> </classes> </test> </suite> |
這樣類CaseOne中的第三個方法會掠過去不執(zhí)行。
總結(jié):
在我看來,TestNG是一個非常好用的測試框架,其測試步驟順序很規(guī)范,很強(qiáng)大,當(dāng)然還有很多東西要去探索。筆者水平較淺,不足之處,大家海涵!
posted on 2014-09-02 09:46 順其自然EVO 閱讀(9848) 評論(0) 編輯 收藏 所屬分類: 測試學(xué)習(xí)專欄


