Appium Server源碼分析之作為Bootstrap客戶端
它是個http服務器,它專門接收從客戶端通過基于http的REST協議發送過來的命令
他是bootstrap客戶端:它接收到客戶端的命令后,需要想辦法把這些命令發送給目標安卓機器的bootstrap來驅動uiatuomator來做事情
通過上一篇文章《Appium Server 源碼分析之啟動運行Express http服務器》我們分析了Appium Server是如何作為一個http服務器進行工作的。那么今天我們就要分析第二點,Appium Server是怎么作為bootstrap的客戶端來向目標安卓機器的bootstrap發送命令以驅動uiautomator框架來做事情的
1. MVC設計模式中的Controller及路由Routing
在我們上一篇文章描述appium server在啟動http服務器的過程中,實例化appium 服務器后,下一步就是要設置好從client端過來的請求的數據路由了:
var main = function (args, readyCb, doneCb) {
...
routing(appiumServer);
...
}
這里大家要有MVC設計模式這個背景知識,我相信大家做過界面應用或者網站編程的話應該很熟悉這種解藕降低依賴的著名設計模式,如果不清楚的話請自行百度谷歌。這里我會簡要摘錄下在我們這個http服務器中Controller扮演的角色:MVC的核心就是Controller(控制器),它負責處理http客戶端傳送過來的所有請求,并決定要將什么內容響應給http客戶端。但Controller并不負責決定內容應該如何顯示,而是將特定形態的內容響應給MVC架構,最后才由MVC架構依據響應的形態來決定如何將內容響應給http客戶端。如何決定響應內容是View的責任。
nodejs的express架構就是采用了MVC框架的,所以這里才有了我們的Routing,我們先找到對應的Routing文件,然后進去看看。我們先看main.js的比較前的變量定義部分:
var http = require('http') , express = require('express') , ... , routing = require('./routing.js') 可以看到routing是在main.js所在目錄的routing.js文件里導出來的,我們打開該文件: var controller = require('./controller.js'); module.exports = function (appium) { var rest = appium.rest; var globalBeforeFilter = controller.getGlobalBeforeFilter(appium); // Make appium available to all REST http requests. rest.all('/wd/*', globalBeforeFilter); routeNotYetImplemented(rest); rest.all('/wd/hub/session/*', controller.sessionBeforeFilter); rest.get('/wd/hub/status', controller.getStatus); rest.post('/wd/hub/session', controller.createSession); rest.get('/wd/hub/session/:sessionId?', controller.getSession); rest.delete('/wd/hub/session/:sessionId?', controller.deleteSession); rest.get('/wd/hub/sessions', controller.getSessions); rest.get('/wd/hub/session/:sessionId?/context', controller.getCurrentContext); rest.post('/wd/hub/session/:sessionId?/context', controller.setContext); rest.get('/wd/hub/session/:sessionId?/contexts', controller.getContexts); rest.post('/wd/hub/session/:sessionId?/element', controller.findElement); rest.post('/wd/hub/session/:sessionId?/elements', controller.findElements); rest.post('/wd/hub/session/:sessionId?/element/:elementId?/value', controller.setValue); rest.post('/wd/hub/session/:sessionId?/element/:elementId?/click', controller.doClick); ... |
路由一開始就指定了我們MVC的處理http客戶端過來的Controller是controller.js這個javascript腳本
然后從上面調用穿進來的appiumServer中取出express實例并賦給rest這個變量
然后設置gloabalBeforeFilter這個控制器來處理客戶端過來的而在這個routing文件中沒有定義的請求的情況
在往下就是定義客戶端過來的各種請求的controller處理方法了,比如最下面那個客戶端請求對一個控件進行點擊操作。這里就不一一列舉了。這里要注意的是其中大問號的都是代表變量,真正的值是客戶端傳送過來的時候賦予的,所以解析的時候可以直接取elementId就能得到真正的值了。
這里有一點我覺得需要跟蹤下去的是上面的controller.getGlobalBeforeFilter(appium)這個調用,因為這個方法里面設置了appium server的一個很重的成員變量:
exports.getGlobalBeforeFilter = function (appium) {
return function (req, res, next) {
req.appium = appium;
req.device = appium.device;
...
};
};
就是把appium的device這個成員變量賦予給了nodejs提供的req這個request的device這個變量,當前在沒有啟動一個與boostrap的session前這個值為null,但往后appium.device將會賦予android這個對象,而因為上面代碼的賦值是對象賦值,所以在javascript會是指針傳遞,那么也就是說最后appium.device被賦值了android對象就相當于req.device被賦予了android這個對象。這個是后話,下面你會跟到這些賦值的變化的了。
2. 創建Appium任務隊列Work Queue
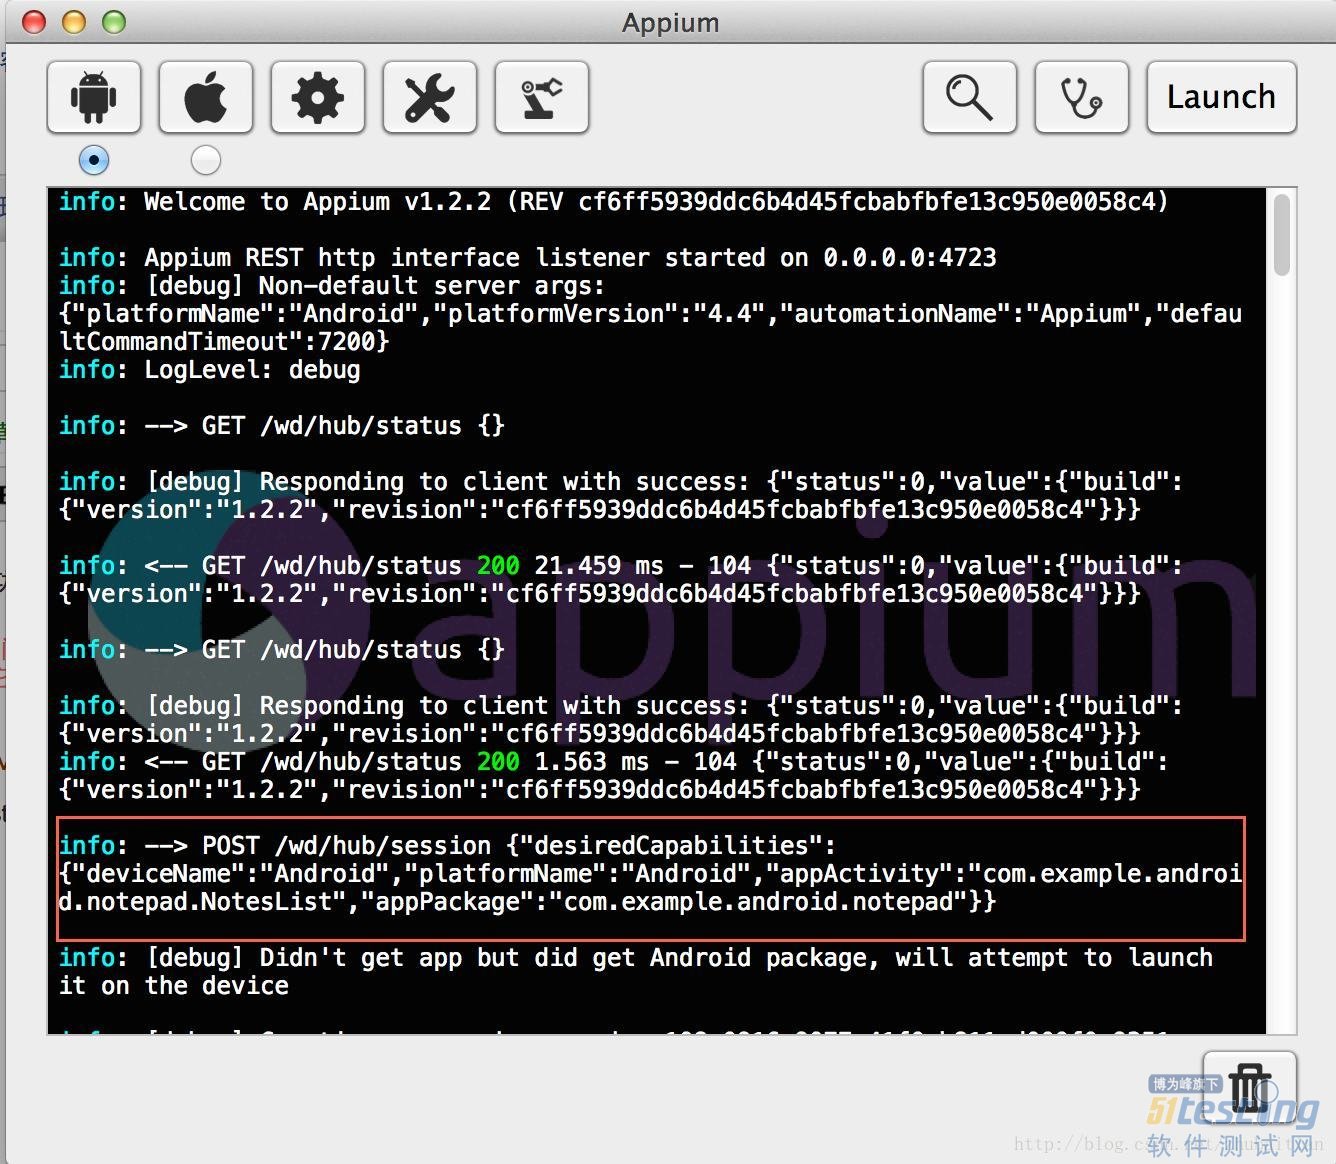
appium server和bootstrap的連接在什么時候開始建立呢?其實這個需要由appium client端來進行啟動。也就是說如果你只是啟動appium這個應用的話,它是不會嘗試和目標安卓機器的bootstrap進行連接的,而一旦我們準備運行一個腳本的時候,appium cilent端就會立刻先發送一個創建與bootstrap回話的請求“/wd/hub/session”請求過來:
這個appium client創建session的請求所帶的參數就是我們腳本中設置好的capabilities,在我的例子中是這些:
DesiredCapabilities capabilities = new DesiredCapabilities();
capabilities.setCapability("deviceName","Android");
capabilities.setCapability("appPackage", "com.example.android.notepad");
capabilities.setCapability("appActivity", "com.example.android.notepad.NotesList");
driver = new AndroidDriver(new URL("http://127.0.0.1:4723/wd/hub"), capabilities);
往下我們就跟蹤下創建session在routing路由表里對應的controller是怎么實現和bootstrap的通信的,但是其實在真正實現通信之前,appium需要先去初始化一個async庫的queue隊列來排隊我們需要發送到bootstrap的命令任務,我們下面會一步步看這個隊列是怎么建立起來的。
我們先找到routing中對應的controller方法:
rest.post('/wd/hub/session', controller.createSession);
處理函數是controller的createSession這個方法,我們進去看看:
exports.createSession = function (req, res) {
if (typeof req.body === 'string') {
req.body = JSON.parse(req.body);
}
...
req.appium.start(req.body.desiredCapabilities, function (err, instance) { ...
}
它會先取得http client發過來的request的body,也就是上面包含我們的capabilities的那一串鍵值對組成的字符串了。然后將這些鍵值對轉換成JSON格式,最后就以這些capabilities作為參數來調用req.appium的start方法,還記得req.appium是在哪里賦值的嗎?對,就在上面初始化routing的時候調用的‘controller.getGlobalBeforeFilter“這個方法里面了,初始化成我們在啟動http服務器時創建的那個appium server了(如果不清楚appium server是在啟動http服務器過程中什么時候創建的,請查看上一篇文章)。好我們跳進該方法繼續往下看:
Appium.prototype.start = function (desiredCaps, cb) { var configureAndStart = function () { this.desiredCapabilities = new Capabilities(desiredCaps); this.updateResetArgsFromCaps(); this.args.webSocket = this.webSocket; // allow to persist over many sessions this.configure(this.args, this.desiredCapabilities, function (err) { if (err) { logger.debug("Got configuration error, not starting session"); this.cleanupSession(); cb(err, null); } else { this.invoke(cb); } }.bind(this)); }.bind(this); if (this.sessionId === null) { configureAndStart(); } else if (this.sessionOverride) { logger.info("Found an existing session to clobber, shutting it down " + "first..."); this.stop(function (err) { if (err) return cb(err); logger.info("Old session shut down OK, proceeding to new session"); configureAndStart(); }); } else { return cb(new Error("Requested a new session but one was in progress")); } }; |
代碼開始就是些根據傳進來的capabilites參數初始化一個Capabilities對象之類的,這里Capabilities這個類值得一提的地方是它定義了一系列的capability,其中有一類是我們在測試腳本中必須填寫的:
var requiredCaps = [
'platformName'
, 'deviceName'
];
也就是說其他的capability我們在腳本中可以根據需求取配置填寫,但是這兩個是必須的,硬性要求的。其實根據我對現有源碼的研究,在安卓上面只有platformName是必須的,deviceName只有在ios上面才會用到,只是為了保持一致性,測試安卓時還是需要傳進來而已,但是無論你設置什么值都沒有影響。
好,我們繼續往下看,Appium類的start方法在實例化好Capabilities類后,往下有幾步非常重要:
第一步:通過調用configure方法來初始化Android設備類,Android設備類的實例維護的Appium Work Queue
第二步:通過調用invoke方法建立好uiautomator類與bootstrap的連接
Appium.prototype.configure = function (args, desiredCaps, cb) {
var deviceType;
try {
deviceType = this.getDeviceType(args, desiredCaps);
...
}
...
this.device = this.getNewDevice(deviceType);
this.device.configure(args, desiredCaps, cb);
...
};
configure首先會去調用Appium類的getDeviceType這個方法,而這個方法最終又會去調用getDeviceTypeFromPlatform這個方法:
Appium.prototype.getDeviceTypeFromPlatform = function (caps) {
var device = null;
switch (caps) {
case 'ios':
device = DT_IOS;
break;
case 'android':
device = DT_ANDROID;
break;
case 'firefoxos':
device = DT_FIREFOX_OS;
break;
}
return device;
};
可以看到我們支持的platform就三個,所以我們在測試腳本設置capabilities選項的時候別填錯了:
ios
android
firefox
最終返回的device定義如下,其實就是一些對應的字串:
var DT_IOS = "ios"
, DT_SAFARI = "safari"
, DT_ANDROID = "android"
, DT_CHROME = "chrome"
, DT_SELENDROID = "selendroid"
, DT_FIREFOX_OS = "firefoxos";
但是別小看這些字串,我們下面會看到就是通過他們來實例化對應的設備類的。
在獲得deviceType后,configure方法下一個重要的步驟就是去根據這個deviceType字串去調用getNewDevice這個方法獲得或者叫做創建一個對應的設備對象了:
Appium.prototype.getNewDevice = function (deviceType) { var DeviceClass = (function () { switch (deviceType) { case DT_IOS: return IOS; case DT_SAFARI: return Safari; case DT_ANDROID: return Android; case DT_CHROME: return Chrome; case DT_SELENDROID: return Selendroid; case DT_FIREFOX_OS: return FirefoxOs; default: throw new Error("Tried to start a device that doesn't exist: " + deviceType); } })(); return new DeviceClass(); }; |
DeviceClass這個變量是通過匿名函數返回的一個別的地方export出來的一個對象,比如以DT_ANDROID這個deviceType為例子,它返回的是Android,而Android的定義是:
, Android = require('./devices/android/android.js')
而android.js導出來的其實就是Android這個類:
var Android = function () {
this.init();
};
...
module.exports = Android;
最終getNewDevice這個方法通過new DeviceClass()對設備類進行實例化,事實上就是相當于new Android(),在我們這個例子中。那么在實例化Android這個設備類的時候其構造函數調用init方法又做了什么事情呢?
Android.prototype.init = function () {
...
this.args.devicePort = 4724;
...
this.initQueue();
...
this.adb = null;
...
this.uiautomator = null;
...
}
Android類的init方法會初始化一大堆成員變量,在這里我們列出幾個我們這篇文章需要關注的:
args.devicePort:指定我們pc端forward到bootstrap的端口號4724
adb:Android Debug Bridge實例,初始化為null,往后很進行設置
uiautomator:初始化為空,往后會設置成uiautomator類的實例,轉本處理往bootstrap發送接收命令的事情
當中還調用了一個initQueue方法來把Appium的Work Queue給初始化了,這個Work Queue其實就是nodejs的async這個庫的queue這個流程控制對象。首先,我們要搞清楚我們為什么需要用到這個queue呢?我們知道nodejs是異步執行框架的,如果不做特別的處理的話,我們一下子來了幾個命令如“1.點擊按鈕打開新頁面;2.讀取新頁面讀取目標控件內容和預期結果比較”,那么nodejs就會兩個命令同時執行,但不保證誰先占用了cpu完成操作,那么問題就來了,如果在準備執行1之前,cpu調度切換到2,那么我們的腳本就會失敗,因為我們1還沒有執行完,新頁面還沒有打開!
而async這個庫的不同對象就是專門針對這些問題提供的解決辦法,比如waterfals,auto,serials和queue等,其他的我暫時沒有碰到,所以不清楚,至于queue是怎么運作的,我們摘錄下網上的一個解析:
queue: 是一個串行的消息隊列,通過限制了worker數量,不再一次性全部執行。當worker數量不夠用時,新加入的任務將會排隊等候,直到有新的worker可用。
這里worker決定了我們一次過能并行處理queue里面的task的數量,我們看下Appium的Work Queue的worker是多少:
Android.prototype.initQueue = function () { this.queue = async.queue(function (task, cb) { var action = task.action, params = task.params; this.cbForCurrentCmd = cb; if (this.adb && !this.shuttingDown) { this.uiautomator.sendAction(action, params, function (response) { this.cbForCurrentCmd = null; if (typeof cb === 'function') { this.respond(response, cb); } }.bind(this)); } else { this.cbForCurrentCmd = null; var msg = "Tried to send command to non-existent Android device, " + "maybe it shut down?"; if (this.shuttingDown) { msg = "We're in the middle of shutting down the Android device, " + "so your request won't be executed. Sorry!"; } this.respond({ status: status.codes.UnknownError.code , value: msg }, cb); } }.bind(this), 1); }; |
從倒數第2行我們可以看到worker是1,也就是一次過appium只會處理一個task,其他push進去的task只能等待第一個task處理完。那么這樣就清楚了,我們剛才提到的兩個命令,只要保證1先于2入隊列,那么在異步執行的nodejs框架中就能保證1會先于2而執行。
說到執行,其實就是初始化queue的第一個匿名函數的參數,而第二個參數就是上面提到的worker的數量了,那我們繼續看下這個執行函數是怎么執行的。
首先它會從push進來的task中取出action和params兩個參數(其實這兩個就是要一個命令的主要組成部分),我們在第4小節會描述一個task是怎么push進來的
然后到最重要的一行代碼就是調用了uiautomator的sendAction方法,當然這里我們還在初始化階段,所以并沒有任務可以執行。我們在第4小節會描述action是怎么發送出去的
那么到現在為止Appium在調用start方法啟動時的第一步configure算是完成了,往下就要看第二步,
3. 建立Appium Server和Bootstrap的連接
我們先進入Appium類的invoke這個方法,這個方法是在第2節初始化Appium Work Queue等configuration成功的基礎上才會執行的。
Appium.prototype.invoke = function (cb) { this.sessionId = UUID.create().hex; logger.debug('Creating new appium session ' + this.sessionId); if (this.device.args.autoLaunch === false) { ... } else { // the normal case, where we launch the device for folks var onStart = function (err, sessionIdOverride) { if (sessionIdOverride) { this.sessionId = sessionIdOverride; logger.debug("Overriding session id with " + JSON.stringify(sessionIdOverride)); } if (err) return this.cleanupSession(err, cb); logger.debug("Device launched! Ready for commands"); this.setCommandTimeout(this.desiredCapabilities.newCommandTimeout); cb(null, this.device); }.bind(this); this.device.start(onStart, _.once(this.cleanupSession.bind(this))); } }; |
onStart是啟動連接上設備后的回調,重要的是最后面的一行,從上一節我們知道appium現在保存的設備類其實已經是Android類了,它調用device的start其實就是調用了Android實例的start,我們跳到/devices/android/android.js看下這個start做了什么:
Android.prototype.start = function (cb, onDie) { this.launchCb = cb; this.uiautomatorExitCb = onDie; logger.info("Starting android appium"); if (this.adb === null) { this.adb = new ADB(this.args); } if (this.uiautomator === null) { this.uiautomator = new UiAutomator(this.adb, this.args); this.uiautomator.setExitHandler(this.onUiautomatorExit.bind(this)); } logger.debug("Using fast reset? " + this.args.fastReset); async.series([ this.prepareDevice.bind(this), this.packageAndLaunchActivityFromManifest.bind(this), this.checkApiLevel.bind(this), this.pushStrings.bind(this), this.processFromManifest.bind(this), this.uninstallApp.bind(this), this.installAppForTest.bind(this), this.forwardPort.bind(this), this.pushAppium.bind(this), this.initUnicode.bind(this), this.pushSettingsApp.bind(this), this.pushUnlock.bind(this), this.uiautomator.start.bind(this.uiautomator), this.wakeUp.bind(this), this.unlock.bind(this), this.getDataDir.bind(this), this.setupCompressedLayoutHierarchy.bind(this), this.startAppUnderTest.bind(this), this.initAutoWebview.bind(this) ], function (err) { if (err) { this.shutdown(function () { this.launchCb(err); }.bind(this)); } else { this.didLaunch = true; this.launchCb(null, this.proxySessionId); } }.bind(this)); }; |
這個方法很長,但做的事情也很重要:
建立adb,代碼跟蹤進去可以見到建立adb不是在appium server本身的源碼里面實現的,調用的是另外一個叫"appium-adb"的庫,我手頭沒有源碼,所以就不去看它了,但是不用看我都猜到是怎么回事,無非就是像本人以前分析《MonkeyRunner源碼分析之啟動》時分析chimpchat一樣,把adb給封裝一下,然后提供一些額外的方便使用的方法出來而已
創建uiautomator這個底層與bootstrap和目標機器交互的類的實例,既然需要和目標機器交互,那么剛才的adb時必須作為參數傳進去的了。大家還記得上面提到的在初始化Android這個設備類的時候uiautomator這個變量時設置成null的吧,其實它是在這個時候進行實例化的。這里有一點需要注意的是systemPort這個參數,appium server最終與bootstrap建立的socket連接的端口就是它,現在傳進來的就是
var UiAutomator = function (adb, opts) {
this.adb = adb;
this.proc = null;
this.cmdCb = null;
this.socketClient = null;
this.restartBootstrap = false;
this.onSocketReady = noop;
this.alreadyExited = false;
this.onExit = noop;
this.shuttingDown = false;
this.webSocket = opts.webSocket;
this.systemPort = opts.systemPort;
this.resendLastCommand = function () {};
};
往下我們會看到nodejs流程控制類庫async的另外一個對象series,這個有別于上面用到的queue,因為queue時按照worker的數量來看同時執行多少個task的,而series時完全按順序執行的,所以叫做series
這個series 要做的事情就多了,主要就是真正運行時的環境準備,比如檢查目標及其api的level是否大于17,安裝測試包,bootstrap端口轉發,開始測試目標app等,如果每個都進行分析的話大可以另外開一個系列了。這個不是不可能,今后看我時間吧,這里我就分析跟我們這個小節密切相關的uiautomator.start這個方法,其實其他的大家大可以之后自行分析。
往下分析之前大家要注意bind的參數
this.uiautomator.start.bind(this.uiautomator),
大家可以看到bind的參數是當前這個Android實例的uiautomator這個對象,所以最終start這個方法里面用到的所有的this指得都是Android這個實例的uiautomator對象。
UiAutomator.prototype.start = function (readyCb) { logger.info("Starting App"); this.adb.killProcessesByName('uiautomator', function (err) { if (err) return readyCb(err); logger.debug("Running bootstrap"); var args = ["shell", "uiautomator", "runtest", "AppiumBootstrap.jar", "-c", "io.appium.android.bootstrap.Bootstrap"]; this.alreadyExited = false; this.onSocketReady = readyCb; this.proc = this.adb.spawn(args); this.proc.on("error", function (err) { logger.error("Unable to spawn adb: " + err.message); if (!this.alreadyExited) { this.alreadyExited = true; readyCb(new Error("Unable to start Android Debug Bridge: " + err.message)); } }.bind(this)); this.proc.stdout.on('data', this.outputStreamHandler.bind(this)); this.proc.stderr.on('data', this.errorStreamHandler.bind(this)); this.proc.on('exit', this.exitHandler.bind(this)); }.bind(this)); }; |
UiAutomator的實例在啟動的時候會先通過傳進來的adb實例spawn一個新進程來把bootstrap給啟動起來,啟動的詳細流程這里就不談了,大家可以看本人之前的文章《Appium Android Bootstrap源碼分析之啟動運行》
啟動好bootstrap之后,下面就會設置相應的事件處理函數來處理adb啟動的bootstrap在命令行由標準輸出,錯誤,以及退出的情況,注意這些輸出跟bootstrap執行命令后返回給appium server的輸出是沒有半毛錢關系的,那些輸出是通過socket以json的格式返回的。
這里我們看下outputStreamHandler這個收到標準輸出時的事件處理函數,這個函數肯定是會觸發的,你可以去adb shell到安卓機器上面通過uiatuomator命令啟動bootstrap看下,你會看到必然會有相應的標準輸出打印到命令行中的,只是在這里標準輸出被這個函數進行處理了,而不是像我們手動啟動那樣只是打印到命令行給你看看而已。
UiAutomator.prototype.outputStreamHandler = function (output) {
this.checkForSocketReady(output);
this.handleBootstrapOutput(output);
};
很簡短,僅僅兩行,第二行就是剛才說的去處理bootstrap本應打印到命令行的其他標準輸出。而第一行比較特殊,注意它的輸入參數也是ouput這個標準輸出數據,我們進去看看它要干嘛:
UiAutomator.prototype.checkForSocketReady = function (output) {
if (/Appium Socket Server Ready/.test(output)) {
this.socketClient = net.connect(this.systemPort, function () {
this.debug("Connected!");
this.onSocketReady(null);
}.bind(this));
this.socketClient.setEncoding('utf8');
...
}
};
它做的第一件事情就是去檢查啟動bootstrap 的時候標準輸出有沒有"Appium Socket Server Ready"這個字符串,有就代表bootstrap已經啟動起來了,沒有的話這個函數就直接finish了。
為了印證,我們可以在adb shell中直接輸入下面命令然后看該字串是否真的會出現:
uiautomator runtest AppiumBootstrap.jar -c io.appium.android.bootstrap.Bootstrap
輸入如下,果不其然:
在確保bootstrap已經啟動起來后,下一個動作就是我們這一小節的目的,通過調用nodejs標準庫的方法net.connect去啟動與bootstrap的socket連接了:
this.socketClient = net.connect(this.systemPort, function () {
UiAutomator實例,也就是Android類實例的uiautomator對象,所擁有的socketClient就是appium server專門用來與bootstrap通信的實例。這里的this.systemPort就是4724,至于為什么,我就不回答了,大家去再跟蹤細點就知道了
4. 往Bootstrap發送命令
既然任務隊列已經初始化,與boostrap通信的socket也建立妥當了,那么現在就是時候看一個實例來看下appium server是如何在接受到appium client的rest命令后,往bootstrap那邊去灌命令的了。
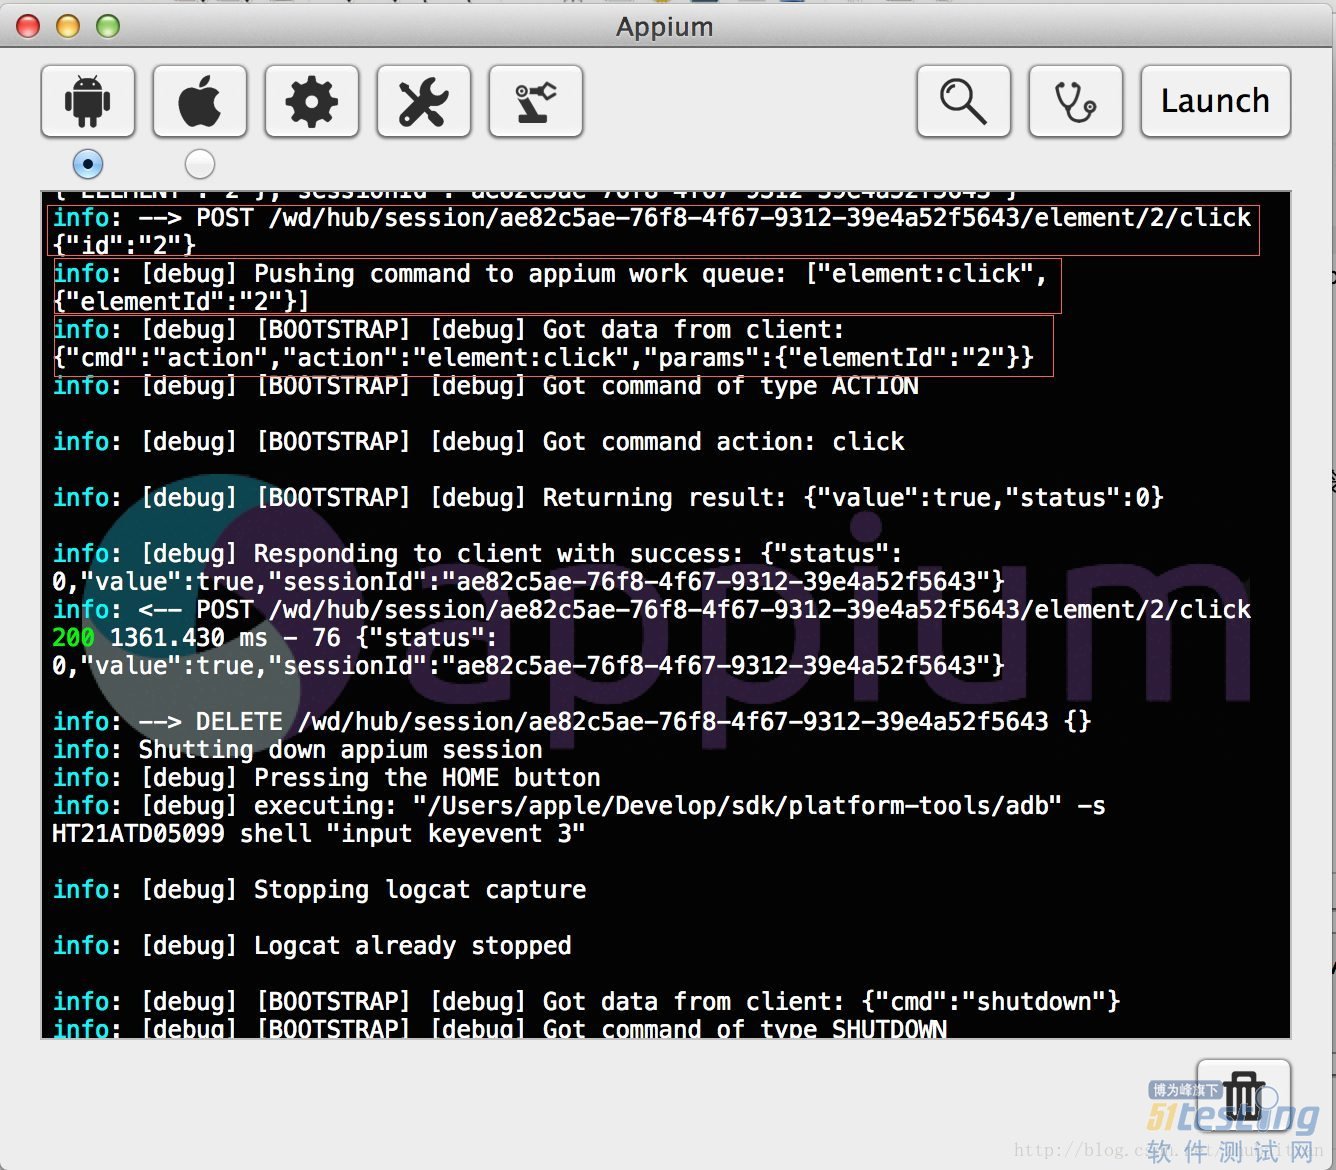
開始之前我們先看下debug log,看下appium client端發送過來的命令及相關的輸出:
我們可以看到client端發送過來的命令是:
info: --> POST /wd/hub/session/ae82c5ae-76f8-4f67-9312-39e4a52f5643/element/2/click {"id":"2"}
那么我們參照路由routing表查找到對應的處理controller:
rest.post('/wd/hub/session/:sessionId?/element/:elementId?/click', controller.doClick);
對應的處理方法是controller.doClick。注意這里前面一部分是http request的body,后面一部分是params。
這里我們可以回顧下上面說過的打問好的是變量,會用真實的值進行替代的,如在我們的例子中:
sessionId:ae82c5ae-76f8-4f67-9312-39e4a52f5643
elementId: 2
從這些參數我們可以知道appium client端需要appium server幫忙處理的事情是:請在當前這個session中點擊當前界面的bootstrap那邊的控件哈稀表鍵值為2的控件(至于控件哈稀表這個概念如果不清楚的勞煩你先去看下本人的這篇文章《Appium Android Bootstrap源碼分析之控件AndroidElement》)
ok,往下我們進入這個doClick方法進行分析:
exports.doClick = function (req, res) {
var elementId = req.params.elementId || req.body.element;
req.device.click(elementId, getResponseHandler(req, res));
};
第一行是把client傳送過來的控件在bootstrap中的控件哈稀表key解析出來,至于為什么需要傳兩個一樣的值然后進行或,我還沒有看appium client端的代碼,所以這里解析不了,也許今后有時間分析client代碼的話會給大家說明白。但在這里你只需要知道這個elementId是怎么回事做什么用的就夠了,這個不影響我們去理解appium server的運行原理。
第二行去調用nodejs提供的http request對象的device的click方法,這個device是什么呢?這個大家不記得的話請翻看第1節我們在初始化路由表的時候調用的getGlobalBeforeFilter方法中是把Appium對西那個的device對象賦予給了了這個request.device對象的:
req.device = appium.device;
而appium.device對象又是在第2節在start Appium實例時通過其configuration等一系列調用中初始化的,最終在我們安卓環境中就是初始化成Android這個設備類的實例,而Android這個類又extend了android-controller.js里面的所有方法:
...
, androidController = require('./android-controller.js')
...
_.extend(Android.prototype, androidController);
所以最終的click落實到了android-controller.js里面也就是androidController對象的click方法:
androidController.click = function (elementId, cb) {
this.proxy(["element:click", {elementId: elementId}], cb);
};
只有一行,調用的是proxy這個方法,跳進去:
exports.proxy = function (command, cb) {
logger.debug('Pushing command to appium work queue: ' + JSON.stringify(command));
this.push([command, cb]);
};
所做的事情就是直接把剛才那傳命令作為一個task來push到上面提到的async.queue這個Apium Work Queue里面。
其實到了這里,click的處理已經完成任務了,因為這個queue不是由click的相關處理controller來控制的,它只是負責把這個任務加入到隊列,而真正去隊列取出任務進行執行的是我們上面第2節最后面提到的初始化async queue的時候的第一個參數,而那個參數是個匿名函數,沒當有一個task進入隊列需要執行之前都會去調用這個方法,我們回顧下:
Android.prototype.initQueue = function () { this.queue = async.queue(function (task, cb) { var action = task.action, params = task.params; this.cbForCurrentCmd = cb; if (this.adb && !this.shuttingDown) { this.uiautomator.sendAction(action, params, function (response) { this.cbForCurrentCmd = null; if (typeof cb === 'function') { this.respond(response, cb); } }.bind(this)); } else { this.cbForCurrentCmd = null; var msg = "Tried to send command to non-existent Android device, " + "maybe it shut down?"; if (this.shuttingDown) { msg = "We're in the middle of shutting down the Android device, " + "so your request won't be executed. Sorry!"; } this.respond({ status: status.codes.UnknownError.code , value: msg }, cb); } }.bind(this), 1); }; |
取得傳進來的task相關鍵值,在我們這個例子中就是:
action:"element:click"
params:"{elementId:2"}
然后調用uiatutomator的sendAction方法,并把以上兩個參數給傳進去:
UiAutomator.prototype.sendAction = function (action, params, cb) {
if (typeof params === "function") {
cb = params;
params = {};
}
var extra = {action: action, params: params};
this.sendCommand('action', extra, cb);
};
將參數組合成以下并傳給sendCommand:
參數1:‘action’
參數2:'{action:action,parames:{elementId:2}'
進入sendCommand:
UiAutomator.prototype.sendCommand = function (type, extra, cb) { ... else if (this.socketClient) { ... var cmd = {cmd: type}; cmd = _.extend(cmd, extra); var cmdJson = JSON.stringify(cmd) + "\n"; this.cmdCb = cb; var logCmd = cmdJson.trim(); if (logCmd.length > 1000) { logCmd = logCmd.substr(0, 1000) + "..."; } this.debug("Sending command to android: " + logCmd); this.socketClient.write(cmdJson); } ... } |
根據傳進來的參數,最終組合成以下參數通過第3節初始化好的與bootstrap進行socket通信的socketClient來往bootstrap灌入命令:
{"cmd":"action","action":element:click","params":{"elementId":"2"}}
大家對比下圖看下高亮圈住的最后一行由bootstrap打印出來的接收到的json命令字串,它們是絕對吻合的:
往下的事情就由bootstrap進行處理了,至于不清楚bootstrap怎么處理這些命令的,請查看我上一個bootstrap源碼分析系列。
5. 小結
通過本文我們了解了appium server作為bootstrap的客戶端,同時又作為appium client的服務器端,是如何處理從client來的命令然后組建成相應的json命令字串發送到bootstrap來進行處理的:
初始化REST路由表來接收appium client過來的REST命令調用并分發給相應的controller方法來進行處理
appium client發送命令之前會先觸發一個創建session的請求,在路由表表現為“rest.post('/wd/hub/session', controller.createSession);”。對應的controller處理方法會開始初始化與bootstrap的連接
創建的session的過程會調用Appium類的start方法然后機型一系列的動作:
初始化設備類Android
用Async庫的queue對象初始化Appium的Work Queue
創建adb實例并啟動adb
安裝測試apk
通過adb啟動bootstrap
建立Appium Server和bootstrap的socket連接
...,等等等等
創建好連接后Appium Server就會接收client過來的命令,比如click,然后對應的controller處理方法就會建立命令對應的task并把它push到async queue里面
一旦有新task進入到async queue,對應的回調函數就會觸發,開始往已經建立的與bootstrap的socket連接發送json字串命令
posted on 2014-12-23 00:14 順其自然EVO 閱讀(3508) 評論(0) 編輯 收藏 所屬分類: 測試學習專欄


