它有:
calabash-android
calabash-ios
主頁: http://calabash.sh
Calabash-android介紹
Calabash-android 是支持 android 的 UI
自動化測試框架,PC 端使用了 cucumber 框架,通過 http 和 json 與模擬器和真機上安裝的測試 apk 通信,測試 apk 調用 Robotium 的方法來進行 UI 自動化測試,支持 webview 操作。
Calabash-android 架構圖
Features —— 這里的 feature 就是 cucumber 的 feature,用來描述 user stories 。
Step Definitions —— Calabash Android 事先已經定義了一些通用的 step。你可以根據自己的需求,定義更加復雜的步驟。
Your app —— 測試之前,你不必對你的應用修改。(這里其實是有問題,后面我們會說到。)
Instrumentation
Test Server —— 這是一個應用,在運行測試的時候會被安裝到設備中去。 這個應用是基于 Android SDK 里的 ActivityInstrumentationTestCase2。它是 Calabash Android 框架的一部分。Robotium 就集成在這個應用里。
Calabash-android 環境搭建
rvm
rbenv
RubyInstaller.org for windows
Android 開發環境
JAVA
Android SDK
Ant
指定 JAVA 環境變量, Android SDK 環境變量(ANDROID_HOME), Ant 加入到 PATH 中去。
安裝 Calabash-android
gem install calabash-android
sudo gem install calabash-android # 如果權限不夠用這個。
如有疑問,請參考: https://github.com/calabash/calabash-android/blob/master/documentation/installation.md
創建 calabash-android 的骨架
calabash-android gen
會生成如下的目錄結構:
? calabash tree
.
features
|_support
| |_app_installation_hooks.rb
| |_app_life_cycle_hooks.rb
| |_env.rb
|_step_definitions
| |_calabash_steps.rb
|_my_first.feature
寫測試用例
像一般的 cucumber 測試一樣,我們只要在 feature 文件里添加測試用例即可。比如我們測試 ContactManager.apk (android sdk sample 里面的, Appium 也用這個 apk)。
我們想實現,
打開這個應用
點擊 Add Contact 按鈕
添加 Contact Name 為 hello
添加 Contact Phone 為 13817861875
添加 Contact Email 為 hengwen@hotmail.com
保存
所以我們的 feature 應該是這樣的:
Feature: Login feature Scenario: As a valid user I can log into my app When I press "Add Contact"
Then I see "Target Account"
Then I enter "hello" into input field number 1 Then I enter "13817861875" into input field number 2 Then I enter "hengwen@hotmail.com" into input field number 3 When I press "Save"
Then I wait for 1 second Then I toggle checkbox number 1 Then I see "hello"
這里 input field number 就針對了 ContactAdder Activity 中輸入框。我現在這樣寫其實不太友好,比較好的方式是進行再次封裝,對 DSL 撰寫者透明。比如:
When I enter "hello" as "Contact Name" step_definition When (/^I enter "([^\"]*)" as "([^\"]*)"$/) do | text, target | index = case target when "Contact Name": 1 ... end steps %{ Then I enter #{text} into input field number #{index} }end |
這樣 feature 可讀性會強一點。
運行 feature
在運行之前,我們對 apk 還是得處理下,否則會遇到一些問題。
App did not start (RuntimeError)
因為calabash-android的client和test server需要通信,所以要在 AndroidManifest.xml 中添加權限:
<uses-permission android:name="android.permission.INTERNET" />
ContacterManager 代碼本身的問題
由于 ContacerManager 運行時候,需要你一定要有一個賬戶,如果沒有賬戶 Save 的時候會出錯。為了便于運行,我們要修改下。
源代碼地址在 $ANDROID_HOME/samples/android-19/legacy/ContactManager,大家自己去找。
需要修改 com.example.android.contactmanager.ContactAdder 類里面的 createContactEntry 方法,我們需要對 mSelectedAccount 進行判斷, 修改地方如下:
// Prepare contact creation request // // Note: We use RawContacts because this data must be associated with a particular account. // The system will aggregate this with any other data for this contact and create a // coresponding entry in the ContactsContract.Contacts provider for us. ArrayList<ContentProviderOperation> ops = new ArrayList<ContentProviderOperation>(); if(mSelectedAccount != null ) { ops.add(ContentProviderOperation.newInsert(ContactsContract.RawContacts.CONTENT_URI) .withValue(ContactsContract.RawContacts.ACCOUNT_TYPE, mSelectedAccount.getType()) .withValue(ContactsContract.RawContacts.ACCOUNT_NAME, mSelectedAccount.getName()) .build()); } else { ops.add(ContentProviderOperation.newInsert(ContactsContract.RawContacts.CONTENT_URI) .withValue(ContactsContract.RawContacts.ACCOUNT_TYPE, null) .withValue(ContactsContract.RawContacts.ACCOUNT_NAME, null) .build()); }.... if (mSelectedAccount != null) { // Ask the Contact provider to create a new contact Log.i(TAG,"Selected account: " + mSelectedAccount.getName() + " (" + mSelectedAccount.getType() + ")"); } else { Log.i(TAG,"No selected account"); } |
代碼修改好之后,導出 apk 文件。
運行很簡單:
calabash-android run <apk>
如果遇到簽名問題,請用: calabash-android resign apk。
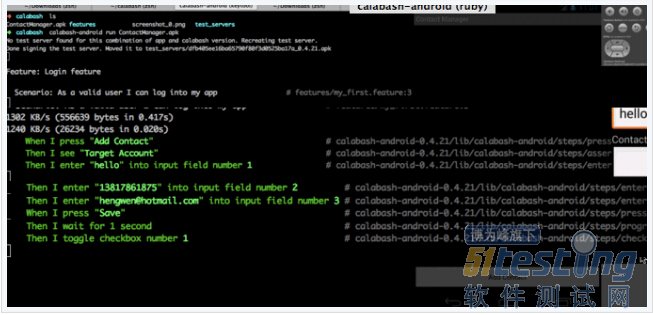
可以看看我運行的情況:
? calabash calabash-android run ContactManager.apk Feature: Login feature Scenario: As a valid user I can log into my app # features/my_first.feature:33135 KB/s (556639 bytes in 0.173s)3315 KB/s (26234 bytes in 0.007s) When I press "Add Contact" # calabash-android-0.4.21/lib/calabash-android/steps/press_button_steps.rb:17 Then I see "Target Account" # calabash-android-0.4.21/lib/calabash-android/steps/assert_steps.rb:5 Then I enter "hello" into input field number 1 # calabash-android-0.4.21/lib/calabash-android/steps/enter_text_steps.rb:5 Then I enter "13817861875" into input field number 2 # calabash-android-0.4.21/lib/calabash-android/steps/enter_text_steps.rb:5 Then I enter "hengwen@hotmail.com" into input field number 3 # calabash-android-0.4.21/lib/calabash-android/steps/enter_text_steps.rb:5 When I press "Save" # calabash-android-0.4.21/lib/calabash-android/steps/press_button_steps.rb:17 Then I wait for 1 second # calabash-android-0.4.21/lib/calabash-android/steps/progress_steps.rb:18 Then I toggle checkbox number 1 # calabash-android-0.4.21/lib/calabash-android/steps/check_box_steps.rb:1 Then I see "hello" # calabash-android-0.4.21/lib/calabash-android/steps/assert_steps.rb:51 scenario (1 passed)9 steps (9 passed)0m28.304s All pass! |
大家看到 gif 是 failed,是因為在模擬器上運行的。而上面全部通過的是我在海信手機上運行的。環境不一樣,略有差異。
總結
本文是對 calabash-android 的一個簡單介紹,做的是拋磚引玉的活。移動測試框架并非 Appium 一家,TesterHome 希望其他框架的話題也能熱火起來。watch and learn!
English » | | | | | | | | |
Text-to-speech function is limited to 100 characters