這是第一次寫博客��,是有關JAVA頁面設計當中的布局管理器,可能大多數人會選擇使用 NetBeans 或者是Eclipse 的組件來實現可視化拖拽組件來達到自己頁面設計布局�����,因為是第一次做界面��,總結一下�,以供以后復習能用到。
JAVA中Layout Mananager這次界面中主要用到的有BorderLayout����、FlowLayout�、GridLayout��、GridLayBagout
1����、BorderLayout是JFrame中的默認布局方式��,如果你沒有在容器類明確的定義布局方式���,它將是默認的布局方式����,當你想在容器中添加組件的時候��,默認添加到中央的位置,所以第二個組件會遮住第一個組件,下面是BorderLayout 一個小小的例子����;
import javax.swing.*;
import java.awt.*;
public class BorderLayout1 {
public BorderLayout1(){
JFrame frame=new JFrame();
frame.add(BorderLayout.NORTH,new JButton("North"));
frame.add(BorderLayout.SOUTH,new JButton("South"));
frame.add(BorderLayout.WEST,new JButton("West"));
frame.add(BorderLayout.EAST,new JButton("East"));
frame.add(BorderLayout.CENTER,new JButton("Center"));
frame.setVisible(true);
frame.setSize(400,200);
}
public static void main(String[] args) {
new BorderLayout1();
}
} |
總結:在整體的界面當中沒有很規范能夠使用這種布局方式���,需要和其他的布局方式進行搭配才能夠達到自己想要的界面布局效果�����。
2、FlowLayout 設置流布局以后你所要添加的組件就會按照順序排列在容器里面,能保證沒有組件會被阻擋起來�����,當時當你拉動界面的時候會很不滿意��,組將也同樣會想水一樣流動起來����,如果有使用流布局的容器能夠固定大小是最好不過的了�,例子如下:
import javax.swing.*;
import java.awt.*; public class FlowLayout1{
public FlowLayout1() {
JFrame frame=new JFrame();
frame.setLayout(new FlowLayout());
for(int i = 1; i <=5; i++)
frame.add(new JButton("Button " + i));
frame.setVisible(true);
frame.setSize(500,100);
}
public static void main(String[] args) {
new FlowLayout1();
}
} |
3、GridLayout 表格布局能將你的組將整齊的擺放在容器當中�,當組件的數量超出表格的數量的時候����,表格會自動添加來滿足組件的數量要求��,同BorderLayout 相同����,完整的界面一般不會是整齊的表格樣式����,所以這種布局方式和其他的搭配起來才能夠真正的達到你想要的界面效果�����,下面是個小例子:
import javax.swing.*;
import java.awt.*; public class GridLayout1 {
public GridLayout1() {
JFrame frame=new JFrame();
frame.setLayout(new GridLayout(3,2)); //3行2列的表格布局
for(int i = 0; i < 7; i++)
frame.add(new JButton("Button " + i));
frame.setVisible(true);
frame.setSize(500,300);
}
public static void main(String[] args) {
new GridLayout1();
}
} |
4����、GridBagLayout 這個布局方式是最復雜的��,它動態的給每一個組件精確的進行位置的約束����,為此還專門有個約束的對象GridBagConstraints�,總共有11個參數能夠對組件進行約束; GridBagConstraints(int gridx,int gridy,int gridwidth,int gridheight,double weightx,double weighty,int anchor,int fill, Insets,int ipadx,int ipady);
gridx和gridy是組件在網格中的位置���,這位置的計算方法非常有趣��,類似與直角坐標系里面的位置分布;
gridwidth和gridheight 這倆個參數是設置組件在表格當中的大小的,設置的時候要小心一點�����,自己要有一個界面的草圖在旁邊參考�����;
weightx和weighty參數可以設置當你的窗口被拉大(或拉?����。┑臅r候,組件所按照什么比例進行縮放,數字越大,組件變化的會越大����;
anchor 參數是有兩個組件,相對小的的組件應該放在哪里����;
fill 參數是當組件所處的動態表格里面有空余的位置的時候����,組件將按什么方向填充��,這個參數在界面中比較關鍵一點��;
Insets 參數是一個小的對象,其中也有4個不同的參數���,分別是上,左���,右,下來設置組件之間的間距��;
ipadx和ipady是組件邊框離組件中心的距離��,對有些組件來說這個參數是沒有必要的��;
感覺有很多的參數來設置一個組件,還有專門的約束對象���,其實每次并不是哪一個參數都要重新設置的,下面是一個例子
import javax.swing.*;
import java.awt.*; public class GridBagLayout1 {
public GridBagLayout1(){
JFrame frame =new JFrame();
GridBagLayout grid=new GridBagLayout();
GridBagConstraints c1=new GridBagConstraints();
frame.setLayout(grid);
//為button1進行約束
c1.gridwidth=2; c1.gridheight=1;
c1.insets=new Insets(5,5,0,0); //和上面的組件間距為5,右邊為間距5
JButton button1=new JButton("button1");
grid.setConstraints(button1,c1);
frame.add(button1);
//為button2進行約束
c1.fill=GridBagConstraints.HORIZONTAL;
JButton button2=new JButton("button2");
grid.setConstraints(button2,c1);
frame.add(button2);
//為button3進行約束
c1.gridx=0; c1.gridy=1; //動態表格(0����,1)位置
c1.gridwidth=4; //組件長占4個單元格�,高占一個單元格
JButton button3=new JButton("button3");
grid.setConstraints(button3,c1);
frame.add(button3);
frame.setVisible(true);
frame.setSize(200,150);
}
public static void main(String[] args) {
new GridBagLayout1();
} } |
下面是學校實驗里面的一個聊天界面的實現����,里面綜合了上面講到的幾種布局方式:
import javax.swing.*;
import java.awt.*; public class ChatDisplay extends JPanel{
private JPanel interfacePanel;
private JPanel userPanel;
private JLabel userLabel;
private JComboBox userComboBox;
private JLabel messageLabel;
private JButton sendButton;
private JTextField messageText;
private JTabbedPane textTabbedPane;
private JScrollPane publicScrollPane;
private JTextPane publicTextPane;
private JScrollPane privateScrollPane;
private JTextPane privateTextPane;
public ChatDisplay(){
interfacePanel=new JPanel();
interfacePanel.setLayout(new BorderLayout(10,10));
//兩個菜單項
//實例化菜單與菜單項
JMenu[] menus={ new JMenu("File"),new JMenu("Action")};
JMenuItem[] items={new JMenuItem("Save"),new JMenuItem("Exit")};
menus[0].add(items[0]);
menus[0].add(items[1]);
//實例化菜單棒��,添加菜單項至菜單棒
JMenuBar mb = new JMenuBar();
mb.add(menus[0]);
mb.add(menus[1]);
//設置菜單條的位置在界面的最上方
interfacePanel.add(mb,BorderLayout.NORTH);
//界面中央的信息面板
//實例化共有和私有的文本域 ��、 滾動面板、設置不可讀
publicTextPane=new JTextPane();
publicScrollPane=new JScrollPane(publicTextPane);
publicTextPane.setEditable(false); privateTextPane=new JTextPane();
privateScrollPane=new JScrollPane(privateTextPane);
privateTextPane.setEditable(false);
//實例化動態選項卡
textTabbedPane=new JTabbedPane();
textTabbedPane.addTab("public",publicScrollPane);
textTabbedPane.addTab("private",privateScrollPane);
textTabbedPane.setTabPlacement(JTabbedPane.BOTTOM);
interfacePanel.add(textTabbedPane,BorderLayout.CENTER);
//界面底部的用戶面板
//實例化并初始化化各組件
userPanel =new JPanel();
userLabel=new JLabel(" Send to :");
userComboBox=new JComboBox();
String users[]={"Public","ClientB","CientA"};
userComboBox.addItem(users[0]);
userComboBox.addItem(users[1]);
userComboBox.addItem(users[2]);
messageLabel=new JLabel("Message:");
messageText=new JTextField(22);
sendButton=new JButton("Send");
//為下面的uesePanel面板進行布局
//userPanel 設置為兩行一列的網格布局,兩行分別放兩個面板�,userPanel2.與userPanel
userPanel.setLayout(new GridLayout(2,1));
JPanel userPanel2 =new JPanel();
JPanel userPanel3 =new JPanel();
userPanel.add(userPanel2 );
userPanel.add(userPanel3); //第一行的面板 userPanel2 采用網格精準定位布局���,并添加一個標簽與組合框
userPanel2.add(userLabel);
userPanel2.add(userComboBox);
GridBagLayout gridbag=new GridBagLayout();
userPanel2.setLayout(gridbag);
//對第一行第二個組件組合框進行布局約束,實例化一個對象C
GridBagConstraints c=new GridBagConstraints();
//當組合框被拉伸后所按的的比例
c.weightx=1;
c.weighty=1;
//當組件框所占的單位行數還有剩余的時候�����,組件的填充方式為水平
c.fill=GridBagConstraints.HORIZONTAL;
//組件與組件之前的距離,參數依次為上 左 下 右
c.insets=new Insets(0,10,0,5);
//將布局約束添加在組合框上
gridbag.setConstraints(userComboBox,c); //第二行的面板 userPanel3采用流布局�����,添加一個標簽���,一個輸入文本的框��,一個發送按鈕
userPanel3.setLayout(new FlowLayout());
userPanel3.add(messageLabel);
userPanel3.add(messageText);
userPanel3.add(sendButton);
//放置在頁面下方���,并添加面板到用戶面板中去
interfacePanel.add(BorderLayout.SOUTH,userPanel);
JFrame frame=new JFrame();
frame.add(interfacePanel);
frame.setVisible(true);
frame.setSize(410,400);
}
public static void main(String[] args) {
new ChatDisplay();
}
}; |
界面效果如下:
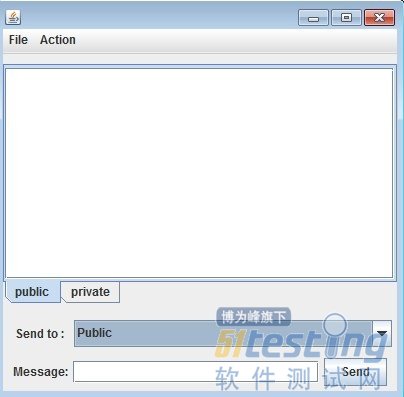
應該總結一下���,簡單的界面實現���,首先需要自己畫一個草圖�,將自己需要的組件都放進去,然后開始敲鍵盤�����,復雜一點的界面����,借助一點工具是必然的�,這樣可以省去很大的一部分時間,專注在功能的實現上面��。