gdufo


          maven2 配置代理上網

          在currentuser目錄下.m2文件夾中,新增一個setting.xml文件      

           <settings>

                    <proxies>
                     <proxy>
                        <active>true</active>
                        <protocol>http</protocol>
                        <host>10.110.1.238</host>  =>代理服務器地址
                        <port>3128</port>
                        <username>proxyuser</username>
                        <password>somepassword</password>
                        <nonProxyHosts>www.google.com|*.somewhere.com</nonProxyHosts>
                      </proxy>
                    </proxies>
           
                  </settings>

          posted @ 2012-06-06 14:28 gdufo 閱讀(1245) | 評論 (0)編輯 收藏

          maven tomcat eclipse 配置 debug

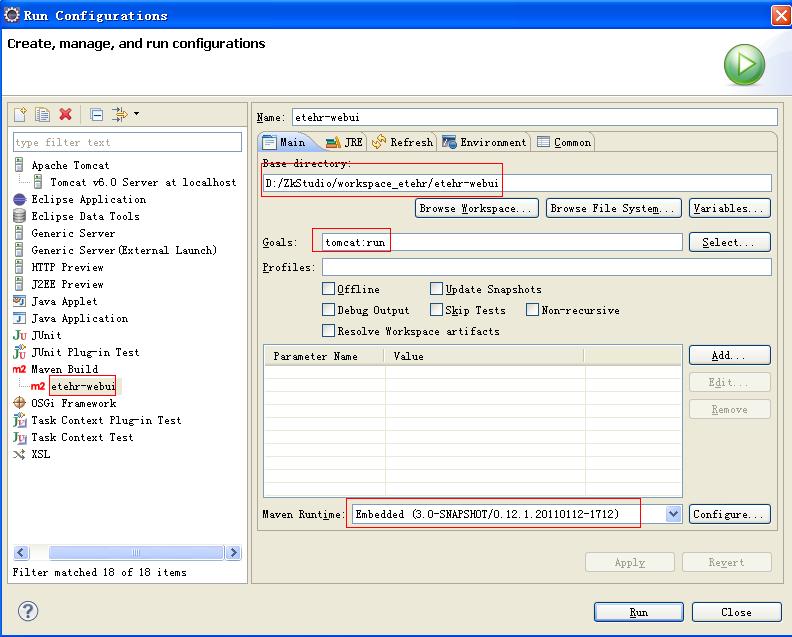
          單擊Eclipse菜單“Run”中的“Run Configurations”。

          2、在彈出的對話框中的左側樹中找“到Maven Build”,在其上點擊右鍵并單擊“New”。

          3、在右側的“Name”一欄填入自定義的名稱。單擊在“Main”選項卡的“Browse Workspace”按鈕,選擇目標項目,選擇后在“Base directory”一欄中會出現形如“${workspace_loc:/project_a}”的內容(project_a是前文所述應用項目A,它 會根據你所選的目標項目而改變)。

          4、在“Goals”一欄中填入“tomcat:run”。

          5、在“Maven Runtime”選擇你需要的Maven環境(注意:必須是2.0.8以上的版本)。

          6、單擊“Apply”,配置完成。

          經過測試,通過以上配置,在eclipse自身的Run(“右箭頭”)和Debug(“小蟲子”)按鈕下都會找到以你先前配置中“Name”值為名 的條目(條目最前端也會有“m2”標識),單擊之后即可啟動基于Tomcat之上的相應項目的運行操作或調試操作。至于是運行項目還是調試項目,只取決于 你單擊的條目是在“右箭頭”按鈕下還是在“小蟲子”按鈕下。從這方面來看,他們還是很智能化的。


          posted @ 2012-06-06 14:25 gdufo 閱讀(4348) | 評論 (0)編輯 收藏

          TOMCAT6配置負載均衡和集群 _2

          http://blog.csdn.net/dangerous_fire/article/details/6278435

          最近要配置tomcat集群,在網上搜了很多文章,但照著步驟一步一步做到最后卻無法成功,著使我費了兩天的勁查看了apache 和 tomcat的大量文檔,才將問題一一解決。為方便自己和新手配置tomcat集群,我將整理好的過程曬一曬,希望可以幫到后來人少走一些彎路。

          ==================

          目標:
          使用 apache 和 tomcat 配置一個可以應用的 web 網站,要達到以下要求:
          1、 Apache 做為 HttpServer ,后面連接多個 tomcat 應用實例,并進行負載均衡。
          2、 為系統設定 Session 超時時間,包括 Apache 和 tomcat
          3、 為系統屏蔽文件列表,包括 Apache 和 tomcat

          注:本例程以一臺機器為例子,即同一臺機器上裝一個apache和2個Tomcat。

          一、前期準備工作:安裝用的程序(前提保證已安裝了JDK1.5以上的版本)
          APAHCE 2.2.8下載:apache_2.2.8-win32-x86-no_ssl.msi
          TOMCAT6.0.14下載:apache-tomcat-6.0.14.zip直接解壓。

          二、安裝過程
          APAHCE安裝目錄:D:/Apache。
          兩個TOMCAT目錄:自行解壓到(D:/TomcatCluster/)下。
          分別為 tomcat6-a,tomcat6-b

          三、配置
          1、Apache配置
          1.1 httpd.conf配置
          修改APACHE的配置文件D:/Apache/conf/httpd.conf

          這里并沒有使用mod_jk.so進行apache和tomcat的鏈接,從2.X以后apache自身已集成了mod_jk.so的功能。只需簡單的把下面幾行去掉注釋,就相當于以前用mod_jk.so比較繁瑣的配置了。
          這里主要采用了代理的方法,就這么簡單。

          將以下Module的注釋去掉
          LoadModule proxy_module modules/mod_proxy.so
          LoadModule proxy_connect_module modules/mod_proxy_connect.so
          LoadModule proxy_ftp_module modules/mod_proxy_ftp.so
          LoadModule proxy_http_module modules/mod_proxy_http.so
          LoadModule proxy_ajp_module modules/mod_proxy_ajp.so
          LoadModule proxy_balancer_module modules/mod_proxy_balancer.so

          再找到
          <IfModule dir_module>
          DirectoryIndex index.html
          </IfModule>
          加上index.jsp修改成

          <IfModule dir_module>
          DirectoryIndex index.html index.jsp
          </IfModule>

          此處添加index.jsp 主要為了配置完成以后利用index.jsp輸出測試信息!

          在 httpd.conf 最后面加入
          ProxyRequests Off
          <proxy balancer://cluster>
          BalancerMember ajp://127.0.0.1:8009 loadfactor=1 route=jvm1
          BalancerMember ajp://127.0.0.1:9009 loadfactor=1 route=jvm2
          </proxy>

          上面的兩個BalancerMember成員是我們配置的tomcat集群。


          1.2 httpd-vhosts.conf設置
          接下來進行虛擬主機的設置。
          APACHE的虛擬主機設置如下:
          首先要修改 conf/httpd.conf
          找到

          # Virtual hosts
          #Include conf/extra/httpd-vhosts.conf

          把Include語句注釋去掉。改成

          # Virtual hosts
          Include conf/extra/httpd-vhosts.conf

          在文件(extra/httpd-vhosts.conf)最下面加入

          <VirtualHost *:80>
           ServerAdmin adminname
           ServerName localhost
           ServerAlias localhost
           ProxyPass / balancer://cluster/ stickysession=jsessionid nofailover=On lbmethod=bytraffic
           ProxyPassReverse / balancer://cluster/
          </VirtualHost>

          其中的域名和路徑根據你自己情況設置

          負載均衡有三種方式,可以通過設置 lbmethod 選擇自己需要的方式,詳細可查看apache文檔

          proxy是位于客戶端與實際的服務器之間的服務器,一般稱為facade server,負責將外部的請求分流,也負責對內部的響應做一些必要的處理。
          如果結合mod_cache,則可提高訪問速度,適當的減輕網絡流量壓力。
          閑話少說,直接拿個例子來:
              設本站地址為 www.test.com
              ProxyPass /images/ !
              ProxyPass /js/ !
              ProxyPass /css/ !
              ProxyPass /example http://www.example.com/
              ProxyPassReverse /example http://www.example.com/
              ProxyPass / ajp://127.0.0.1:8009/
              ProxyPassReverse / ajp://127.0.0.1:8009/
          還是上一篇的例子,ProxyPass易理解,就是轉發url上的請求,而其中的配置順序也是需要遵守。
          要禁止轉發的url需要放在一般的請求之前。
          對于
          http://www.test.com/images/ 
          http://www.test.com/js/
          http://www.test.com/css/
          的請求是不予轉發的,對于http://www.test.com/example/的請求,會轉發到http://www.example.com
          值得注意的就是ProxyPassReverse的配置了,這是反向代理。
          為什么要在這里加上這樣的配置?我們來看個例子:
           在沒有加這樣的反向代理設置的情況下,訪問http://www.test.com/example/a
           如果www.example.com對請求進行了redirect至http://www.example.com/b
           那么,客戶端就會繞過反向代理,進而訪問http://www.test.com/example/b
           如果設置了反向代理,則會在轉交HTTP重定向應答到客戶端之前調整它為http://www.test.com/example/a/b
           即是在原請求之后追加上了redirect的路徑。
          更多更詳細的關于mod_proxy的描述可以參見手冊:
          http://lamp.linux.gov.cn/Apache/ApacheMenu/mod/mod_proxy.html


          2 配置 tomcat
          2.1 配置 server 的關閉
          我們需要在一臺機器上跑兩個不同的 tomcat ,需要修改不同的 tomcat 的關閉口,避免出現端口被占用的情況。
          其中tomcat6-a用默認值,不修改。
          tomcat6-b修改。在tomcat6-b/conf下的 server.xml 中找到 server, 將:
          <Server port="8005" shutdown="SHUTDOWN">
          改為
          <Server port="9005" shutdown="SHUTDOWN">

          2.2 配置 Engine
          把原來的配置注釋掉,把下面一句去掉注釋。并標明jvmRoute="jvm2"
          <Engine name="Standalone" defaultHost="localhost" jvmRoute="jvm2">

          以下是原來的配置。
          <Engine name="Catalina" defaultHost="localhost">
           
          2.3. 配置 Connector
          原來的默認配置。

          <Connector port="8080" protocol="HTTP/1.1"
                         connectionTimeout="20000"
                         redirectPort="8443" />

          <!-- Define an AJP 1.3 Connector on port 8009 -->
          <Connector port="8009" protocol="AJP/1.3" redirectPort="8443" />

          將tomcal6-b 中的 protocol="HTTP/1.1" 的 Connector 端口改為 8081 避免沖突。tomcat6-a 中的保持不變。
          protocol="AJP/1.3" 的 Connector 是apache和tomcat鏈接的關鍵,前臺apache就是通過AJP協議與tomcat進行通信的,以完成負載均衡的作用。
          也可以用HTTP協議。大家注意它們是如何連接通信的,(port="8009")就是連接的接口了。

          把tomcat6-b的<Connector port="8009" protocol="AJP/1.3" redirectPort="8443" /> 中的port改成 9009
          <proxy balancer://cluster>
          #與 tomcat6-a 對應,route與<Engine jvmRoute="jvm1">對應。
          BalancerMember ajp://127.0.0.1:8009 loadfactor=1 route=jvm1
          #與 tomcat6-b 對應,route與<Engine jvmRoute="jvm2">對應。
          BalancerMember ajp://127.0.0.1:9009 loadfactor=1 route=jvm2
          </proxy>

          中的端口對應,
          tomcat6-a 的ajp端口port:8009
          tomcat6-b 的ajp端口port:9009
          一定要與上面的一致。

          2.5.配置Cluster(兩個tomcat中都要修改)
          原來的配置。
          <Cluster className="org.apache.catalina.ha.tcp.SimpleTcpCluster"/>
          修改為以下的代碼:<Receiver port=”XX”/>port也要保證唯一性。

          <Cluster className="org.apache.catalina.ha.tcp.SimpleTcpCluster"? channelSendOptions="6">
           <Manager className="org.apache.catalina.ha.session.BackupManager"
            expireSessionsOnShutdown="false"
            notifyListenersOnReplication="true"
            mapSendOptions="6"/>
           <!--
           <Manager className="org.apache.catalina.ha.session.DeltaManager"
            expireSessionsOnShutdown="false"
            notifyListenersOnReplication="true"/>
           -->
           <Channel className="org.apache.catalina.tribes.group.GroupChannel">
            <Membership className="org.apache.catalina.tribes.membership.McastService"
             address="228.0.0.4"
             port="45564"
             frequency="500"
             dropTime="3000"/>
            <Receiver className="org.apache.catalina.tribes.transport.nio.NioReceiver"
             address="auto"
             port="5001"
             selectorTimeout="100"
             maxThreads="6"/>
            <Sender className="org.apache.catalina.tribes.transport.ReplicationTransmitter">
             <Transport className="org.apache.catalina.tribes.transport.nio.PooledParallelSender"/>
            </Sender>
            <Interceptor className="org.apache.catalina.tribes.group.interceptors.TcpFailureDetector"/>
            <Interceptor className="org.apache.catalina.tribes.group.interceptors.MessageDispatch15Interceptor"/>
            <Interceptor className="org.apache.catalina.tribes.group.interceptors.ThroughputInterceptor"/>
           </Channel>
           <Valve className="org.apache.catalina.ha.tcp.ReplicationValve"
            filter=".*/.gif;.*/.js;.*/.jpg;.*/.png;.*/.htm;.*/.html;.*/.css;.*/.txt;"/>
           <Deployer className="org.apache.catalina.ha.deploy.FarmWarDeployer"
            tempDir="/tmp/war-temp/"
            deployDir="/tmp/war-deploy/"
            watchDir="/tmp/war-listen/"
            watchEnabled="false"/>
           <ClusterListener className="org.apache.catalina.ha.session.ClusterSessionListener"/>
          </Cluster>

          這個設置是主要用以tomcat的集群。
          tomcat集群各節點通過建立tcp鏈接來完成Session的拷貝,拷貝有同步和異步兩種模式。
          在同步模式下,對客戶端的響應必須在Session拷貝到其他節點完成后進行;異步模式無需等待Session拷貝完成就可響應。
          異步模式更高效,但是同步模式可靠性更高。同步異步模式由channelSendOptions參數控制,默認值是8,為異步模式,4是同步模式。
          在異步模式下,可以通過加上拷貝確認(Acknowledge)來提高可靠性,此時channelSendOptions設為10。

          Manager用來在節點間拷貝Session,默認使用DeltaManager,DeltaManager采用的一種all-to-all的工作方式,
          即集群中的節點會把Session數據向所有其他節點拷貝,而不管其他節點是否部署了當前應用。
          當集群中的節點數量很多并且部署著不同應用時,可以使用BackupManager,BackManager僅向部署了當前應用的節點拷貝Session。
          但是到目前為止BackupManager并未經過大規模測試,可靠性不及DeltaManager。

          四、啟動服務,測試tomcat自帶的例子
          1、測試apache和tomcat協作。
          先在每個tomcat中的/webapps/ROOT下的index.jsp下面加上以下的測試代碼部分:
          (X代表不同的tomcat的輸出不同的信息),把index.html刪除,以免影響測試效果。
          在最后面的加上.即</table></body>之間。
          <%
           System.out.println("tomcat6 A|B deal with request");
          %>
          然后再通過http://127.0.0.1來訪問一下,就會出現大家熟悉的貓貓。
          然后再通過分別訪問
          http://127.0.0.1:8080
          http://127.0.0.1:8081


          它們訪問的內容和上面的http:// 127.0.0.1是一樣的。
          這樣就說明apache和TOMCAT整合成功!
          2、測試均衡器
          如果在 extra/httpd-vhosts.conf 中配置 沒有設置 lbmethod=bytraffic,將使用默認的 byrequests ,控制分配的一共有三種方式,還有一種是 bybusyness 。
          通過http://127.0.0.1多次訪問,
          如 果使用的是 byrequests 的分配方式,要想看到真正的效果,必須用一些壓力測試工具,可用微軟Microsoft Web Application Stress Tool進行簡單壓力測試,不然你靠不停刷新是體現不出來的,你只會在一個tomcat的控制臺有輸出結果。
          只用用壓力測試工具模擬大量用戶同時訪問,你會發現四個tomcat控制臺均有打出控制信息,說明均衡器工作正常。
          而如果配置為 bytraffic 并且tomcat6-a 和 tomcat6-b 設置了 loadfactor=1,則請求會均勻的分配給不同的tomcat,很容易測試出來。
          如果想對此感興趣,請查看apache 的文檔并嘗試修改
          httpd.conf
          ----------------------
          ProxyRequests Off
          <proxy balancer://cluster>
          BalancerMember ajp://127.0.0.1:8009 loadfactor=1 route=jvm1
          BalancerMember ajp://127.0.0.1:9009 loadfactor=1 route=jvm2
          </proxy>
          ----------------------
           中的 loadfactor  參數和
          extra/httpd-vhosts.conf
          ----------------------
          <VirtualHost *:80>
           ServerAdmin adminname
           ServerName localhost
           ServerAlias localhost
           ProxyPass / balancer://cluster/ stickysession=jsessionid nofailover=On lbmethod=bytraffic
           ProxyPassReverse / balancer://cluster/
          </VirtualHost>
          ----------------------
          中的 lbmethod 參數


          注意:如果apache 中出現如下錯誤
          Encountered too many errors accepting client connections. Possible causes: dynamic address renewal, or incompatible VPN or firewall software. Try using the Win32DisableAcceptEx directive.

          編輯httpd.conf 加入
          Win32DisableAcceptEx ##加入這行
          重啟apache就解決了。

          如果修改后還是不行,任然有錯誤記錄,
          cmd下
          netsh winsock reset

          因為這個錯誤可能與winsock有關,有網友也出現了這個問題,他認為是金山毒霸或者升級精靈修改了WINSOCK導致的。我沒有安裝但是系統經常自動更新,別的軟件也有,可能會有沖突。
          使用此條命令恢復Winsock后,重啟電腦后這個問題就會解決了。

          posted @ 2012-06-02 08:55 gdufo| 編輯 收藏

          Tomcat6.0負載均衡策略 _ 1

          http://www.cnblogs.com/shiyangxt/archive/2009/02/26/1398902.html

                         開學以后,連續幾天休息不好,總是犯困,也許這就是“春困秋乏”的癥狀吧。最近老師提出了負載均衡功能的需求,以減輕

          網站的高峰期的服務器負擔,現在學校的硬件設施還是蠻好的,有三,四臺服務器可以提供使用,也很大程度的上方便了我做一些測試。

          因為這個子項目,假期三個同學已經基本完工,所以我也只能出點微薄之力,把這個負載均衡搞定,具體用不用我不管,起碼是我的一個

          小功能。


                         其實無論是分布式,數據緩存,還是負載均衡,無非就是改善網站的性能瓶頸,在網站源碼不做優化的情況下,負載均衡可以說

          是最直接的手段了。其實拋開這個名詞,放開了說,就是希望用戶能夠分流,也就是說把所有用戶的訪問壓力分散到多臺服務器上,也可以

          分散到多個tomcat里,如果一臺服務器裝多個tomcat,那么即使是負載均衡,性能也提高不了太多,不過可以提高穩定性,即容錯性。

          當其中一個主tomcat當掉,其他的tomcat也可以補上,因為tomcat之間實現了Session共享。待tomcat服務器修復后再次啟動,就會

          自動拷貝所有session數據,然后加入集群。這樣就可以不間斷的提供服務。如果要真正從本質上提升性能,必須要分布到多臺服務器。

          同樣tomcat也可以做到。網上相關資料比較多,可以很方便的查到,但是質量不算高。我希望可以通過這篇隨筆,系統的總結。本文的

          例子是同一臺服務器上運行兩個tomcat,做兩個tomcat之間的負載均衡。其實多臺服務器各配置一個tomcat也可以,而且那樣的話,可以使用

          安裝版的tomcat,而不用是下文中的免安裝的tomcat,而且tomcat端口配置也就不用修改了。下文也會提到。


                         tomcat的負載均衡需要apache服務器的加入來實現。在進行配置之前請先卸載調已安裝的tomcat,然后檢查apache的版本。

          我這次配置使用的是apache-tomcat-6.0.18免安裝版本,我親自測試后推斷安裝版的tomcat在同一臺機子上會不能啟動兩個以上,可能是

          因為安裝版的tomcat侵入了系統,導致即使在server.xml里修改了配置,還是會引起沖突。所以我使用tomcat免安裝版。

          apache使用的是apache_2.2.11-win32-x86-no_ssl.msi。如果版本低于2.2負載均衡的配置要有所不同,因為這個2.2.11和2.2.8版本

          集成了jk2等負載均衡工具,所以配置要簡單許多。別的版本我沒有具體測試,有待考究。這兩個軟件可以到官方網站下載。


                           把Apache安裝為運行在80端口的Windows服務,安裝成功后在系統服務列表中可以看到Apache2.2服務。服務啟動后在瀏覽器中

          輸入http://localhost進行測試,如果能看到一個"It works!"的頁面就代表Apache已經正常工作了。把tomcat解壓到任意目錄,賦值一個另命名。

          起名和路徑對配置沒有影響。但要保證端口不要沖突,如果裝有Oracle或IIS的用戶需要修改或關閉相關接口的服務。當然jdk的配置也是

          必須的,這個不再過多敘述。


                           首先,在Apache安裝目錄下找到conf/httpd.conf文件,去掉以下文本前的注釋符(#)以便讓Apache在啟動時自動加載代理(proxy)

          模塊。


              LoadModule proxy_module modules/mod_proxy.so
               LoadModule proxy_ajp_module modules/mod_proxy_ajp.so
               LoadModule proxy_balancer_module modules/mod_proxy_balancer.so
               LoadModule proxy_connect_module modules/mod_proxy_connect.so
               LoadModule proxy_ftp_module modules/mod_proxy_ftp.so
               LoadModule proxy_http_module modules/mod_proxy_http.so


          向下拉動文檔找到<IfModule dir_module>節點,在DirectoryIndex index.html后加上index.jsp,這一步只是為了待會配置完tomcat后能看到小

          貓首頁,可以不做。繼續下拉文檔找到Include conf/extra/httpd-vhosts.conf,去掉前面的注釋符。


          然后打開conf/extra/httpd-vhosts.conf,配置虛擬站點,在最下面加上


          復制代碼
          <VirtualHost *:80> 
                   ServerAdmin 管理員郵箱
                    ServerName localhost
                   ServerAlias localhost 
                   ProxyPass / balancer://sy/ stickysession=jsessionid nofailover=On 
                   ProxyPassReverse / balancer://sy/ 
                   ErrorLog "logs/sy-error.log"
                   CustomLog "logs/sy-access.log" common
          </VirtualHost>

          復制代碼


          然后回到httpd.conf,在文檔最下面加上


          ProxyRequests Off 
          <proxy balancer://sy> 
                 BalancerMember ajp://127.0.0.1:8009 loadfactor=1 route=jvm1
                 BalancerMember ajp://127.0.0.1:9009 loadfactor=1 route=jvm2
          </proxy>


          ProxyRequests Off 是告訴Apache需要使用反向代理,ip地址和端口唯一確定了tomcat節點和配置的ajp接受端口。loadfactor是負載因子,

          Apache會按負載因子的比例向后端tomcat節點轉發請求,負載因子越大,對應的tomcat服務器就會處理越多的請求,如兩個tomcat都

          是1,Apache就按1:1的比例轉發,如果是2和1就按2:1的比例轉發。這樣就可以使配置更靈活,例如可以給性能好的服務器增加處理

          工作的比例,如果采取多臺服務器,只需要修改ip地址和端口就可以了。route參數對應后續tomcat配置中的引擎路徑(jvmRoute)。

                           如果僅僅為了配置一個可用的集群,Tomcat的配置將會非常簡單。分別打開兩個tomcat的server.xml配置文件,其中一臺可以采用默認

          的設置,只需要修改兩個地方,而另一個要有較大改動以避免與前一臺沖突。如果兩臺不在同一臺服務器上運行,對于端口就不需做改動。首先是

          配置關閉端口,找到<Server port="8005" shutdown="SHUTDOWN">,第一臺不變,把第二臺改為9005。

                          下面配置Connector的端口,找到non-SSL HTTP/1.1 Connector,即tomcat單獨工作時的默認Connector,保留第一臺默認配置,在8080端

          口偵聽,而把第二臺設置為在9080端口偵聽。往下找到AJP 1.3 Connector,<Connector port="8009" protocol="AJP/1.3" redirectPort="8443" />,這是

          tomcat接收從Apache過來的ajp連接請求時使用的端口,保留第一臺默認設置,把第二臺端口改為9009。第一臺tomcat的server.xml中找到

          <Engine name="Catalina" defaultHost="localhost">,去掉這段或改為注釋,把上方緊挨的<Engine name="Catalina" defaultHost="localhost" jvmRoute="jvm1">

          注釋符去掉,對于第二臺,去掉注釋符并把jvm1改為jvm2。

                         向下找到<Cluster className="org.apache.catalina.ha.tcp.SimpleTcpCluster"/>,去掉注釋,這里的配置是為了可以在集群中的所有tomcat節點

          間共享會話(Session)。如果僅僅為了獲得一個可用的tomcat集群,Cluster只需要這么配置就可以了。

                         只需要簡單的幾步就配置完成,然后可以測試一下是否配置成功。引用網上的一個測試方法,就是在webapps目錄下新建test目錄,在test目

          錄下新建test.jsp文件,代碼我稍作改動如下:


          復制代碼
          <%@ page contentType="text/html; charset=GBK" %>
          <%@ page import="java.util.*" %>
          <html><head><title>shiyang</title></head>
          <body>
          服務信息:
          <%
          out.println(request.getLocalAddr() 
          + " : " + request.getLocalPort()+"<br/>");%>
          <%
          out.println(
          "<br> ID " + session.getId()+"<br/>"); 
          String dataName = request.getParameter("dataName");

          if (dataName != null && dataName.length() > 0) {
          String dataValue = request.getParameter("dataValue");
          session.setAttribute(dataName, dataValue);
          }

          out.print(
          "<b>Session 列表</b><br/>");
          Enumeration e 
          = session.getAttributeNames();

          while (e.hasMoreElements()) {
          String name = (String)e.nextElement();
          String value = session.getAttribute(name).toString();
          out.println( name 
          + " = " + value+"<br/>");
          System.out.println( name 
          + " = " + value);
          }
          %>
          <form action="test.jsp" method="POST">
          名稱:
          <input type=text size=20 name="dataName">
          <br/>
          值:
          <input type=text size=20 name="dataValue">
          <br/>
          <input type=submit value="提交">
          </form>
          </body>
          </html>
          復制代碼


          在test目錄下繼續新建WEB-INF目錄和web.xml,在<web-app>節點下加入<distributable />,這一步非常重要,是為了通知tomcat服務器,

          當前應用需要在集群中的所有節點間實現Session共享。如果tomcat中的所有應用都需要Session共享,也可以把conf/context.xml中的

          <Context>改為<Context distributable="true">,這樣就不需對所有應用的web.xml再進行單獨配置。測試代碼完成!


          先啟動Apache服務,在先后啟動兩臺tomcat,分別點startup.bat批處理。如果一切順利的話,就會啟動成功。再次訪問http://localhost

          可以看到小貓頁面。訪問http://localhost/test/test.jsp。可以看到包括服務器地址,端口,session等信息在內的頁面。

                          然后你可以測試一下容錯功能,關閉一個tomcat,看看服務是否正常,然后重啟tomcat,關掉另一臺tomcat,看看

          是否也可以繼續提供服務。當然你也可以配置多臺tomcat,但是原理都一樣。

           OK,講到這里。

          posted @ 2012-06-02 08:54 gdufo| 編輯 收藏

          讓開發自動化

          http://www.ibm.com/developerworks/cn/java/j-ap/

          posted @ 2012-06-01 22:25 gdufo 閱讀(505) | 評論 (0)編輯 收藏

          jmeter測試zkoss

          http://books.zkoss.org/wiki/Small_Talks/2012/May/Perform_stress_test_on_ZK_using_JMeter-take_Shopping_Cart_as_an_example

          Contents

          [hide]

          Preface

          Dennis Chen has shared a small talk illustrating how you can execute a loading test with ZK applications using JMeter. Now, in this small talk we will take a real application as an example to demonstrate in detail how you can actually apply the ideas illustrated in Dennis’ article to perform a stress test.

          Test plan

          We will be using the "shopping cart" example from ZK Essentials as the template application to perform the stress test.

          Setup

          • ZK 5.0.11
          • zk testing demo ( a demo based on the shopping cart sample)
          • Jmeter 2.5.1

          Test Scenario

          1. User enters his user name and password for authentication
          2. Login successfully to the shopping site, redirect to index.zul
          3. User selects an item and drag to the shopping cart
          4. User checks out

          Since this is a stress test, we can apply 50, 100, 150,... concurrent users to perform the test scenario simultaneously. In our example we have created a max of 300 accounts, which allows you to perform the test with as many as 300 concurrent users.

          Before we start

          As mentioned above we will be using the "shopping cart" example from ZK Essentials as the template application. However there is only one set of login/password in the current shopping cart implementation which is not sufficient for multiple users. To support multiple users, we have modified the shopping cart example to generate multiple accounts, so that each user will be logged in using a different account. This is done as follows, and it will be triggered as you click "createUserBtn" in login.zul:

          1. prepare a CSV file that includes a list of user names and passwords:

          Csv.png

          2. Add the following code to LoginViewCtrl.java

          1
          2
          3
          4
          5
          6
          7
          8
          9
          10
          11
          12
          13
          14
          15
          16
          17
          18
          19
          20
          21
          22
          public void onClick$createUserBtn() {
                  Map map = userinfo();
                  Session session = StoreHibernateUtil.openSession();
                  Transaction t = session.beginTransaction();
                   
                  Iterator entries = map.entrySet().iterator();
                  int i = 0;
                  while (entries.hasNext()) {
                      i ++;
                      Map.Entry entry = (Map.Entry) entries.next();
                      String name = (String)entry.getKey();
                      String pwd = (String)entry.getValue();
                      User user = new User(i, name, pwd, "user");
                      session.save(user);
                      if (i % 20 == 0) {
                          session.flush();
                          session.clear();
                      }
                  }
                  t.commit();
                  session.close();
              }

          Configuring ZK

          As illustrated in Dennis’ small talk, you need to define IdGenerator to fix the desktop IDs and component IDs so that we can record and play the testing script. The IdGenerator is implemented as follows:

          1
          2
          3
          4
          5
          6
          7
          8
          9
          10
          11
          12
          13
          14
          15
          16
          17
          18
          19
          20
          21
          22
          23
          24
          25
          26
          27
          28
          public class MyIdgenerator implements IdGenerator {
              private static ThreadLocal<HttpServletResponse> response = new ThreadLocal<HttpServletResponse>();
              private static AtomicInteger ai = new AtomicInteger();
           
              public String nextComponentUuid(Desktop desktop, Component comp) {
                  String number;
                  if ((number = (String) desktop.getAttribute("Id_Num")) == null) {
                      number = "0";
                      desktop.setAttribute("Id_Num", number);
                  }
                  int i = Integer.parseInt(number);
                  i++;// Start from 1
                  desktop.setAttribute("Id_Num", String.valueOf(i));
                  return "t_" + i;
              }
           
              public String nextDesktopId(Desktop desktop) {
                  HttpServletRequest req = (HttpServletRequest)Executions.getCurrent().getNativeRequest();
                  String dtid = req.getParameter("tdtid");
                  if(dtid!=null){
                  }
                  return dtid==null?null:dtid;
              }
           
              public String nextPageUuid(Page page) {
                  return null;
              }
          }
          • Define your IdGenerator in zk.xml

          Then, define your IdGenerator in zk.xml, for example,

          1
          2
          3
          <system-config>
                  <id-generator-class>foo.MyIdgenerator</id-generator-class>
          </system-config>

          Preparing Testing Scripts

          Now we are ready to record the scripts. We will be recording 6 HTTP requests as illustrated in the image below. What we need to do is to configure the parameters of these 6 requests based on the application that we wish to test.

          All.png

          Load CSV file as the variable of the user name and password

          • Add a CSV Data Set Config

          First we need to add a CSV Data Set Config here. The element will iterate the csv data set to simulate muti-users login into the application. Please specify a fully qualified name to the Filename field (ex: C:\mycsv\users.csv ), and specify the variable name to the Variable Names field for later use.

          Csv data set.png

          • Add BSF PostProcessor

          Then we need to ask jmeter to generate the accounts and passwords automatically based on our CSV file. What we need to do is to add a BSF PostProcessor element, set the language to beanshell, and define:


          var username = vars.get("username");

          var password = vars.get("password");

          vars.put("user","{\"value\":\""+username+"\",\"start\":2}");

          vars.put("pwd","{\"value\":\""+password+"\",\"start\":2}");


          This script will get the username and password variables generated by CSV Data Set Config element, and combine the result and some text as a parameter which will be used as user names and passwords later.

          BSF PostProcessor.png

          Set account & password as variables

          With these settings ready, we can now set the parameter dtid as ${dtid} and use EL to replace a fixed account and password in the first ajax request (i.e. the login request). For example if we send zk/zk as user name and password, then we will be seeing

          data_3: {"value":"zk","start":2} //for username

          data_4: {"value":"zk","start":2} //for password

          in the recorded jmeter’s request. Then, we use ${user} and ${pwd} to replace {"value":"zk","start":2} for handling the accounts and passwords dynamically.

          Submit.png

          Generate new desktop ID for redirecting to a new page

          After an user logged into the system, he will be redirected to index.zul. Since the URL is changed, the desktop and it’s id will also be changed, we need to retrieve the desktop id again using ${__intSum(${dtid},1,dtid)}.

          Specify parameter

          The last 3 http requests are for adding products to the shopping cart, check out, and close the browser tab. What we need to do is just to modify their tdtid to ${__intSum(${dtid},1,dtid).

          DTID.png

          Add the listeners for creating reports

          There are many different elements that allows you to generate different kinds of reports, such as Aggregate Report and Graph Results. You can add these listeners to Thread Group or HTTP request depending on the report you wish to generate.

          Listener1.png

          Now we have completed all the settings and have saved these configurations as test.jmx.

          Running the test

          Now we are ready to start the application and to run the test.

          1. Generate accounts
          2. Start your web server, and access login.zul. Click createUserBtn for creating multiple accounts.

            CreateAccounts.png

          3. Run the testing script
            1. Open jmeter’s menu, File > Open , and load test.jmx.
            2. Specify your IP and port, for example we use localhost/8080 as ip and port number
            3. Http request default.png

            4. In Thread Group ( the root element), set the number of concurrent users to test.
            5. Set number of Users .png

            6. Perform Run > Start to run the test.
            7. You can then observe the average response time, 90% line response time, median response time and other results by accessing the Aggregate Report .

              Aggregate report.png

          Trouble-shooting & Tips

          1. Tips: Performing repeating tests
          2. If you have finished a round of test (for example 0~50) you should restart your server before performing another round of test. This is because after you finish a round of test, there will be an extra item listed in each user’s page because they all ordered an item. This extra item is displayed at the bottom of the page (see the image on the right). As there is a DOM change due to this extra item, components’ IDs and orders are also changed thus different from the script you recorded earlier. To solve this problem, just restart your server before performing another round of test.

            Without order.png One order.png

          3. Trouble-shooting: Erred response
          4. Nothing response.png

            If you encounter the Response data error shown as the image above, it is most likely that you did not implement IdGenerator correctly. Please refer to Configuring ZK section to implement UUID.

          5. Trouble-shooting: Timeout error
          6. Timeout.png

            Timeout errors occur when the desktop id in the Ajax request is no longer available at the server side. This normally happens when the URL is changed. If this happens, you need to retrieve desktop ID again. Please refer to Testing Scripts section to implement Desktop ID.

            Timeout may also relate to the max allowed desktops. In ZK there is a setting called “max-desktops-per-session” which defines the max concurrent desktops for each session. The more browser tabs an user opens the more desktops will be saved on the session. If the number exceeds the max allowed desktops then some desktops will be dropped with the timeout error.

            By default the number is 15 which means an user can open as many as 15 tabs in a same browser at the same time. If you have configured it to a smaller number for saving the memory, and in your use case the users will be opening up multiple tabs then you should double check whether this is the reason causing the timeout error. To change this setting, use:

            1
            2
            3
            <session-config>
                <max-desktops-per-session>1</max-desktops-per-session>
            </session-config>
          7. Tips: close browser tab for saving memory
          8. ZK stores desktops in sessions, when user closes the browser tab ZK will send the rmDesktop command to remove the desktop. We can simulate this behavior to save memory when performing a stress test. This is done in the last http request defined in test.jmx. You can refer to the image below:

            RmDesktop.png

          Downloads

          users.csv - users.csv (Please place the csv file under C:/mycsv/)

          zk testing demo – the modified shopping cart application used in this small talk

          jmeter 2.5.1 – http://jmeter.apache.org/download_jmeter.cgi

          test.jmx – test.jmx


          posted @ 2012-05-31 23:35 gdufo| 編輯 收藏

          SQL2008的數據更新跟蹤測試 (監控數據表變化,可用于同步)

          http://blog.csdn.net/jinjazz/article/details/5495955

          最近一個項目中需要監測SQLServer數據庫中某些表的數據更新情況,于是做了一番POC測試和簡單性能的評估.這里使用的是 SQLServer2008的更改跟蹤.因為需求原因,沒有考慮使用進一步的變更數據捕獲.


          POC過程如下:


          這里我們建立一個測試環境,模擬數據在 Insert , Update 和 Delete 情況下的跟蹤效果。

          1 、測試腳本的準備,下面腳本建立一個新的數據庫環境,并作相應的跟蹤配置后向表中添加刪除更改數據。


          Use master

          go

          /***

          1 、建立測試環境:生成一個帶主鍵的測試表 T_Trace

          */

          if ( DB_ID ( 'db_Trace_test' ) is not null ) drop database db_Trace_test

          go

          Create DataBase db_Trace_test

          go

          use db_Trace_test

          go

          Create Table T_Trace ( id int not null , name varchar ( 100 )

          CONSTRAINT [ PK_T_Trace ] PRIMARY KEY CLUSTERED ( [ id ] ASC )

          )

          go

          /***

          2 、配置數據庫和表的更改跟蹤參數

          */

          ALTER DATABASE db_Trace_test SET

              CHANGE_TRACKING = ON (

                      AUTO_CLEANUP = ON ,            -- 打開自動清理選項

                      CHANGE_RETENTION = 1 HOURS    -- 數據保存期為時

              );


          ALTER TABLE dbo . T_Trace ENABLE CHANGE_TRACKING

          go

          /***

          3 、向表中增加修改刪除數據

          */

          insert into T_Trace values ( 1 , ' 上海 ' ),( 2 , ' 北京 ' ),( 3 , ' 廣州 ' )

          delete from T_Trace where id = 3


          update T_Trace set name = ' 天津 ' where id = 1

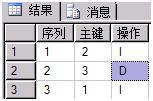
          2 、跟蹤分析,測試腳本和效果如下


          /***

          4 、獲取更改過的數據

          */

          SELECT

              CHG . Sys_Change_Version as 序 列 , id as 主鍵 , Sys_change_Operation as 操 作

          FROM CHANGETABLE ( CHANGES dbo . T_Trace , 0 ) CHG

          order by CHG . Sys_Change_Version

          /*

          其中,測試腳本中函數 CHANGETABLE 的第二個參數 0 代表查詢開始的事物操作序列,這三條數據分別表示兩個插入( I )和一個刪除( D )操作并且用主鍵 ID 標識出來。

          * 這里主鍵為 1 的數據標志為插入,是因為 Insert 和 Update 是在同一個跟蹤事務中查詢出來的。

          3 、調整跟蹤范圍參數,我們從序列為 2 的操作開始跟蹤,這樣可以跟蹤到測試數據的 Update 語句:

          SELECT

              CHG . Sys_Change_Version as 序列 , id as 主鍵 , Sys_change_Operation as 操作

          FROM CHANGETABLE ( CHANGES dbo . T_Trace , 2) CHG


          order by CHG . Sys_Change_Version


          這個結果則表示,主鍵為 1 的數據數據執行過更新操作 (U)


          1、硬件測試環境:


          2 、軟件測試環境:

          Windows 2008Server SQLServer2008

          3 、樣本數據:

                 /--**--/

          4 、測試結果:其中判斷和提取更新表示查詢時間,包含了返回到 SQLServer 客戶端的傳輸時間。

          序列

          源表數據

          操作

          判斷更新

          提取更新

          1

          1000

          Delete 語句刪除 1000

          0

          2

          0

          Insert 語句插入 100

          0

          0

          3

          100

          Insert 語句插入 1000

          0

          0

          4

          1100

          Insert 語句插入 10000

          0

          0

          5

          11100

          Insert 語句插入 100000

          3

          4

          6

          111100

          Insert 語句插入 100000

          6

          7

          7

          211100

          Insert 語句插入 100000

          7

          11

          8

          311100

          Delete 語句刪除 100

          0

          9

          311100

          Update 語句更新 100

          0

          0

          10

          311100

          Update 語句更新 1000

          0

          0

          11

          311100

          Update 語句更新 10000

          0

          0

          5 、測試評估:

                 在變更數據量萬級的情況下,可以很快地響應跟蹤結果并提取出所需要的數據。

          posted @ 2012-05-27 22:31 gdufo| 編輯 收藏

          ad 刪除一個實體的SQL語句

          DECLARE
              /**
               * Please change this one to any client id you want to delete
               **/
              v_Client_ID                                                 NUMBER      := 1000014;
              
              v_SQL1                               VARCHAR2(1024);
              
              CURSOR Cur_Contraints  IS
                          select  table_name,constraint_name
                         from user_constraints  
                          where  status='ENABLED'  AND constraint_type='R' ;
                  
               CURSOR Cur_Contraints2  IS
                          select table_name,constraint_name
                          from user_constraints
                          where status='DISABLED' AND constraint_type='R';
                          
                  CURSOR Cur_Triggers  IS
                          select TRIGGER_NAME
                          from user_triggers
                          where status='ENABLED';
                                  
             CURSOR Cur_RemoveData  IS
                      select 'delete from '|| TABLENAME ||' where AD_Client_ID=' || v_Client_ID
                      AS v_SQL
                          from AD_Table a where a.ISVIEW='N'
                          AND exists ( select AD_Column_ID from AD_Column c where

          a.AD_Table_ID=c.AD_Table_ID
                          and upper(c.COLUMNNAME)= upper('AD_Client_ID') );
                      
                          
          BEGIN
              
              DBMS_OUTPUT.PUT_LINE('  Delete Client Where AD_Client_ID=' || v_Client_ID);
              
              /****************************************************************
               *  Disable all the constraints one by one
               ****************************************************************/
               DBMS_OUTPUT.PUT_LINE(' Disable the contraints ');
               FOR p IN Cur_Contraints  LOOP
                 BEGIN
                 v_SQL1 := 'alter table '|| p.table_name ||' disable constraint '|| p.constraint_name;
                  EXECUTE IMMEDIATE v_SQL1;        
                 END;  
               END LOOP;        --        Disable contraints
               
               
               DBMS_OUTPUT.PUT_LINE(' Disable the triggers ');
               FOR p IN Cur_Triggers  LOOP
                 v_SQL1 := 'alter trigger '|| p.TRIGGER_NAME ||' disable ';
                  EXECUTE IMMEDIATE v_SQL1;
               END LOOP;        --        Disable contraints
               
               /****************************************************************
               *  Remove all the records belongs to that client
               ****************************************************************/
              FOR p IN Cur_RemoveData LOOP
                  v_SQL1 := p.v_SQL;
                  EXECUTE IMMEDIATE v_SQL1;
                  
               END LOOP;        --        Remove data
               
               
               /****************************************************************
               *  Disable all the constraints one by one
               ****************************************************************/
               DBMS_OUTPUT.PUT_LINE(' Enable the contraints ');
              FOR p IN Cur_Contraints2  LOOP
                  BEGIN
                  v_SQL1 := 'alter table '|| p.table_name ||' enable constraint '|| p.constraint_name;
                  EXECUTE IMMEDIATE v_SQL1;        
                  END;
               END LOOP;        --        Enable contraints
               
               DBMS_OUTPUT.PUT_LINE(' Enable the triggers ');
               FOR p IN Cur_Triggers  LOOP
                 v_SQL1 := 'alter trigger '|| p.TRIGGER_NAME ||' enabled ';
                  EXECUTE IMMEDIATE v_SQL1;
               END LOOP;        --        Enable contraints
               
               COMMIT;


          END;

          posted @ 2012-05-26 16:57 gdufo 閱讀(573) | 評論 (0)編輯 收藏

          id登錄窗口與生成主界面的序列圖


          posted @ 2012-05-25 17:01 gdufo 閱讀(448) | 評論 (0)編輯 收藏

          SQL 2005配置發郵件


          http://www.sqlstudy.com/sql_article.php?id=2008072403

          SQL Server:在 SQL Server 2005 中配置數據庫郵件,發送郵件

          [作/譯者]:鵬城萬里    [日期]:2008-07-24    [來源]:本站原創    [查看]: 6343

          【鵬城萬里】 發表于 www.sqlstudy.com

          SQL Server:在 SQL Server 2005 中配置數據庫郵件。

          對于真正的 DBA 來說,數據庫郵件是必不可少的。 例如,數據庫發生了警報(alert), DBA 希望得到郵件通知,以便即時排除故障。 或者是監控數據庫作業(SQL Server Job)的運行狀況,當檢查到失敗的作業時, 就發送數據庫郵件報告給 DBA。

          在 SQL Server 2000 中 配置 “SQL Mail”,需要安裝 Outlook,配置過程比較麻煩。 在 SQL Server 2005 中配置 “Database Mail” 就相對容易多了。 主要是理清思路。

          SQL Server 并沒有內置郵件服務器(Mail Server), 它跟我們發送郵件一樣,需要用戶名和密碼通過 SMTP(Simple Message Transfer Protocol) 去連接郵件服務器。我們想讓 SQL Server 來發送郵件,首先要告訴它用戶名稱,密碼, 服務器地址,網絡傳送協議,郵件服務器的端口。。。等信息。這是通過 SQL Server 系統 存儲過程 sysmail_add_account_sp 來實現的。

          exec sysmail_add_account_sp 

          這樣,在 SQL Server 2005 中就添加了一個發送郵件的帳戶。 道理上講,有了這個郵件帳戶,SQL Server 就可以發送郵件了。 如:

          sp_send_dbmail @account_name = 'mail_account' 

          但是,SQL Server 考慮的更周全。試想:如果這個郵件帳戶發生故障 (比如:用戶密碼過期,或者郵件服務器宕機)那豈不是發送不了郵件了? 為了應對這種情況,SQL Server 2005 引入了 mail profile 這個東東。 一個 profile 中可以包含多個 account (郵件帳戶),這樣,SQL Server 發郵件的時候會依次嘗試 profile 中的多個郵件帳戶,如果發送成功,則退出, 否則,利用下一個郵件帳戶發送郵件。其中,添加 profile 和 在 account 和 profile 建立映射是通過下面兩個系統存儲過程實現的:

          sysmail_add_profile_sp sysmail_add_profileaccount_sp 

          這時候,SQL Server 發送郵件,就采用下面的方法了:

          sp_send_dbmail @profile_name = 'profile_name' 

          下面是具體的配置郵件步驟

          在 sa 系統帳戶下運行。

          1. 啟用 SQL Server 2005 郵件功能。

          use master go  exec sp_configure 'show advanced options',1 go  reconfigure go  exec sp_configure 'Database mail XPs',1 go  reconfigure go 

          2. 在 SQL Server 2005 中添加郵件帳戶(account)

          exec msdb..sysmail_add_account_sp         @account_name            = 'p.c.w.l'                 -- 郵件帳戶名稱(SQL Server 使用)        ,@email_address           = 'webmaster@sqlstudy.com'  -- 發件人郵件地址        ,@display_name            = null                      -- 發件人姓名        ,@replyto_address         = null        ,@description             = null        ,@mailserver_name         = '58.215.64.159'           -- 郵件服務器地址        ,@mailserver_type         = 'SMTP'                    -- 郵件協議(SQL 2005 只支持 SMTP)        ,@port                    = 25                        -- 郵件服務器端口        ,@username                = 'webmaster@sqlstudy.com'  -- 用戶名        ,@password                = 'xxxxxxxxx'               -- 密碼        ,@use_default_credentials = 0        ,@enable_ssl              = 0        ,@account_id              = null 

          3. 在 SQL Server 2005 中添加 profile

          exec msdb..sysmail_add_profile_sp @profile_name = 'dba_profile'      -- profile 名稱                                   ,@description  = 'dba mail profile' -- profile 描述                                   ,@profile_id   = null 

          4. 在 SQL Server 2005 中映射 account 和 profile

          exec msdb..sysmail_add_profileaccount_sp  @profile_name    = 'dba_profile' -- profile 名稱                                           ,@account_name    = 'p.c.w.l'     -- account 名稱                                           ,@sequence_number = 1             -- account 在 profile 中順序  

          5. 利用 SQL Server 2005 Database Mail 功能發送郵件。

          exec msdb..sp_send_dbmail @profile_name =  'dba_profile'               -- profile 名稱                           ,@recipients   =  'sqlstudy@163.com'          -- 收件人郵箱                           ,@subject      =  'SQL Server 2005 Mail Test' -- 郵件標題                           ,@body         =  'Hello Mail!'               -- 郵件內容                           ,@body_format  =  'TEXT'                      -- 郵件格式  

          6. 查看郵件發送情況:

          use msdb go  select * from sysmail_allitems select * from sysmail_mailitems select * from sysmail_event_log 

          如果不是以 sa 帳戶發送郵件,則可能會出現錯誤:

          Msg 229, Level 14, State 5, Procedure sp_send_dbmail, Line 1 EXECUTE permission denied on object 'sp_send_dbmail', database 'msdb', schema 'dbo'. 

          這是因為,當前 SQL Server 登陸帳戶(login),在 msdb 數據庫中沒有發送數據庫郵件的權限, 需要加入 msdb 數據庫用戶,并通過加入 sp_addrolemember 角色賦予權限。假設該SQL Server 登陸帳戶 名字為 “dba”

          use msdb go  create user dba for login dba go  exec dbo.sp_addrolemember @rolename   = 'DatabaseMailUserRole',                           @membername = 'dba' go 

          此時,再次發送數據庫郵件,仍可能有錯誤:

          Msg 14607, Level 16, State 1, Procedure sp_send_dbmail, Line 119 profile name is not valid 

          雖然,數據庫用戶 “dba” 已經在 msdb 中擁有發送郵件的權限了, 但這還不夠,他還需要有使用 profile:“dba_profile” 的權限。

          use msdb go  exec sysmail_add_principalprofile_sp  @principal_name = 'dba'                                      ,@profile_name   = 'dba_profile'                                      ,@is_default     = 1 

          從上面的參數 @is_default=1 可以看出,一個數據庫用戶可以在多個 mail profile 擁有發送權限。

          現在,可以利用 SQL Server 2005 發送數據庫郵件了吧。如仍有問題,請留言。


          posted @ 2012-05-24 16:38 gdufo 閱讀(1129) | 評論 (0)編輯 收藏

          僅列出標題
          共19頁: 上一頁 1 2 3 4 5 6 7 8 9 下一頁 Last 

          導航

          統計

          常用鏈接

          留言簿(6)

          隨筆分類

          隨筆檔案

          文章分類

          文章檔案

          收藏夾

          Hibernate

          友情鏈接

          搜索

          最新評論

          閱讀排行榜

          評論排行榜

          主站蜘蛛池模板: 平利县| 天津市| 永济市| 团风县| 漠河县| 遵义县| 乐平市| 新竹市| 台中市| 囊谦县| 左云县| 邮箱| 论坛| 青龙| 双柏县| 石柱| 册亨县| 陆河县| 玉山县| 元氏县| 三原县| 德州市| 天台县| 甘肃省| 广饶县| 马边| 青冈县| 酉阳| 静安区| 马山县| 彩票| 垦利县| 青龙| 多伦县| 鄱阳县| 武夷山市| 得荣县| 黔南| 霍城县| 霍州市| 神池县|