深圳下了一周的雨,天陰沉陰沉的,好想曬曬陽光,心情快被發霉了。這周運氣很好,bugzilla和TestLink安裝很順利,mysql數據庫的備份和恢復、bugzilla和testlink升級順利。
在這好心情的日子里,讓實習生把做測試時,經常要用sql命令進行一些數據檢查測試的都集中整理放上來,那天要用直接上來看就行了,分享給大家,特別是剛做測試的新手。
一、mysql數據庫日常操作。
1.啟動mysql:/etc/init.d/mysql start (前面為mysql的安裝路徑)
2.重啟mysql: /etc/init.d/mysql restart (前面為mysql的安裝路徑)
3.關閉mysql: /etc/init.d/mysql stop(前面為mysql的安裝路徑)
4.連接本機上的mysql:
mysql -u 用戶名 –p (按回車,再輸入密碼)
例:mysql –u root –p
5.退出mysql:exit
6.修改mysql密碼:
(1)mysqladmin -u用戶名 -p舊密碼 password 新密碼
例:mysqladmin –u root –p 123456 password 654321
(2)進入mysql命令行SET PASSWORD FOR 用戶名@主機=PASSWORD("root");
例:set password for root@localhost=password(“123456”);
(3)修改自己的密碼:
set password=password(“123456”);
7.增加新用戶:
grant 操作 on 數據庫.* to 用戶名@登錄主機 identified by "密碼"
例:grant select on yingyu to qiu@localhost indentify by “123456”;
8.建庫:
create database 庫名;
例:create database yingyu;
9.顯示數據庫列表: show databases;
10.打開數據庫:
use 數據庫;
例:use yingyu;
11.刪庫:
drop database 庫名;
例:drop database yingyu;
12.顯示庫中的數據表:
show tables;
13.顯示數據表的結構:
describe 表名;
例:describe student;
14.編碼的修改:
(1)改變整個mysql的編碼格式:
啟動mysql的時候,mysqld_safe命令行加入
--default-character-set=編碼格式
例:--default-character-set=UTF-8
(2)改變某個庫的編碼格式:
在mysql提示符后輸入命令:
alter database 數據庫 default character set 編碼格式;
例:alter database student default character set UTF-8;
二、sql常用命令
1.建表:
create table 表名(字段設定列表);
例:create table student
(stuid char(10) primary key,
name char(20),
grade int(3),
age int(3)
);
2.刪表:
drop table 表名;
例:drop table student;
3.將表中記錄清空:
delete from 表名;
例:delete from student;
4.顯示表中的記錄:
select * from 表名;
例:select * from student;
5.給表改名:
rename table 舊表名 to 新表名;
例:rename table student to people;
6.修改字段屬性:
(1)alter table 表名 change 字段名稱 字段名稱 字段類型 [是否允許非空];
例:alter table student change name newname char(20) null;
(2)alter table 表名稱 modify 字段名稱 字段類型 [是否允許非空];
例:alter table student modify name char(20) null;
7.修改表設置默認字段:
(1)alter table 表名 modify 字段名稱 字段類型 default 默認值;
例:alter table student modify name char(10) defalt 7;
(2)alter table 表名 alter 字段名稱 set default value;
例:alter table student alter name set default 7;
8.增加表的一個字段:
alter table 表名 add column 字段名稱 字段類型 (default 默認值);
例:alter table student add column sex char(10) (default 1);
9.刪除表的一個字段
alter table 表名 drop column 字段名稱;
例:alter table student drop column name;
10.刪除表主鍵
alter table 表名 drop primary key;
例:alter table student drop primary key;
11.添加新主鍵:
alter table 表名 add primary key(字段);
例:alter table student add primary key(stuid);
12.往表里插入一行數據:
insert into 表名 values(字段數據1,字段數據2,•••)
例:insert into student values(‘123’,‘qqqq’,‘80’);
13.往表里插入多行數據:
insert into 表名 values(字段數據1,字段數據2,•••) ,(字段數據1,字段數據2,•••),•••;
例:insert into student values(‘123’,‘qqqq’,‘80’),(‘124’,‘yyyy’,‘90’);
14. 修改表的數據:
update 表名 set 字段名=value where 范圍
例:update student set name=‘qqq1111’ where stuid=‘123’;
15.模糊查詢
select * from 表名 where 字段 like ’%value1%’;
例:select * from student where name like ‘q%’;
16.排序查詢:
select * from 表名 order by 字段名1,字段名2 [desc]
例:selec * from student order by grade;(升序)
select * from student order by grade desc;(降序)
17.左連接查詢:
select 表1.字段1,表1.字段2,表2.字段1,表2.字段2 from 表1 left (outer) join 表2 on 表1.字段=表2.字段;
例:select student.num,student.name,people.name,people.age from student left (outer) join people on student.name=people.name;
18.右連接查詢:
select 表1.字段1,表1.字段2,表2.字段1,表2.字段2 from 表1 right (outer) join 表2 on 表1.字段=表2.字段;
例:select student.num,student.name,people.name,people.age from student right (outer) join people on student.name=people.name;
19.全連接查詢(mySql不支持全連接,所以用左連接union右連接)
select 表1.*,表2.* from 表1 left (outer) join 表2 on 表1.字段=表2.字段 union select表1.*,表2.* from 表1 right (outer) join 表2 on 表1.字段=表2.字段;
例:select s.*,p.* from student s left join people p on s.name = p.name union select s.*,p.* from student s right join people p on s.name = p.name;
20.關于年份的查詢
例:查詢在1990-1993年之間出生的學生的全部信息
select * from student where year(Sbirthday)between 1990 and 1993;
查詢在1990年12月5日之前出生的學生的全部信息
select * from student where birthday < date(‘1990-12-05’);
三、備份與還原
1.備份數據庫:
mysqldump –u 用戶名 –p 數據庫名 > 保存路徑+文件名;
例:mysqldump –u root –p yingyu > /home/yingyu/yingyu.sql;
2.還原數據庫:
mysql –u 用戶名 –p 數據庫名 < 文件路徑+文件名;
例:mysql –u root –p yingyu < /home/yingyu/yingyu.sql;
3.直接將MySQL數據庫壓縮備份
mysqldump –u 用戶名 –p 數據庫名 | gzip > 保存路徑+文件名
例:mysqldump –u root –p yingyu | gzip > /home/yingyu/yingyu.sql.gz;
4.還原壓縮的Mysql數據庫
gunzip < 文件路徑+文件名 | mysql –u 用戶名 –p 數據庫名
例:gunzip < /home/yingyu/yingyu.sql.gz | mysql –u root –p yingyu;
5.備份數據庫中的某些表:
mysqldump –u 用戶名 –p 數據庫名 表名1 表名2 > 保存路徑+文件名
例:mysqldump –u root –p yingyu student > /home/yingyu/yingyu.sql;
6.備份數據庫中的某些數據庫:
mysqldump –u 用戶名 –p –B 庫1 庫2 > 保存路徑+文件名
例:mysqldump –u root –p –B yingyu1 yingyu2>/home/yingyu/yingyu.sql;
7.還原數據庫中的某些數據庫:
mysqldump –u 用戶名 –p –D 庫1 庫2 < 文件路徑 + 文件名;
例:mysqldump–u root –p–D qiuyingyu yingyu</home/yingyu/yingyu.sql;
8.還原數據庫中的某些表:
mysql –u 用戶名 –p 數據庫名 < 保存路徑+表文件名
例:mysql –u root –p yingyu < /home/yingyu/yingyu.sql;
]]>
一、 備份Bugzilla 4.0.1數據庫
使用如下命令備份Bugzilla 4.0.1的mysql數據庫
# mysqldump -u root -p bugs | gzip > /tmp/llj/bugzilla_20121206.sql.gz
bugs是數據庫名字
/tmp/llj/bugzilla_20121206.sql.gz 是備份存儲的路徑
二、 導入Bugzilla 4.0.1數據庫
創建新的數據庫用于導入備份的數據庫,命令如下:
# mysql –u root –p
輸入密碼后進入mysql操作界面
輸入:create database bugzilla_new
使用如下命令導入備份的Bugzilla 4.0.1的mysql數據庫,從新命名數據庫名
# gunzip < bugzilla_20121206.sql.gz | mysql –u root –p bugzilla_new
三、 安裝Bugzilla 4.2.3程序包
安裝步驟具體見:http://www.aygfsteel.com/lijun_li/archive/2012/11/29/392220.html
四、 更新導入的Bugzilla 4.2.3數據庫表結構
創建bugzilla_new數據庫用戶
# mysql –u root –p
# use bugzilla_new
grant select,insert,update,delete,index,alter,create,lock tables,drop,references on bugzilla_new.* to
bugs@localhost identified by '123456';
flush privileges;
修改bugzilla配置
#cd /data/apache2/htdocs/bugzilla
#vi localconfig
根據數據庫的實際情況修改如下參數:
$db_name = 'bugzilla_new';
$db_user = 'bugs';
$db_pass = '123456';
$db_port = 3306;
$db_sock = '/var/lib/mysql/mysqld.sock';
$index_html = 1;
更新bugzilla_new數據庫表
進入新安裝的bugzilla 4.2.3文件目錄
#cd /data/apache2/htdocs/bugzilla
#./checksetup.pl
自動更新bugzilla_new數據庫表內容
在瀏覽器訪問新版本bugzilla,使用之前的老用戶賬戶登錄,能成功登錄進去并看到之前的bug組件和內容,恭喜你成功了。^_^。
到這里,更新完畢,轉帖的同行記得要寫上此貼出處。
]]>
一、 備份TestLink 1.8.4數據庫
使用如下命令備份TestLink 1.8.4的mysql數據庫
# mysqldump -u root -p testlink | gzip > /tmp/llj/testlink_20121205.sql.gz
Testlink是數據庫名字
/tmp/llj/testlink_20121205.sql.gz 是備份存儲的路徑
二、 導入TestLink 1.8.4數據庫
創建新的數據庫用于導入備份的數據庫,命令如下:
# mysql –u root –p
輸入密碼后進入mysql操作界面
輸入:create database testlink_new
使用如下命令導入備份的TestLink 1.8.4的mysql數據庫,從新命名數據庫名
# Gunzip < testlink_20121205.sql.gz | mysql –u root –p testlink_new
三、 安裝TestLink 1.9.4程序包
安裝步驟具體見:http://www.aygfsteel.com/lijun_li/archive/2012/11/29/392224.html
四、 更新導入的Testlink1.8.4數據庫表結構
記錄testlink的數據庫更新sql文件存放地方進行數據庫表升級
# cd /data/apache2/htdocs/Testlink/install/sql/alter_tables/
# ll
會顯示Testlink各版本的更新數據庫sql文件,從1.9依次升級到1.9.4
進入mysql執行如下命令
# mysql –u root –p
# use testlink_new
# source /data/apache2/htdocs/Testlink/install/sql/alter_tables/1.9/mysql/DB.1.3/step1/db_schema_update.sql
# source /data/apache2/htdocs/Testlink/install/sql/alter_tables/1.9/mysql/DB.1.3/stepZ/z_final_step.sql
# source /data/apache2/htdocs/Testlink/install/sql/alter_tables/1.9.1/mysql/DB.1.4/step1/db_schema_update.sql
# source /data/apache2/htdocs/Testlink/install/sql/alter_tables/1.9.1/mysql/DB.1.4/stepZ/z_final_step.sql
# source /data/apache2/htdocs/Testlink/install/sql/alter_tables/1.9.4/mysql/DB.1.5/step1/db_schema_update.sql
# source /data/apache2/htdocs/Testlink/install/sql/alter_tables/1.9.4/mysql/DB.1.5/stepZ/z_final_step.sql
# commit;
五、 更新TestLink1.9.4配置文件
進入新安裝的TestLink1.9.4數據庫配置文件,更新鏈接的數據庫鏈接到testlink_new.
# cd /data/apache2/htdocs/Testlink
# vi config_db.inc.php
修改’DB_NAME’ 的值為:testlink_new
保存后在瀏覽器訪問testlink,使用之前的老用戶賬戶登錄,能成功登錄進去并看到之前的測試用例和測試計劃,恭喜你成功了。^_^。
六、 更新缺失的數據庫表
對比備份的TestLink 1.8.4和新安裝的TestLink 1.9.4數據庫表,發現還需要做如下操作。
需要在testlink_new增加如下表:
last_executions
last_executions_by_platform
tcversions_last_active_bare_bones
需要在testlink_new刪除如下表:
text_templates
具體操作如下:
# mysql –u root –p
# use testlink_new
# drop table text_templates;
# create table Last_executions
(tcversion_id int(10) unsigned NOT NULL Default 0,
testplan_id int(10) unsigned NOT NULL Default 0,
platform_id int(10) unsigned NOT NULL Default 0,
Build_id int(10) NOT NULL Default 0,
id int(10) unsigned default NULL );
# create table Last_executions_by_platform
(tcversion_id int(10) unsigned NOT NULL Default 0,
testplan_id int(10) unsigned NOT NULL Default 0,
platform_id int(10) unsigned NOT NULL Default 0,
id int(10) unsigned default NULL );
# create table Tcversions_last_active_bare_bones
(tcase_id int(10) unsigned default NULL,tcversion_id int(10) unsigned default NULL);
到這里,更新完畢,轉帖的同行記得要寫上此貼出處。^_^。
]]>
參考資料:http://www.btschina.com/home/index.php/the-bugzilla-install-and-configure.html
http://www.ishow.me/2012/09/11/929.html
Buzilla 4.2.3郵箱配置
Bugzilla自帶有SMTP服務,只需開啟和設置就可以使用,不需要sendmail支持。配置方法如下:
1.修改bugzilla的params文件內容
進入Bugzilla安裝目錄
# cd /data/apache2/htdocs/bugzilla
修改params文件
# vi params
配置其中的
maintainer : test@test.com
mail_delivery_method : SMTP
mailfrom : test@test.com
smtpserver : smtp.test.com
smtp_username: test@test.com
smtp_password : **********
注意:maintainer、mailfrom必須相同!smtp_username郵箱必須是存在的真實的郵箱,smtp_password是郵箱的密碼(要與你所登陸郵箱時的密碼相同)!
2.登錄bugzilla進行params參數核對
訪問:http://localhost/bugzilla/
用管理員賬戶和密碼登錄
登錄后選擇“Administartor”-》“Parameters”-》“Email”
查看并核對各參數是否正確。
3.錄入一個新bug,到郵箱查看新接收到的bug郵件,如能收到就恭喜你,OK啦。^_^。
TestLink 1.9.4 郵箱配置
進入TestLink安裝目錄文件,修改config.inc.php配置文件內容
# cd /data/apache2/htdocs/TestLink
# vi config.inc.php
$g_smtp_host = ‘[smtp.testlink.com]‘;修改為
$g_smtp_host = ‘公司smtp郵箱域名‘;
# Configure using custom_config.inc.php 以下這三處不能有中括號,一般保持一致即可。
$g_tl_admin_email = ‘testlink@testlink.com’; # for problem/error notification
$g_from_email = ‘testlink@testlink.com’; # email sender
$g_return_path_email = ‘testlink@testlink.com’;
/** Configure only if SMTP server requires authentication */
$g_smtp_username = ‘testlink’; # user #賬號和密碼,有的需要加上域名有的不需要,最好加上域名。
$g_smtp_password = ’123123123′; # password
保存后,再次登錄testlink:http://localhost/TestLink/,重置某一用戶的密碼,到該用戶郵箱中查收郵件,能收到郵件就恭喜你,OK啦。^_^。
]]>
安裝環境:redhat enterprise linux 5 + mysql-5.5.27+httpd-2.2.23+php-5.3.19+TestLink-1.9.4
安裝方法:編譯安裝
安裝步驟:
一、安裝程序包下載
下載php的安裝包:php-5.3.19.tar.gz
下載TestLink的安裝包:testlink-1.9.4.tar.gz
Mysql的安裝具體見blog:《Bugzilla 4.2.3 for Linux redhat 5 安裝介紹》
二、安裝PHP
1.安裝php包
# tar zxvf php-5.3.19.tar.gz
# cd php-5.3.19
# ./configure –with-mysql=/data/msyql –with-apxs2=/data/apache2/bin/apxs
# make
# make test
# make install
# cp php.ini-development /usr/local/lib/php.ini
2.httpd配置
# cd /data/apache2/conf/
# vi httpd.conf
在LoadModule處增加一行:
LoadModule php5_module modules/libphp5.so
在AddType處添加內容為:
AddType application/x-httpd-php .php .phtml
保存后重啟httpd服務
# cd /data/apache2/bin/
# ./apachectl restart
備注:查找文件命令是 # find / -name 查找的文件名字
3.php配置
# vi php.ini
修改max_execution_time=120
取消掉;extension=php_gd2.dll 前面的;號,讓其生效
修改;date.timezone的值為:date.timezone=”Asia/Shanghai”,并去掉前面的;號,讓其生效
修改mysql.default_port=3306
修改mysql.default_socket=/var/lib/mysql/mysqld.sock (注意:是mysql安裝時設置的路徑)
保存后重啟httpd服務
# cd /data/apache2/bin/
# ./apachectl restart
三、安裝配置TestLink
1.解壓文件包
# tar zxvf testlink-1.9.4.tar.gz
# mv testlink-ga-testlink-code /data/apache2/htdocs/TestLink
# cd /data/apache2/htdocs/
# chmod 777 –R testlink
2.修改testlink配置文件
# cd /data/apache2/htdocs/TestLink
# vi config.inc.php
修改如下內容:
$tlCfg->default_language = 'en_GB';改為$tlCfg->default_language = 'zh_CN';
$tlCfg->log_path=’/data/apache2/htdocs/TestLink/logs/’
$g_repositoryPath=’ /data/apache2/htdocs/TestLink/upload_area/’
修改完畢保存
3.訪問TestLink
在URL中輸入:http://localhost/TestLink/install/index.php
在界面中輸入數據庫的用戶名:root;密碼:123456
成功后出現TestLink的登錄頁面,用用戶名:admin;密碼:admin 登錄即可。
到此,TestLink安裝完畢,后續還需要進行郵箱配置。
]]>
參考資料:http://blog.chinaunix.net/uid-10697776-id-3080243.html
http://hi.baidu.com/widebright/item/2f28cd0da72b9210addc70a7
問:dell的optiplex 360或者optiplex 380機器,broadcom網卡如何在redhat enterprise linux 5系統下識別和安裝驅動?
答案如下:
首先看網卡是否已經正確連接到計算機,使用的命令是lspci。redhat上使用lspci的輸出:
[root@localhost ~]# lspci
00:00.0 Host bridge: Intel Corporation Eaglelake DRAM Controller (rev 03)
00:01.0 PCI bridge: Intel Corporation Eaglelake PCI Express Root Port (rev 03)
00:02.0 VGA compatible controller: Intel Corporation Eaglelake Integrated Graphics Controller (rev 03)
00:02.1 Display controller: Intel Corporation Eaglelake Integrated Graphics Controller (rev 03)
00:1b.0 Audio device: Intel Corporation 82801G (ICH7 Family) High Definition Audio Controller (rev 01)
00:1c.0 PCI bridge: Intel Corporation 82801G (ICH7 Family) PCI Express Port 1 (rev 01)
00:1d.0 USB Controller: Intel Corporation 82801G (ICH7 Family) USB UHCI Controller #1 (rev 01)
00:1d.1 USB Controller: Intel Corporation 82801G (ICH7 Family) USB UHCI Controller #2 (rev 01)
00:1d.2 USB Controller: Intel Corporation 82801G (ICH7 Family) USB UHCI Controller #3 (rev 01)
00:1d.3 USB Controller: Intel Corporation 82801G (ICH7 Family) USB UHCI Controller #4 (rev 01)
00:1d.7 USB Controller: Intel Corporation 82801G (ICH7 Family) USB2 EHCI Controller (rev 01)
00:1e.0 PCI bridge: Intel Corporation 82801 PCI Bridge (rev e1)
00:1f.0 ISA bridge: Intel Corporation 82801GB/GR (ICH7 Family) LPC Interface Bridge (rev 01)
00:1f.1 IDE interface: Intel Corporation 82801G (ICH7 Family) IDE Controller (rev 01)
00:1f.2 IDE interface: Intel Corporation 82801GB/GR/GH (ICH7 Family) SATA IDE Controller (rev 01)
00:1f.3 SMBus: Intel Corporation 82801G (ICH7 Family) SMBus Controller (rev 01)
會發現系統識別不到這個網卡的設備,需要更新網卡設備讀取文件,具體是:
用update-pciids 命令先更新一下 系統的pci.ids文件,這個最新的應該有人維護的在http://pciids.sourceforge.net/ 可以找得到。
或者像我這樣直接手工更新一下/usr/share/hwdata/pci.ids 文件的內容。
把pci.ids文件放到tmp目錄
Redhat上使用命令:cp /tmp/pci.ids /usr/share/hwdata/pci.ids;回車后回復yes
再次執行lspci,結果如下,成功識別。
[root@localhost ~]# cp /tmp/llj/pci.ids /usr/share/hwdata/pci.ids
cp:是否覆蓋“/usr/share/hwdata/pci.ids”? yes
[root@localhost ~]# lspci
00:00.0 Host bridge: Intel Corporation 4 Series Chipset DRAM Controller (rev 03)
00:01.0 PCI bridge: Intel Corporation 4 Series Chipset PCI Express Root Port (rev 03)
00:02.0 VGA compatible controller: Intel Corporation 4 Series Chipset Integrated Graphics Controller (rev 03)
00:02.1 Display controller: Intel Corporation 4 Series Chipset Integrated Graphics Controller (rev 03)
00:1b.0 Audio device: Intel Corporation NM10/ICH7 Family High Definition Audio Controller (rev 01)
00:1c.0 PCI bridge: Intel Corporation NM10/ICH7 Family PCI Express Port 1 (rev 01)
00:1d.0 USB controller: Intel Corporation NM10/ICH7 Family USB UHCI Controller #1 (rev 01)
00:1d.1 USB controller: Intel Corporation NM10/ICH7 Family USB UHCI Controller #2 (rev 01)
00:1d.2 USB controller: Intel Corporation NM10/ICH7 Family USB UHCI Controller #3 (rev 01)
00:1d.3 USB controller: Intel Corporation NM10/ICH7 Family USB UHCI Controller #4 (rev 01)
00:1d.7 USB controller: Intel Corporation NM10/ICH7 Family USB2 EHCI Controller (rev 01)
00:1e.0 PCI bridge: Intel Corporation 82801 PCI Bridge (rev e1)
00:1f.0 ISA bridge: Intel Corporation 82801GB/GR (ICH7 Family) LPC Interface Bridge (rev 01)
00:1f.1 IDE interface: Intel Corporation 82801G (ICH7 Family) IDE Controller (rev 01)
00:1f.2 IDE interface: Intel Corporation NM10/ICH7 Family SATA Controller [IDE mode] (rev 01)
00:1f.3 SMBus: Intel Corporation NM10/ICH7 Family SMBus Controller (rev 01)
02:00.0 Ethernet controller: Broadcom Corporation NetLink BCM57780 Gigabit Ethernet PCIe (rev 01)
網卡成功識別后,使用ifconfig命令看網卡信息,發現沒有eth0,需要進行如下操作:
下載網卡驅動安裝包:
kernel-2.6.18-92.el5.i686.rpm
kernel-devel-2.6.18-92.el5.i686.rpm
kernel-xen-2.6.18-92.el5.i686.rpm
kernel-xen-devel-2.6.18-92.el5.i686.rpm
tg3-3.122n-1.src.rpm
使用rpm –ivh 命令安裝上面的kernel包
Tg3包安裝步驟如下:
[root@localhost llj]# rpm -ivh tg3-3.122n-1.src.rpm
1:tg3 ########################################### [100%]
[root@localhost llj]# cd /usr/src/redhat/
[root@localhost redhat]# rpmbuild -bb SPECS/tg3.spec
[root@localhost redhat]# rpm -ivh RPMS/i386/tg3-3.122n-1.i386.rpm
Preparing... ########################################### [100%]
1:tg3 ########################################### [100%]
[root@localhost redhat]# modprobe tg3
打開網絡設備:[root@linpcl root]#ifconfig eth0 up
使用命令ifconfig查看可看見eth0
到此Dell optiplex 380 broadcom網卡在redhat 5下網卡識別和安裝驅動完畢。^_^。
]]>
編寫背景:
這幾天開始梳理和總結測試環境維護管理方面的工作,bugzilla和Testlink也該升級了,找了臺機器重新安裝這兩個軟件,先試試;順帶整理相關安裝文檔給測試人員進行安裝學習并錄像,便于以后要用或培訓時可以拿出來分享。放在這里希望對測試新手有幫助。
參考資料:http://3708841.blog.51cto.com/3698841/1020932
安裝環境:redhat enterprise linux 5 + mysql-5.5.27+httpd-2.2.23+bugzilla-4.2.3
安裝方法:編譯安裝
安裝步驟:
一、安裝程序包下載
下載mysql-5.5.27所需的如下安裝文件:
libevent-2.0.20-stable.tar.gz
cmake-2.8.9tar.gz
下載mysql-5.5.27的安裝包:mysql-5.5.27.tar.gz
下載httpd-2.2.23的安裝包:httpd-2.2.23.tar.bz2
下載bugzilla-4.2.3的安裝包:bugzilla-4.2.3.tar.gz
下載bugzilla安裝的相關組件包:DBD-mysql-4.0.22.tar.gz
二、卸載linux安裝后自動安裝上的mysql和httpd所有相關包,具體如下:
1. 用下面命令查看系統自動安裝的mysql和http相關的包有哪些
rpm –qa|grep mysql
rpm –qa|grep http
2. 用下面命令刪除系統自動安裝的mysql和http的包
3. rpm -e –nodeps mysql已經安裝的文件包名
三、安裝mysql并創建bugzilla數據庫
1. 安裝libevent
# tar zxvf libevent-2.0.20-stable.tar.gz
# cd libevent-2.0.20-stable
# ./configure
# make
# make install
# ln -s /usr/local/lib/libevent-2.0.so.5 /usr/lib/libevent-2.0.so.5
2. 安裝cmake
安裝前確認系統是否安裝了ncurses包,具體如下:
#rpm -qa|grep ncurses
ncurses-5.5-24.20060715
ncurses-devel-5.5-24.20060715
# tar zxvf cmake-2.8.9tar.gz
# cd cmake-2.8.9
# ./bootstrap
# make
# make install
3. 安裝mysql
1)建立mysql用戶
# groupadd mysql
# useradd -g mysql -s /sbin/nologin mysql
# mkdir -p /data/db/mysql_data
# mkdir -p /data/mysql
# mkdir -p /etc/mysql
# mkdir /data/db/innodb_data/ -p
# mkdir /data/db/mysql_logs/binary_log -p
# mkdir /data/db/mysql_logs/innodb_log -p
# mkdir /data/db/mysql_logs/query_log -p
# mkdir /data/db/mysql_logs/slow_query_log -p
# mkdir /data/db/mysql_logs/error_log -p
# chown mysql. /data/db/* -R
2)安裝配置
# tar zxvf mysql-5.5.27.tar.gz
#cd mysql-5.5.27
# cmake . -DCMAKE_INSTALL_PREFIX=/data/mysql/ -DMYSQL_DATADIR=/data/db/mysql_data -DDEFAULT_CHARSET=utf8 -DDEFAULT_COLLATION=utf8_general_ci -DEXTRA_CHARSETS=all -DWITH_SSL=bundled -DWITH_ZLIB=system -DWITH_EMBEDDED_SERVER=1 -DENABLED_LOCAL_INFILE=1 -DWITH_MYISAM_STORAGE_ENGINE=1 -DSYSCONFDIR=/etc/mysql -DMYSQL_TCP_PORT=3306 -DWITH_DEBUG=0 -DMYSQL_UNIX_ADDR=/var/lib/mysql/mysqld.sock -DWITH_INNOBASE_STORAGE_ENGINE=1 -DWITH_ARCHIVE_STORAGE_ENGINE=1 -DWITH_BLACKHOLE_STORAGE_ENGINE=1 -DWITH_FEDERATED_STORAGE_ENGINE=1 -DWITH_PARTITION_STORAGE_ENGINE=1
# make && make install
3)初始化數據庫
# /data/mysql/scripts/mysql_install_db --basedir=/data/mysql/ --user=mysql --datadir=/data/db/mysql_data/
4)創建配置文件
#vi /etc/mysql/my.cnf
[client]
#password = [your_password]
port = 3306
socket = /tmp/mysqld.sock
default-character-set=utf8
[mysqld]
wait_timeout=7200
port = 3306
socket = /tmp/mysqld.sock
character_set_server=utf8
basedir=/data/mysql
datadir=/data/db/mysql_data
back_log = 500
log-error=/data/db/mysql_logs/error_log/server.err
max_connections = 1024
max_connect_errors = 10
table_open_cache = 2048
max_allowed_packet = 16M
binlog_cache_size = 1M
max_heap_table_size = 64M
read_buffer_size = 2M
read_rnd_buffer_size = 16M
join_buffer_size = 8M
thread_cache_size = 128
thread_concurrency = 8
query_cache_size = 64M
query_cache_limit = 2M
ft_min_word_len = 4
#default-storage-engine = MYISAM
default-storage-engine = innodb
thread_stack = 192K
transaction_isolation = REPEATABLE-READ
tmp_table_size = 64M
log-bin=/data/db/mysql_logs/binary_log/db-bin
expire_logs_days=10
binlog_format=mixed
#general_log=1
#general_log_file=/data/db/mysql_logs/query_log/query.log
slow_query_log=1
long_query_time = 2
slow_query_log_file=/data/db/mysql_logs/slow_query_log/slow_query.log
server-id = 1
key_buffer_size = 200M
bulk_insert_buffer_size = 64M
myisam_sort_buffer_size = 128M
myisam_max_sort_file_size = 10G
myisam_repair_threads = 1
myisam_recover
innodb_additional_mem_pool_size = 16M
innodb_buffer_pool_size = 300M
innodb_data_file_path = ibdata1:100M;ibdata2:100M;ibdata3:100M;ibdata4:100M:autoextend
innodb_data_home_dir=/data/db/innodb_data/
innodb_write_io_threads = 8
innodb_read_io_threads = 8
innodb_thread_concurrency = 16
innodb_flush_log_at_trx_commit = 1
innodb_log_buffer_size = 8M
innodb_log_file_size = 256M
innodb_log_files_in_group = 3
innodb_log_group_home_dir=/data/db/mysql_logs/innodb_log
innodb_max_dirty_pages_pct = 90
innodb_lock_wait_timeout = 120
[mysqldump]
quick
max_allowed_packet = 16M
[mysql]
no-auto-rehash
[myisamchk]
key_buffer_size = 512M
sort_buffer_size = 512M
read_buffer = 8M
write_buffer = 8M
[mysqlhotcopy]
interactive-timeout
[mysqld_safe]
open-files-limit = 8192
5)后臺啟動
# cp support-files/mysql.server /etc/init.d/mysqld
# chmod 755 /etc/init.d/mysqld
# vim /etc/init.d/mysqld
basedir=/data/mysql
datadir=/data/db/mysql_data
# /etc/init.d/mysqld start
Starting MySQL……………..[ OK ]
# netstat -an |grep 3306
tcp 0 0 0.0.0.0:3306 0.0.0.0:* LISTEN
# vim /etc/profile
用#注釋掉之前的export內容,追加如下內容
export PATH=$PATH:/data/mysql/bin
# source /etc/profile
# mysql
Welcome to the MySQL monitor. Commands end with ; or \g.
Your MySQL connection id is 2
Server version: 5.5.27-log Source distribution
Copyright (c) 2000, 2012, Oracle and/or its affiliates. All rights reserved.
Oracle is a registered trademark of Oracle Corporation and/or its
affiliates. Other names may be trademarks of their respective owners.
Type 'help;' or '\h' for help. Type '\c' to clear the current input statement.
6)添加Mysql自啟動服務
# ln -sf /data/mysql/bin/mysql /sbin/mysql
# ln -sf /data/mysql/bin/mysqladmin /sbin/mysqladmin
# chkconfig mysqld on
# chkconfig --level 24 mysqld off
# chkconfig --list mysqld
mysqld 0:off 1:off 2:off 3:on 4:off 5:on 6:off
# vi /etc/ld.so.conf
用#注釋掉文件內容,增加如下內容
/data/mysql/lib
# ldconfig -v |grep mysql
/data/mysql/lib:
libmysqlclient.so.18 -> libmysqlclient_r.so.18.0.0
7)為mysql數據庫root用戶設置密碼
# mysqladmin -uroot password "qwe123"
# mysql –uroot –p
use mysql
Grant all privileges on *.* to 'root'@'%' identified by 'qwe123' with grant option;
flush privileges;
select host, user, password from user;
增加遠程登錄權限
刪除匿名用戶:
delete from user where user=' ';
設置所有root密碼
update user set password=password( "qwe123") where user= "root";
4. 創建bugzilla數據庫和用戶
1)創建數據庫bugs
create database bugs;
show databases;
use bugs;
2)創建用戶bugs
grant select,insert,update,delete,index,alter,create,lock tables,drop,references on bugs.* to bugs@localhost identified by '123456';
flush privileges;
四、安裝httpd
1. 安裝apache
# tar jxvf httpd-2.2.23.tar.bz2
# cd httpd-2.2.23
# ./configure --prefix=/data/apache2 --enable-so --enable-rewrite --enable-vhost-alias=shared --enable-cache=shared --enable-file-cache=shared --enable-disk-cache=shared --enable-mem-cache=shared --enable-proxy=shared --enable-proxy-http=shared --enable-proxy-ajp=shared --enable-proxy-balancer=shared --enable-proxy-connect=shared --enable-dav --enable-dav-fs --disable-proxy-ftp --disable-userdir --disable-asis --enable-ssl --with-mpm=worker
# make
# make install
2. 添加apache自啟動腳本
#cp /data/apache2/bin/apachectl /etc/init.d/httpd
#vi /etc/init.d/httpd
在第三行添加以下兩行內容
#chkconfig:345 85 15
#description: Start and stops the Apache HTTP Server.
[root@localhost opt]#chkconfig httpd on
3. 啟動HTTP服務
[root@localhost opt]#service httpd start
安裝完畢,啟動httpd,輸入“http://ip”能看到“it works”證明成功。
五、安裝bugzilla
1. 安裝bugzilla
# tar zxvf bugzilla-4.2.3.tar.gz
# mv bugzilla-4.2.3 /data/apache2/htdocs/bugzilla
#chmod 777 /data/apache2/htdocs/bugzilla –R
2. 安裝bugzilla所需模塊
由于默認的perl安裝包缺少一些bugzilla需要的模塊,所以需要補充一些模塊,最好是在線進行,不要一個一個的自己安裝。以root身份運行在聯網情況下用以下命令安裝所需的最少perl模塊:
#perl -MCPAN -e 'install "Bundle::Bugzilla"'
Are you ready for manual configuration? [yes] no
of modules we are processing right now? [yes] 敲回車,以后都敲回車!
#/usr/bin/perl install-module.pl -all
# perl -MCPAN -e 'install "mod_perl2"'
安裝需要把Apache的apxs路徑:/data/apache2/bin/apxs
#cd /data/apache2/htdocs/bugzilla
#./checksetup.pl
再次執行安裝相關包命令
# /usr/bin/perl install-module.pl –all
安裝DBD-mysql-4.0.22.tar.gz
# tar zxvf DBD-mysql-4.0.22.tar.gz
# cd DBD-mysql-4.0.22
# perl Makefile.PL --mysql_config=/usr/local/mysql/bin/mysql_config
# make
# make install
# perl -MCPAN -e 'install "mod_perl2"'
安裝需要把Apache的apxs路徑:/data/apache2/bin/apxs
3. 配置bugzilla
#cd /data/apache2/htdocs/bugzilla
#vi localconfig
根據數據庫的實際情況修改如下參數:
$db_name = 'bugs';
$db_user = 'bugs';
$db_pass = '123456';
$db_port = 3306;
$db_sock = '/var/lib/mysql/mysqld.sock';
$index_html = 1;
4. 配置啟動apache
在 httpd.conf 中添加(或者去除注釋)以下這一行:
AddHandler cgi-scrīpt .cgi
到 httpd.conf 中 DirectoryIndex 那一行,修改為:
DirectoryIndex index.html index.html.var index.cgi
指定Bugzilla的訪問目錄,在最后添加:
<Directory /data/apache2/htdocs/bugzilla>
AddHandler cgi-script .cgi
Options +Indexes +ExecCGI
DirectoryIndex index.cgi
AllowOverride Limit FileInfo Indexes
</Directory>
5. 安裝bugzilla數據庫配置和文件權限設置
#cd /data/apache2/htdocs/bugzilla
#./checksetup.pl
開始自動安裝bugzilla數據庫表并設置管理員賬號
# cd /data/apache2/htdocs/
# chmod 777-R bugzilla
編輯hosts文件:
# vi /etc/hosts
增加如下一行
127.0.0.1 localhost.localdomain localhost MYHOST
在瀏覽器輸入:http://XXX.XXX.XXX.XXX/bugzilla,用剛才設置的管理員賬號登陸即可。
]]>
這周要開始搭建測試管理系統bugzilla,第一步是裝操作系統。由于使用的機器配置非常的老,機器有4塊硬盤,每個硬盤17G;第一次遇到這樣的情況,裝上操作系統后,如何掛接硬盤還真是不會,在網上找了不少資料看,對資料進行歸類總結,在此收錄保存同時供大家需要時查看。
Redhat Linux 硬盤掛載方法!!!
參考資料網址:http://www.chinalinuxpub.com/read.php?wid=1080
硬盤掛載操作工作步驟:
1、先查看目前機器上有幾塊硬盤,查看命令有兩種:
命令1:# fdisk –l
命令2:# dmesg | grep sd
其中:fdisk命令說明如下:
fdisk命令用途:觀察硬盤的實體使用情形與分割硬盤用。
fdisk命令使用方法:
一、在 console 上輸入 fdisk -l ,觀察硬盤之實體使用情形。
二、在 console 上輸入 fdisk /dev/sda(具體磁盤名稱),可進入分割硬盤模式。
Ø 輸入 m 顯示所有命令列示。
Ø 輸入 p 顯示硬盤分割情形。
Ø 輸入 a 設定硬盤啟動區。
Ø 輸入 n 設定新的硬盤分割區。
Ø 輸入 e 硬盤為[延伸]分割區(extend)。
Ø 輸入 p 硬盤為[主要]分割區(primary)。
Ø 輸入 t 改變硬盤分割區屬性。
Ø 輸入 d 刪除硬盤分割區屬性。
Ø 輸入 q 結束不存入硬盤分割區屬性。
Ø 輸入 w 結束并寫入硬盤分割區屬性。
dmesg命令說明如下:
功能說明:顯示開機信息。
語 法:dmesg [-cn][-s ]
補充說明:kernel會將開機信息存儲在ring buffer中。您若是開機時來不及查看信息,可利用dmesg來查看。開機信息亦保存在/var/log目錄中,名稱為dmesg的文檔里。
參 數:
-c 顯示信息后,清除ring buffer中的內容。
-s 預配置為8196,剛好等于ring buffer的大小。
-n 配置記錄信息的層級。
2、對要掛載的硬盤創建磁盤分區
創建磁盤分區步驟舉例如下:
# fdisk /dev/sdb
進入fdisk模式:
Command (m for help):m //查看fdisk命令幫助
Command (m for help):n //創建新分區
Command action:
e extended //輸入e為創建擴展分區
p primary partition (1-4) //輸入p為創建主分區,這里我們選擇p
Partion number(1-4):1 //第一個擴展分區,按需求可以最多分4個主分區
First Cylinder(1-1014,default 1): 1 //第一個主分區起始的磁盤塊數,可以選擇默認值
Last cylindet or +siza or +sizeM or +sizeK: +1024MB //可以是以MB為單位的數字或者
以磁盤塊數,這 里我們輸入+1024MB表示分區大小為1G
這樣我們就創建完一個分區,如果要創建更多分區可以照上面的步驟繼續創建。所有分區創建完后用w保存分區。
Command (m for help): w
The partition table has been altered!
保存完成后重啟服務器,可以用#fdisk -l 命令檢查剛剛所建分區,可以在返回結果中確認/dev/sdb1的信息。
3、對要掛載的分區進行格式化
用如下命令將新建的分區格式化為ext3
# mkfs -t ext3 -c /dev/sdb1
mkfs 命令說明如下:
功能說明:建立各種文件系統。
語法:mkfs [-vV][fs][-f <文件系統類型>][設備名稱][區塊數]
補充說明:mkfs本身并不執行建立文件系統的工作,而是去調用相關的程序來執行。
參數:
fs 指定建立文件系統時的參數。
-t<文件系統類型> 指定要建立何種文件系統。
-v 顯示版本信息與詳細的使用方法。
-V 顯示簡要的使用方法。
4、掛載分區
格式化完后我們需要進行掛載分區,舉例如下:
# mkdir /test
# mount /dev/sdb1 /test
# df //用df命令進行查看
Filesystem 1K-blocks Used Available Use% Mounted on
/dev/sda1 101089 9463 86407 10% /boot
none 62988 0 62988 0% /dev/shm
/dev/sdb1 485906 8239 452580 2% /test //新掛載的分區
為了在每次系統啟動時自動掛載新分區,需要修改/etc/fstab文件來進行自動掛載。在文件的末位加入如下一行:
/dev/sdb1 /test ext3 defaults 1 2
這樣服務器每次啟動都會自動掛載此分區,到此硬盤掛載工作就結束了。
mkdir命令說明如下:
功能:創建一個目錄(類似MSDOS下的md命令)。
語法:mkdir [選項] dir-name
說明:該命令創建由dir-name命名的目錄。要求創建目錄的用戶在當前目錄中(dir-name的父目錄中)具有寫權限,并且dir-name不能是當前目錄中已有的目錄或文件名稱。
參數:
- m 對新建目錄設置存取權限。也可以用chmod命令設置。
- p 可以是一個路徑名稱。此時若路徑中的某些目錄尚不存在,加上此選項后,系統將自動建立好那些尚不存在的目錄,即一次可以建立多個目錄。
mount命令說明如下:
功能:加載指定的文件系統。
語法:mount [-afFhnrvVw] [-L<標簽>] [-o<選項>] [-t<文件系統類型>] [設備名] [加載點]
用法說明:mount可將指定設備中指定的文件系統加載到Linux目錄下(也就是裝載點)。可將經常使用的設備寫入文件/etc/fastab,以使系統在每次啟動時自動加載。mount加載設備的信息記錄在/etc/mtab文件中。使用umount命令卸載設備時,記錄將被清除。
參數說明:
描述內容比較多,在這里就不記錄了。
具體可訪問這個網址:http://blog.chinaunix.net/u1/55764/showart_1145424.html
df命令說明如下:
功能:查看Linux 文件系統的狀態信息,顯示各個分區的容量、已使用量、未使用量及掛載點等信息。
語法:df [選項]... [文件]...
參數說明:
-a, --all 包括大小為 0 個塊的文件系統
-B, --block-size=大小塊以指定<大小>的字節為單位
-h, --human-readable 以容易理解的格式印出文件系統大小 (例如 1K 234M 2G)
-H, --si 類似 -h,但取 1000 的次方而不是 1024
-i, --inodes 顯示 inode 信息而非塊使用量
-k 即 --block-size=1K
-l, --local 只顯示本機的文件系統
--no-sync 取得使用量數據前不進行 sync 動作 (默認)
-P, --portability 使用 POSIX 輸出格式
--sync 取得使用量數據前先進行 sync 動作
-t, --type=類型 只印出指定<類型>的文件系統信息
-T, --print-type 印出文件系統類型
-x, --exclude-type=類型 只印出不是指定<類型>的文件系統信息
-v (此選項不作處理)
--help 顯示此幫助信息并離開
--version 顯示版本信息并離開
常用操作:
df -k 以千字節KB 為單位顯示各分區的信息
df -a 顯示所有分區包括大小為0 的分區
df -T 顯示分區類型EXT2 或EXT3 等
]]>
在測試機器上成功安裝了redhat enterprise Linux 5.0后,發現不能上網,原來網卡沒有被識別,也沒有網卡驅動,這回可費勁了,家里可沒有遇到這樣的問題;在Google上搜了1天,也沒有搜出個結果,只有零零散散的資料,靠自己拼湊;功夫不負有心人,終于在痛苦的1天過后,成功的搞定了。在這里記錄記錄,對網上那些還沒有找到這個答案的人會得到解脫。
redhat enterprise Linux 5.0如何識別網卡和安裝驅動r8169
問題一:如何查看機器上的網卡型號
答:進入linux命令終端界面,使用命令
[root@wapdbrac1 ~]# kudzu --probe --class=network
界面上就會顯示網卡的型號以及機器上都有幾個網卡
我的測試機器網卡型號是:realtek 8169
問題二:有了網卡,如何安裝網卡驅動,讓系統啟動時能識別上網卡
答案如下,比較長要耐心看:
第一步:在網上下載這個網卡型號的linux版本驅動程序,下載地址找了半天,好不容易找到,可惜沒把具體地址給保存,想要就給我發郵件獲取吧,下次看到在帖上來了。
第二步:使用命令查看kernel包是否都裝全了,具體如下:
[root@localhost kernel]# rpm -qa | grep kernel
如果裝全了,會顯示如下幾個包:
kernel-xen-devel-2.6.18-8.el5
kernel-devel-2.6.18-8.el5
kernel-2.6.18-8.el5
kernel-xen-2.6.18-8.el5
kernel-headers-2.6.18-8.el5
如果沒有裝全,就在redhat enterprise Linux 5.0第一個ISO的Server文件目錄下可以找到對應的包,拷貝到某一具體目錄下,進入目錄后,用如下命令就可以進行安裝:
[root@localhost kernel]# rpm -ivh kernel-devel-2.6.18-8.el5.x86_64.rpm
注意:如果不裝全這些包,在網卡編譯時就會報錯說找不到src目錄文件。
用如下命令查看GCC是否安裝,通常都裝上的,還是檢查一下比較好。
[root@localhost 2.6.18-8.el5]# whereis -b gcc
gcc : /usr/bin/gcc /usr/lib/gcc /usr/libexec/gcc
第三步:把下載的r8169驅動文件拷貝到某一目錄下,我放在了tmp目錄下,解壓:
tar jxvf r8169-6.003.00.tar.bz2
第四步:進入解壓到驅動程序目錄,命令:cd r8169-6.003.00
進入src目錄,命令:cd src
查看目前是否有網卡驅動模塊,命令:lsmod|grep r8169,通常都無
執行清除網卡驅動命令:make clean
執行安裝網卡模塊命令:make modules
接著安裝:make install
接著掛接:depmod –a
掛驅動:insmod ./r8168.ko
查看是否成功:lsmod | grep r8169,如顯示有信息則成功
注意:在上面一系列命令操作過程中,如無error,則就OK了,之前我在裝的過程中,在make install這一步老報錯,說找不到src目錄,后來才知道是上面的kernel包少裝的緣故。
第五步:重新啟動系統,進去后,在圖形界面,工具欄下選擇network,進入網絡配置圖形界面,就會看到硬件下多了個網卡,這時,在圖形界面下操作,創建個網絡配置鏈接就OK了。具體的圖形配置我在網上也沒有看到有,我呢又懶得截圖了,因為圖上說的比較清楚。到此我的測試環境基本好了,系統裝上了,網也可以上了,接下來就是安裝mysql、oracle、bugzilla、testlink等東西了,這些就比較簡單了。^_^。
]]>
上周已經把這幾年來做項目的測試工作經驗整理成PPT,估計年后會拿到測試時代和測試同行分享,希望對測試新人有所幫助,也算是實現自己的一個心愿。在整理的過程中,最后發現原來就是這么幾個點,壓縮壓縮在壓縮。
上回在自己家的機器上成功安裝了redhat enterprise 5.0,最近也想在公司的測試機器上裝上試試,順便整理測試環境管理的一些工具文檔。可惜發現在公司的測試機器上裝起來還是蠻費勁的,這次解決的問題對自己有這么一點小收獲,在此記錄記錄。也許會對測試同行有所幫助。
redhat enterprise Linux 5.0硬盤安裝
我的機器情況如下:
1、硬盤分3個區:C盤NTFS格式(裝的是XP系統),D盤FAT32格式,E盤分區但沒有格式化。
2、沒有光驅,網卡不是集成的,是R8169系列。
3、沒有DOS啟動盤
安裝辦法:
按照上次自己在家里的安裝方法,先安裝GRUB。
出現問題:
發現不能成功安裝GRUB,原因是C盤是NTFS格式。
解決辦法:
在網上搜索了半天,終于找到了如下兩個資料地址,進行安裝。
http://www.dbablog.org/index.php/archives/576
http://www.aygfsteel.com/iamlibo/archive/2008/07/05/183960.html
可惜,第一個資料里面的包在裝的過程中還是進入不了引導驅動。最后經過幾次來回實驗終于成功了,下面是我的具體操作步驟:
一、準備好redhat enterprise 5.0的ISO安裝文件
二、到這個網址:www.dbablog.org/wp-content/uploads/2008/10/grldr.rar
下載grldr.rar包,把這個包解壓縮,里面有一個文件夾:grub、一個文件:grldr
三、在C盤建立一個文件夾:C:\boot,然后把解壓縮后的grub文件夾整個的拷貝到C:\boot文件夾下
四、到這個網址:http://www.aygfsteel.com/Files/iamlibo/menu.zip
下載menu壓縮包,把這個包解壓縮,里面有兩個文件:grldr、menu.lst
五、在C盤,打開C:\boot\grub下的menu.lst文件,會看到里面有如下內容:
title DOS/Win9x/Me/NT/2K/XP
root (hd0,0)
chainloader +1
打開上面步驟四中的menu.lst文件,把下面的內容替換上面的內容
title RedHat Enterprise 5.0
find --set-root /RedHat.Enterprise.Linux.5.Update.1-XiSO.iso
kernel /vmlinuz boot=casper find_iso=/RedHat.Enterprise.Linux.5.Update.1-XiSO.iso
initrd /initrd.img
然后保存
六、把步驟四中的grldr文件放到C盤根目錄下,C:\
七、修改C盤的“boot.ini”文件(xp系統的啟動支持文件)在最下面加上一行:
C:\grldr=”install Red Hat Enterprise Linux AS 5”然后保存
注:boot.ini文件是被隱藏的,修改C盤下顯示隱藏文件為可見,就可以看見該文件了。
八、把redhat enterprise 5.0的ISO安裝文件拷貝到D盤根目錄
九、在D盤根目錄新建立文件夾linux,從下載的第一張ISO下isolinux文件夾中抽取vmlinuz和initrd.img兩個文件放到Linux目錄下,即:D:\linux文件夾下。
十、下載wingrub程序,安裝到D盤,運行wingrub.exe程序,選擇Tool-》partioinlist(分區列表),查看分區號,我的測試機器分區號是:C盤(hd0,0);D盤(hd0,4);E盤(hd0,5)。
十一、 重新啟動操作系統,會出現兩個選項:windowsXP和install Red Hat Enterprise Linux AS 5,選擇install Red Hat Enterprise Linux AS 5,進入頁面會有grup語句執行的提示,具體如下:
find --set-root /RedHat.Enterprise.Linux.5.Update.1-XiSO.iso
kernel /vmlinuz boot=casper find_iso=/RedHat.Enterprise.Linux.5.Update.1-XiSO.iso
initrd /initrd.img
光標移到find這一行,敲擊鍵盤e,進入編輯頁面,刪除信息
從新輸入grup命令:root (hd0,4) 然后回車
光標移到kernel這一行,敲擊鍵盤e,進入編輯頁面,刪除信息
從新輸入grup命令:kernel (hd0,4)/linux/vmlinuz 然后回車
光標移到initrd這一行,敲擊鍵盤e,進入編輯頁面,刪除信息
從新輸入grup命令:initrd (hd0,4)/linux/initrd.img 然后回車
然后敲擊鍵盤b,系統就開始啟動安裝,進入圖形安裝界面,下面的就好辦了,按照圖形說明一步一步的裝就OK了,上次的圖形安裝flash說明忘記在那個地方下載了,需要的給我郵件,我轉給大家就OK了。
最后,費了1個工作日時間,我終于在自己的測試機器上裝上了,很有成就感啊!!!!
]]>
測試環境遷移的工作已經過了60%,在遷移完畢后,在數據庫上遇到了一些問題和現象;花費了不少時間,最終問題給解決了,非常有必要記錄下來,因為
通過GOOGLE搜索來的信息,沒有發現一個是有效指導如何解決問題的辦法。自己必須要記錄下來,萬一那天要用,就不用搜索了。錯誤日志比Google寶貝是此次解
決mysql數據庫中的問題得到的最大感想。
錯誤日志比GOOGLE寶貝!!!!
問題及現象1:
在home目錄下安裝了一個mysql,此mysql保存了一部分測試數據,現在需要把線上的測試數據導入到mysql數據庫中,發現數據文件非常的大,
導入會占滿空間,現在,需要把home目錄下的mysql移動到一個大的目錄文件home1,確保home空間可足夠運行。
解決辦法:
1、停止mysql服務,具體是:yinst stop mysql_server
2、把/home/y/share/mysql 目錄文件拷貝到新的目錄文件 /home1/y/share/mysql
3、把/home/y/logs/mysql 目錄文件拷貝到新的目錄文件/home1/y/logs/mysql
修改/home1/y/logs/ 中的mysql目錄權限的擁有者是mysql,用戶組是users,文件權限是775
修改命令是:sudo chown -R mysql mysql/ ;sudo chgrp -R users mysql/ ;sudo chmod 775 mysql/
4、把/home/y/var/mysql 目錄文件拷貝到新的目錄文件 /home1/y/var/mysql ,
修改/home1/y/var/ 中的mysql目錄權限的擁有者是mysql,用戶組是users,文件權限是775
修改命令是:sudo chown -R mysql mysql/ ;sudo chgrp -R users mysql/ ;sudo chmod 775 mysql/
5、把/home/y/conf/mysql 目錄文件拷貝到新的目錄文件 /home1/y/conf/mysql ,
修改/home1/y/conf/ 中的mysql目錄權限的擁有者是mysql,用戶組是mysql,文件權限是775
修改命令是:sudo chown -R mysql mysql/ ;sudo chgrp -R mysql mysql/ ;sudo chmod 775 mysql/
6、在home1目錄下創建目錄tmp,tmp目錄文件操作權限是:777;sudo chmod 777 /home1/tmp
7、修改mysql的my.cnf配置文件,把文件中的home名改成home1
8、啟動mysql服務,具體是:yinst start mysql_server
9、進入數據庫,把大量的測試數據導入數據庫中
問題及現象2:
在測試機器上,有一個mysql裝在了home目錄,另一個mysql被移動到home1,home的磁盤空間比較小,測試數據少,mysql數據主要用于功能測試;home1上的
磁盤空間比較大,測試數據大,mysql數據主要用于性能測試;問題:當作功能測試時,如何設置目前使用的數據庫是home目錄下的;當作性能測試時,如何設
置目前使用的數據庫是home1目錄下的。
解決辦法:
1、復制home目錄mysql的my.cnf文件,具體路徑是:/etc/my.cnf,新命名為my_new.cnf文件
2、修改my_new.cnf文件中的信息,把文件中的home名改成home1,保存到目錄文件:/home/y/etc/
3、當要用功能測試數據庫時,停止mysql服務,執行命令:sudo ln -s /home/y/etc/my.cnf my.cnf;執行完畢,啟動mysql服務
4、當要用性能測試數據庫時,停止mysql服務,執行命令:sudo ln -s /home/y/etc/my_new.cnf my.cnf;執行完畢,啟動mysql服務
備注和說明:
在處理上面的兩個問題中,遇到了很多問題,其中就有一個:發現數據庫服務啟動不起來;mysql.sock文件找不到,這時可查看mysql的錯誤日志進行分析,比在
GOOGLE中輸入“mysql.sock文件”的搜索結果看解決辦法快,并且定位準確。通過錯誤日志分析,最后確定是把/home/y/var/mysql 目錄文件拷貝到新的目錄
文/home1/y/var/mysql 后,沒有給目錄文件授權為mysql,導致mysql服務啟動時,無法初始化創建mysql.sock文件。
具體mysql的log日志文件地址,可以在my.cnf文件中查看到,常用的日志文件有:mysql.log、mysqld.err。
問題及現象3:
需要把mysql數據庫中的某一張表導入到另一個數據庫中
解決辦法:
1、導出數據庫表文件,具體操作命令:mysqldump -u root ncp2 alimama_member >/tmp/alimama_member.sql
2、導入數據庫表文件,具體操作命令:mysql -uroot aliads<~/alimama_member.sql
最后總結:在日常所測試的軟件,一定要打印錯誤日志,通過錯誤日志,可以分析程序是那個地方出了問題。在查找問題原因時,如果日志不管用,可以加調試信息
打印出來用于調試程序。這個也非常管用,我在大學編程時經常用這一辦法。
]]>
周末抽了個半小時在51testing的新手專區溜達、溜達;看看能收到些啥信息,發現了jackei曾經寫的一篇文章:軟件測試實踐之測試環境的規劃與管理;剛好這次也想起草一個測試環境管理規范文檔,根據當前情況,參照這個文檔進行了部分修改,放在這里和大家分享,希望大家能再次對這文檔提供一些新的意見,好進一步完善和改良。參考的文章URL地址是:http://www.cnblogs.com/jackei/archive/2005/10/02/248141.html
測試環境管理規范
版本:V1.0
1. 測試環境重要性及意義
1、穩定、可控的測試環境,可使測試人員花費較少時間完成測試用例的執行;
2、 可保證每一個被提交的缺陷被準確的重現;
3、經過良好規劃和管理的測試環境,可以盡可能的減少環境的變動對測試工作的不利影響,并可以對測試工作的效率和質量的提高產生積極的作用。
2. 測試環境搭建原則
測試環境搭建之前,需要明確以下問題:
1、所需計算機數量,以及對每臺計算機的硬件配置要求,包括CPU的速度、內存和硬盤的容量、網卡所支持的速度等;
2、部署被測應用的服務器所必需的操作系統、數據庫管理系統、中間件、WEB服務器以及其他必需組件的名稱、版本,以及所要用到的相關補丁的版本;
3、用來執行測試工作的計算機所必需的操作系統、數據庫管理系統、中間件、WEB服務器以及其他必需組件的名稱、版本,以及所要用到的相關補丁的版本;
4、是否需要專門的計算機用于被測應用的服務器環境和測試管理服務器的環境的備份;
5、測試中所需要使用的網絡環境;
6、執行測試工作所需要使用的文檔編寫工具、測試管理系統、性能測試工具、缺陷跟蹤管理系統等軟件的名稱、版本、License數量,以及所要用到的相關補丁的版本。對于性能測試工具,則還應當特別關注所選擇的工具是否支持被測應用所使用的協議;
7、測試數據的備份與恢復是否需要;
8、模擬實際生產環境或用戶環境搭建。
3. 測試環境管理
一、設置專門的測試環境管理員
每條業務線或測試小組應配備一名專門的測試環境管理員,其職責包括:
ü 測試環境搭建。包括操作系統、數據庫、中間件、WEB服務器等必須軟件的安裝,配置,并做好各項安裝、配置手冊編寫;
ü 記錄組成測試環境的各臺機器硬件配置、IP地址、端口配置、機器的具體用途,以及當前網絡環境的情況;
ü 完成被測應用的部署,并做好發布文檔的編寫;
ü 測試環境各項變更的執行及記錄;
ü 測試環境的備份及恢復;
ü 操作系統、數據庫、中間件、WEB服務器以及被測應用中所需的各用戶名、密碼以及權限的管理;
ü 當測試組內多名成員需要占用服務器并且相互之間存在沖突時(例如在執行性能測試時,在同一時刻應當只有一個場景在運行),負責對服務器時間進行分配和管理。
二、測試環境文檔管理
需要維護如下文檔是最新版本:
ü 組成測試環境的各臺計算機上各項軟件的安裝配置手冊,記錄各項軟件的名稱、版本、安裝過程、相關參數的配置方法等,并記錄好歷次軟件環境的變更情況;
ü 組成測試環境的各臺機器的硬件環境文檔,記錄各臺機器的硬件配置(CPU/內存/硬盤/網卡)、IP地址、具體用途以及歷次的變更情況;
ü 被測軟件或產品的發布手冊,記錄被測軟件或產品的發布/安裝方法,包括數據庫表的創建、數據的導入、應用層的安裝等。另外,還需要記錄歷次被測軟件或產品的發布情況,對版本差異進行描述;
ü 測試環境的備份和恢復方法手冊,并記錄每次備份的時間、備份人、備份原因(與上次備份相比發生的變化)以及所形成的備份文件的文件名和獲取方式;
ü 用戶權限管理文檔,記錄訪問操作系統、數據庫、中間件、WEB服務器以及被測軟件或產品所需的各種用戶名、密碼以及各用戶的權限,并對每次變更進行記錄。
三、測試環境訪問權限管理
按照如下要求維護測試環境權限:
ü 訪問操作系統、數據庫、中間件、WEB服務器以及被測軟件或產品等所需的各種用戶名、密碼、權限,由測試環境管理員統一管理;
ü 測試環境管理員擁有全部的權限;
ü 除對被測軟件或產品的訪問權限外,一般不授予開發人員對測試環境其他部分的訪問權限。如的確有必要(例如查看系統日志),則只授予只讀權限(user權限);
ü 除測試環境管理員外,其他測試組成員不授予刪除權限;
ü 用戶及權限的各項維護、變更,需要記錄到相應的“用戶權限管理文檔”中。
四、測試環境變更管理
確保每次變更是可追溯和可控:
ü 測試環境的變更申請由測試人員提出郵件申請,由測試環境管理員負責執行。測試環境管理員不接受非正式的變更申請(例如口頭申請);
ü 對測試環境的任何變更,測試負責人均應記入相應的文檔;
ü 每次變更相關的變更申請文檔、軟件、腳本等均應保留原始備份,作為配置項進行管理;
ü 對于被測軟件或產品的發布,開發人員負責打包、測試人員核對發布包。
五、測試環境備份與恢復
1、確保測試環境程序版本、數據是可恢復;
2、對于功能或性能測試,測試數據需定期進行備份或從生產環境導入測試數據;
3、通過備份軟件工具備份數據,同時保障備份數據可快速恢復。
4. 測試環境維護執行流程附件
1、測試機器申請流程
2、測試機器維護列表格式
3、測試環境部署文檔維護列表格式
4、發布手冊維護列表格
]]>
由于開發人員也不知道該如何解決,通過搜索來的一些資料進行分析后解決了問題,為此整理了該文檔。


]]>
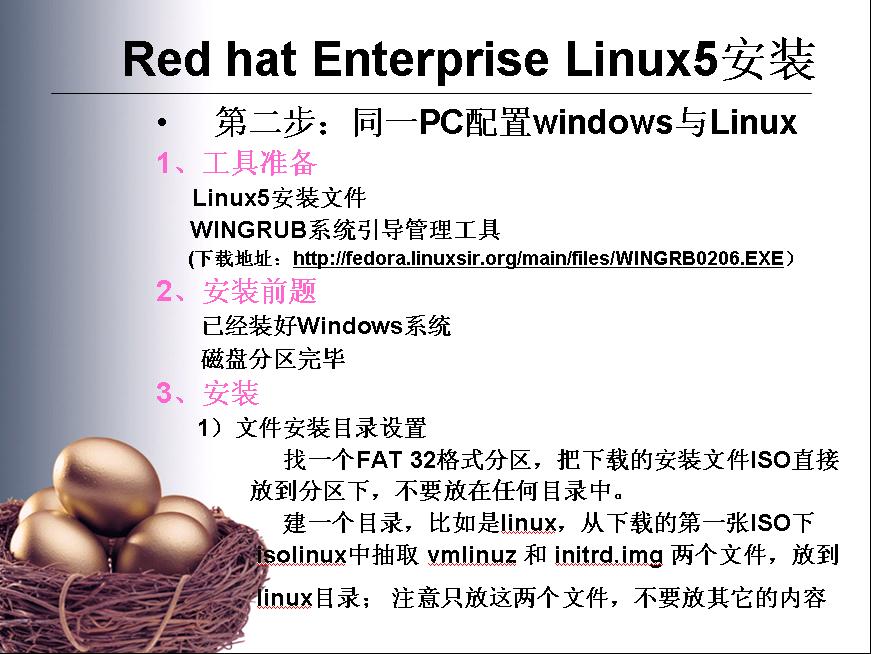
電腦買回來已經有快一個月了,在充分利用了GOOGLE工具的情況下,終于自己搞定了Red hat Enterprise Linux 5的安裝,當然代價很慘重,那就是過年回家拍的照片沒了,因為安裝的時候磁盤分區搞錯了。幸運的是,與馬云拍的照片在另一個地方還存有。為此,特整理了這么個文檔,供自己工作的同事及看我blog的測試新手做參考,希望對大家有幫助。


]]>
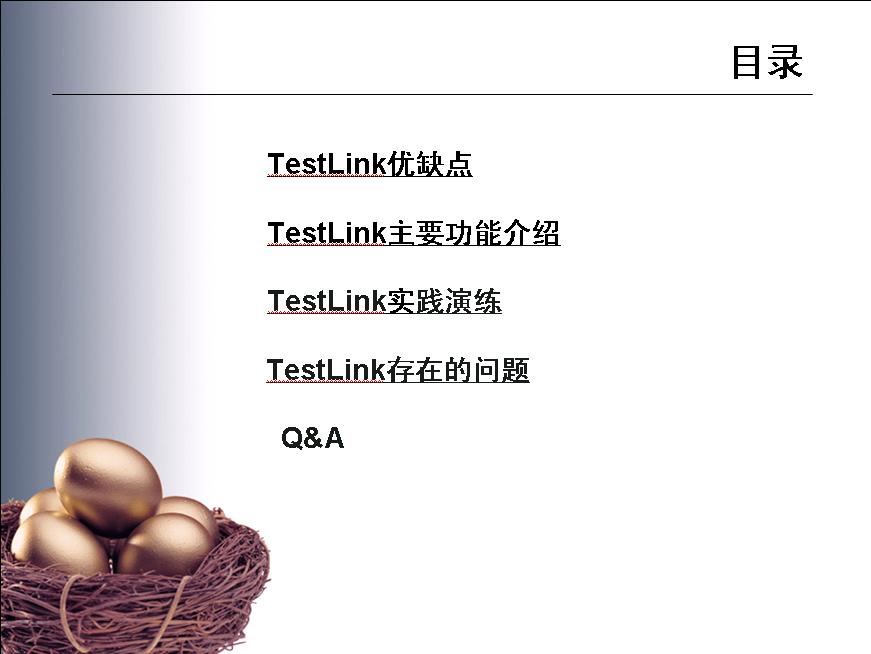
編寫背景:
前段時間,使用TestLink應用到測試工作中的3個測試任務;感覺有些東西需要總結和大家一起分享,剛好下周要給部門內部做分享,今天也拿出來給大家分享,算是08年開春,送給自己blog的第一份禮物。
工作快5年了,同學一直在嘲笑我,搞IT的連屬于自己的一臺電腦都沒有,這月發了工資打算給自己買臺電腦,把這幾年的測試心得和資料好好整理整理。
這篇隨筆只是記錄了使用TestLink的一些心得,不是具體的使用幫助手冊,希望對大家有所幫助,很多東西都還在學習和摸索中。
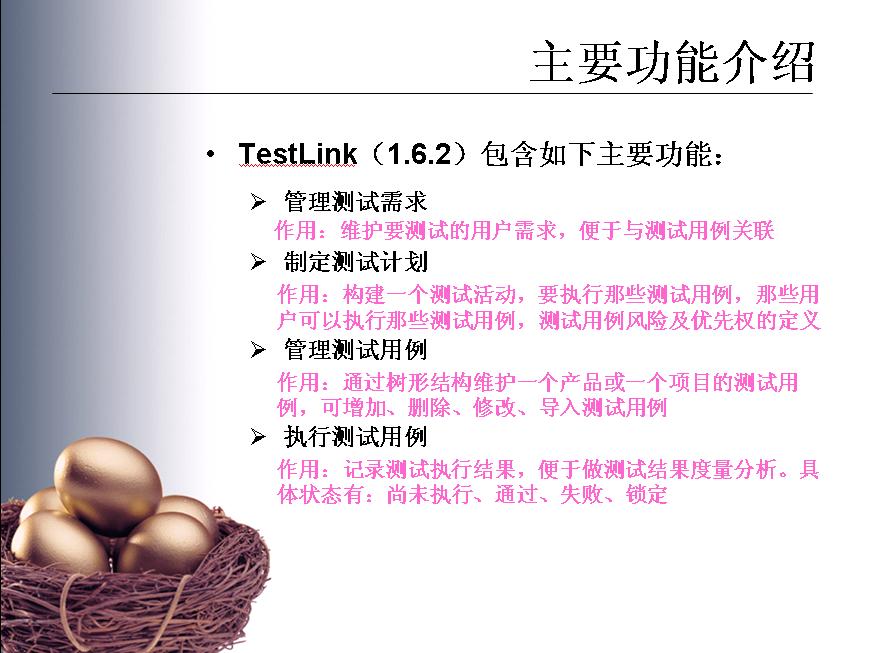


]]>