增加一些內容
現在我們已經有一個view能夠成功運行了.我們可以往里面增加一些內容.Eclipse forms有一個body,我們可以這樣創建內容.
public void createPartControl(Composite parent) {
  toolkit = new FormToolkit(parent.getDisplay());
  form = toolkit.createForm(parent);
  form.setText("Hello, Eclipse Forms");
  GridLayout layout = new GridLayout();
  form.getBody().setLayout(layout);
  Hyperlink link = toolkit.createHyperlink(form.getBody(),
    "Click here.", SWT.WRAP);
  link.addHyperlinkListener(new HyperlinkAdapter() {
   public void linkActivated(HyperlinkEvent e) {
    System.out.println("Link activated!");
   }
  });
 }
form的body是標題下面的可用空間.因為這個空間是一個SWT Composite,它能做為其它組件的parent.在上面的代碼里,我們為body設置了layout, 然后創建了一個超鏈接.超鏈接是由Eclipse Forms提供的為數不多的組件之一.我們可以為超鏈接增加監聽器,這樣能夠在用戶點擊它時做出反應.
升級后的視圖應該看起來象這樣:
圖3:一個有超鏈接的簡單form.
超鏈接組(Hyperlink Groups)
Form tookit有一個"超鏈接組"對象.每個創建出的超鏈接都加入這個組對象中.超鏈接為多個角色服務.它們定義了這個組中所有超鏈接在正常、hover���、激活不同狀態下的顏色.它們根據小組中鏈接不同的狀態來改變顏色.它們根據小組中鏈接不同的狀態來改變下劃線風格.
當你要改變超鏈接組對象的默認設置時,可以通過toolkit的getHyperlinkGroup()方法來獲得超鏈接組對象.
創建普通組件
Eclipse Forms的一個設計目標就是讓能夠在編輯器/視圖中創建普通SW
T組件.因為form的body是一個普通composite,你能夠在它里面使用任何layout和組件.但是,記住"原生的"SWT組件有一個組件背景.我們現在通過它們的構造方法創建一些組件.
  layout.numColumns = 2;
  GridData gd = new GridData();
  gd.horizontalSpan = 2;
  link.setLayoutData(gd);
  Label label = new Label(form.getBody(), SWT.NULL);
  label.setText("Text field label:");
  Text text = new Text(form.getBody(), SWT.BORDER);
  text.setLayoutData(new GridData(GridData.FILL_HORIZONTAL));
  Button button = new Button(form.getBody(), SWT.CHECK);
  button.setText("An example of a checkbox in a form");
  gd = new GridData();
  gd.horizontalSpan = 2;
  button.setLayoutData(gd);
現在我們使用了兩列,并且創建了一個標簽(label),一個文本框(text field)和一個復選框(checkbox).結果如下:
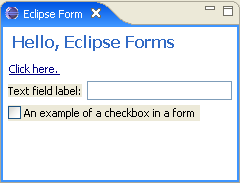
圖4:一個擁有直接用它們的構造器創建出的SWT組件的form
這張圖片怎么回事?我們創建的組件的背景直接和系統窗口背景相匹配
,而不是和form的背景匹配.另外,文本框看起來還好是因為這張截圖是在Windows XP下截的.在其它操作系統上,它會看起來是有一個3D邊框的空白條.為了解決這個問題,我們會用toolkit的工廠方法來創建這些組件:
  Label label = toolkit.createLabel(form.getBody(), "Text field label:");
  Text text = toolkit.createText(form.getBody(), "");
  text.setLayoutData(new GridData(GridData.FILL_HORIZONTAL));
  Button button = toolkit.createButton(form.getBody(), "A checkbox in a form", SWT.CHECK);
  gd = new GridData();
  gd.horizontalSpan = 2;
  button.setLayoutData(gd);
這個視圖現在會看來更好些了:
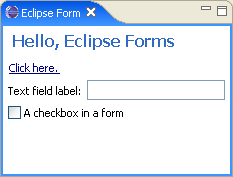
圖5:一個擁有用form toolkit的工廠方法創建出的SWT組件的form
由form toolkit提供的工廠方法是為了方便.Toolkit沒有函蓋所有情況,甚至是SWT組件集合,而且明顯沒有為你可能有的自己定制的組件提供這一便利.當你需要使一個SWT組件與form統一時,你應該使用一個方法:FormToolkit.adapt(Control control, boolean trackFocus, boolean trackKeyboard).所有的工廠方法各自分別調用了這個適配方法.
達到"平滑"的視覺效果
一個在PDE編輯器中Eclipse Forms的可看出的屬性是組件的"平滑"視覺效果.以前所有沒有3D邊框的組件在窗口中看起來不錯,但是在編輯器或視圖中就不行.這個支持寫在FormToolkit類中.但是,在一些系統上它是通過一些定制達到的.舉個例子,看一下這張從PDE編輯器(2.1版本)中的截圖:
圖片6:Eclipse 2.1中Eclipse Forms的平滑視覺效果.
象表格,文本類,復選框等,是加上一個平滑的1個象素寬的邊框.這些邊框不是來自組件自己(SWT.BORDER風格沒有用到).另外,如果設置一下,tookit會為每個組件的parent增加一個paint監聽器,在paint事件發生時為組件加上邊框.要想這樣的話,你需要為你創建的象文本,表格,樹等組件的每個composite調用paintBordersFor(parent).每個parent只需要調用一次方法就足夠了:不需要為每個組件這樣調用.
Form toolkit知道哪個組件需要一個定制的邊框.但是,你可能新創建了一個不在原來名單中的組件,它也需要一個邊框.你可以通過象下面這樣的代碼給toolkit一個提示:
Control myControl = new MyControl(parent);
myControl.setData(FormToolkit.KEY_DRAW_BORDER, FormToolkit.TEXT_BORDER);
// or myControl.setData(FormToolkit.KEY_DRAW_BORDER, FormToolkit.TREE_BORDER);
toolkit.paintBordersFor(parent);
你可以在上面這張圖中看出,象樹和表格這樣的"結構化(structural)"的組件有和文本區域不同的邊框風格并且你可以選擇和你的組件相符合的那個.注意用toolkit的工廠方法創建出的組件不需要這樣做.
 因為Eclipse 3.0和在Windows XP上,當javaw.exe.manifest文件在Java虛擬機bin文件夾中時,沒有邊框產生出來.(這篇文章里我所有截圖都是在Windows XP下截的).這個文件--你可以在 SWT home page上下載--告訴toolkit為本地組件使用XP皮膚.用XP皮膚,象文本,表格和樹是已經平滑的并且不需要再去調整.為了讓你的代碼擁有可移植性,你可以總是調用paintBordersFor(Composite)方法,讓toolkit去根據不同操作系統來決定該怎么做.
定制布局(Custom layouts)
Eclipse Forms在SWT layout的基礎上增加了兩個新的layout.這些layout繼承了SWT Layout基類并能夠在任何SWT composite上使用,但是一般都是和Eclipse Forms聯合使用的.
TableWrapLayout
現在我們知道如何來組合一個form,讓我們先給一個懸念.我們會改變那個超鏈接文本使它加長一些:
link.setText("This is an example of a form that is much longer "+
"and will need to wrap.");
讓我們看看結果:
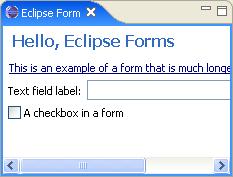
圖片7:一個使用GridLayout的form
發生什么事了?記住我們使用的是GridLayout.當它問這個超鏈接組件來計算它大小時,超鏈接告訴它文字在單獨行里需要的長度.雖然我們告訴組件去包裹(wrap),它并沒有這樣做因為GridLayout需要組件返回它的長度.超連接組件--和其它象Label一樣的SWT組件,可以通過你傳遞它數值來決定長和寬,但是GridLayout不會向組件傳遞數值參數.
我們需要的是一個象HTML表格一樣的layout.我們希望內容去試圖配合提供的客戶空間,并且一行行地疊加.Eclipse Forms提供了一個這樣的layout叫TableWrapLayout.GridLayout和TableWrapLayout之間有許多共同點.都是用表格來組織parent的children.都有layout data來告訴layout如何對待每個組件.都能夠在需要占據所有空間時等接受組件的提示.
但是,它們在布局時完全不同.TableWrapLayout從列開始.它計算每列的最小的,合適的,最大的寬度并用這個信息來占據空間.它也試圖盡可能地公平地在各列間分隔,這樣有些組件就沒有多余的空間.
讓我們使用TableWrapLayout來重新更改例子(更改處高亮顯示):
public void createPartControl(Composite parent) {
toolkit = new FormToolkit(parent.getDisplay());
form = toolkit.createForm(parent);
form.setText("Hello, Eclipse Forms");
TableWrapLayout layout = new TableWrapLayout();
form.getBody().setLayout(layout);
Hyperlink link = toolkit.createHyperlink(form.getBody(),"Click here.", SWT.WRAP);
link.addHyperlinkListener(new HyperlinkAdapter() {
public void linkActivated(HyperlinkEvent e) {
System.out.println("Link activated!");
}
});
link.setText("This is an example of a form that is much longer and will need to wrap.");
layout.numColumns = 2;
TableWrapData td = new TableWrapData();
td.colspan = 2;
link.setLayoutData(td);
Label label = toolkit.createLabel(form.getBody(), "Text field label:");
Text text = toolkit.createText(form.getBody(), "");
td = new TableWrapData(TableWrapData.FILL_GRAB);
text.setLayoutData(td);
Button button = toolkit.createButton(form.getBody(), "A checkbox in a form", SWT.CHECK);
td = new TableWrapData();
td.colspan = 2;
button.setLayoutData(td);
}
我們用了GridData相同的概念.一些變量擁有不同的名字(舉個例子,colspan和rowspan,align和valign取自HTML TABLE的屬性),但是你可以做相同的事--創建一個超鏈接和按鈕占據兩列的格子.因為空白(margins)和GridLayout是相同的,結果會看起來一樣,除了超鏈接現在會包裹起來:
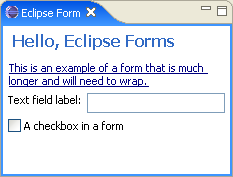
圖片8:一個使用TableWrapLayout的form
TableWrapLayout和GridLayout的一個主要的不同點是你應該停止去計算垂直的空間.在GridLayout里,你一般會讓"不易變形的(rigid)"組件用自然的位置和大小并讓"可伸縮的(flexible)"組件去占據水平或垂直的空間.相反,TableWrapLayout是從上往下工作的,并且它容下所有的組件,它的工作是完全的.占據水平空間的概念還存在(象上面展示一樣).但是,垂直方向上,你只能在單元(cell)比組件高時選擇FILL單元,或選擇TOP,MIDDLE或BOTTOM垂直對齊.
你也許會注意到一個地方和剛剛說的不符:TableWrapLayout仍然有一個grabVertical變量.但是,這里這個變量在這里有明確的目的:當一個設置了高度的組件占多行時,它的高度會給出一個條件就是垂直dimension已經知道了,組件需要去除它所在的多個單元之間的多余空間.
為了用TableWrapLayout有好的結果,確定組件可以接近風格(SWT.WRAP).Eclipse Froms提供的組合定制組件能夠在box外面包裹.這是通過實現ILayoutExtension接口實現的:
public interface ILayoutExtension {
/**
* Computes the minimum width of the parent. All widgets capable of word
* wrapping should return the width of the longest word that cannot be
* broken any further.
*
* @param parent the parent composite
* @param changed <code>true</code> if the cached information should be
* flushed, <code>false</code> otherwise.
* @return the minimum width of the parent composite
*/
public int computeMinimumWidth(Composite parent, boolean changed);
/**
* Computes the maximum width of the parent. All widgets capable of word
* wrapping should return the length of the entire text with wrapping
* turned off.
*
* @param parent the parent composite
* @param changed <code>true</code> if the cached information
* should be flushed, <code>false</code> otherwise.
* @return the maximum width of the parent composite
*/
public int computeMaximumWidth(Composite parent, boolean changed);
}
TableWrapLayout本身實現了這個接口,這樣讓它處理當composites的layout是這個composite的parent的children的情況.另外的兩個方法能夠計算兩種極端情況--當所有組件盡可能寬地布滿時的顯然的最小寬度和最大寬度.兩者的不同是使列之間的多余空間盡可能小時貢獻出公平的空間.
讓我們看清楚貢獻空間是怎樣的.我們會推薦我們到現在為止寫的代碼并象下面這樣做出修改:
layout.numColumns = 3;
Label label;
TableWrapData td;
label = toolkit.createLabel(form.getBody(),
"Some text to put in the first column", SWT.WRAP);
label = toolkit.createLabel(form.getBody(),
"Some text to put in the second column and make it a bit "+
"longer so that we can see what happens with column "+
distribution. This text must be the longest so that it can "+
"get more space allocated to the columns it belongs to.",
SWT.WRAP);
td = new TableWrapData();
td.colspan = 2;
label.setLayoutData(td);
label = toolkit.createLabel(form.getBody(),
"This text will span two rows and should not grow the column.",
SWT.WRAP);
td = new TableWrapData();
td.rowspan = 2;
label.setLayoutData(td);
label = toolkit.createLabel(form.getBody(),
"This text goes into column 2 and consumes only one cell",
SWT.WRAP);
label.setLayoutData(new TableWrapData(TableWrapData.FILL_GRAB));
label = toolkit.createLabel(form.getBody(),
"This text goes into column 3 and consumes only one cell too",
SWT.WRAP);
label.setLayoutData(new TableWrapData(TableWrapData.FILL));
label = toolkit.createLabel(form.getBody(),
"This text goes into column 2 and consumes only one cell",
SWT.WRAP);
label.setLayoutData(new TableWrapData(TableWrapData.FILL_GRAB));
label = toolkit.createLabel(form.getBody(),
"This text goes into column 3 and consumes only one cell too",
SWT.WRAP);
label.setLayoutData(new TableWrapData(TableWrapData.FILL));
form.getBody().setBackground(form.getBody().getDisplay().
getSystemColor(SWT.COLOR_WIDGET_BACKGROUND));
這個創建了一些有不同長度文本的label.有些labels占據多列,有些占據多行.為了讓測試更加簡單,
我們把form的背景設置為組件背景,這樣單元能夠更簡單看出來.當我們運行例子,我們會得到下面的樣子:
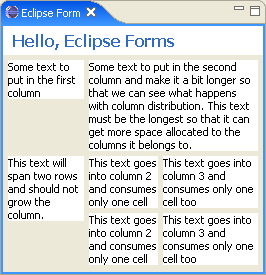
圖片9:TableWrapLayout留下的多余空間
關鍵之處在于組件最小寬度和最大寬度相比較時.相差越多,結果越明顯,會看到列中有很大的縫隙.占據的寬度是組件所需要的最小的寬度.注意第3列比第2列稍微寬一點點,這是因為第3列中的文字長度比第2列中文字要長點.如果需要閱讀布局的相關理論,可以去這里W3C recommendations for HTML table auto-layout.
ColumnLayout
Eclipse Forms另外一個定制的layout是SWT RowLayout的變種.如果我們把RowLayout上的children垂直放置時--按列-并且使同列中的所有組件擁有相同的寬度,我們會由組件的寬度得到多個列.但是,最后一列顯然不是被填滿的--這由組件的個數決定.如果在form中,我們會仍然看到所有組件在一列中,因為RowLayout不能夠"垂直" 包裹.如果我們用GridLayout相替代的話,列的數量由我們自己決定.
在更加復雜的forms中我們需要列的數量按情況變化.換句話來說,我們希望數字按照form的寬度來改變--有可能需要更多的列,當寬度減小時則把數字減小.而且我們希望所有列的長度象報紙布局一樣相同.這些要求都能夠通過ColumnLayout來達到.
與TableWrapLayout相比,ColumnLayout更加簡單.不需要復雜的設置.唯一需要你設置的就是列數的范圍,默認是1到3.下面的例子演示了一個使用ColumnLayout的有許多段落(sections)的form.初始時,只需要兩列就可以放置所有段落了.如果我們把編輯器變窄一點,layout會使它們在同一列中.
圖片10:使用ColumnLayout的所有按列排列的段落
.layout開始是兩列,但是按照空間的改變變成了一列.
轉自:http://blog.csdn.net/starshus/archive/2006/02/07/593785.aspx