本機(jī)環(huán)境
Win 8
JDK 7
Maven 3.2
Nexus 2.11
版本選擇
http://www.sonatype.org/nexus/archived
nexus 2.6 及 2.6+ 版本要求 jdk 1.7 或 1.7+ 版本(jdk 1.6 請選擇 nexus 2.5 及 以下版本)。根據(jù)你現(xiàn)有的環(huán)境來選擇合適的版本。
這里選擇
nexus-2.11.0 (如果無法打開下載, 可將新標(biāo)簽頁地址欄中的地址復(fù)制到迅雷等下載工具中進(jìn)行下載)。
下載得到 nexus-2.11.0-bundle.zip 壓縮包。解壓縮里面的 nexus-2.11.0-02 目錄,如我的 E:\setup\dev\servers\nexus, 最終得到
的目錄結(jié)構(gòu)為 E:\setup\dev\servers\nexus\nexus-2.11.0-02。
配置 nexus 環(huán)境
NEXUS_HOME = E:\setup\dev\servers\nexus\nexus-2.11.0-02
Path = .;%NEXUS_HOME%\bin
安裝 nexus 服務(wù)
如果你所使用的是 Win8 操作系統(tǒng),以下操作需要管理員權(quán)限。在命令行中執(zhí)行
nexus install(Win8 系統(tǒng)組合鍵為 Ctrl + X, A):
C:\WINDOWS\system32>nexus install
wrapper | nexus installed.
啟動 nexus
在命令行中執(zhí)行
nexus start:
C:\WINDOWS\system32>nexus start
wrapper | Starting the nexus service...
wrapper | Waiting to start...
wrapper | Waiting to start...
wrapper | Waiting to start...
wrapper | nexus started.
頁面訪問的入口地址:
http://localhost:8081/nexus
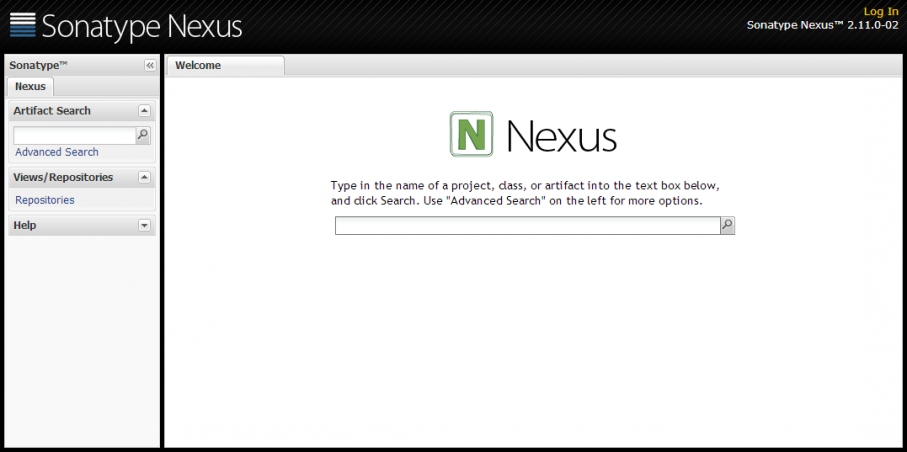
登錄 nexus
默認(rèn)的管理員賬號是:admin, 密碼是:admin123
停止 nexus
在命令行中執(zhí)行
nexus stop:
C:\Users\fanlychie>nexus stop
wrapper | Stopping the nexus service...
wrapper | Waiting to stop...
wrapper | nexus stopped.
修改 nexus 賬號密碼
先停止 nexus,打開 %NEXUS_HOME%\sonatype-work\nexus\conf\security.xml,修改即可。
nexus 的密碼采用 SHA1 加密算法 (
在線加密工具 ),將加密后的 SHA1 串(小寫)拷貝覆蓋原來的。重啟 nexus:
nexus restart 。
<user>
<id>admin</id>
<firstName>Administrator</firstName>
<lastName>User</lastName>
<password>2899441143e28aee7287e8da3d7211258f5edbd3</password>
<status>active</status>
<email>fanlychie@yeah.net</email>
</user>
修改 nexus 端口
打開 %NEXUS_HOME%\nexus-2.11.0-02\conf\nexus.properties, 修改 application-port 的值。重啟 nexus:
nexus restart 。
application-port=8081
application-host=0.0.0.0
nexus-webapp=${bundleBasedir}/nexus
nexus-webapp-context-path=/nexus
倉庫類型
打開 Views/Repositories --> Repositories 視圖
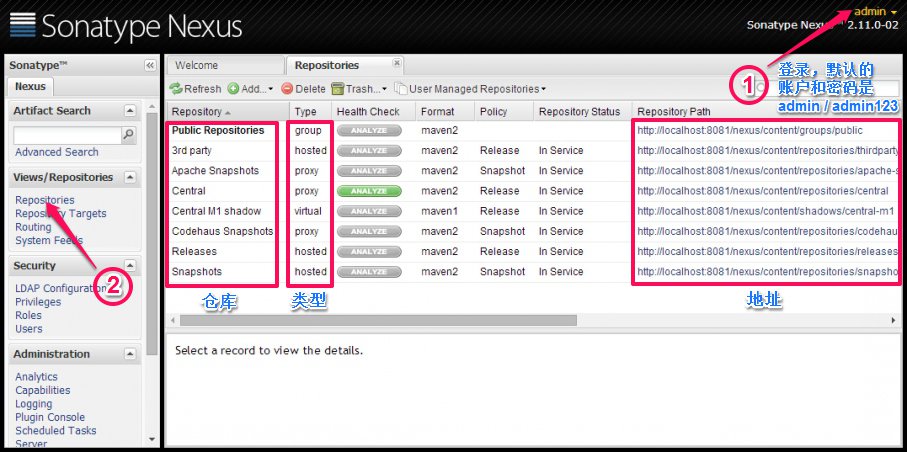
nexus 倉庫分為 4 種,group(倉庫組)、hosted(宿主倉庫)、proxy(代理倉庫)、virtual(虛擬倉庫)。
我們自己開發(fā)的構(gòu)件通常是發(fā)布到 hosted 倉庫,proxy 用來代理遠(yuǎn)程的公共倉庫,一個(gè) group 可以包含多個(gè) hosted/proxy 倉庫。
倉庫組
打開 Views/Repositories --> Repositories --> Public Repositories --> Configuration 視圖
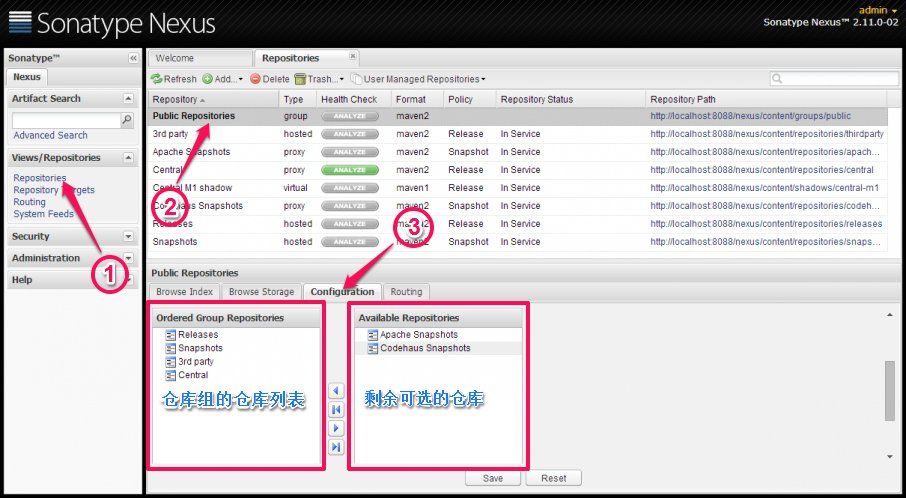
Configuration 欄的左邊是倉庫組倉庫列表,右邊是當(dāng)前可選的倉庫,可以從右邊挑選合適的倉庫加入到左邊的倉庫組,點(diǎn)擊 Save 保存即可。
一個(gè)倉庫組通常包含了多個(gè)倉庫,倉庫組中的倉庫列表的順序決定了構(gòu)件下載時(shí)遍歷的倉庫的先后次序,因此,建議將遠(yuǎn)程中央倉庫(Central)放
到倉庫組的最后一項(xiàng)。
maven settings.xml 配置
在 settings.xml 配置文件中添加如下配置:
<servers>
<server>
<id>releases</id>
<username>admin</username>
<password>admin123</password>
</server>
<server>
<id>snapshots</id>
<username>admin</username>
<password>admin123</password>
</server>
<server>
<id>thirdparty</id>
<username>admin</username>
<password>admin123</password>
</server>
</servers>
<mirrors>
<mirror>
<id>nexus</id>
<mirrorOf>*</mirrorOf>
<name>nexus public repositories</name>
<url>http://127.0.0.1:8088/nexus/content/groups/public</url>
</mirror>
</mirrors>
<server> 節(jié)點(diǎn)配置服務(wù)的賬戶密碼,用于發(fā)布構(gòu)件時(shí)進(jìn)行身份和權(quán)限的認(rèn)證。<mirror> 節(jié)點(diǎn)用于鏡像的配置,具體用法參考
maven 鏡像配置
發(fā)布構(gòu)件
在 nexus 中找到如下的視圖頁面:

復(fù)制以上的配置,粘貼到你的 pom.xml 配置文件中:
<project xmlns="http://maven.apache.org/POM/4.0.0" xmlns:xsi="http://www.w3.org/2001/XMLSchema-instance"
xsi:schemaLocation="http://maven.apache.org/POM/4.0.0 http://maven.apache.org/xsd/maven-4.0.0.xsd">
<modelVersion>4.0.0</modelVersion>
<groupId>org.fanlychie</groupId>
<artifactId>proj</artifactId>
<version>1.0.0</version>
<packaging>jar</packaging>
<name>proj</name>
<url>http://maven.apache.org</url>
<distributionManagement>
<repository>
<id>releases</id>
<url>http://localhost:8088/nexus/content/repositories/releases</url>
</repository>
</distributionManagement>
</project>
這里需要注意的是,repository 節(jié)點(diǎn)的 id 需與 settings.xml 中配置的 server 節(jié)點(diǎn)的 id 相同,如果不相同,修改任意一方都可以,只
要讓它們保持一致即可,否則,發(fā)布構(gòu)件的時(shí)候會報(bào) 401,ReasonPhrase:Unauthorized 的錯(cuò)誤,原因是無法認(rèn)證用戶的身份。
右鍵項(xiàng)目,Run As --> Maven build...,在 Goals 欄輸入
deploy 或在命令行(cmd)執(zhí)行
mvn deploy,在控制臺若能看到
BUILD SUCCESS,表明構(gòu)件發(fā)布成功。你可以在 nexus 的 Releases 倉庫中找到這個(gè)構(gòu)件:

發(fā)布構(gòu)件的時(shí)候,如果想把源碼也一起發(fā)布出去(執(zhí)行
mvn dependency:sources 可獲得源碼),配置如下:
<project xmlns="http://maven.apache.org/POM/4.0.0" xmlns:xsi="http://www.w3.org/2001/XMLSchema-instance"
xsi:schemaLocation="http://maven.apache.org/POM/4.0.0 http://maven.apache.org/xsd/maven-4.0.0.xsd">
<modelVersion>4.0.0</modelVersion>
<groupId>org.fanlychie</groupId>
<artifactId>proj</artifactId>
<version>1.0.1</version>
<packaging>jar</packaging>
<name>proj</name>
<url>http://maven.apache.org</url>
<distributionManagement>
<repository>
<id>releases</id>
<url>http://localhost:8088/nexus/content/repositories/releases</url>
</repository>
</distributionManagement>
<build>
<plugins>
<plugin>
<groupId>org.apache.maven.plugins</groupId>
<artifactId>maven-source-plugin</artifactId>
<version>2.4</version>
<executions>
<execution>
<id>attach-sources</id>
<phase>install</phase>
<goals>
<goal>jar-no-fork</goal>
</goals>
</execution>
</executions>
</plugin>
</plugins>
</build>
</project>
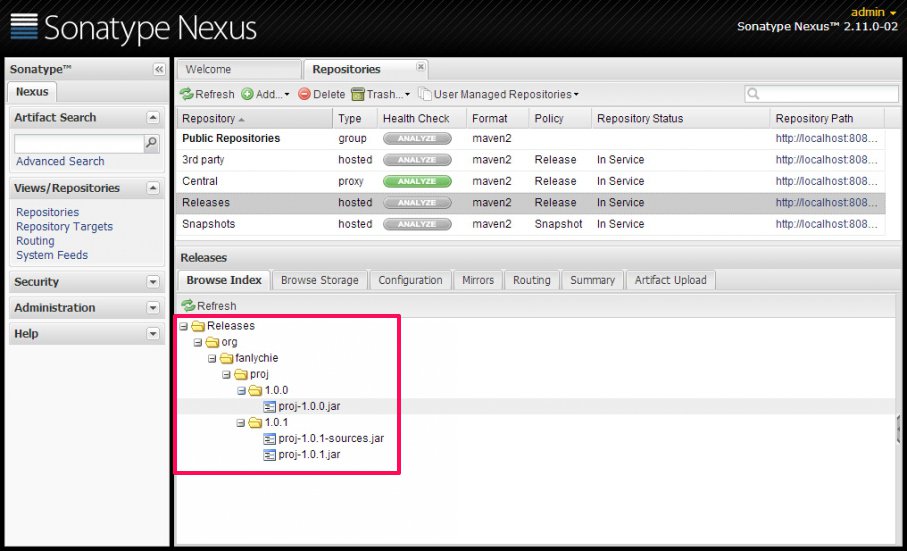
同一個(gè)構(gòu)件是不允許發(fā)布兩次的,先修改一下構(gòu)件的版本,然后
deploy,結(jié)果如圖:
發(fā)布快照
快照用于區(qū)分穩(wěn)定與不穩(wěn)定的構(gòu)件(發(fā)布的版本就是穩(wěn)定的,快照版本是不穩(wěn)定的)。構(gòu)件的升級通常會帶來許多的不穩(wěn)定性,需要不斷的修復(fù),
快照可以避免由于升級帶來的不穩(wěn)定性迫使的不停的升級版本號,最終造成版本號的泛濫的問題。快照允許重新發(fā)布,而不需要變更構(gòu)件的版本號。
在 nexus 中找到如下的視圖頁面:
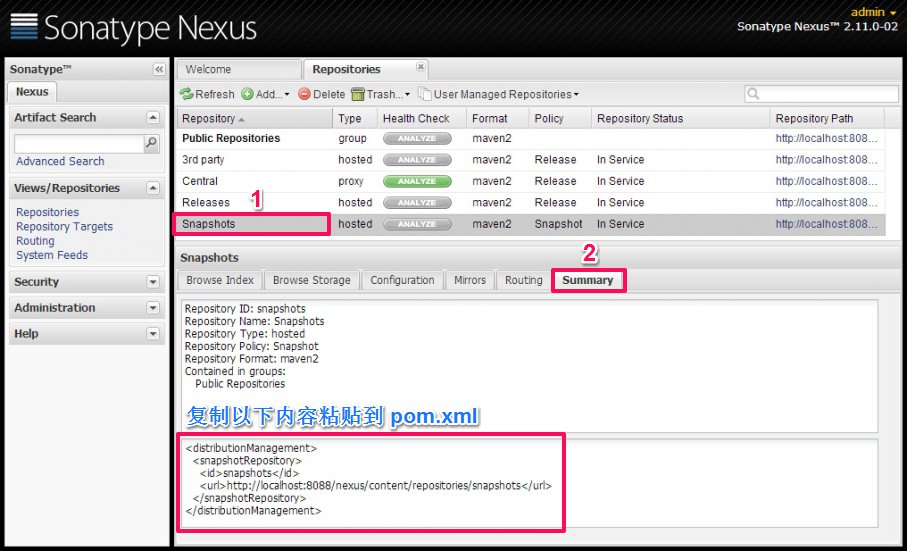
復(fù)制以上的配置,粘貼到你的 pom.xml 配置文件中:
<project xmlns="http://maven.apache.org/POM/4.0.0" xmlns:xsi="http://www.w3.org/2001/XMLSchema-instance"
xsi:schemaLocation="http://maven.apache.org/POM/4.0.0 http://maven.apache.org/xsd/maven-4.0.0.xsd">
<modelVersion>4.0.0</modelVersion>
<groupId>org.fanlychie</groupId>
<artifactId>proj</artifactId>
<version>2.0.0-SNAPSHOT</version>
<packaging>jar</packaging>
<name>proj</name>
<url>http://maven.apache.org</url>
<distributionManagement>
<repository>
<id>releases</id>
<url>http://localhost:8088/nexus/content/repositories/releases</url>
</repository>
<snapshotRepository>
<id>snapshots</id>
<url>http://localhost:8088/nexus/content/repositories/snapshots</url>
</snapshotRepository>
</distributionManagement>
<build>
<plugins>
<plugin>
<groupId>org.apache.maven.plugins</groupId>
<artifactId>maven-source-plugin</artifactId>
<version>2.4</version>
<executions>
<execution>
<id>attach-sources</id>
<phase>install</phase>
<goals>
<goal>jar-no-fork</goal>
</goals>
</execution>
</executions>
</plugin>
</plugins>
</build>
</project>
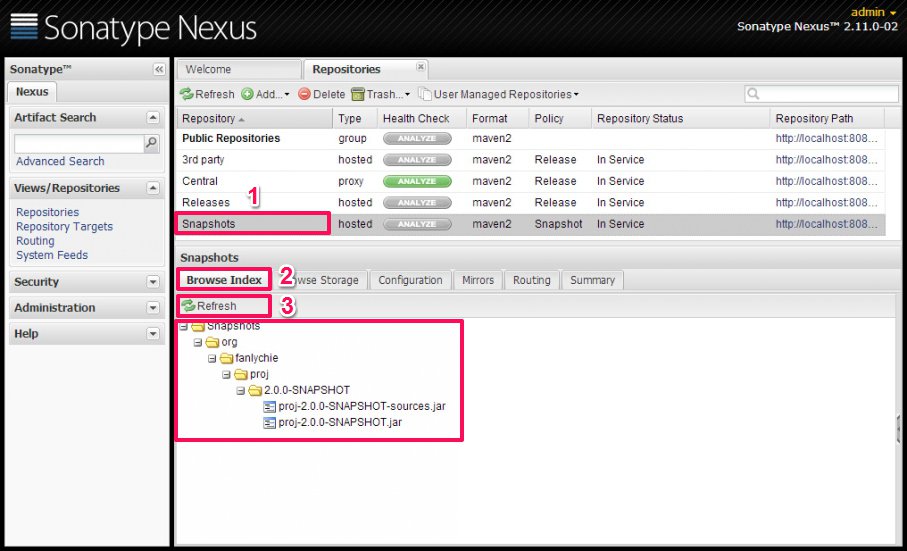
版本號含有 SNAPSHOT 的構(gòu)件將發(fā)布到 Snapshots 倉庫,否則,將發(fā)布到 Releases 倉庫。執(zhí)行發(fā)布命令:
mvn deploy,結(jié)果如圖:
發(fā)布第三方構(gòu)件
步驟見下圖的標(biāo)注:
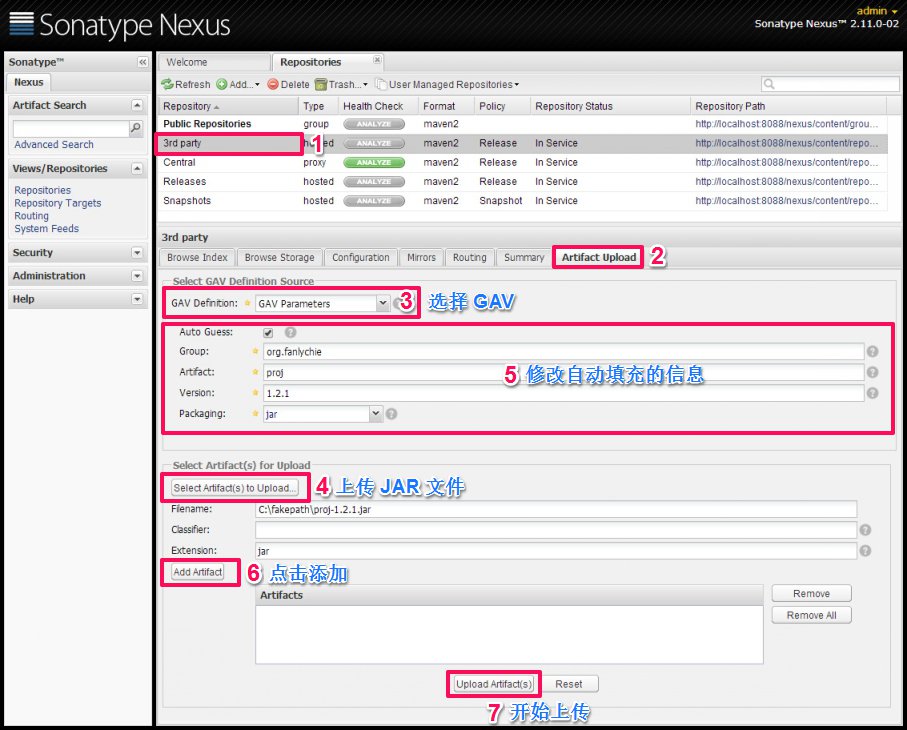
命令行方式發(fā)布:
mvn deploy:deploy-file -DgroupId=自定義groupId -DartifactId=自定義artifactId -Dversion=版本號 -Dpackaging=jar
-Dfile=JAR文件的路徑 -Durl=http://127.0.0.1:8088/nexus/content/repositories/thirdparty -DrepositoryId=thirdparty
遠(yuǎn)程索引
在 nexus 中找到如下的視圖頁面:
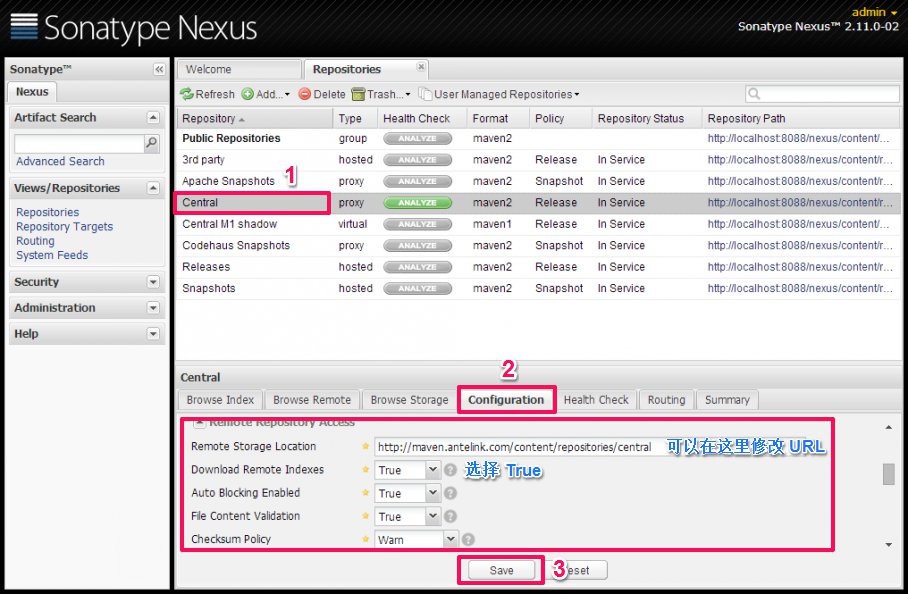
保存之后,在左側(cè)面板中選擇 Administration --> Scheduled Tasks,如下圖:

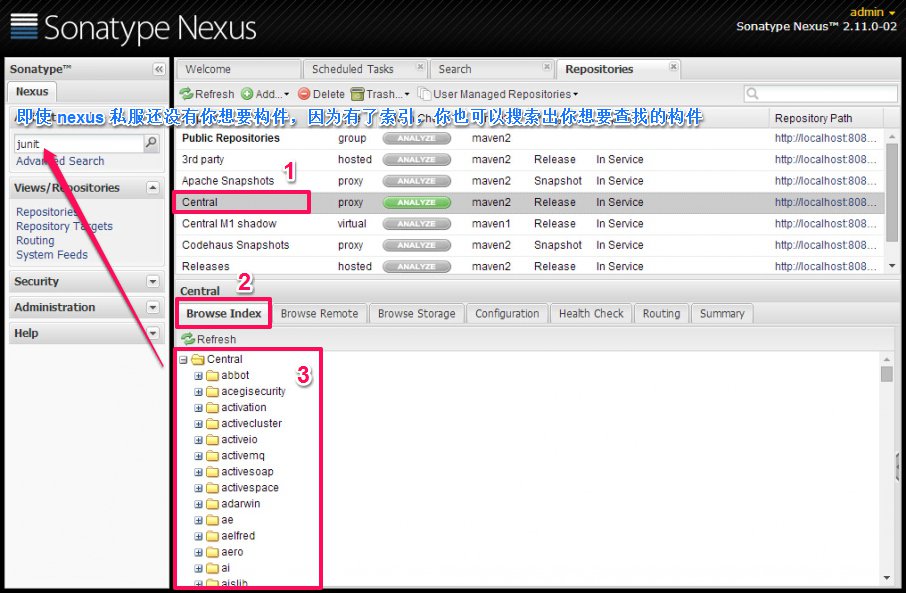
可以看到這里有一個(gè) Repair Repositories Index 任務(wù),任務(wù)完成之后會自動從面板中移除,點(diǎn)擊左上角的 Refresh 按鈕來查看。任務(wù)完成
之后回到 Repositories 面板,選擇 Central 倉庫右鍵,選擇 Update Index,再回到 Scheduled Tasks 面板,可以看到有一個(gè) Update
Repositories Index 任務(wù),這個(gè)任務(wù)花時(shí)較長,任務(wù)完成之后,回到 Repositories 面板,在 Browse Index 中可以看到從遠(yuǎn)程倉庫下載回
來的索引文件,有了索引,即使 nexus 私服還沒有你想要構(gòu)件,你也可以搜索出你想要查找的構(gòu)件。