PS:一般在項(xiàng)目開發(fā)過程中,使用比較多的就是先建好表,再利用hibernate反向工程生成*.hbm.xml文件跟POJO類,個(gè)人認(rèn)為由于目前所使用的數(shù)據(jù)庫都是關(guān)系數(shù)據(jù)庫,而hibernate作為一個(gè)ORM,把對數(shù)據(jù)庫的操作都對象化了,更應(yīng)當(dāng)從對象出發(fā),生成數(shù)據(jù)庫里面相關(guān)表,這樣更加符合人認(rèn)知事物的習(xí)慣。
由于hibernate3提供了自帶的工具hbm2ddl,建立根據(jù)你的對象建立數(shù)據(jù)庫是一件非常簡單的事情。
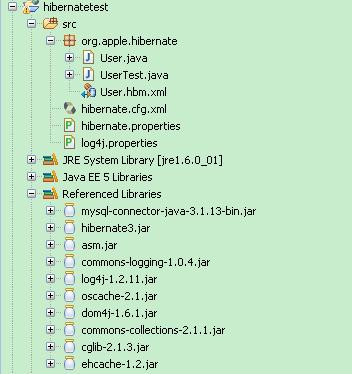
Demo結(jié)構(gòu)圖如下:

1、首先建立POJO類
## 數(shù)據(jù)庫鏈接,密碼自己根據(jù)自己的實(shí)際數(shù)據(jù)庫進(jìn)行修改!
hibernate.dialect org.hibernate.dialect.MySQLDialect
hibernate.connection.driver_class com.mysql.jdbc.Driver
hibernate.connection.url jdbc:mysql://localhost/usertest?useUnicode=true&characterEncoding=GBK
hibernate.connection.username root
hibernate.connection.password password
5、建立UserTest類
PS:要在mysql數(shù)據(jù)庫里面先建立好usertest表,然后運(yùn)行UserTest類,這樣就可以順利通過hibernate3提供了自帶的工具hbm2ddl,建立根據(jù)你的對象建立數(shù)據(jù)庫相關(guān)表。
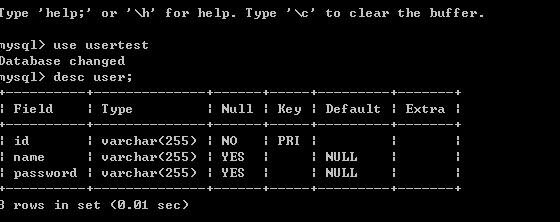
打開mysql數(shù)據(jù)庫:

大功告成!
由于hibernate3提供了自帶的工具hbm2ddl,建立根據(jù)你的對象建立數(shù)據(jù)庫是一件非常簡單的事情。
Demo結(jié)構(gòu)圖如下:

1、首先建立POJO類
1 package org.apple.hibernate;
2
3 public class User {
4 private String id;
5 private String name;
6 private String password;
7 public String getId() {
8 return id;
9 }
}
10 public void setId(String id) {
11 this.id = id;
12 }
}
13 public String getName() {
14 return name;
15 }
}
16 public void setName(String name) {
17 this.name = name;
18 }
}
19 public String getPassword() {
20 return password;
21 }
}
22 public void setPassword(String password) {
23 this.password = password;
24 }
}
25
26 }
}
2、根據(jù)POJO類里面里面相關(guān)的字段寫User.hbm.xml映射文件 package org.apple.hibernate;
2

3
 public class User {
4
 private String id;
5
 private String name;
6
 private String password;
7
 public String getId() {
8
 return id;
9
 }
}10
 public void setId(String id) {
11
 this.id = id;
12
 }
}13
 public String getName() {
14
 return name;
15
 }
}16
 public void setName(String name) {
17
 this.name = name;
18
 }
}19
 public String getPassword() {
20
 return password;
21
 }
}22
 public void setPassword(String password) {
23
 this.password = password;
24
 }
}25

26
 }
} 1 <?xml version="1.0" encoding="GB2312"?>
2 <!DOCTYPE hibernate-mapping SYSTEM "http://hibernate.sourceforge.net/hibernate-mapping-2.0.dtd" >
3 <hibernate-mapping>
4 <class name="org.apple.hibernate.User">
5 <!--hibernate為我們生成主鍵id-->
6 <id name = "id" unsaved-value = "null">
7 <generator class="uuid.hex"/>
8 </id>
</id>
9
10 <!--默認(rèn)把類的變量映射為相同名字的表列,當(dāng)然我們可以修改其映射方式-->
11 <property name="name"/>
12 <property name="password"/>
13 </class>
14 </hibernate-mapping>
3、建立hibernate.cfg.xml <?xml version="1.0" encoding="GB2312"?>
2
 <!DOCTYPE hibernate-mapping SYSTEM "http://hibernate.sourceforge.net/hibernate-mapping-2.0.dtd" >
3
 <hibernate-mapping>
4
 <class name="org.apple.hibernate.User">
5
 <!--hibernate為我們生成主鍵id-->
6
 <id name = "id" unsaved-value = "null">
7
 <generator class="uuid.hex"/>
8
 </id>
</id>9

10
 <!--默認(rèn)把類的變量映射為相同名字的表列,當(dāng)然我們可以修改其映射方式-->
11
 <property name="name"/>
12
 <property name="password"/>
13
 </class>
14
 </hibernate-mapping>
 1 <!DOCTYPE hibernate-configuration PUBLIC
2 "-//Hibernate/Hibernate Configuration DTD 3.0//EN"
3 "http://hibernate.sourceforge.net/hibernate-configuration-3.0.dtd">
4
5 <hibernate-configuration>
6 <session-factory>
7
8 <property name="hibernate.dialect">org.hibernate.dialect.MySQLDialect</property>
9 <property name="hibernate.show_sql">true</property>
10 <mapping resource="org/apple/hibernate/Person.hbm.xml"/>
11 </session-factory>
12 </hibernate-configuration>
4、建立 hibernate.properties數(shù)據(jù)庫鏈接 <!DOCTYPE hibernate-configuration PUBLIC
2
 "-//Hibernate/Hibernate Configuration DTD 3.0//EN"
3
 "http://hibernate.sourceforge.net/hibernate-configuration-3.0.dtd">
4

5
 <hibernate-configuration>
6
 <session-factory>
7

8
 <property name="hibernate.dialect">org.hibernate.dialect.MySQLDialect</property>
9
 <property name="hibernate.show_sql">true</property>
10
 <mapping resource="org/apple/hibernate/Person.hbm.xml"/>
11
 </session-factory>
12
 </hibernate-configuration>
## 數(shù)據(jù)庫鏈接,密碼自己根據(jù)自己的實(shí)際數(shù)據(jù)庫進(jìn)行修改!
hibernate.dialect org.hibernate.dialect.MySQLDialect
hibernate.connection.driver_class com.mysql.jdbc.Driver
hibernate.connection.url jdbc:mysql://localhost/usertest?useUnicode=true&characterEncoding=GBK
hibernate.connection.username root
hibernate.connection.password password
5、建立UserTest類
1 package org.apple.hibernate;
2
3 import org.hibernate.cfg.Configuration;
4 import org.hibernate.tool.hbm2ddl.SchemaExport;
5
6
7
8 class UserTest{
9 public static void main(String[] args) throws Exception{
10 //配置環(huán)境,分析xml映射文件
11 Configuration conf= new Configuration()
12 .addClass(User.class);
13
14 //生成并輸出sql到文件(當(dāng)前目錄)和數(shù)據(jù)庫
15 SchemaExport dbExport=new SchemaExport(conf);
16 dbExport.create(true, true);
17 }
}
18 }
}
6、建立log4j.properties日志文件 package org.apple.hibernate;
2

3
 import org.hibernate.cfg.Configuration;
4
 import org.hibernate.tool.hbm2ddl.SchemaExport;
5

6

7

8
 class UserTest{
 9
 public static void main(String[] args) throws Exception{
 10
 //配置環(huán)境,分析xml映射文件
11
 Configuration conf= new Configuration()
12
 .addClass(User.class);
13

14
 //生成并輸出sql到文件(當(dāng)前目錄)和數(shù)據(jù)庫
15
 SchemaExport dbExport=new SchemaExport(conf);
16
 dbExport.create(true, true);
17
 }
}18
 }
}### direct log messages to stdout ###
log4j.appender.stdout=org.apache.log4j.ConsoleAppender
log4j.appender.stdout.Target=System.out
log4j.appender.stdout.layout=org.apache.log4j.PatternLayout
log4j.appender.stdout.layout.ConversionPattern=%d{ABSOLUTE} %5p %c{1}:%L - %m%n
### set log levels - for more verbose logging change 'info' to 'debug' ###
log4j.rootLogger=warn, stdout
PS:要在mysql數(shù)據(jù)庫里面先建立好usertest表,然后運(yùn)行UserTest類,這樣就可以順利通過hibernate3提供了自帶的工具hbm2ddl,建立根據(jù)你的對象建立數(shù)據(jù)庫相關(guān)表。
打開mysql數(shù)據(jù)庫:

大功告成!


