mule號稱開源ESB的最好實現,研究mule也有段時間了, 在“浩如煙海”的xml配置中,保持清醒的頭腦確實不容易。
作為學習筆記之一,記錄一下一個mule簡單應用的實現。
需求:給指定的email地址發送郵件.
一:基本實現:
1: 實現命令行輸入發送email:
為了能在命令行接受輸入, 需要配置一個輸入輸出連接器:
1 <stdio:connector name="SystemStreamConnector" promptMessage="Please enter email content(email address, contents): " messageDelayTime="1000" />
2:配置一個UMO,把輸入的內容放入一個隊列:
service name="contentUMO">
<!-- any number of endpoints can be added to an inbound router -->
<inbound>
<stdio:inbound-endpoint system="IN" />
</inbound>
<outbound>
<pass-through-router>
<vm:outbound-endpoint path="content" />
</pass-through-router>
</outbound>
</service>
outbound節點的配置, 把輸入的內容(String) 路由到一個叫“content”的queue中, 此queue為jvm中的內存隊列。
3:配置一個UMO,實現發送email:
<service name="EmailBridge">
<inbound>
<vm:inbound-endpoint path="content" />
</inbound>
<outbound>
<pass-through-router>
<smtps:outbound-endpoint user="lcllcl987"
password="yourpassword" host="smtp.gmail.com"
transformer-refs="ContentToEmail StringToMimeMessage"
connector-ref="emailConnector" from="hujintao@mycomp.com.cn"
subject="test for mule email bridge!" />
</pass-through-router>
</outbound>
</service>
其中inbound的配置為contentUMO的outbound, contentUMO和EmailBridge這個兩個UMO通過名稱為“content”的queue連接起來, 實現通訊。EmailBridge接收到輸入后, 會依次通過ContentToEmail, StringToMimeMessage兩個transformer進行內容的轉換。
BTW:為了在mule中使用smtp, 需要在xml的namespace中聲明:
xmlns:smtps="http://www.mulesource.org/schema/mule/smtps/2.1"
mule有很多對于具體協議的transport實現,每一個transport的實現作為一個jar包存在(比如mule-transport-email-2.1.2.jar), 在jar中的META-INF/spring.schemas文件中, 寫明了xsd文件的對應關系, META-INF/sping.handers配置了相關命名空間的handle class, 可以據此在mule的配置文件中聲明命名空間.
完整的mule配置文件如下:
<?xml version="1.0" encoding="UTF-8"?>
<mule xmlns="http://www.mulesource.org/schema/mule/core/2.1"
xmlns:xsi="http://www.w3.org/2001/XMLSchema-instance"
xmlns:spring="http://www.springframework.org/schema/beans"
xmlns:stdio="http://www.mulesource.org/schema/mule/stdio/2.1"
xmlns:vm="http://www.mulesource.org/schema/mule/vm/2.1"
xmlns:smtps="http://www.mulesource.org/schema/mule/smtps/2.1"
xsi:schemaLocation="
http://www.springframework.org/schema/beans http://www.springframework.org/schema/beans/spring-beans-2.5.xsd
http://www.mulesource.org/schema/mule/core/2.1 http://www.mulesource.org/schema/mule/core/2.1/mule.xsd
http://www.mulesource.org/schema/mule/stdio/2.1 http://www.mulesource.org/schema/mule/stdio/2.1/mule-stdio.xsd
http://www.mulesource.org/schema/mule/vm/2.1 http://www.mulesource.org/schema/mule/vm/2.1/mule-vm.xsd
http://www.mulesource.org/schema/mule/smtps/2.1 http://www.mulesource.org/schema/mule/smtps/2.1/mule-smtps.xsd">
<description>
This is a simple component example that demostrates how to send
a e-mail
</description>
<stdio:connector name="SystemStreamConnector"
promptMessage="Please enter email content(email address, contents): " messageDelayTime="1000" />
<!-- This configures an extra setting if you're using GMail's SMTP -->
<custom-connector name="emailConnector"
class="co.mule.mail.SmtpConnector" />
<custom-transformer name="ContentToEmail"
class="co.mule.mail.ContentToEmailTransformer" />
<custom-transformer name="StringToMimeMessage"
class="org.mule.transport.email.transformers.StringToEmailMessage" />
<!--
The Mule model initialises and manages your UMO components
-->
<model name="myEmail">
<!--
A Mule service defines all the necessary information about how your components will
interact with the framework, other components in the system and external sources.
Please refer to the Configuration Guide for a full description of all the parameters.
-->
<service name="contentUMO">
<!-- any number of endpoints can be added to an inbound router -->
<inbound>
<stdio:inbound-endpoint system="IN" />
</inbound>
<outbound>
<pass-through-router>
<vm:outbound-endpoint path="content" />
</pass-through-router>
</outbound>
</service>
<service name="EmailBridge">
<inbound>
<vm:inbound-endpoint path="content" />
</inbound>
<outbound>
<pass-through-router>
<smtps:outbound-endpoint user="lcllcl987"
password="yourpassword" host="smtp.gmail.com"
transformer-refs="ContentToEmail StringToMimeMessage"
connector-ref="emailConnector" from="hujintao@mycomp.com.cn"
subject="test for mule email bridge!" />
</pass-through-router>
</outbound>
</service>
</model>
</mule>
相關class如下:
自定義消息轉換器:
public class ContentToEmailTransformer extends AbstractTransformer
{
@Override
protected Object doTransform(Object src, String encoding) throws TransformerException
{
String body = (String)src;
String[] msg = body.split(",");
String email = msg[0];
String content = msg[1];
RequestContext.getEventContext().getMessage().setProperty(
MailProperties.TO_ADDRESSES_PROPERTY, email);
System.out.println("Sent email to " + email + " ,content: " + content);
return content;
}
}
自定義smtp連接器(smtp connector):
public class SmtpConnector extends org.mule.transport.email.SmtpsConnector
{
@Override
protected void extendPropertiesForSession(Properties global, Properties local, URLName url) {
super.extendPropertiesForSession(global, local, url);
local.setProperty("mail.smtp.starttls.enable", "true");
local.setProperty("mail.smtp.auth", "true");
local.setProperty("mail.smtps.starttls.enable", "true");
local.setProperty("mail.smtps.auth", "true");
}
}
運行此程序, 根據提示, 在命令行輸入:
Please enter email content(email address, contents):
lichunlei@mycompt.com.cn, I come from Wuhan city!
二: 升級:增加一個component.
修改UMO:EmailBridge配置, 增加一個component:
<service name="EmailBridge">
<inbound>
<vm:inbound-endpoint path="content" />
</inbound>
<component class="co.mule.mail.EmailComponent"/>
<outbound>
<pass-through-router>
<smtps:outbound-endpoint user="lcllcl987"
password="yourpassword" host="smtp.gmail.com"
transformer-refs="emailModelToString StringToMimeMessage"
connector-ref="emailConnector" from="hujintao@mycomp.com.cn"
subject="test for mule email bridge!" />
</pass-through-router>
</outbound>
</service>
注意到增加了一個component, 接受命令行的輸入(String), 產生一個EmailModel的對象.之后,這個EmailModel對象進入outbound, 并經過
emailModelToString, StringToMimeMessag的處理, 最后發送出去.
其中emailModelToString是新添加的一個自定義transformer:
<custom-transformer name="emailModelToString"
class="co.mule.mail.EmailModelToString" />
相關class如下:
EmailModel.java:
package co.mule.mail;
public class EmailModel
{
private String address;
private String content;
public EmailModel(String address, String content)
{
this.address = address;
this.content = content;
}
public String getAddress()
{
return address;
}
public void setAddress(String address)
{
this.address = address;
}
public String getContent()
{
return content;
}
public void setContent(String content)
{
this.content = content;
}
@Override
public String toString()
{
// TODO Auto-generated method stub
return "address=" + address + ", content=" + content;
}
}
EmailComponent.java
需要說明的是:
mule默認采用方法參數類型匹配策略, 所以, 如果有String類型的輸入, foo方法自動調用, 也可以詳細指定調用哪個方法,比如以下配置明確指定調用component的foo方法:
<component class="co.mule.mail.EmailComponent">
<method-entry-point-resolver>
<include-entry-point method="foo"/>
</method-entry-point-resolver>
</component>
package co.mule.mail;
import org.mule.RequestContext;
import org.mule.transport.email.MailProperties;
public class EmailComponent
{
public Object foo(String input)
{
String[] msg = input.split(",");
String address = msg[0];
String content = msg[1];
EmailModel email = new EmailModel(address, content);
System.out.println("create email model: " + email);
RequestContext.getEventContext().getMessage().setProperty(
MailProperties.TO_ADDRESSES_PROPERTY, email.getAddress());
return new EmailModel(address, content);
}
}
package co.mule.mail;
import org.mule.api.transformer.TransformerException;
import org.mule.transformer.AbstractTransformer;
public class EmailModelToString extends AbstractTransformer
{
public EmailModelToString()
{
super();
this.registerSourceType(EmailModel.class);
this.setReturnClass(String.class);
}
@Override
protected Object doTransform(Object src, String encoding)
throws TransformerException {
EmailModel emailModel = (EmailModel)src;
return emailModel.toString();
}
}
三:繼續升級:不滿足于在命令行輸入, 需要在瀏覽器輸入, 也就是發布一個http接口。
修改contentUMO如下:
<service name="contentUMO">
<!-- any number of endpoints can be added to an inbound router -->
<inbound>
<!-- Incoming HTTP requests -->
<inbound-endpoint address="http://localhost:9999"
transformer-refs="HttpRequestToString"
synchronous="true" />
</inbound>
<outbound>
<pass-through-router>
<vm:outbound-endpoint path="content" />
</pass-through-router>
</outbound>
</service>
過http請求得到輸入參數, 經過HttpRequestToString的轉換, 放入“content” queue, 為了和content中的數據格式匹配,在瀏覽器中按如下方式輸入:
http://localhost:9999?email=lichunlei@mycompt.com.cn,hello
新增了一個class:
HttpRequestToString.java
package co.mule.mail;
import org.mule.api.transformer.TransformerException;
import org.mule.transformer.AbstractTransformer;
import org.mule.util.IOUtils;
import java.io.InputStream;
import java.io.UnsupportedEncodingException;
import java.net.URLDecoder;
public class HttpRequestToString extends AbstractTransformer
{
private static final String EMAIL_REQUEST_PARAMETER = "email=";
public HttpRequestToString()
{
super();
this.registerSourceType(String.class);
this.setReturnClass(String.class);
}
public Object doTransform(Object src, String encoding) throws TransformerException
{
return extractEmailValue(extractRequestQuery(convertRequestToString(src, encoding)));
}
private String convertRequestToString(Object src, String encoding)
{
return src.toString();
}
private String extractRequestQuery(String request)
{
String requestQuery = null;
if (request != null && request.length() > 0 && request.indexOf('?') != -1)
{
requestQuery = request.substring(request.indexOf('?') + 1).trim();
}
return requestQuery;
}
private String extractEmailValue(String requestQuery) throws TransformerException
{
String emailValue = null;
if (requestQuery != null && requestQuery.length() > 0)
{
int nameParameterPos = requestQuery.indexOf(EMAIL_REQUEST_PARAMETER);
if (nameParameterPos != -1)
{
int nextParameterValuePos = requestQuery.indexOf('&');
if (nextParameterValuePos == -1 || nextParameterValuePos < nameParameterPos)
{
nextParameterValuePos = requestQuery.length();
}
emailValue = requestQuery.substring(nameParameterPos + EMAIL_REQUEST_PARAMETER.length(), nextParameterValuePos);
}
if (emailValue != null && emailValue.length() > 0)
{
try
{
emailValue = URLDecoder.decode(emailValue, "UTF-8");
}
catch (UnsupportedEncodingException uee)
{
logger.error(uee.getMessage());
}
}
}
if (emailValue == null)
{
emailValue = "";
}
return emailValue;
}
}
繼續在mule的xml汪洋中遨游。
向一個vm:queue發送map消息, mule根據map信息, 動態執行sql, 并返回數據.select 的查詢mule默認返回map數據.
<?xml version="1.0" encoding="UTF-8"?>
<mule xmlns="http://www.mulesource.org/schema/mule/core/2.1"
xmlns:xsi="http://www.w3.org/2001/XMLSchema-instance"
xmlns:jdbc="http://www.mulesource.com/schema/mule/jdbc/2.1"
xmlns:spring="http://www.springframework.org/schema/beans"
xmlns:vm="http://www.mulesource.org/schema/mule/vm/2.1"
xsi:schemaLocation="
http://www.mulesource.com/schema/mule/jdbc/2.1 http://www.mulesource.com/schema/mule/jdbc/2.1/mule-jdbc-ee.xsd
http://www.mulesource.org/schema/mule/core/2.1 http://www.mulesource.org/schema/mule/core/2.1/mule.xsd
http://www.springframework.org/schema/beans http://www.springframework.org/schema/beans/spring-beans-2.5.xsd
http://www.mulesource.org/schema/mule/vm/2.1 http://www.mulesource.org/schema/mule/vm/2.1/mule-vm.xsd">
<spring:bean id="dataSource"
class="org.apache.commons.dbcp.BasicDataSource"
destroy-method="close">
<spring:property name="driverClassName"
value="com.mysql.jdbc.Driver" />
<spring:property name="url"
value="jdbc:mysql://192.168.10.120/sand_res" />
<spring:property name="username" value="username" />
<spring:property name="password" value="888" />
<spring:property name="maxActive" value="30" />
<spring:property name="maxIdle" value="10" />
<spring:property name="maxWait" value="1000" />
<spring:property name="defaultAutoCommit" value="true" />
</spring:bean>
<jdbc:connector name="jdbcConnector" dataSource-ref="dataSource">
<jdbc:query key="selectUser"
value="SELECT first_name,last_name FROM app_user where first_name=#[map-payload:firstName]" />
<jdbc:query key="insertUser"
value="insert into app_user
(id,first_name,last_name ) values(#[map-payload:id], #[map-payload:firstName], #[map-payload:lastName])" />
</jdbc:connector>
<!--
The Mule model initialises and manages your UMO components
-->
<model name="databaseModel">
<service name="insertUMO">
<!-- any number of endpoints can be added to an inbound router -->
<inbound>
<vm:inbound-endpoint path="query"/>
</inbound>
<!--
An outbound router can have one or more router configurations that can be
invoked depending on business rules, message contents, headers or any other
criteria. The pass-through-router is a router that automatically passes
on every message it receives
-->
<outbound>
<pass-through-router>
<jdbc:outbound-endpoint queryKey="selectUser" synchronous="true"/>
</pass-through-router>
</outbound>
</service>
</model>
</mule>
注意: 如果mule采用2.1, jdbc transport的namespase后綴為com, 而不是org, 如果寫錯,IDE不會提示,程序異常也很奇怪,讓我折騰了一個下午:(
測試程序:
public class MyMuleClientTest
{
public static void main(String[] args) throws MuleException
{
// create mule
MuleContext muleContext;
String config = "my-mule-jdbc-config.xml";
muleContext = new DefaultMuleContextFactory().createMuleContext(config);
muleContext.start();
// creat mule client
MuleClient client = new MuleClient();
Map map = new HashMap();
map.put("firstName", "feng");
MuleMessage response = client.send("vm://query", map, null);
System.out.println("response = " + response.getPayload());
}
}
執行的sql為:
SELECT first_name,last_name FROM app_user where first_name="feng"
insert的執行類似,只需修改如下:
<outbound>
<pass-through-router>
<jdbc:outbound-endpoint queryKey="insertUser" synchronous="true"/>
</pass-through-router>
</outbound>
mule的jdbc transport功能過于簡單, 今天的需求是把ibatis集成進來, 作為一個service的component, 以增強持久層功能.
mule可以直接引用spring的配置文件, 方法如下:
<spring:beans>
<spring:import resource="applicationContext.xml" />
<spring:import resource="applicationContext-ibatis.xml" />
</spring:beans>
作為一個演示,我需要往一個vm:queue中寫入消息,component(由spring bean充當)
得到消息, 并作為查詢參數 從數據庫查詢數據并返回.
model定義如下:
<model name="databaseModel">
<service name="databaseUMO">
<!-- any number of endpoints can be added to an inbound router -->
<inbound>
<vm:inbound-endpoint path="query" />
</inbound>
<component>
<method-entry-point-resolver>
<include-entry-point method="getUser" />
</method-entry-point-resolver>
<spring-object bean="userDao"></spring-object>
</component>
</service>
mule中關于component的xsd很不友好, component的子項居然是一個序列, 次序不能顛倒.
現在的任務就是完成userDao 的構建.
首先給出dao的接口:
public interface Dao {
public Object save(String sqlId, Object parameterObject);
public int delete(String sqlId, Object parameterObject);
public int update(String sqlId, Object parameterObject);
public List query(String sqlId, Object parameterObject);
public Object queryObject(String sqlId, Object parameterObject);
public Connection getConn();
public interface UserDao extends Dao {
public List getUsers();
public User getUser(Long userId);
public void saveUser(User user);
public void removeUser(Long userId);
}
public class UserDaoiBatis extends BaseDao implements UserDao {
private DataFieldMaxValueIncrementer incrementer;
public void setIncrementer(DataFieldMaxValueIncrementer incrementer) {
this.incrementer = incrementer;
}
public List getUsers() {
return getSqlMapClientTemplate().queryForList("getUsers", null);
}
public User getUser(Long id) {
User user =
(User) getSqlMapClientTemplate().queryForObject("getUser", id);
if (user == null) {
throw new ObjectRetrievalFailureException(User.class, id);
}
return user;
}
public void saveUser(User user) {
if (user.getId() == null) {
Long id = new Long(incrementer.nextLongValue());
user.setId(id);
// To use iBatis's <selectKey> feature, which is db-specific, comment
// out the above two lines and use the line below instead
// Long id = (Long) getSqlMapClientTemplate().insert("addUser", user);
getSqlMapClientTemplate().insert("addUser", user);
logger.info("new User id set to: " + id);
} else {
getSqlMapClientTemplate().update("updateUser", user);
}
}
public void removeUser(Long id) {
getSqlMapClientTemplate().update("deleteUser", id);
}
}
在spring配置文件中, 裝配userDao:
<?xml version="1.0" encoding="UTF-8"?>
<beans xmlns="http://www.springframework.org/schema/beans" xmlns:xsi="http://www.w3.org/2001/XMLSchema-instance"
xsi:schemaLocation="http://www.springframework.org/schema/beans http://www.springframework.org/schema/beans/spring-beans-2.5.xsd">
<bean id="dataSource" class="org.apache.commons.dbcp.BasicDataSource" destroy-method="close">
<property name="driverClassName" value="${jdbc.driverClassName}"/>
<property name="url" value="${jdbc.url}"/>
<property name="username" value="${jdbc.username}"/>
<property name="password" value="${jdbc.password}"/>
<property name="maxActive" value="30"/>
<property name="maxIdle" value="10"/>
<property name="maxWait" value="1000"/>
<property name="defaultAutoCommit" value="true"/>
</bean>
<!-- Transaction manager for iBATIS DAOs -->
<bean id="transactionManager" class="org.springframework.jdbc.datasource.DataSourceTransactionManager">
<property name="dataSource" ref="dataSource"/>
</bean>
<!-- SqlMap setup for iBATIS Database Layer -->
<bean id="sqlMapClient" class="org.springframework.orm.ibatis.SqlMapClientFactoryBean">
<property name="dataSource" ref="dataSource"/>
<property name="configLocation" value="classpath:/co/iplatform/dao/sql-map-config.xml"/>
</bean>
<bean id="userIncrementer" class="org.springframework.jdbc.support.incrementer.MySQLMaxValueIncrementer">
<property name="dataSource" ref="dataSource"/>
<property name="incrementerName" value="user_sequence"/>
<property name="columnName" value="value"/>
</bean>
<bean id="userDao" class="co.iplatform.dao.UserDaoiBatis">
<property name="incrementer" ref="userIncrementer"/>
<property name="sqlMapClient" ref="sqlMapClient"/>
</bean>
<!-- Add additional DAO definitions here -->
</beans>
ibatis的配置文件長大很標準,就不貼了。
寫一個userDao的測試, 以確保dao正常工作:
public abstract class BaseDaoTestCase extends AbstractTransactionalDataSourceSpringContextTests {
protected final Log log = logger;
private ApplicationContext ctx;
protected String[] getConfigLocations() {
setAutowireMode(AUTOWIRE_BY_NAME);
String[] paths = {"classpath*: applicationContext*.xml" };
return paths;
}
}
public class UserDaoTest extends BaseDaoTestCase {
private User user = null;
private UserDao dao = null;
public void setUserDao(UserDao userDao) {
this.dao = userDao;
}
public void testGetUsers() {
user = new User();
user.setFirstName("li");
user.setLastName("chunlei");
dao.saveUser(user);
System.out.println("size--"+dao.getUsers().size());
assertTrue(dao.getUsers().size() >= 1);
}
public void testSaveUser() throws Exception {
user = new User();
user.setFirstName("li");
user.setLastName("chunlei");
dao.saveUser(user);
assertTrue("primary key assigned", user.getId() != null);
assertNotNull(user.getFirstName());
}
public void testAddAndRemoveUser() throws Exception {
user = new User();
user.setFirstName("feng");
user.setLastName("Joy");
dao.saveUser(user);
assertNotNull(user.getId());
assertTrue(user.getFirstName().equals("feng"));
log.debug("removing user ");
");
dao.removeUser(user.getId());
endTransaction();
try {
user = dao.getUser(user.getId());
fail("User found in database");
} catch (DataAccessException dae) {
log.debug("Expected exception: " + dae.getMessage());
assertNotNull(dae);
}
}
}
public class MyMuleClientTest
{
public static void main(String[] args) throws MuleException
{
// create mule
MuleContext muleContext;
String config = "mule-database-config.xml";
muleContext = new DefaultMuleContextFactory().createMuleContext(config);
muleContext.start();
// creat mule client
MuleClient client = new MuleClient();
MuleMessage response = client.send("vm://query", new Long(11), null);
System.out.println("response = " + response.getPayload());
}
}
Mule的消息路由
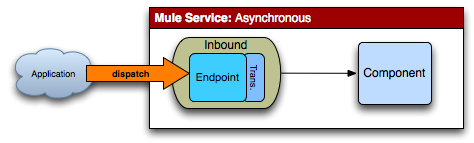
異步方式
異步方式是一種單向調用,調用者不需要獲得響應。
如果只想將消息以“即發即棄(fire and
forget)”的方式發送給一個服務,(并不需要給調用者返回響應),那么可使用異步消息類型。如果將入站端點的synchronous屬性設置為false,它就不會給調用者返回響應。
<model name="Asynchronous_Message_Pattern">
<service name="AsynchronousService">
<inbound>
<jms:inbound-endpoint queue="test.in" synchronous="false"/>
</inbound>
<component class="org.myorg.WidgetHandler"/>
<outbound>
<pass-through-router>
<jms:outbound-endpoint queue="test.out">
</pass-through-router>
</outbound>
</service>
</model>
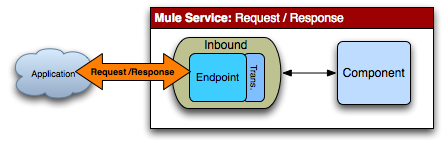
請求-響應方式
請求-響應方式即請求方調用服務后,服務立即處理并返回響應結果,不需將消息再次傳遞。
在簡單的Request-Response場景中,服務在一個同步的入口端點上接收請求,并處理該請求,然后將它作為回復發送給調用者。例如,如果用戶在
HTML表單中輸入一個值,想轉換該值并將其結果顯示在同一個頁面上,那么可以在該服務上簡單地配置一個同步入站端點,由該服務完成數據轉換。這種場景并不需要使用出站端點。這就是request-response消息類型。
<model name="Request-Response_Message_Pattern">
<service name="SynchronousService">
<!-- 為了返回response將synchronous的值設置為“true”-->
<inbound>
<http:inbound-endpoint host="localhost" port="8080" path="/mule/services" synchronous="true"/>
</inbound>
<!-- 指定處理該請求的組件 -->
<component class="org.myorg.WidgetHandler"/>
</service>
</model>
同步
如果為了進一步處理消息,需要將消息傳遞給第二個服務,那么需要在第一個服務上配置一個出站路由器將該消息傳遞給第二個服務。在第二個服務處理完消息后,第一個服務將它作為回復發送給調用者。值得注意的是將第一個服務設置為同步入口端點就意味著之后的所有服務都會以同步的方式處理該消息,所以無需在第二個服務上設置synchronous屬性的值。這就是同步消息類型。

<model name="Synchronous_Message_Pattern">
<service name="SynchronousService">
<inbound>
<!-- 為了返回response將synchronous的值設置為“true” -->
<jms:inbound-endpoint queue="test.in" synchronous="true"/>
</inbound>
<component class="org.myorg.WidgetHandler"/>
<outbound>
<!-- 使用pass-through路由器時,如果想返回response必須將synchronous的值設置為“true”-->
<pass-through-router>
<!-- 設置出站端點 -->
<jms:outbound-endpoint queue="test.out" synchronous="true"/>
</pass-through-router>
</outbound>
</service>
<!-- 配置第二個服務,并將它的入站端點設置為上一個服務的出站端點的路徑。 值得注意的是無需設置synchronous的值,因為在第一個服務中已經將消息設置為synchronous了。 -->
<service>
<inbound>
<jms:inbound-endpoint queue="test.out"/>
</inbound>
<component class="org.myorg.WidgetProcesser"/>
</service>
</model>
異步請求-響應方式
異步請求-響應方式即請求方調用服務后不需要立即獲得返回結果,component將請求發送給其他外圍系統處理(可能有多個),全部處理完畢后通過指定的異步應答Router返回給請求方。
在大多數復雜的場景中,可以使用request-response消息,并使用后端(back-end)流程調用其它的服務,并基于多個服務調用的結果異步地返回一個回復。你可以將入站端點的synchronous屬性設置為false,因為異步回復路由器會處理該回復,除非你想給調用者發送響應。這就是異步request-response消息類型。
在下面的例子中,HTTP端點接收一個請求,并使用Multicast路由器將該請求廣播到兩個端點,再將這些結果以異步的方式發送到一個JMS端點。
<model name="Async_Request-Response_Message_Pattern">
<service name="AsyncRequestResponseService">
<inbound>
<!-- 將synchronous設置為“false”,因為response將由異步回復路由器處理 -->
<http:inbound-endpoint host="localhost" port="8080" path="/mule/services"
synchronoussynchronous="false"/>
</inbound>
<component class="org.myorg.WidgetHandler"/>
<!-- 配置異步回復的設置。這個例子使用了收集異步回復路由器, 在發送回復信息之前,它將所有的響應信息收集在一起。 -->
<async-reply timeout="5000>
<collection-async-reply-router/>
<jms:inbound-endpoint queue="reply.queue"/>
</async-reply>
<!--設置負責接收和處理消息的端點以及回復消息的端點 -->
<outbound>
<multicasting-router>
<reply-to address="jms://reply.queue"/>
<jms:outbound-endpoint queue="service1" synchronous="false"/>
<jms:outbound-endpoint queue="service2" synchronous="false"/>
</multicasting-router>
</outbound>
</service>
</model>
將消息傳遞到另一個端點
pass-through路由器是為簡化端點間的消息傳遞而設計的。比如,它對分發消息給一個隊列非常有用。
也可以使用pass-through路由器將協議橋接到其它的出站端點。例如:
<service name="HttpProxyService">
<inbound>
<inbound-endpoint address="http://localhost:8888" synchronous="true"/>
</inbound>
<outbound>
<pass-through-router>
<outbound-endpoint address="http://www.webservicex.net#[header:http.request]"
synchronous="true"/>
</pass-through-router>
</outbound>
</service>
當使用pass-through路由器時,如果想返回一個響應,必須將出站端點的synchronous屬性設置為true。其它的路由器,比如
chaining路由器并不需將出站端點的synchronous屬性設置為true,該路由器總會在同步的場景中返回一個響應。因此,如果將消費發送給多個服務,可能會用chaining路由器代替pass-through路由器,因為chaining路由器中不需要將每個端點的synchronous
設置為true。
過濾消息
使用過濾器可以控制服務處理哪些消息。選擇性消費者路由器(Selective Consumer
Router)用于入站端點,它可以控制服務處理哪些消息。過濾路由器(Filtering
Router)用于出站端點,可以控制哪些消息發送到下一個服務上。可以組合使用這些過濾器來控制消息流。
例如,如果只想處理不包含錯誤的消息,那么可以使用選擇性消費者以確保只處理結果代碼為success的消息。并使用Catch-all策略將其它的消息轉發到另外端點上作為錯誤處理:
<inbound>
<selective-consumer-router>
<mulexml:jxpath-filter expression="msg/header/resultcode = 'success'"/>
</selective-consumer-router>
<forwarding-catch-all-strategy>
<jms:endpoint topic="error.topic"/>
</forwarding-catch-all-strategy>
</inbound>
服務處理消息時,如果想通過指定的標準決定將消息發送到哪個端點,那么可以在出站端點上使用過濾路由器。在下面的示例中,將包含異常信息的消息發送到系統管理員的email郵箱,將包含特定字符串的消息發送到名為string.queue的隊列,并使用forwarding
catch-all路由器接收余下的所有消息,并將它們發送到名為error.queue的死信隊列:
<outbound>
<filtering-router>
<smtp:outbound-endpoint to="ross@muleumo.org"/>
<payload-type-filter expectedTypeexpectedType="java.lang.Exception"/>
</filtering-router>
<filtering-router>
<jms:outbound-endpoint to="string.queue"/>
<and-filter>
<payload-type-filter expectedType="java.lang.String"/>
<regex-filter pattern="the quick brown (.*)"/>
</and-filter>
</filtering-router>
<forwarding-catch-all-strategy>
<jms:outbound-endpoint queue="error.queue"/>
</forwarding-catch-all-strategy>
</outbound>
與過濾路由器(filtering router)相似的路由器有轉發路由器(forwarding
router),它可以處理一些消息并可以選擇性地將消息轉發到其它路由器,還有wiretap
router,這種路由器可以處理所有的消息,并將它們發送到端點上,同時也將消息的副本發送到另外一個端點。
將多個出站端點鏈接在一起
假設我們有一個驗證服務,當消息沒有通過驗證時,想將該消息以及驗證異常轉發到另一個服務,并將消息和驗證異常返回給調用者。那么可以使用鏈接路由器(chaining
router),它是一個高速的、輕量級的可配置路由器,可用于將消息發送到端點,然后將該端點的輸出結果發送到另一個端點。例如:
<chaining-router>
<!-- 首先,將消息發送到這個端點,用于驗證。 -->
<vm:outbound-endpoint path="ValidationService" synchronous="true"/>
<!-- 接著將包含表達式的消息發送到這個端點上 -->
<vm:outbound-endpoint path="ValidationError" synchronous="true">
<exception-type-filter expectedType="java.lang.Exception"/>
</vm:outbound-endpoint>
</chaining-router>
消息分解
消息分解器(message splitter)可用于將輸出消息(outgoing
message)分解成多個部分,再將他們分發到配置在路由器(router)上的不同端點。例如,在訂單處理應用中,如果想將經消息分解后的不同部分分發給不同的服務去處理,那么可以使用下面的路由器:
列表消息分解器(List Message
Splitter):接收一個對象列表,這些對象將被路由到不同的端點。例如:
<outbound>
<list-message-splitter-router">
<!-- 將order路由到隊列order.queue -->
<jms:outbound-endpoint queue="order.queue">
<payload-type-filter expectedType="com.foo.Order"/>
</jms:outbound-endpoint>
<!-- 將items路由到隊列item.queue -->
<jms:outbound-endpoint queue="item.queue">
<payload-type-filter expectedType="com.foo.Item"/>
</jms:outbound-endpoint>
</list-message-splitter-router>
</outbound>
表達式分解路由器(Expression Splitter
Router):它與列表消息分解器相似,只是它是基于表達式分解消息,將消息分解成一個或者多個部分。例如:
<outbound>
<expression-splitter-router evaluator="xpath" expression="/mule:mule/mule:model/mule:service"
disableRoundRobin="true" failIfNoMatch="false">
<outbound-endpoint ref="service1">
<expression-filter evaluator="xpath" expression="/mule:service/@name = 'service splitter'"/>
</outbound-endpoint>
<outbound-endpoint ref="service2">
<expression-filter evaluator="xpath" expression="/mule:service/@name = 'round robin deterministic'"/> </outbound-endpoint>
</expression-splitter-router>
</outbound>
為了提高性能也可以將消息分解成多個部分。輪叫(Round
Robin)消息分解器將消息分解成多個部分,并以輪叫(round-robin)的方式將它們發送到端點。Message Chunking
Router將消息按固定長度分解成多個部分,并將它們路由到同一個端點。
消息分解之后,可以使用Message Chunking
Aggregator重新將消息塊聚合在一起。該聚合器(aggregator)通過關聯ID(correlation
ID)來識別哪些消息塊屬于同一個消息,關聯ID(correlation ID)在出站路由器(outbound router)上設置。
<inbound>
<message-chunking-aggregator-router>
<expression-message-info-mapping correlationIdExpression="#[header:correlation]"/>
<payload-type-filter expectedType="org.foo.some.Object"/>
</message-chunking-aggregator-router>
</inbound>
處理消息僅有一次
冪等接收器(Idempotent
Receiver)通過核對輸入消息的唯一消息ID來保證只有擁有唯一ID的消息才能被服務所接收。消息ID可以通過使用一個表達式從消息中產生,該表達式在
idExpression屬性中定義。#[message:id]是默認的表達式,也就是說如果要實現該功能,端點必須支持唯一性消息ID。在下面的例子中,唯一性ID是由消息ID和消息標頭中標簽的內容組合而成。所有的消息ID都被記錄到一個簡單的文本文件中,用于追蹤哪些消息已經處理過。
<inbound>
<idempotent-receiver-router idExpression="#[message:id]-#[header:label]">
<simple-text-file-store directory="./idempotent"/>
</idempotent-receiver-router>
</inbound>
通過組件綁定調用外部服務
除了使用消息路由器控制服務間的消息流之外,也可以通過組件綁定(Component Bindings)調用處理消息的外部服務(External
Service)。
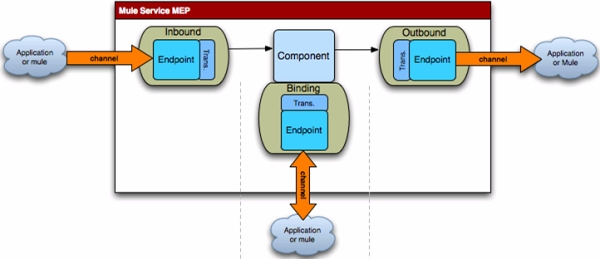
在這個方法中,可以將Mule的端點綁定到Java接口方法。該方法的優勢在于,在組件仍在處理消息時,你可以使用外部服務,而無需使用Mule的API
或者修改組件的代碼。相反,只需要在XML配置文件中配置組件綁定,從而指定外部服務的端點。例如,在下面的綁定例子中,當sayHello方法被調用時,HelloInterface中的sayHello方法會調用外部的HelloWeb服務。
<component class="org.mule.examples.bindings.InvokerComponent">
<binding interface="org.mule.examples.bindings.HelloInterface" method="sayHello">
<cxf:outbound-endpoint address="http://myhost.com:81/services/HelloWeb?method=helloMethod" synchronous="true"/>
</binding>
</component>