]]>
在安裝好Sql Server2005后默認是不支持JTA分布式事務的,要進行一下額外的設置才可以支持JTA事務。
那么如何讓Sql Server2005具有JTA事務那,那大家就跟我一步一步做吧!
第一步:
下載Sql Server2005的JDBC驅動。下載完成后得到的是一個exe文件:“sqljdbc_1.0.809.102_chs.exe”。
雙擊打開:

點擊Browse... 選擇要解壓的目錄。解壓后得到:
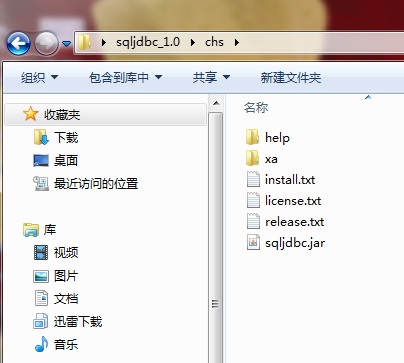
其中:sqljdbc.jar是Java連接Sql Server2005的驅動程序。
打開xa目錄:
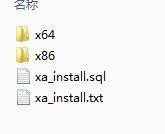
可以看到x64目錄和x86目錄和xa_install.sql文件
我們這里選擇x86也就是32位的機器。打開可以看到sqljdbc_xa.dll文件
復制該文件到Sql Server2005的安裝目錄中的Binn文件夾下面。(Sql Server2005的安裝目錄下面有很多Binn,我也不知道那個復制那個不復制,所以我就都復制了。
有知道的朋友可以回復告訴大家和我!)
第二步:
打開操作系統win7和XP:
win7下面是:控制面板--> 系統和安全-->管理工具-->組件服務-->計算機-->Distributed Transaction Coordinator-->右鍵,【本地DTC】,【屬性】選擇【安全】勾選
啟用XA事務,點擊確認。服務會重啟。
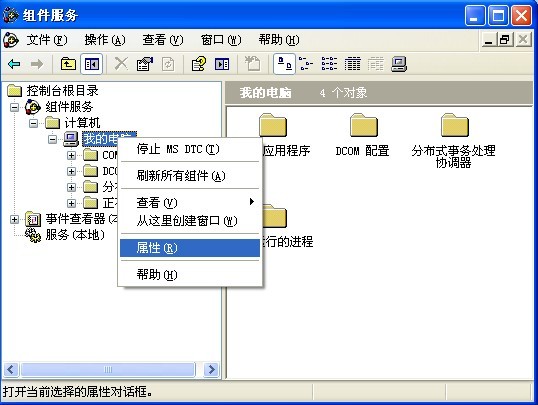
XP:控制面板-->管理工具-->組件服務-->計算機-->我的電腦-->右鍵,【屬性】如圖:
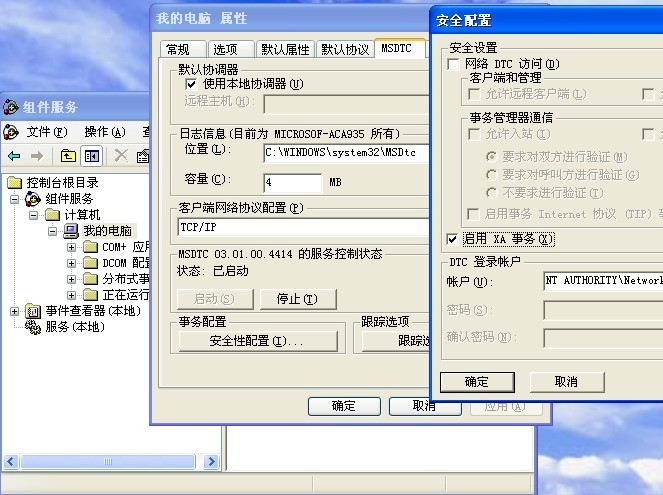
勾選【啟用XA事務】點擊確定完成。
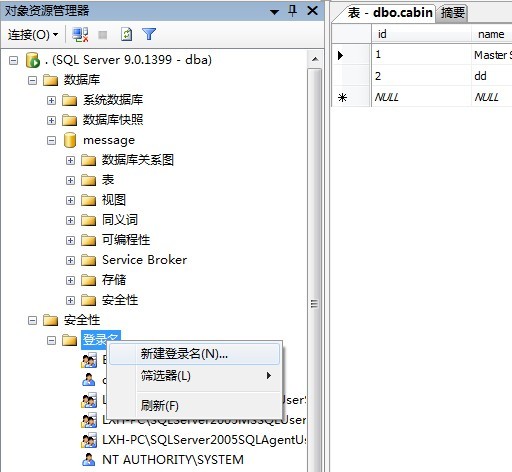
第三步:
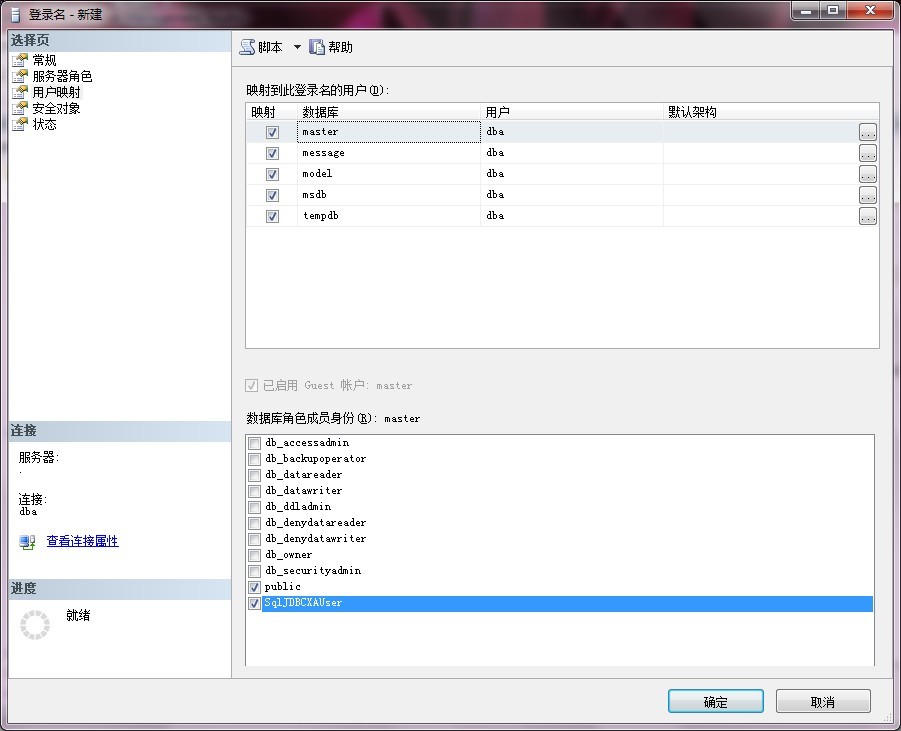
復制xa_install.sql到Sql Server2005的查詢分析器中執行會創建一個角色:sqlJDBCXAUser
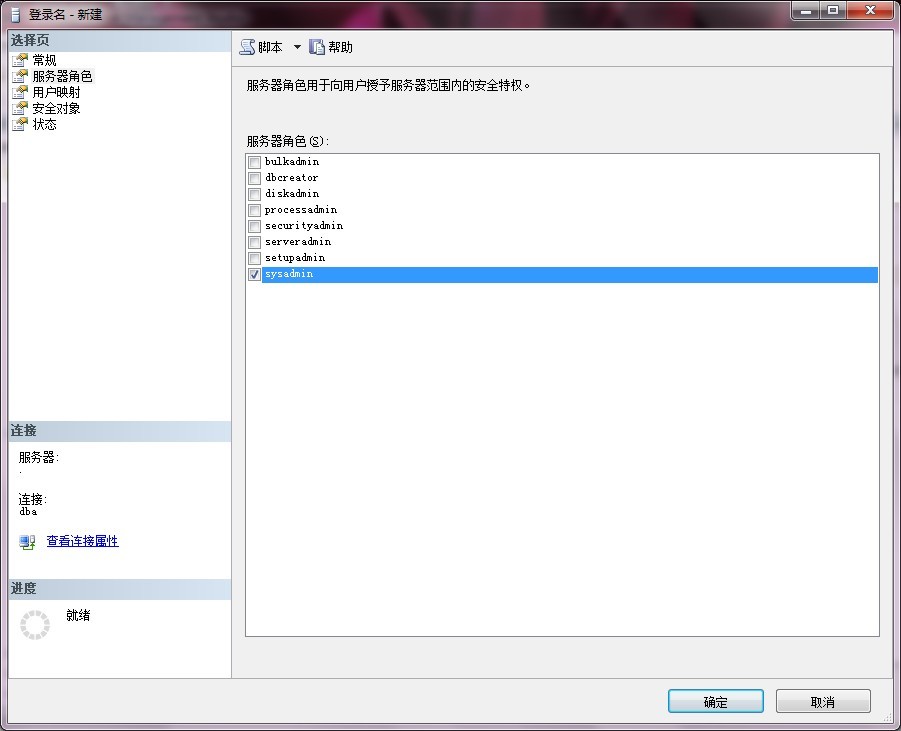
因為Sql Server2005默認的超級管理員sa無法綁定sqlJDBCXAUser,所以我們重新創建一個超級管理員名稱dba
然后把sqlJDBCXAUser授權給他就可以了:
1. 創建用戶和授權:
a). 創建用戶:
b). 登錄名的基本配置:
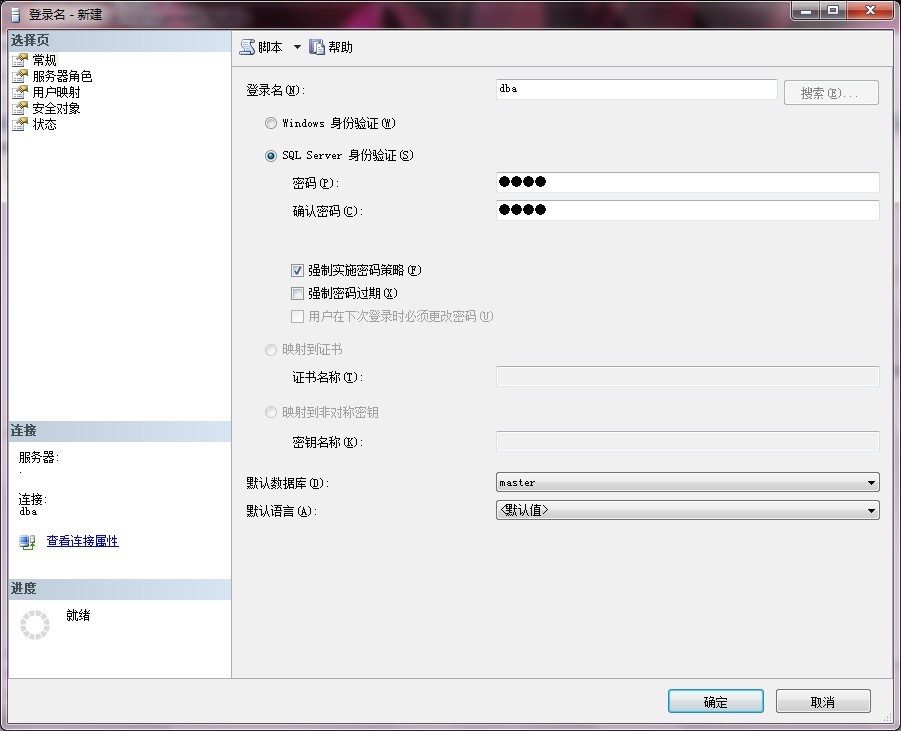
點擊確認用戶創建成功!重啟數據庫服務。
使用剛創建的用戶登錄。使用JTA分布式事務時也使用該用戶登錄,就OK了!
]]>
1.創建一個Web工程,添加Struts2支持。
2.創建兩個實體類:
a). Mother(母親)的Java類。
package struts.map.entity;
import java.io.Serializable;
public class Mother implements Serializable {
private static final long serialVersionUID = 1L;
private int motherId; //母親ID
private String motherName; //母親名字
public int getMotherId() {
return motherId;
}
public void setMotherId(int motherId) {
this.motherId = motherId;
}
public String getMotherName() {
return motherName;
}
public void setMotherName(String motherName) {
this.motherName = motherName;
}
}
b).Children(孩子)的Java類
package struts.map.entity;
import java.io.Serializable;
public class Children implements Serializable {
private static final long serialVersionUID = 1L;
private int childId; //孩子ID
private int motherId; //母親的ID
private String childName; //孩子名字
public int getChildId() {
return childId;
}
public void setChildId(int childId) {
this.childId = childId;
}
public int getMotherId() {
return motherId;
}
public void setMotherId(int motherId) {
this.motherId = motherId;
}
public String getChildName() {
return childName;
}
public void setChildName(String childName) {
this.childName = childName;
}
}
3. 創建一個Action,并創建一位母親和她的孩子。
package struts.map.test;
import java.util.ArrayList;
import java.util.HashMap;
import java.util.List;
import java.util.Map;
import struts.map.entity.Children;
import struts.map.entity.Mother;
import com.opensymphony.xwork2.ActionSupport;
public class Struts2_Map extends ActionSupport {
private static final long serialVersionUID = 1L;
private Map<Mother,List<Children>> motherChildn;
public Map<Mother, List<Children>> getMotherChildn() {
return motherChildn;
}
@Override
public String execute() throws Exception {
/*-------------------以對象做父節點的鍵,List做子節點的值,的Map-----------------------*/
Mother mother = new Mother();
mother.setMotherId(10000);
mother.setMotherName("花木蘭");
Children children1 = new Children();
children1.setChildId(10000);
children1.setMotherId(10000);
children1.setChildName("小花木蘭1");
Children children2 = new Children();
children2.setChildId(10001);
children2.setMotherId(10000);
children2.setChildName("小花木蘭2");
Children children3 = new Children();
children3.setChildId(10002);
children3.setMotherId(10000);
children3.setChildName("小花木蘭3");
motherChildn = new HashMap<Mother,List<Children>>();
List<Children> childrens = new ArrayList<Children>();
childrens.add(children1);
childrens.add(children2);
childrens.add(children3);
motherChildn.put(mother,childrens);
return SUCCESS;
}
}
struts.xml
<?xml version="1.0" encoding="UTF-8" ?>
<!DOCTYPE struts PUBLIC "-//Apache Software Foundation//DTD Struts Configuration 2.1//EN" "http://struts.apache.org/dtds/struts-2.1.dtd">
<struts>
<package name="map" extends="struts-default">
<action name="struts_map" class="struts.map.test.Struts2_Map">
<result>result.jsp</result>
</action>
</package>
</struts>
4.創建兩個頁面:
a).跳轉頁面:
<%@ page language="java" pageEncoding="UTF-8"%>
<%
String path = request.getContextPath();
%>
<!DOCTYPE HTML PUBLIC "-//W3C//DTD HTML 4.01 Transitional//EN">
<html>
<head>
<title>Struts_Map</title>
<meta http-equiv="pragma" content="no-cache">
<meta http-equiv="cache-control" content="no-cache">
<meta http-equiv="expires" content="0">
<meta http-equiv="keywords" content="keyword1,keyword2,keyword3">
<meta http-equiv="description" content="This is my page">
</head>
<body>
<a href="struts_map.action">查看Map</a>
</body>
</html>
b).最終頁面,也是作重要的頁面:
<%@ page language="java" pageEncoding="UTF-8"%>
<%@taglib uri="/struts-tags" prefix="s" %>
<%
String path = request.getContextPath();
%>
<!DOCTYPE HTML PUBLIC "-//W3C//DTD HTML 4.01 Transitional//EN">
<html>
<head>
<title>Struts_Map</title>
<meta http-equiv="pragma" content="no-cache">
<meta http-equiv="cache-control" content="no-cache">
<meta http-equiv="expires" content="0">
<meta http-equiv="keywords" content="keyword1,keyword2,keyword3">
<meta http-equiv="description" content="This is my page">
</head>
<body>
<div>
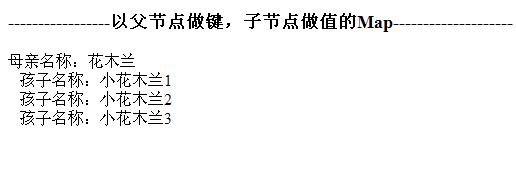
<h3>-----------------以對象做父節點的鍵,List做子節點的值,的Map--------------------</h3>
<s:iterator var="mc" value="motherChildn">
<div>
母親名稱:<s:property value="key.motherName"/>
</div>
<s:iterator var="ch" value="value">
<div>
孩子名稱:<s:property value="#ch.childName"/>
</div>
</s:iterator>
</s:iterator>
</div>
</body>
</html>
<%@taglib uri="/struts-tags" prefix="s" %>
<%
String path = request.getContextPath();
%>
<!DOCTYPE HTML PUBLIC "-//W3C//DTD HTML 4.01 Transitional//EN">
<html>
<head>
<title>Struts_Map</title>
<meta http-equiv="pragma" content="no-cache">
<meta http-equiv="cache-control" content="no-cache">
<meta http-equiv="expires" content="0">
<meta http-equiv="keywords" content="keyword1,keyword2,keyword3">
<meta http-equiv="description" content="This is my page">
</head>
<body>
<div>
<h3>-----------------以對象做父節點的鍵,List做子節點的值,的Map--------------------</h3>
<s:iterator var="mc" value="motherChildn">
<div>
母親名稱:<s:property value="key.motherName"/>
</div>
<s:iterator var="ch" value="value">
<div>
孩子名稱:<s:property value="#ch.childName"/>
</div>
</s:iterator>
</s:iterator>
</div>
</body>
</html>
最終運行結果:
]]>
第一步:下載安裝的文件
1. MySQL:下載地址mysql-5.1.49-win32.msi;
2. Apache: 下載地址httpd-2.2.16-win32-x86-openssl-0.9.8o.msi;
3. PHP5.3.3 下載地址php-5.3.3-Win32-VC6-x86 注意:一定要下載php-5.3.3-Win32-VC6-x86版本
的,不要下載php-5.3.3-nts-Win32-VC6-x86版本,更不要下載VC9版本的,因為他是IIS服務器安裝版本。
第二步:安裝文件
1. 在要安裝的磁盤建一個文件夾(筆者的做法是在D盤的根目錄下創建一個php文件夾D:\php)。
2. 安裝Apache服務器,安裝完成后的目錄結果是:D:\php\Apache。
3. 把下載的php-5.3.3-Win32-VC6-x86解壓的D:\php目錄中,可以把文件夾的名字改短,結果D:\php\php5
4. 安裝MySql數據庫,它的安裝和一般情況一樣。筆者把他安裝在(D:\php\MySQL)和php同目錄。
第三步:配置PHP5.3.3
1. 配置PHP5.3.3,打開php安裝目錄(筆者是D:\php\php5)可以看到目錄下有兩個這樣的文件php.ini- development和php.ini-production,第一個是開發使用的配置文件,第二個是標準的生產環境的配置。
2. 選擇php.ini-development復制一份到同目錄下,并改名為php.ini使用文本工具打開,查找extension_dir,可以
看到兩個,選擇On windows:下面的那個并去得前面的分號修改為extension_dir = "D:/php/php5/ext",讀者根
據自己的目錄結構配置,目的是找到和php.ini同目錄下的ext文件夾中的擴展庫。
3. 查找extension=php_,去掉extension=php_curl.dll、extension=php_gd2.dll、extension=php_mbstring.dll、
extension=php_mysql.dll、extension=php_mysqli.dll、extension=php_pdo_mysql.dll、extension=php_xmlrpc.dll前面
的分號。查找short_open_tag = Off把它修改成short_open_tag = On,讓其支持短標簽。
4. 復制php5ts.dll文件到WINDOWS/system32目錄下,只有php-5.3.3-Win32-VC6-x86版本中才有php5ts.dll
php-5.3.3-nts-Win32-VC6-x86版本是沒有的。
第四步:配置Apache
1. 打開Apache目錄下conf目錄中的httpd.conf文件,查找#LoadModule,在其末尾處大概是128行的地方
添加:
LoadModule php5_module "D:/php/php5/php5apache2_2.dll"
PHPIniDir "D:/php/php5"
AddType application/x-httpd-php .php
AddType application/x-httpd-php .htm
AddType application/x-httpd-php .html
目錄結構根據用戶自己目錄配置。
2. 查找DirectoryIndex index.html 將其修改成DirectoryIndex index.php default.php index.html index.htm default.html
default.htm
3. 查找DocumentRoot將其修改為指向你需要放置web文件的文件夾上(筆者在D:/php目錄中創建了一個
www文件夾)所以DocumentRoot就是DocumentRoot "D:/php/www",讀者可以根據自己配置來修改。
4. 查找<Directory將其修改為你自己配置的DocumentRoot的路徑(筆者是<Directory "D:/php/www">)
第五步:測試php+Apache+MySql是否配置成功
1. 打開MySql在MySql中創建一個新數據庫和表。(筆者是userInfo數據庫和users表就有id和name兩個字段)
測試嗎?簡單就好,呵呵!!
2. 在上面創建的www文件夾中創建一個index.php文件使用EditPlus或者其他文本工具打開。
3. 寫入:
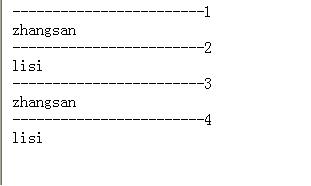
 <? $DB_HOST = "localhost"; $DB_USER = "root"; $DB_PASS = "root"; $DB_NAME = "userInfo"; mysql_connect($DB_HOST,$DB_USER,$DB_PASS); mysql_select_db($DB_NAME); mysql_query("set NAMES gb2312"); $sql = "Select * From users"; $result = mysql_query($sql); while($data=mysql_fetch_array($result)){ echo "------------------------"; echo $data['id']."<br/>"; echo $data['name']."<br/>"; } mysql_close();?>
如果看到下圖:表示我們大功告成了!祝賀祝賀!
]]>
GSON是Google公司的Java對象序列化成JSON的插件
下載地址:http://code.google.com/p/google-gson/downloads/list
下載下來以后:把gson-1.4.jar這個jar文件加到工程里。
Action的使用方式是:
package test.gson;import java.io.PrintWriter;import javax.servlet.http.HttpServletResponse;import org.apache.struts2.ServletActionContext;import com.google.gson.Gson;import com.opensymphony.xwork2.ActionSupport; public class TestGson extends ActionSupport {

 private static final long serialVersionUID = 1L; private Users user;
 public Users getUser() {
 return user;
 } public void setUser(Users user) { this.user = user; } @Override public String execute() throws Exception { user = new Users(); user.setId(10000); user.setUserName("zhangsan"); user.setPwd("000000"); user.setEmail("zhangsan@sina.com"); Gson g = new Gson(); String json = g.toJson(user); HttpServletResponse response = ServletActionContext.getResponse(); response.setContentType("application/json;charset=utf-8"); response.setHeader("Cache-Control","no-cache"); PrintWriter pw = response.getWriter(); pw.print(json); pw.flush(); pw.close(); return null; }
 }
}一定要把ContentType設置成application/json形式
struts.xml:
<?xml version="1.0" encoding="UTF-8" ?><!DOCTYPE struts PUBLIC "-//Apache Software Foundation//DTD Struts Configuration 2.1//EN" "http://struts.apache.org/dtds/struts-2.1.dtd"><struts> <package name="jsons" extends="struts-default" namespace="/"> <action name="testGson" class="test.gson.TestGson"></action> </package></struts>]]>
只需在XML配置就可以了,配置方式是:
<?xml version="1.0" encoding="UTF-8" ?><!DOCTYPE struts PUBLIC "-//Apache Software Foundation//DTD Struts Configuration 2.1//EN" "http://struts.apache.org/dtds/struts-2.1.dtd"><struts> <package name="jsons" extends="json-default" namespace="/"> <action name="getJSON" class="test.json.Users"> <result name="success" type="json"> <!-- excludeProperties表示不包含的屬性(可以使用正則表達式匹配) --> <param name="excludeProperties"> id,userName </param> <!-- includeProperties表示包含序列化的屬性(可以使用正則表達式匹配) --> <param name="includeProperties"> pwd,address </param> </result> </action> </package></struts> <!-- 這樣序列化工作就從birthday開始了 --> <param name="root"> birthday </param>]]>
在使用Struts2的JSON插件,實現Action中的屬性序列化成JSON對象時默認JSON插件會把所有Action中包含getter方法的屬性都序列化到JSON對象中。但是有時候我們并不需要太多的屬性,或者只需要一個屬性。那么怎樣控制屬性序列化到JSON對象中哪?Struts2的JSON插件為我們提供了兩種方式,第一:使用注解的方式控制,第二:使用Struts2的struts.xml配置文件的方式。
這一講我們主要介紹注解方式。如果大家還不會Struts2+JSON+JQuery的交互方式請查看 http://zyw090111.javaeye.com的Struts2+jQuery+JSON實現異步交互的文章
我們要使用JSON的注解是@JSON這個類共有是個屬性分別是:
1. name String 類型 用戶為屬性起一個別名(我們序列化到JSON對象中的鍵默認是屬性名稱,如果使用了name屬性那么鍵是name起的名字);
2. serialize Boolean類型 默認為true 也就是可以被序列化,如果設為false那么該屬性將不包含在JSON對象中;
3. format String類型 主要是對日期進行格式化
4. deserialize Boolean類型 默認為true,它是指反序列化,和serialize相反。
請看代碼:
package test.json;import java.util.Date;import org.apache.struts2.json.annotations.JSON;import com.opensymphony.xwork2.ActionSupport;@SuppressWarnings("serial")public class Users extends ActionSupport { private int id; private String userName; private String pwd; private String address; private Date birthday; public int getId() { return id; } public void setId(int id) { this.id = id; } @JSON(serialize=false) public String getUserName() { return userName; } public void setUserName(String userName) { this.userName = userName; } @JSON(name="mm") public String getPwd() { return pwd; } public void setPwd(String pwd) { this.pwd = pwd; } public String getAddress() { return address; } public void setAddress(String address) { this.address = address; } @JSON(format="yy-MM-dd") public Date getBirthday() { return birthday; } public void setBirthday(Date birthday) { this.birthday = birthday; } @Override public String execute() throws Exception { this.id = 10000; this.userName = "zhangsan"; this.pwd = "00000"; this.address = "xian"; this.birthday = new Date(); return SUCCESS; }}]]>
1. 去掉#號:
在項目上右鍵選擇Properties-->Flex Compiler去掉Enable integration with browser navigation前面的鉤點擊OK
2. 在項目<mx:Application pageTitle="項目名稱"/>
修改完畢!
]]>
昨天BlogJava的博客開通了!2010-07-14
]]>