??
前段時間用
eclipse
的插件
SWT
做了一個簡單的應用程序界面��,感覺沒有
VC
做界面方便和強大���,還不時的和
AWT
沖突,也可能是剛學����,沒有體會
SWT
的優點�����,我把自己的掌握的寫出來���,大家一起交流哈��。
??
好了��,現在言歸正傳,開始哈�。
1.
安裝
Designer_v5.0.0_for_Eclipse3.0
根據
eclipse
版本的不同�����,下載不同的
SWT-Desiger.
下載地址:
http://www.swt-designer.com/
安裝方法和所有的
eclipse
插件一樣,將
features, plugins
下的文件放到
eclipse
相應的文件夾中就好了���,重啟
eclipse, OK .
2.
破解
Designer_v5.0.0_for_Eclipse3.0
eclipse->windows->preferences->Designer –Registration and Activation ->SWT Designer Professional Paid ->next->
輸入相關的信息
->next
在
serial Number
和
Activation Key
輸入注冊碼。注冊機的下載地址:
http://www.aygfsteel.com/Files/zjuedsion/解壓并且修改好的破解工具.rar
next
就
OK
了��。
3.
新建一個
Test
工程
File- >project-> Designer SWT/JFace Java Project
建好工程后要導入
SWT
的原生庫�����,要不然�,項目運行時會抱錯:
Java.lang.UnsatifiledLinkError. no swt-awt-win32-3064.dll in java.Labrary.path
我這里是
swt-awt-win32-3064.dll
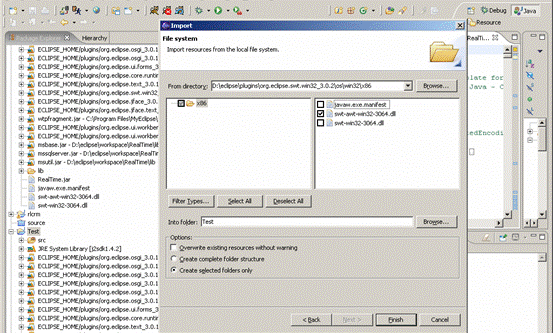
�,可能版本會有點不一樣。導入的方法:選擇項目名,點右鍵�����,
Import->File System
如下圖
?
 ?
?
一般
swt-awt-win32-3064.dll
在
x:\eclipse\plugins\org.eclipse.swt.win32_3.0.2\os\win32\x86
下選擇好后
Finish
就好了
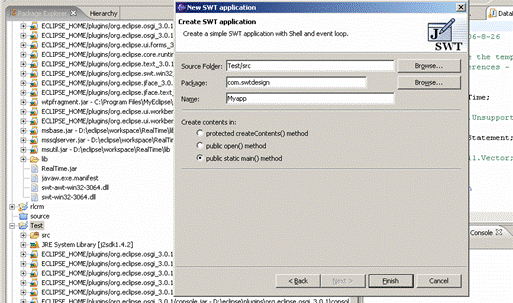
?4.
建
SWT Application
File->new ->others->Designer->SWT->Application Window
package :? com.swtdesign
name: Myapp
create contents in : public static main() method
如下圖
 ?
?
?
點
Finish
就好了
看代碼
package com.swtdesigner; //
包名
import org.eclipse.swt.widgets.Display;//
程序所用到的類都會用
import
標記在這里���,
import org.eclipse.swt.widgets.Shell;??? //import
的快捷鍵
Ctrl+Shift+O
public class Test{? //
一個標準的
Java
類
HelloWorld
??? public static void main(String[] args) {
?????????? //display
負責管理事件循環和控制
UI
線程和其他線程之間的通訊����。
??????? final Display display = Display.getDefault();?
??????? final Shell shell = new Shell();? // shell
是程序的主窗口
??????? shell.setSize(327, 253);? //
設置主窗口的大小
??????? shell.setText("SWT Application");? //
設置主窗口的標題
??????? shell.layout();? //shell
應用界面布置
??????? shell.open();? //
打開
shell
主窗口
??????? while (!shell.isDisposed()) { //
如果主窗口沒有關閉��,則一直循環
??????????? if (!display.readAndDispatch())? //
如果
display
不忙
??????????????? display.sleep(); //display
休眠
??????? }
??? }
}
從這個代碼可以看到����,創建一個典型的SWT應用程序需要以下步驟:
l??????????
創建一個
Display
l??????????
創建一個或多個
Shell
l??????????
設置
Shell
的布局
l??????????
創建
Shell
中的的組件(注:本例還沒有加入組件���,只是一個空窗口)
l??????????
用
open()
方法打開
Shell
窗口
l??????????
寫一個事件轉發循環
l??????????
銷毀
display
?
?
接下來我們在
應用程序上加一個
Button
并制作他的
單擊事件�。事件的內容是調出一個提示窗口,和一個文本框��,接受外面的輸入�。
?
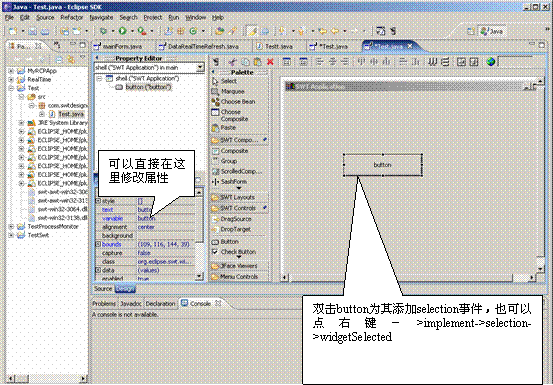
如下圖在,切換到
design
模式��,加一個
button
�����,在左邊的菜單里選一個
button
���,然后直接點在面板上��,不是拖過去。
雙擊
button
為其添加
selection
事件�����,也可以點右鍵-
>implement->selection-
>widgetSelected
|
?
?
?
?
然后切換到
source
模式�����,看到增加了以下代碼
?????????????
final Button button = new Button(shell, SWT.NONE);
?
//
這就是增加的鼠標單擊事件代碼��,以匿名內部類的方式寫的
?
????????????? button.addSelectionListener(new SelectionAdapter() {
?
//
要實現事件����,必須實現
widgetSelected
方法
???????????????????? public void widgetSelected(SelectionEvent e) {
//
信息提示對話框
MessageDialog.openInformation(null,"hello world","hello");
???????????????????? }
????????????? });
?????????????
我們可以將匿名內部類��,改成不是匿名的
?
將原來的事件代碼改為:
????????????? button.addSelectionListener(new addButtonSelected());
同時加
addButtonSelected
內部類
//
加
static
使其可以直接
new
,繼承
SelectionAdapter
��,直接寫方法就可以了
public static class? addButtonSelected extends SelectionAdapter
?????? {
????????????? public void widgetSelected(SelectionEvent e) {
???????????????????? MessageDialog.openInformation(null,"hello world","hello");
????????????? }
?????? }
?
好了這樣就實現了加一個
button
��,并單擊相應一個事件�����。夠簡單了吧。下面加一個文本框
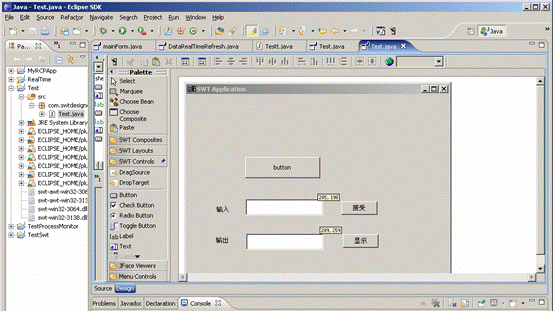
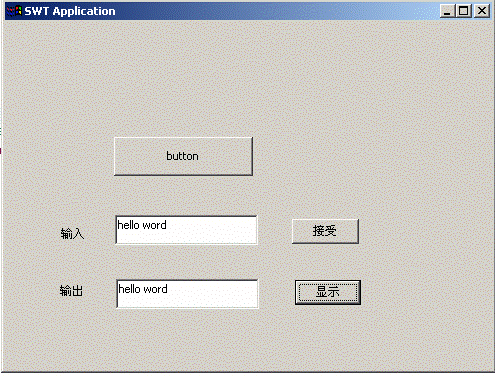
同理切換到
Design
模式下加一個名為
input_Text
的文本框�,在文本框左邊加個
Clable
的標簽“輸入”�,再加一個
button(input_button)
����,點確定后接受輸入。然后加一組輸出現實��,
output_Text.
��,
output_button
如下圖
 ?
?
然后加響應代碼���;
?????? //
把文本框的內容和一個
String
變量綁定
?
?????? private static String? output_string=null;
//
輸入輸出事件
input_button.addSelectionListener(new inputText());
output_button.addSelectionListener(new outputText());
?
//
輸入事件
?????? public static?? class? inputText extends SelectionAdapter
?????? {
????????????? public void widgetSelected(SelectionEvent e)
????????????? {
???????????????????? output_string=input_text.getText();
????????????????????
???????????????????? System.out.println(output_string);
????????????? }
??????
?????? }
//????
輸入事件
?????? public static?? class? outputText extends SelectionAdapter
?????? {
????????????? public void widgetSelected(SelectionEvent e)
????????????? {
???????????????????? output_text.setText(output_string);
????????????????????
????????????????????
???????????????????? System.out.println(output_string);
????????????? }
??????
?????? }
?
最后的效果如下圖
OK!
結束����。如有問題����,請聯系
edsionchen_zju@hotmal.com