小毅收藏之------S2SH框架配置步驟
Posted on 2009-07-24 14:14 H2O 閱讀(625) 評論(0) 編輯 收藏 所屬分類: Spring+Struts+Hibernate整合S2SH框架配置步驟
現(xiàn)在開發(fā)的一個項目使用S2SH框架,配置環(huán)境用了一兩天,現(xiàn)在把當(dāng)時配置環(huán)境時寫的文檔整理下發(fā)出來,也算加強點記憶。
1 開發(fā)環(huán)境
Ø MyEclipse5.5
Ø JDK 1.6
Ø Java EE 5.0
Ø Tomcat6.0
Ø Struts2.1.6
Ø Spring2.5.6
Ø Hibernate3.3.1
2 為ssh做好準(zhǔn)備
2.1下載包
Ø Struts2.1.6包下載:
http://struts.apache.org/download.cgi#struts216
- Full Distribution:
- struts-2.1.6-all.zip (110mb) [PGP] [MD5]
Ø Hibernate3.3包下載:
https://www.hibernate.org/6.html
Ø Spring2.5下載:
http://www.springsource.org/download
2.2搭建開發(fā)環(huán)境
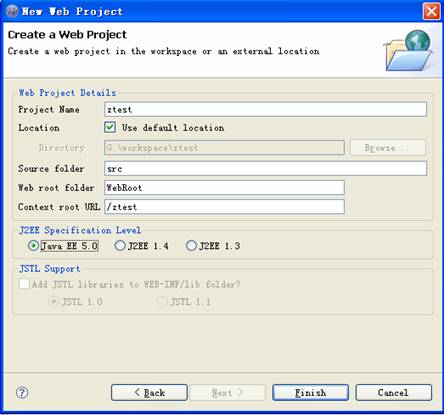
打開MyEclipse,新建一個web project,如圖:
注意:J2ee版本設(shè)為java ee 5.0


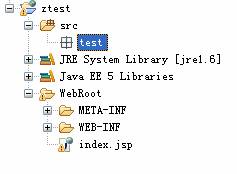
點擊Finish完成,建好的工程如圖:

如果你的myeclipse還沒有配置一個web服務(wù)器,那就進行下面的步驟,這里以tomcat6為例:
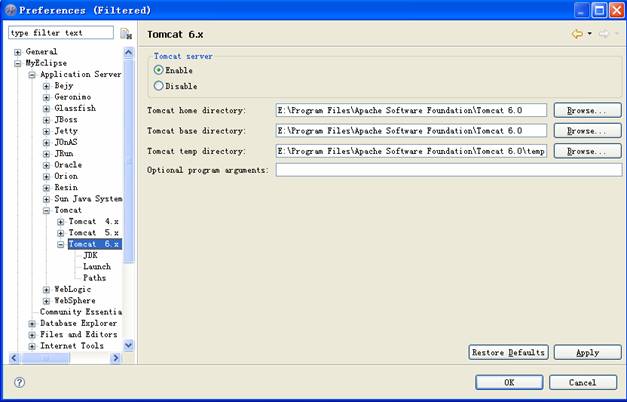
打開MyEclipseàPreferences窗口,展開目錄樹如下圖:
設(shè)置好你的tomcat6的路徑即可,前提你要先安裝好tomcat哦。還有需要注意的一點是,看到目錄樹tomcat6.x下面的JDK了嗎?點擊它,也要把tomcat的JDK設(shè)為jdk1.6才行,以與myeclipse一致。
好了,工程已經(jīng)建好了,下面就開始配置struts吧。配置之前先把struts的包下載下來哦,下載地址上面已經(jīng)給出了。
3 配置Struts2.0
3.1 基礎(chǔ)配置
1)引入Struts必需的五個jar包。下載struts-2.1.6-all.zip解壓后,struts-2.1.6"lib目錄下是struts所有的相關(guān)jar包。這么多jar包并不是struts必須得,使用struts只需要把下面五個引入即可,以后用到什么jar包,再引入。
² Commons-logging-1.0.4.jar
² Freemarker-2.3.13.jar
² Ognl-2.6.11.jar
² Struts2-core-2.1.6.jar
² Xwork-2.1.2.jar
2)修改WEB-INF下的web.xml文件,增加struts2的配置。增加代碼如下:這些配置代碼對于struts2是不變的,直接復(fù)制到web.xml即可。
 <filter>
 <filter-name>struts2</filter-name>
 <filter-class>
 org.apache.struts2.dispatcher.ng.filter.StrutsPrepareAndExecuteFilter
 </filter-class>
 </filter>
 <filter-mapping>
 <filter-name>struts2</filter-name>
 <url-pattern>/*</url-pattern>
 </filter-mapping>
3)添加struts配置文件。 在WEB-INF/classes目錄下,新建struts.xml,模版如下:
 <?xml version="1.0" encoding="UTF-8" ?>
 <!DOCTYPE struts PUBLIC
 "-//Apache Software Foundation//DTD Struts Configuration 2.0//EN"
 "http://struts.apache.org/dtds/struts-2.0.dtd">
 <struts>
 </struts>
好了,struts基本配置完畢,是不是很簡單?
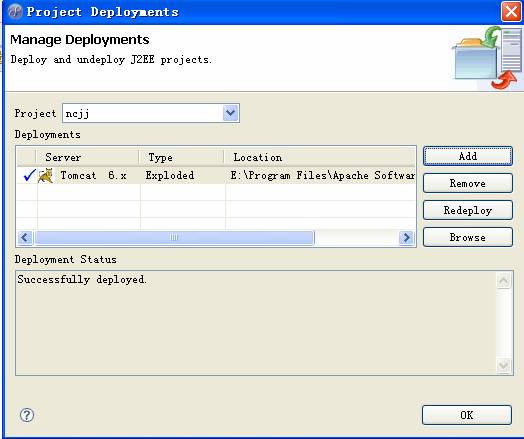
現(xiàn)在把工程發(fā)布到tomcat上去測試一下,在工程名字上點擊右鍵,選擇MyEclipseàAdd and Remove project Deployments,在打開的窗口里,點擊Add,選擇我們之前配置好的tomcat6服務(wù)器,如下圖:

發(fā)布好了,啟動tomcat,如果啟動無異常,則說明配置成功。
注意:可能會出現(xiàn)struts-default.xml相關(guān)異常,根據(jù)提示引入相關(guān)jar包。我測試的時候是缺少fileupload相關(guān)jar包,于是引入了commons-fileupload-1.2.1.jar。
3.2 配置一個Action
下面開始配置一個Action吧,以用戶登錄為例:
1)首先新建一個登陸頁面login.jsp,代碼如下:
 <%@ page language="java" import="java.util.*" pageEncoding="UTF-8"%>
 <%@ taglib prefix="s" uri="/struts-tags" %>
 <!DOCTYPE HTML PUBLIC "-//W3C//DTD HTML 4.01 Transitional//EN">
 <html>
 <head>
 <title>登錄</title>
 <meta http-equiv="pragma" content="no-cache">
 <meta http-equiv="cache-control" content="no-cache">
 <meta http-equiv="expires" content="0">
  </head>
 <body>
 <s:form name="form1" action="login" >
 <s:textfield name="username" label="username" ></s:textfield>
 <s:password name="password" label="password" ></s:password>
 <s:submit label="submit"></s:submit>
 </s:form>
 <s:actionerror/>
 </body>
 </html>
2)在我們已經(jīng)建好的struts.xml中來配置登錄的action。這里定義登錄action的名字為login,配置代碼如下:
 <?xml version="1.0" encoding="UTF-8" ?>
 <!DOCTYPE struts PUBLIC
 "-//Apache Software Foundation//DTD Struts Configuration 2.0//EN"
 "http://struts.apache.org/dtds/struts-2.0.dtd">
 <struts>
 <package name="struts2" extends="struts-default">
 <action name="login" class="test.LoginAction">
 <result name="success" type="redirect">index.jsp</result>
 <result name="input">login.jsp</result>
 <result name="error">login.jsp</result>
 </action>
 </package>
 </struts>
3)下面就來編寫具體的action類了。代碼如下:
 package test;
2
 import com.opensymphony.xwork2.ActionSupport;
3
 public class LoginAction extends ActionSupport {
4
 public String username;
5
 public String password;
6
 public String execute(){
7
 if(!username.equals("admin")){
8
 super.addFieldError("username", "用戶名錯誤!");
9
 return ERROR;
10
 }
}11
 if(!password.equals("001")){
12
 super.addFieldError("password", "密碼錯誤!");
13
 return ERROR;
14
 }
}15
 return SUCCESS;
16
 }
}17
 public void validate(){
18
 if(username==null||username.length()==0){
19
 super.addActionError("用戶名不能為空");
20
 }
}21
 if(password==null||password.length()==0){
22
 super.addActionError("密碼不能為空");
23
 }
}24
 }
}25
 }
}26

4)好了,一個Action就創(chuàng)建完成了,重啟tomcat測試一下吧。如果第一次使用struts,你可能你明白上面的代碼,以后慢慢學(xué)習(xí)即可,現(xiàn)在先來看一下效果吧。
打開登錄頁面http://localhost:8080/test/login.jsp,輸入正確或錯誤的用戶名和密碼,看看有什么提示。
4 配置Hibernate
4.1 基礎(chǔ)配置
1) 導(dǎo)入最小jar包,即使用Hibernate3所必需的jar包。下載hibernate-distribution-3.3.1.GA解壓后,必需jar包都在lib"required目錄下。必需jar包如下:
² hibernate3.jar-----------------------------核心類庫
² antlr-2.7.6.jar-----------------------------代碼掃描器,用來翻譯HQL語句
² commons-collections-3.1.jar----------- Apache Commons包中的一個,包含了一些Apache開發(fā)的集合類,功能比java.util.*強大
² dom4j-1.6.1.jar----------------------------是一個Java的XML API,類似于jdom,用來讀寫XML文件的
² javassist-3.4.GA.jar----------------------- Javassist 字節(jié)碼解釋器
² jta-1.1.jar------------------------------------標(biāo)準(zhǔn)的JTA API。
² slf4j-api-1.5.2.jar
² slf4j-nop-1.5.2.jar
1) 創(chuàng)建Hibernate配置文件。在WEB-INF"calsses目錄下(工程的src包下)新建hibernate.cfg.xml。這是hibernate連接數(shù)據(jù)庫的配置文件。這里以連接Oracle為例:
 <?xml version='1.0' encoding='UTF-8'?>
 <!DOCTYPE hibernate-configuration PUBLIC
 "-//Hibernate/Hibernate Configuration DTD 3.0//EN"
 "http://hibernate.sourceforge.net/hibernate-configuration-3.0.dtd">
 <hibernate-configuration>
 <session-factory>
 <property name="connection.driver_class">
 oracle.jdbc.driver.OracleDriver
 </property>
 <property name="connection.url">
 jdbc:oracle:thin:@192.168.0.141:1521:TEST
 </property>
 <property name="myeclipse.connection.profile">TEST</property>
 <property name="connection.username">test</property>
 <property name="connection.password">test</property>
 <property name="dialect">
 org.hibernate.dialect.Oracle9Dialect
 </property>
 <property name="show_sql">true</property>
 <mapping resource="test/hibernate/TUser.hbm.xml" />
 </session-factory>
 </hibernate-configuration>
1) 創(chuàng)建Session工廠類HibernateSessionFactory。
讓我們先了解一下Session, Hibernat 對數(shù)據(jù)庫的操作是通過Session來實現(xiàn)的,這里的session不同于頁面間傳遞參數(shù)的session,而是類似于JDBC中的 Connection。Session是Hibernate運作的中心,對象的生命周期、事務(wù)的管理、數(shù)據(jù)庫的存取都與session息息相關(guān)。
而Session是由HibernateSessionFactory創(chuàng)建的,是線程安全的,可以讓多個執(zhí)行線程同時存取HibernateSessionFactory而不會有數(shù)據(jù)共享的問題,但不能讓多個線程共享一個Session。
HibernateSessionFactory可以用myeclispe自動創(chuàng)建,這里就不貼出代碼了。
注意:別忘了把數(shù)據(jù)庫驅(qū)動包引入到工程中。對于oracle是class12.jar。
4.2 示例
這個自己去測試一下吧。5 配置Spring2.5
5.1 基礎(chǔ)配置
1) 導(dǎo)入spring包。下載spring-framework-2.5.6并解壓后,在spring-framework-2.5.6"dist目錄下找到spring.jar,引入到工程中。
說明:spring.jar是包含有完整發(fā)布的單個jar包,spring.jar中包含除了 spring-mock.jar里所包含的內(nèi)容外其它所有jar包的內(nèi)容,因為只有在開發(fā)環(huán)境下才會用到spring-mock.jar來進行輔助測試,正式應(yīng)用系統(tǒng)中是用不得這些類的。除了spring.jar文件,Spring還包括有其它13個獨立的jar包,各自包含著對應(yīng)的Spring組件,用戶可以根據(jù)自己的需要來選擇組合自己的jar包,而不必引入整個spring.jar的所有類文件。這里,為了使用方便,我們引入整個spring.jar。
2) 配置web.xml文件。Jar包引入完成后,就開始配置spring了,首先修改web.xml文件,增加如下代碼:
 <!--
<!--  * 從類路徑下加載spring的配置文件, 多個配置文件可以用逗號和空格區(qū)分
 * classpath: 關(guān)鍵字特指類路徑下加載-->
 <context-param>
 <param-name>contextConfigLocation</param-name>
 <param-value>
 classpath*:spring/applicationContext*.xml
 </param-value>
 </context-param>
在這里,我們指定了spring配置文件的路徑,即WEB-INF/classes/spring目錄下的所有以applicationContext開頭命名的xml文件。
3) 在src下面新建applicationContext.xml文件。首先給這個文件加上spring的標(biāo)頭:
 <?xml version="1.0" encoding="UTF-8"?>
 <beans xmlns="http://www.springframework.org/schema/beans"
 xmlns:xsi="http://www.w3.org/2001/XMLSchema-instance"
 xmlns:aop="http://www.springframework.org/schema/aop"
 xmlns:tx="http://www.springframework.org/schema/tx"
 xsi:schemaLocation="http://www.springframework.org/schema/beans http://www.springframework.org/schema/beans/spring-beans-2.5.xsd
 http://www.springframework.org/schema/aop http://www.springframework.org/schema/aop/spring-aop-2.5.xsd
 http://www.springframework.org/schema/tx http://www.springframework.org/schema/tx/spring-tx-2.5.xsd">
 </beans>
注意:標(biāo)頭是2.5的 不要引入2.0, 錯了可能Spring就不能正確加載。
5.2 示例
Spring基本配置完畢,讓我們建個示例來測試一下吧,首先在test.spring包下創(chuàng)建兩個java文件:TUser.java、SpringTest.java。
TUser.java:
 package test.spring;
2

3
 public class TUser implements java.io.Serializable {
4
 private String username;
5
 private String allname;
6
 private String address;
7

8
 public String getUsername() {
9
 return this.username;
10
 }
}11
 public void setUsername(String username) {
12
 this.username = username;
13
 }
}14
 public String getAllname() {
15
 return this.allname;
16
 }
}17
 public void setAllname(String allname) {
18
 this.allname = allname;
19
 }
}20
 public String getAddress() {
21
 return this.address;
22
 }
}23
 public void setAddress(String address) {
24
 this.address = address;
25
 }
}26
 }
}27

SpringTest.java:
 package test.spring;
2

3
 import org.springframework.context.ApplicationContext;
4
 import org.springframework.context.support.ClassPathXmlApplicationContext;
5

6
 public class SpringTest {
7
 public static void main( String[] args ) {
8
 //加載spring配置文件,初始化IoC容器
9
 ApplicationContext ac = new ClassPathXmlApplicationContext("spring/applicationContext.xml");
10
 //從容器 接管Bean
11
 TUser user = (TUser) ac.getBean("TUser");
12
 //輸出歡迎信息
13
 System.out.println( "Hello:" + user.getUsername() + ";u is in " + user.getAddress() + " ; and u is " + user.getAllname() );
14
 }
}15
 }
}16

創(chuàng)建完畢后,就剩最后一步了,在applicationContext.xml中配置一個bean,在xml中增加如下代碼:
 <bean id="TUser" class="test.spring.TUser">
 <property name="username" value="小張"></property>
 <property name="allname" value="張三"></property>
 <property name="address" value="青島市"></property>
 </bean>
好了,下面運行一下吧,右鍵單擊SpringTest.java選擇run as àJava Application,運行結(jié)果如下:

如果你的運行結(jié)果和上面一樣,且沒有異常,則說明Spring配置成功了。是不是很簡單?不要驕傲,重要的是Spring與Hibernate、Struts的整合。繼續(xù)吧!
5.3 整合Struts
Spring與Struts的整合其實就是把Struts的Action類交給Spring來管理,下面開始吧!
1) 導(dǎo)入jar包。在Struts2.1.6的lib目錄中找到struts2-spring-plugin-2.1.6.jar,引入到工程中。
2) 配置web.xml文件。在web.xml中加入以下代碼:
 <listener>
 <listener-class>
 org.springframework.web.context.ContextLoaderListener
 </listener-class>
 </listener>
1) 現(xiàn)在就來看如何把struts的action交給spring。以struts示例中的login.action為例,首先創(chuàng)建一個LoginAction類的Bean。在applicationContext.xml中增加如下代碼:
<bean id="loginAction" class="test.action.LoginAction" scope="prototype">
</bean>
這里,我們把這個bean的id設(shè)為loginAction。Scope設(shè)為prototype,含義是每一次請求創(chuàng)建一個LoginAction類的實例,Scope還有另一個值“singleton”意為“單例模式”。
接下來修改struts.xml文件,把原來login.action的配置做如下修改:
把<action name="login" class=" test.action.LoginAction ">
改為
<action name="login" class="loginAction">
注意到有什么區(qū)別了嗎?class值設(shè)為了loginAction,即LoginAction類的bean的ID。這樣我們就把LoginAction類交給了spring管理。至于具體是怎么處理的,秘密在struts2-spring-plugin-2.1.6.jar中,有空自己就去研究吧,現(xiàn)在會用就可以了。
5.4 整合Hibernate
Spring整合Hibernate主要是對hibernate的Session進行管理,包含Session的創(chuàng)建、提交、關(guān)閉的整個生命周期。Spring對事務(wù)的管理應(yīng)用了AOP的技術(shù),配置前請先了解一下AOP的知識。
1) 配置sessionFactory,讓spring來創(chuàng)建Session。在applicationContext.xml中增加如下代碼:
 <!-- 配置sessionFactory -->
 <bean id="sessionFactory" class="org.springframework.orm.hibernate3.LocalSessionFactoryBean">
 <property name="configLocation">
 <value>classpath:spring/hibernate.cfg.xml</value>
 </property>
 </bean>
我們原來是用HibernateSessionFactory.java來創(chuàng)建Session的,現(xiàn)在刪除即可,交給Spring創(chuàng)建。這里,創(chuàng)建了一個Session工廠類的Bean,其ID為“sessionFactory”。
2) 配置事務(wù)管理器。增加如下代碼:
 <!-- 配置事務(wù)管理器 -->
 <bean id="transactionManager" class="org.springframework.orm.hibernate3.HibernateTransactionManager">
 <property name="sessionFactory">
 <ref bean="sessionFactory"/>
 </property>
 </bean>
這里創(chuàng)建了一個id為transactionManager的事務(wù)管理器,它匹配一個session工廠,<ref bean="sessionFactory"/>這個sessionFactory是指session工廠的ID。
3) 對事務(wù)管理器進行事務(wù)設(shè)置。增加如下代碼:
 <tx:advice id="smAdvice" transaction-manager="transactionManager">
 <tx:attributes>
 <tx:method name="save*" propagation="REQUIRED"/>
 <tx:method name="del*" propagation="REQUIRED"/>
 <tx:method name="update*" propagation="REQUIRED"/>
 </tx:attributes>
 </tx:advice>
這里創(chuàng)建了一個advice(通知),對事務(wù)管理器進行事務(wù)設(shè)置,這里意思是指,對于以save、del、update開頭的方法應(yīng)用事務(wù)。
4) 下面就把事務(wù)應(yīng)用到具體的類。看如下代碼:
 <aop:config>
 <aop:pointcut id="smMethod"
 expression="execution(* test.service.impl.*.*(..))"/>
 <aop:advisor pointcut-ref="smMethod" advice-ref="smAdvice"/>
 </aop:config>
這里配置的作用是把我們上面創(chuàng)建的advice應(yīng)用到具體的類中。以上代碼的意思指,給test.service.impl下的所有類的所有方法應(yīng)用smAdvice。
5) 示例:使用Session。


