Spring是什么?
Spring是一個開源的控制反轉(Inversion of Control,IoC)和面向切面(AOP)的容器框架,它的主要目的是簡化企業開發。
IOC 控制反轉
先看一下一段代碼
public class PersonServiceBean{
private PersonDao personDao = new PersonDaoBean();
public void save(Person person){
personDao.save(person);
}
}
PersonDaoBean是在應用內部(PersonServiceBean)創建及維護的。所以控制反轉就是應用本身不負責依賴對象的創建及維護。依賴對象的創建及維護是由外部容器負責的。這樣控制權就由應用轉移到了外部容器,控制權的轉移就是所謂反轉。
依賴注入(Dependency Injection)
當我們把依賴對象交給外部容器負責創建,那么PersonServiceBean類可以改成如下:
public class PersonServiceBean{
private PersonDao personDao;
//通過構造器參數,讓容器把創建好的依賴對象注入進PersonServiceBean,當然也可以使用setter方法進行注入。
public PersonServiceBean(PersonDao personDao){
this.personDao = personDao ;
}
public void save(Person person){
personDao.save(person);
}
}
所謂依賴注入就是指:在運行期,由外部容器動態地將依賴對象注入到組件中。
為什么要使用Spring?
1.降低組件之間的耦合度,實現軟件各層之間的解耦。
Controller ——》Service ——》 DAO
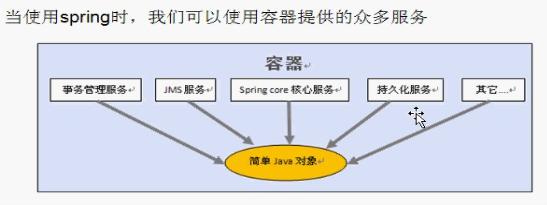
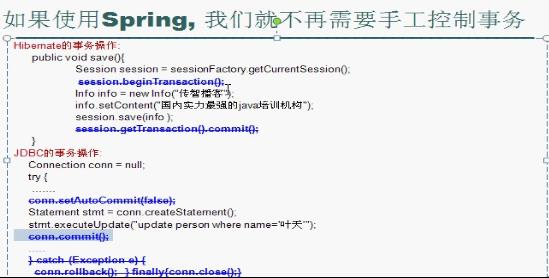
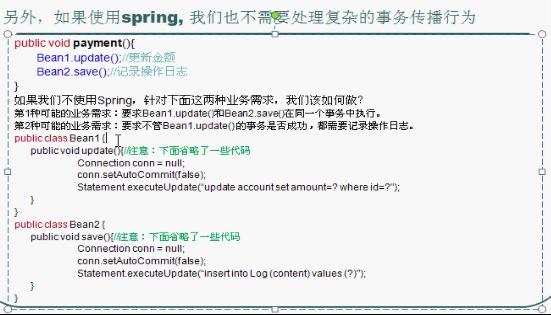
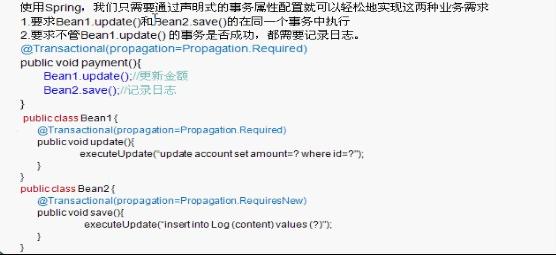
2.可以使用容器提供的眾多服務,如事務管理服務、消息服務等。當我們使用容器管理事務時,開發人員就不再需要手工控制事務,也不需處理復雜的事物傳播。
3.容器提供單例模式支持。開發人員不再需要自己填寫實現代碼。
4.容器提供了AOP技術,利用它很容易實現如權限攔截、運行期監控等功能。
5.容器提供的眾多輔助類,使用這些類能夠加快應用的開發,如JDBC Template、Hibernate Template。
6.Spring對于主流的應用框架提供了集成支持,如集成Hibernate、JPA、Struts等,這樣更便于應用的開發。
搭建與測試Spring的開發環境
使用版本為Spring2.5.6
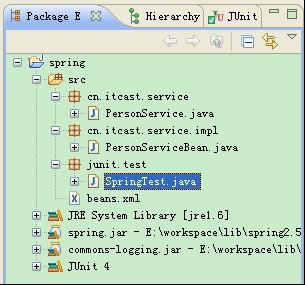
新建一個Java Project 命名為spring 并導入相關的jar包
配置Spring配置文件

在src下新建beans.xml配置文件
<?xml version="1.0" encoding="UTF-8"?>
<beans xmlns="http://www.springframework.org/schema/beans"
xmlns:xsi="http://www.w3.org/2001/XMLSchema-instance"
xsi:schemaLocation="http://www.springframework.org/schema/beans
http://www.springframework.org/schema/beans/spring-beans-2.5.xsd">
</beans>
實例化Spring容器 建議用方法一
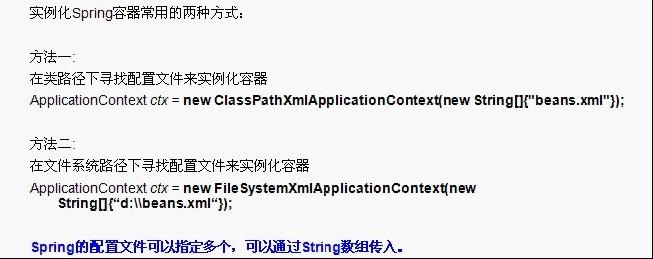
新建一個單元測試SpringTest,并導入測試所用的包
package junit.test;
import org.junit.BeforeClass;
import org.junit.Test;
import org.springframework.context.ApplicationContext;
import org.springframework.context.support.ClassPathXmlApplicationContext;
import cn.itcast.service.PersonService;
public class SpringTest {
@BeforeClass
public static void setUpBeforeClass() throws Exception {
}
@Test public void instanceSpring(){
ApplicationContext ctx = new ClassPathXmlApplicationContext("beans.xml");
}
}
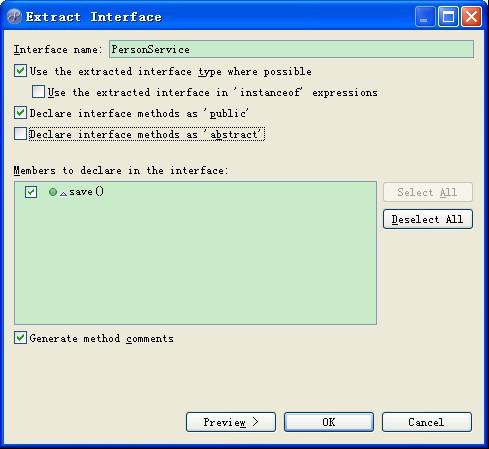
新建一個業務Bean,命名為PersonServiceBean;抽取PersonServiceBean的接口。
package cn.itcast.service.impl;
import cn.itcast.service.PersonService;
public class PersonServiceBean implements PersonService {
public void save(){
System.out.println("我是save()方法");
}
}
package cn.itcast.service;
public interface PersonService {
public void save();
}
在配置文件中加入如下語句實現
<bean id="personService" class="cn.itcast.service.impl.PersonServiceBean"></bean>
注意:編寫spring配置文件時,不能出現幫助信息 同通過如下方法解決

修改SpringTest代碼
package junit.test;
import org.junit.BeforeClass;
import org.junit.Test;
import org.springframework.context.ApplicationContext;
import org.springframework.context.support.ClassPathXmlApplicationContext;
import cn.itcast.service.PersonService;
public class SpringTest {
@BeforeClass
public static void setUpBeforeClass() throws Exception {
}
@Test public void instanceSpring(){
ApplicationContext ctx = new ClassPathXmlApplicationContext("beans.xml");
PersonService personService = (PersonService)ctx.getBean("personService");
personService.save();
}
}
在實例化了容器之后,從容器中取得bean,再調用業務bean的save方法
執行SpringTest文件 觀察控制臺輸出

以上證明本Spring程序運行成功!
編碼剖析Spring管理Bean的原理
通過第一個實例我們會有一個疑問,Spring到底是怎么管理Bean的呢?
我們來模擬Spring的內部實現
在junit.test下新建ItcastClassPathXMLApplicationContext類
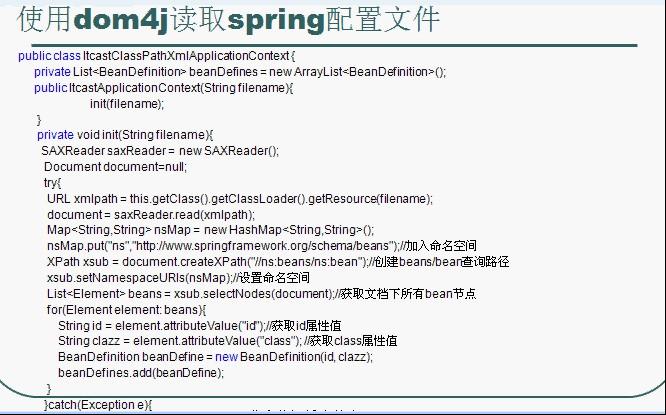
類的完全代碼(這里要引入dom4j的jar包)
package junit.test;
import java.net.URL;
import java.util.ArrayList;
import java.util.HashMap;
import java.util.HashSet;
import java.util.List;
import java.util.Map;
import org.dom4j.Document;
import org.dom4j.Element;
import org.dom4j.XPath;
import org.dom4j.io.SAXReader;
/**
* 傳智傳客版容器
*
*/
public class ItcastClassPathXMLApplicationContext {
private List<BeanDefinition> beanDefines = new ArrayList<BeanDefinition>();
private Map<String, Object> sigletons = new HashMap<String, Object>();
public ItcastClassPathXMLApplicationContext(String filename){
this.readXML(filename);
this.instanceBeans();
}
/**
* 完成bean的實例化
*/
private void instanceBeans() {
for(BeanDefinition beanDefinition : beanDefines){
try {
if(beanDefinition.getClassName()!=null && !"".equals(beanDefinition.getClassName().trim())) sigletons.put(beanDefinition.getId(), Class.forName(beanDefinition.getClassName()).newInstance());
} catch (Exception e) {
e.printStackTrace();
}
}
}
/**
* 讀取xml配置文件
* @param filename
*/
private void readXML(String filename) {
SAXReader saxReader = new SAXReader();
Document document=null;
try{
URL xmlpath = this.getClass().getClassLoader().getResource(filename);
document = saxReader.read(xmlpath);
Map<String,String> nsMap = new HashMap<String,String>();
nsMap.put("ns","http://www.springframework.org/schema/beans");//加入命名空間
XPath xsub = document.createXPath("http://ns:beans/ns:bean");//創建beans/bean查詢路徑
xsub.setNamespaceURIs(nsMap);//設置命名空間
List<Element> beans = xsub.selectNodes(document);//獲取文檔下所有bean節點
for(Element element: beans){
String id = element.attributeValue("id");//獲取id屬性值
String clazz = element.attributeValue("class"); //獲取class屬性值
BeanDefinition beanDefine = new BeanDefinition(id, clazz);
beanDefines.add(beanDefine);
}
}catch(Exception e){
e.printStackTrace();
}
}
/**
* 獲取bean實例
* @param beanName
* @return
*/
public Object getBean(String beanName){
return this.sigletons.get(beanName);
}
}
新建BeanDefinition ,用來存放bean里面的兩個屬性 id 和 className。
package junit.test;
public class BeanDefinition {
private String id;
private String className;
public BeanDefinition(String id, String className) {
this.id = id;
this.className = className;
}
public String getId() {
return id;
}
public void setId(String id) {
this.id = id;
}
public String getClassName() {
return className;
}
public void setClassName(String className) {
this.className = className;
}
}
修改SpringTest代碼 測試程序
package junit.test;
import org.junit.BeforeClass;
import org.junit.Test;
import cn.itcast.service.PersonService;
public class SpringTest {
@BeforeClass
public static void setUpBeforeClass() throws Exception {
}
@Test public void instanceSpring(){
ItcastClassPathXMLApplicationContext ctx = new ItcastClassPathXMLApplicationContext("beans.xml");
PersonService personService = (PersonService)ctx.getBean("personService");
personService.save();
}
}
執行測試 控制臺輸出為

說明我們新建的傳智播客容器取到了bean實例 并成功地調用了save方法
通過實例,我們就可以理解Spring是創建和管理bean的!