在WebWork2.2中和Spring的結(jié)合變得簡(jiǎn)單了,WebWork的Action的也可以由Spring來(lái)管理。但是如何進(jìn)行測(cè)試了,在google上搜了一下,其代碼都是如下形式:
1 Map params = new HashMap();
2 params.put("a", "test");
3 Map paramCtx = new HashMap();
4 paramCtx.put(ActionContext.PARAMETERS, params);
5 ActionProxy proxy = ActionProxyFactory.getFactory().createActionProxy("/organiz", "new_depart", paramCtx, false, false);
6 proxy.setExecuteResult(false);
7 assertEquals(proxy.execute(), "success");
8
9 MyTestAction action = (MyTestAction) proxy.getAction();
10 assertEquals(action.getA(), "test");
該代碼執(zhí)行時(shí)會(huì)報(bào)錯(cuò)誤,查看了一下源代碼應(yīng)該加入
1paramCtx.put(ActionContext.DEV_MODE, Boolean.FALSE);
其次需要加載spring的applicationContext,代碼如下:
1SpringObjectFactory objectFactory = new SpringObjectFactory();
2 ApplicationContext appContext = new ClassPathXmlApplicationContext("applicationContext.xml");
3 objectFactory.setApplicationContext(appContext);
4 ObjectFactory.setObjectFactory(objectFactory);
1.編譯亂碼,設(shè)置編譯的字符集編碼和環(huán)境編碼
<plugin>
<groupId>org.apache.maven.plugins</groupId>
<artifactId>maven-compiler-plugin</artifactId>
<version>2.3.2</version>
<configuration>
<source>1.4</source>
<target>1.4</target>
<encoding>UTF-8</encoding>
</configuration>
</plugin>
設(shè)置環(huán)境變量MAVEN_OPTS=-Xms64m -Xmx128m -Dfile.encoding=UTF-8
2.運(yùn)行mvn test時(shí)亂碼(IDE上運(yùn)行TestCase時(shí)OK,但是運(yùn)行maven test亂碼,結(jié)果測(cè)試不通過(guò))修改pom.xml增加如下內(nèi)容即可
<plugin>
<groupId>org.apache.maven.plugins</groupId>
<artifactId>maven-surefire-plugin</artifactId>
<version>2.7.2</version>
<configuration>
<forkMode>once</forkMode>
<argLine>-Dfile.encoding=UTF-8</argLine>
<systemProperties>
<property>
<name>net.sourceforge.cobertura.datafile</name>
<value>target/cobertura/cobertura.ser</value>
</property>
</systemProperties>
</configuration>
</plugin>
posted @
2011-06-30 02:15 小小~咖啡豆 閱讀(1532) |
評(píng)論 (1) |
編輯 收藏
<title>屏蔽鼠標(biāo)右鍵、Ctrl+n、shift+F10、F5刷新、退格鍵</title>
</head>
<body onkeydown="KeyDown()"
oncontextmenu="event.returnValue=false">
<script language="Javascript"><!--
//屏蔽鼠標(biāo)右鍵、Ctrl+n、shift+F10、F5刷新、退格鍵
//Author: meizz(梅花雨) 2002-6-18
function KeyDown(){
if ((window.event.altKey)&&
((window.event.keyCode==37)|| //屏蔽 Alt+ 方向鍵 ←
(window.event.keyCode==39))){ //屏蔽 Alt+ 方向鍵 →
alert("不準(zhǔn)你使用ALT+方向鍵前進(jìn)或后退網(wǎng)頁(yè)!");
event.returnValue=false;
}
/* 注:這還不是真正地屏蔽 Alt+ 方向鍵,
因?yàn)?Alt+ 方向鍵彈出警告框時(shí),按住 Alt 鍵不放,
用鼠標(biāo)點(diǎn)掉警告框,這種屏蔽方法就失效了。以后若
有哪位高手有真正屏蔽 Alt 鍵的方法,請(qǐng)告知。*/
if ((event.keyCode==8) || //屏蔽退格刪除鍵
(event.keyCode==116)|| //屏蔽 F5 刷新鍵
(event.ctrlKey && event.keyCode==82)){ //Ctrl + R
event.keyCode=0;
event.returnValue=false;
}
if ((event.ctrlKey)&&(event.keyCode==78)) //屏蔽 Ctrl+n
event.returnValue=false;
if ((event.shiftKey)&&(event.keyCode==121)) //屏蔽 shift+F10
event.returnValue=false;
if (window.event.srcElement.tagName == "A" && window.event.shiftKey)
window.event.returnValue = false; //屏蔽 shift 加鼠標(biāo)左鍵新開(kāi)一網(wǎng)頁(yè)
if ((window.event.altKey)&&(window.event.keyCode==115)){ //屏蔽Alt+F4
window.showModelessDialog("about:blank","","dialogWidth:1px;dialogheight:1px");
return false;}
}
/* 另外可以用 window.open 的方法屏蔽 IE 的所有菜單
第一種方法:
window.open("你的.htm", "","toolbar=no,location=no,directories=no,menubar=no,scrollbars=no,resizable=yes,status=no,top=0,left=0")
第二種方法是打開(kāi)一個(gè)全屏的頁(yè)面:
window.open("你的.asp", "", "fullscreen=yes")
*/
// --></script>
<h2 align=center>屏蔽鼠標(biāo)右鍵、Ctrl+n、shift+F10、F5刷新、退格鍵</h2>
</body>
</html>
<div style="position: absolute; top: 10; right: 10; width: 148; height: 18;cursor:hand">
<input type="button" name="Button" value="查看源代碼" onClick=
'window.location = "view-source:" +
window.location.href'></div>
數(shù)據(jù)庫(kù)測(cè)試
在創(chuàng)建企業(yè)級(jí)應(yīng)用的時(shí)候,數(shù)據(jù)層的單元測(cè)試因?yàn)槠鋸?fù)雜性往往被遺棄,Unitils大大降低了測(cè)試的復(fù)雜性,使得數(shù)據(jù)庫(kù)的測(cè)試變得容易并且易維護(hù)。已下介紹databasemodule和dbunitmodule進(jìn)行數(shù)據(jù)庫(kù)的單元測(cè)試。
用dbUnit管理測(cè)試數(shù)據(jù)
數(shù)據(jù)庫(kù)的測(cè)試應(yīng)該在單元測(cè)試數(shù)據(jù)庫(kù)上運(yùn)行,單元測(cè)試數(shù)據(jù)庫(kù)給我們提供了一個(gè)完整的并有著很好細(xì)粒度控制的測(cè)試數(shù)據(jù),DbUnitModule是在dbunit的基礎(chǔ)上進(jìn)一步的為數(shù)據(jù)庫(kù)的測(cè)試提供數(shù)據(jù)集的支持。
加載測(cè)試數(shù)據(jù)集
讓我們以UserDAO中一個(gè)簡(jiǎn)單的方法findByName(檢查姓氏和名字)為例子開(kāi)始介紹。他的單元測(cè)試如下:
@DataSet
public class UserDAOTest extends UnitilsJUnit4 {
@Test
public void testFindByName() {
User result = userDao.findByName("doe", "john");
assertPropertyLenEquals("userName", "jdoe", result);
}
@Test
public void testFindByMinimalAge() {
List<User> result = userDao.findByMinimalAge(18);
assertPropertyLenEquals("firstName", Arrays.asList("jack"), result);
}
}
@DateSet 注解表示了測(cè)試需要尋找dbunit的數(shù)據(jù)集文件進(jìn)行加載,如果沒(méi)有指明數(shù)據(jù)集的文件名,則Unitils自動(dòng)在class文件的同目錄下加載文件名為 className.xml的數(shù)據(jù)集文件。(這種定義到class上面的數(shù)據(jù)集稱為class級(jí)別的數(shù)據(jù)集)
數(shù)據(jù)集 文件必須是dbunit的FlatXMLDataSet文件格式,其中包含了所要測(cè)試的數(shù)據(jù)。測(cè)試數(shù)據(jù)庫(kù)表中所有的內(nèi)容將會(huì)被刪除,然后再插入數(shù)據(jù)集中的 數(shù)據(jù)。如果表不屬于數(shù)據(jù)集中的,哪么該表的數(shù)據(jù)將不會(huì)被刪除。你也可以明確的加入一個(gè)空的表元素,例如<MY_TABLE/>(可以達(dá)到刪除 測(cè)試數(shù)據(jù)庫(kù)表中內(nèi)容的作用),如果要明確指定一個(gè)空的值,那么使用值[null]。
為UserDAOTest我們創(chuàng)建一個(gè)數(shù)據(jù)集,并放在UserDAOTest.class文件同目錄下。
<?xml version='1.0' encoding='UTF-8'?>
<dataset>
<usergroup name="admin" />
<user userName="jdoe" name="doe" firstname="john" userGroup="admin" />
<usergroup name="sales" />
<user userName="smith" name="smith" userGroup="sales" />
</dataset>
測(cè)試運(yùn)行的時(shí)候,首先將刪除掉usergroup表和user表中的所有內(nèi)容,然后將插入數(shù)據(jù)集中的內(nèi)容。其中name為smith的firstname的值將會(huì)是null。
假設(shè)testFindByMinimalAge()方法將使用一個(gè)特殊的數(shù)據(jù)集而不是使用class級(jí)別的數(shù)據(jù)集,你可以定義一個(gè)UserDAOTest.testFindByMinimalAge.xml 數(shù)據(jù)集文件并放在測(cè)試類的class文件同目錄下。
<?xml version='1.0' encoding='UTF-8'?>
<dataset>
<user userName="jack" age="18" />
<user userName="jim" age="17" />
</dataset>
這時(shí),你在testFindByMinimalAge()方法使用@DataSet注解,他將覆蓋class級(jí)的數(shù)據(jù)集
public class UserDAOTest extends UnitilsJUnit4 {
@Test
@DataSet("UserDAOTest.testFindByMinimalAge.xml")
public void testFindByMinimalAge() {
List<User> result = userDao.findByMinimalAge(18);
assertPropertyLenEquals("firstName", Arrays.asList("jack"), result);
}
}
不要過(guò)多的使用method級(jí)的數(shù)據(jù)集,因?yàn)檫^(guò)多的數(shù)據(jù)集文件意味著你要花大量的時(shí)間去維護(hù),你優(yōu)先考慮的是使用class級(jí)的數(shù)據(jù)集。
配置數(shù)據(jù)集加載策略
缺省情況下數(shù)據(jù)集被寫入數(shù)據(jù)庫(kù)采用的是clean insert策略。這就意味著數(shù)據(jù)在被寫入數(shù)據(jù)庫(kù)的時(shí)候是會(huì)先刪除數(shù)據(jù)集中有使用的表的數(shù)據(jù),然后在將數(shù)據(jù)集中的數(shù)據(jù)寫入數(shù)據(jù)庫(kù)。加載策略是可配額制的,我們通過(guò)修改DbUnitModule.DataSet.loadStrategy.default 的屬性值來(lái)改變加載策略。假設(shè)我們?cè)趗nitils.properties屬性文件中加入以下內(nèi)容:
DbUnitModule.DataSet.loadStrategy.default=org.unitils.dbunit.datasetloadstrategy.InsertLoadStrategy
這時(shí)加載策略就由clean insert變成了insert,數(shù)據(jù)已經(jīng)存在表中將不會(huì)被刪除,測(cè)試數(shù)據(jù)只是進(jìn)行插入操作。
加載策略也可以使用@DataSet的注解屬性對(duì)單獨(dú)的一些測(cè)試進(jìn)行配置:
@DataSet(loadStrategy = InsertLoadStrategy.class)
對(duì)于那些樹(shù)形DbUnit的人來(lái)說(shuō),配置加載策略實(shí)際上就是使用不同的DatabaseOperation,以下是默認(rèn)支持的加載策略方式:
l CleanInsertLoadStrategy: 先刪除dateSet中有關(guān)表的數(shù)據(jù),然后再插入數(shù)據(jù)。
l InsertLoadStrategy: 只插入數(shù)據(jù)。
l RefreshLoadStrategy: 有同樣key的數(shù)據(jù)更新,沒(méi)有的插入。
l UpdateLoadStrategy: 有同樣key的數(shù)據(jù)更新,沒(méi)有的不做任何操作。
配置數(shù)據(jù)集工廠
在Unitils中數(shù)據(jù)集文件采用了multischema xml 格式,這是DbUnits的FlatXmlDataSet 格式的擴(kuò)展。配置文件格式和文件的擴(kuò)展可以采用DataSetFactory 。
雖然Unitils當(dāng)前只支持一種數(shù)據(jù)格式,但是我們可以通過(guò)實(shí)現(xiàn)DataSetFactory來(lái)使用其他文件格式。當(dāng)你想使用excel而不是xml格式的時(shí)候,可以通過(guò)unitils.property中的DbUnitModule.DataSet.factory.default 屬性和@DataSet 注解來(lái)創(chuàng)建一個(gè)DbUnit's XlsDataSet 實(shí)例。
驗(yàn)證測(cè)試結(jié)果
有些時(shí)候我們想在測(cè)試時(shí)完畢后使用數(shù)據(jù)集來(lái)檢查數(shù)據(jù)庫(kù)中的內(nèi)容,舉個(gè)例子當(dāng)執(zhí)行完畢一個(gè)存儲(chǔ)過(guò)程后你想檢查一下啊數(shù)據(jù)是否更新了沒(méi)有。
下面的例子表示的是禁用到一年內(nèi)沒(méi)有使用過(guò)的帳戶
public class UserDAOTest extends UnitilsJUnit4 {
@Test @ExpectedDataSet
public void testInactivateOldAccounts() {
userDao.inactivateOldAccounts();
}
}
注意在test方法上增加了一個(gè)@ExpectedDataSet 注解。這將指明unitils將使用UserDAOTest.testInactivateOldAccounts-result.xml 這個(gè)數(shù)據(jù)集的內(nèi)容和數(shù)據(jù)庫(kù)的內(nèi)容進(jìn)行比較。
<?xml version='1.0' encoding='UTF-8'?>
<dataset>
<user userName="jack" active="true" />
<user userName="jim" active="false" />
</dataset>
根據(jù)這個(gè)數(shù)據(jù)集,將會(huì)檢查是否有兩條和記錄集的值相同的記錄在數(shù)據(jù)庫(kù)中。而其他的記錄和表將不理會(huì)。
使用的是@DataSet 注解的話,文件名可以明確指出,如果文件名沒(méi)有明確指出來(lái),那么文件名將匹配className .methodName -result.xml
使用少使用結(jié)果數(shù)據(jù)集,加入新的數(shù)據(jù)集意味著更多的維護(hù)。替代方式是在代碼中執(zhí)行相同的檢查(如使用一個(gè)findactiveusers()方法)。
使用多模式的數(shù)據(jù)集
一個(gè)程序不單單只是連接一個(gè)數(shù)據(jù)庫(kù)shema。Unitils采用了擴(kuò)展的數(shù)據(jù)集xml來(lái)定義多schemas下的數(shù)據(jù)。以下就是一個(gè)讀取數(shù)據(jù)到2個(gè)不同的schemas中的例子:
<?xml version='1.0' encoding='UTF-8'?>
<dataset xmlns="SCHEMA_A" xmlns:b="SCHEMA_B">
<user id="1" userName="jack" />
<b:role id="1" roleName="admin" />
</dataset>
在這個(gè)例子中我定義了兩個(gè)schemas,SCHEMA_A 和 SCHEMA_B。第一個(gè)schema,SCHEMA_A 被連接到默認(rèn)的xml命名空間中,第二個(gè)schema,SCHEMA_B 被連接到命名空間b。如果表xml元素的前綴使用了命名空間b,那么該表就是schema SCHEMA_B 中的,如果沒(méi)有使用任何的命名空間那么該表將被認(rèn)為是SCHEMA_A
中的。以上例子中測(cè)試數(shù)據(jù)定義了表SCHEMA_A.user 和SCHEMA_B.role。
如果在數(shù)據(jù)集中沒(méi)有配置一個(gè)默認(rèn)的命名空間,那么將會(huì)采用在unitils.properties中的屬性database.schemaNames 的第一個(gè)值作為默認(rèn)的
database.schemaNames=SCHEMA_A, SCHEMA_B
這個(gè)配置將SCHEMA_A 作為缺省的schema,這樣你可以簡(jiǎn)化數(shù)據(jù)集的聲明。
<?xml version='1.0' encoding='UTF-8'?>
<dataset xmlns:b="SCHEMA_B">
<user id="1" userName="jack" />
<b:role id="1" roleName="admin" />
</dataset>
連接測(cè)試數(shù)據(jù)庫(kù)
在以上所有的例子中,我們都有一件重要的事情沒(méi)有做:當(dāng)我們進(jìn)行測(cè)試的時(shí)候,怎樣連接數(shù)據(jù)庫(kù)并得到DataSource?
當(dāng)測(cè)試套件的第一個(gè)測(cè)試數(shù)據(jù)庫(kù)的案例運(yùn)行的時(shí)候,Unitils將會(huì)通過(guò)屬性文件創(chuàng)建一個(gè)DataSource 的實(shí)例來(lái)連接你單元測(cè)試時(shí)的數(shù)據(jù)庫(kù),以后的測(cè)試中都將使用這個(gè)DataSource 實(shí)例。連接配置的詳細(xì)內(nèi)容如下:
database.driverClassName=oracle.jdbc.driver.OracleDriver
database.url=jdbc:oracle:thin:@yourmachine:1521:YOUR_DB
database.userName=john
database.password=secret
database.schemaNames=test_john
按配置章節(jié)所說(shuō)的那樣,你可以將連接數(shù)據(jù)庫(kù)的驅(qū)動(dòng)類和url地址配置到unitils.properties 中去,而用戶名,密碼以及schema可以配置到unitils-local.properties 中去,這樣可以讓開(kāi)發(fā)人員連接到自己的單元測(cè)試數(shù)據(jù)庫(kù)中進(jìn)行測(cè)試而不會(huì)干預(yù)到其他的人。
在屬性或者setter方法前使用注解@TestDataSource ,將會(huì)將DataSource 實(shí)例注入到測(cè)試實(shí)例中去,如果你想加入一些代碼或者配置一下你的datasource,你可以做一個(gè)抽象類來(lái)實(shí)現(xiàn)該功能,所有的測(cè)試類都繼承該類。一個(gè)簡(jiǎn)單的例子如下:
public abstract class BaseDAOTest extends UnitilsJUnit4 {
@TestDataSource
private DataSource dataSource;
@Before
public void initializeDao() {
BaseDAO dao = getDaoUnderTest();
dao.setDataSource(dataSource);
}
protected abstract BaseDAO getDaoUnderTest();
}
上面的例子采用了注解來(lái)取得一個(gè)datasource的引用,另外一種方式就是使用DatabaseUnitils.getDataSource() 方法來(lái)取得datasource。
事務(wù)
出于不同的原因,我們的測(cè)試都是運(yùn)行在一個(gè)事務(wù)中的,其中最重要的原因如下:
l 數(shù)據(jù)庫(kù)的很多action都是在事務(wù)正常提交后才做,如SELECT FOR UPDATE 和觸發(fā)器
l 許多項(xiàng)目在測(cè)試數(shù)據(jù)的時(shí)候都會(huì)填寫一些測(cè)試數(shù)據(jù),每個(gè)測(cè)試運(yùn)行都會(huì)修改或者更新了數(shù)據(jù),當(dāng)下一個(gè)測(cè)試運(yùn)行的時(shí)候,都需要將數(shù)據(jù)回復(fù)到原有的狀態(tài)。
l 如果使用的是hibernate或者JPA的時(shí)候,都需要每個(gè)測(cè)試都運(yùn)行在事務(wù)中,保證系統(tǒng)的正常工作。
缺省情況下,事務(wù)管理是disabled的,事務(wù)的默認(rèn)行為我們可以通過(guò)屬性文件的配置加以改變:
DatabaseModule.Transactional.value.default=commit
采用這個(gè)設(shè)置,每個(gè)的測(cè)試都將執(zhí)行commit,其他的屬性值還有rollback 和disabled
我們也可以通過(guò)在測(cè)試類上使用注解@Transactional 來(lái)改變默認(rèn)的事務(wù)設(shè)置,如:
@Transactional(TransactionMode.ROLLBACK)
public class UserDaoTest extends UnitilsJUnit4 {
通過(guò)這種class上注解的事務(wù)管理,可以讓每個(gè)測(cè)試都確保回滾,@Transactional 注解還可以繼承的,因此我們可以將其放在父類中,而不必每個(gè)子類都進(jìn)行聲明。
.........
如果你使用Unitils的spring支持(見(jiàn)使用spring進(jìn)行測(cè)試)你如果配置了PlatformTransactionManager 的bean,那么unitils將會(huì)使用這個(gè)事務(wù)管理。
posted @
2008-08-25 15:11 小小~咖啡豆 閱讀(1950) |
評(píng)論 (2) |
編輯 收藏
1、使用Dir:
If Dir$(dirName, ATTR_DIRECTORY) = "" Then
'Directory does not exist
Else
'Directory does exist
End If
2、使用FileSystemObject:
Set objFSO = CreateObject("Scripting.FileSystemObject")
If objFSO.FolderExists(dirName) Then
'Directory does exist
Else
'Directory does not exist
End If
Unitils模塊
配置
和大多數(shù)的項(xiàng)目一樣,unitils也需要一些配置,默認(rèn)情況下有3個(gè)配置,每個(gè)配置都覆寫前一個(gè)的配置
- unitils-default.properties 默認(rèn)的配置,在unitils發(fā)行包中。
- unitils.properties 可包含項(xiàng)目的全部配置
- unitils-local.properties 可以包含用戶特定配置
第一個(gè)配置文件unitils-default.properties,它包含了缺省值并被包含在unitils的發(fā)行包中。我們沒(méi)有必要對(duì)這個(gè)文件進(jìn)行修改,但它可以用來(lái)作參考。
第二個(gè)配置文件unitils.properties,它是我們需要進(jìn)行配置的文件,并且能覆寫缺省的配置。舉個(gè)例子,如果你的項(xiàng)目使用的是oracle數(shù)據(jù)庫(kù),你可以創(chuàng)建一個(gè)unitils.properties文件并覆寫相應(yīng)的driver class和database url。
database.driverClassName=oracle.jdbc.driver.OracleDriver
database.url=jdbc:oracle:thin:@yourmachine:1521:YOUR_DB
這個(gè)文件并不是必須的,但是一旦你創(chuàng)建了一個(gè),你就需要將該文件放置在項(xiàng)目的classpath下
最后一個(gè)文件,unitils-local.properties是可選的配置文件,它可以覆寫項(xiàng)目的配置,用來(lái)定義開(kāi)發(fā)者的具體設(shè)置,舉個(gè)例子來(lái)說(shuō),如果每個(gè)開(kāi)發(fā)者都使用自己的數(shù)據(jù)庫(kù)schema,你就可以創(chuàng)建一個(gè)unitils-local.properties為每個(gè)用戶配置自己的數(shù)據(jù)庫(kù)賬號(hào)、密碼和schema。
database.userName=john
database.password=secret
database.schemaNames=test_john
每個(gè)unitils-local.properties文件應(yīng)該放置在對(duì)應(yīng)的用戶文件夾中(System.getProperty("user.home"))。
本地文件名unitils-local.properties也可以通過(guò)配置文件定義,在unitils.properties覆寫unitils.configuration.localFileName就可以。
unitils.configuration.localFileName=projectTwo-local.properties
啟用你的unitils
unitils的功能是依賴于基礎(chǔ)的測(cè)試框架,要使用unitils的功能,就必須先enable他們,這樣做的目的也是為了容易擴(kuò)展。目前支持的框架有:
- JUnit3 :org.unitils.UnitilsJUnit3
- JUnit4 :org.unitils.UnitilsJUnit4
- TestNG:org.unitils.UnitilsTestNG
舉個(gè)例子,如果使用JUnit3,你要使用unitils
import org.unitils.UnitilsJUnit3;
public class MyTest extends UnitilsJUnit3 {
}
通常你將創(chuàng)建你自己的包含一些公共行為的測(cè)試基類,如dataSource的注入,你可以讓這個(gè)基類繼承unitils測(cè)試類。
當(dāng)你使用的是JUnit4的話,你也可是使用@RunWith來(lái)代替繼承unitils測(cè)試類
import org.junit.runner.RunWith;
import org.unitils.UnitilsJUnit4TestClassRunner;
@RunWith(UnitilsJUnit4TestClassRunner.class)
public class MyTest {
}
模塊系統(tǒng)
在開(kāi)始舉例之前,讓我們先了解一下unitils概念。
unitils的結(jié)構(gòu)被設(shè)計(jì)成了十分容易擴(kuò)展,每個(gè)模塊提供了一種服務(wù),當(dāng)執(zhí)行Test的時(shí)候通過(guò)TestListener調(diào)用相應(yīng)的服務(wù)。
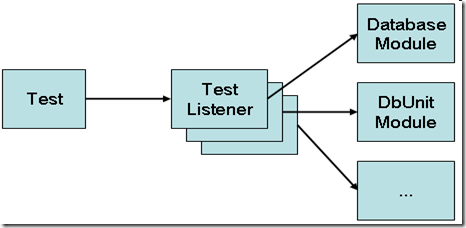
這種設(shè)計(jì)采用了一個(gè)統(tǒng)一的方式提供服務(wù),如果你需要加入其他的服務(wù),無(wú)需去改編測(cè)試基類(UnitilsJUnit4這些類)。要加入新的服務(wù)只需要添加一個(gè)新的模塊并在unitls配置文件中登記這個(gè)模塊。
目前unitils中所有有效的模塊如下:
- DatabaseModule 數(shù)據(jù)庫(kù)單元測(cè)試的維護(hù)和連接池。
- DbUnitModule 使用DBUnit來(lái)管理測(cè)試數(shù)據(jù)。
- hibernatemodule 支持Hibernate的配置和自動(dòng)數(shù)據(jù)庫(kù)映射檢查。
- EasyMockModule 支持創(chuàng)建mock和寬松的反射參數(shù)匹配。
- InjectModule 支持在一個(gè)對(duì)象中注入另一個(gè)對(duì)象。
- SpringModule 支持加載spring的上下文配置,并檢索和Spring Bean注入。
posted @
2008-04-07 00:45 小小~咖啡豆 閱讀(2803) |
評(píng)論 (2) |
編輯 收藏 單元測(cè)試應(yīng)該是簡(jiǎn)單和直觀的,而現(xiàn)實(shí)中的項(xiàng)目大多都是采用多層方式的,如EJB和hibernate的數(shù)據(jù)驅(qū)動(dòng)層的中間件技術(shù)。
unitils來(lái)源于一個(gè)嘗試,就是希望能以更務(wù)實(shí)的方式來(lái)看待單元測(cè)試......
這個(gè)指南會(huì)告訴你,什么項(xiàng)目可以使用unitils。 并在這個(gè)指導(dǎo)方針頁(yè) 中你可以了解到測(cè)試的準(zhǔn)側(cè)和它的特點(diǎn)。如果您想了解如何可以配置unitils ,并得以迅速地啟動(dòng),請(qǐng)查看cookbook 。
- unitils的斷言
- unitils的模塊
- 數(shù)據(jù)庫(kù)的測(cè)試
- 數(shù)據(jù)庫(kù)的自動(dòng)測(cè)試
- hibernate的測(cè)試
- jpa的測(cè)試
- spring的測(cè)試
- mock object的測(cè)試
- 今后的方向
unitils的斷言
在開(kāi)始這個(gè)指南之前我們先說(shuō)明一下獨(dú)立于unitils核心模塊的斷言。在下面的例子中,不需要進(jìn)行配置,將unitils的jar包和依賴包放在你的classpath下,就可以進(jìn)行測(cè)試了。
通過(guò)反射進(jìn)行斷言
一個(gè)典型的單元測(cè)試包含了結(jié)果值和期望值的比較,unitils提供了斷言的方法以幫助你進(jìn)行該操作,讓我們看看實(shí)例2中對(duì)有著id、first name、last name屬性的User類的2個(gè)實(shí)例的比較
public class User {
    private long id;
    private String first;
    private String last;

    public User(long id, String first, String last) {
        this.id = id;
        this.first = first;
        this.last = last;
    }
}

User user1 = new User(1, "John", "Doe");
User user2 = new User(1, "John", "Doe");
assertEquals(user1, user2);
你期望這個(gè)斷言是成功的,因?yàn)檫@兩個(gè)實(shí)例含有相同的屬性,但是運(yùn)行的結(jié)果并非如此,應(yīng)為User類并沒(méi)有覆寫
equals()方法,所以assertEquals是對(duì)兩個(gè)實(shí)例是否相等進(jìn)行判斷(user1 == user2)結(jié)果導(dǎo)致了比較的失敗。
假設(shè)你像如下代碼一樣實(shí)現(xiàn)了equals方法
public boolean equals(Object object) {
    if (object instanceof User) {
        return id == ((User) object).id;
    }
    return false;
}
這在你的程序邏輯中是一個(gè)合乎邏輯的實(shí)現(xiàn),當(dāng)兩個(gè)User實(shí)例擁有相同的id的時(shí)候,那么這兩個(gè)實(shí)例就是相等的。然而這種方式在你的單元測(cè)試中并不合適,并不能通過(guò)id的相同來(lái)認(rèn)為兩個(gè)user是相同的。
User user1 = new User(1, "John", "Doe");
User user2 = new User(1, "Jane", "Smith");
assertEquals(user1, user2);
這個(gè)斷言將會(huì)成功,但這并不是你所期望的,因此不要使用assertEquals來(lái)對(duì)兩個(gè)對(duì)象進(jìn)行判定是否相等(外覆類和java.lang.String類除外)。要想斷言他們相等,一種方法就是斷言每個(gè)屬性相等。
User user1 = new User(1, "John", "Doe");
User user2 = new User(1, "John", "Doe");
assertEquals(user1.getId(), user2.getId());
assertEquals(user1.getFirst(), user2.getFirst());
assertEquals(user1.getLast(), user2.getLast());
unitils提供了一些方法來(lái)幫助你執(zhí)行斷言更加的簡(jiǎn)單,通過(guò)反射,使用ReflectionAssert.assertRefEquals上面的代碼重寫如下:
User user1 = new User(1, "John", "Doe");
User user2 = new User(1, "John", "Doe");
assertRefEquals(user1, user2);
這個(gè)斷言將通過(guò)反射對(duì)兩個(gè)實(shí)例中的每個(gè)屬性都進(jìn)行比較,先是id、然后是first name、最后是last name。
   如果一個(gè)屬性本身也是一個(gè)對(duì)象,那么將會(huì)使用反射進(jìn)行遞歸比較,這同樣適合與集合、map、和數(shù)組之間的比較,他們
的每個(gè)元素會(huì)通過(guò)反射進(jìn)行比較。如果值是一個(gè)基本類型或者是一個(gè)外覆類,那么將會(huì)使用==進(jìn)行值的比較,因此下面的斷
言會(huì)取得成功
assertRefEquals(1, 1L);

List<Double> myList = new ArrayList<Double>();
myList.add(1.0);
myList.add(2.0);
assertRefEquals(Arrays.asList(1, 2), myList);
寬松的斷言
出于可維護(hù)性,這一點(diǎn)是十分重要的,舉例說(shuō)明:如果你要計(jì)算一個(gè)帳戶的余額,那你就沒(méi)比較檢查這個(gè)帳戶的名稱。他只會(huì)增加復(fù)雜性,使之更難理解。如果你想讓你的測(cè)試代碼更容易生存,更容易重構(gòu)的話,那請(qǐng)確保你斷言的范圍。
寬松的順序
在比較集合和數(shù)組的時(shí)候你可能并不關(guān)心他們中元素的順序,通過(guò)使用ReflectionAssert.assertRefEquals方法并配合ReflectionComparatorMode.LENIENT_ORDER參數(shù)將忽略元素的順序。
List<Integer> myList = Arrays.asList(3, 2, 1);
assertRefEquals(Arrays.asList(1, 2, 3), myList, LENIENT_ORDER);
無(wú)視默認(rèn)
   第二種的從寬方式是使用ReflectionComparatorMode.IGNORE_DEFAULTS模式,當(dāng)這種模式被設(shè)置的時(shí)候,java
的默認(rèn)值,如null、0、false將會(huì)不參與斷言(忽略)。
   舉個(gè)例子,如果你有一個(gè)User類,該類有著first name,last name,street等屬性,但是你僅僅想對(duì)first name
和street進(jìn)行檢查而忽略其他的屬性。
User actualUser   = new User("John", "Doe", new Address("First street", "12", "Brussels"));
User expectedUser = new User("John",  null, new Address("First street", null,       null));
assertRefEquals(expectedUser, actualUser, IGNORE_DEFAULTS);
你所期望忽略的屬性的對(duì)象必須放在斷言左邊,如果放在右邊那么依然進(jìn)行比較。
assertRefEquals(null, anyObject, IGNORE_DEFAULTS);  // Succeeds
assertRefEquals(anyObject, null, IGNORE_DEFAULTS);  // Fails
寬松的日期
第三種從寬處理是ReflectionComparatorMode.LENIENT_DATES,當(dāng)兩個(gè)日期都是值,或者都是null的時(shí)候,實(shí)際的日期將會(huì)被忽略(即斷言為相等)。
Date actualDate =   new Date(44444);
Date expectedDate = new Date();
assertRefEquals(expectedDate, actualDate, LENIENT_DATES);
assertLenEquals
ReflectionAssert還提供了一種斷言,他提供寬松的順序又提供無(wú)視的忽略。
List<Integer> myList = Arrays.asList(3, 2, 1);
assertLenEquals(Arrays.asList(1, 2, 3), myList);

assertLenEquals(null, "any");  // Succeeds
assertLenEquals("any", null);  // Fails
屬性斷言
assertLenEquals和assertRefEquals都是比較對(duì)象,ReflectionAssert也提供方法對(duì)對(duì)象的屬性進(jìn)行比較。(依賴與ONGL)。
一些屬性比較的例子
assertPropertyLenEquals("id", 1, user);  //斷言u(píng)ser的id屬性的值是1
assertPropertyLenEquals("address.street", "First street", user); //斷言u(píng)ser的address的street屬性
在這個(gè)方式中你期望的值和判定的對(duì)象也可以使用集合
assertPropertyLenEquals("id", Arrays.asList(1, 2, 3), users);
assertPropertyLenEquals("address.street", Arrays.asList("First street",
                        "Second street", "Third street"), users);
posted @
2008-04-05 14:23 小小~咖啡豆 閱讀(2331) |
評(píng)論 (5) |
編輯 收藏
- 寫代碼,就一定要寫測(cè)試
- 不要受單元測(cè)試的教條所限
- 相信單元測(cè)試將會(huì)帶來(lái)的成果
- 統(tǒng)一考慮編碼和測(cè)試
- 測(cè)試比單元代碼重要
- 測(cè)試的最佳時(shí)機(jī)是代碼剛寫完之時(shí)
- 測(cè)試不會(huì)白費(fèi)
- 當(dāng)天有瑕疵的測(cè)試也比后補(bǔ)的完美測(cè)試好
- 不好的測(cè)試也比沒(méi)有測(cè)試強(qiáng)
- 測(cè)試有時(shí)可以驗(yàn)證意圖
- 只有傻瓜不用工具
- 用好的去測(cè)試不好的
引至:Info中文網(wǎng)站http://www.infoq.com/cn/news/2007/04/savoia-tao-of-testing
實(shí)際運(yùn)用 Tomcat 5.0.19,我們了解在不修改 Tomcat 原始碼的狀況下,使用者透過(guò) Form submit 的資料將一律以 ISO8859-1 處理,程式設(shè)計(jì)師必須自行將字串將轉(zhuǎn)換為 Big5(繁體中文) or GB2312/GBK(簡(jiǎn)體中文),我們?cè)趹?yīng)用程式中,對(duì)所有的 request.getParameter("xx"); 作了 toBig5String() 的處理,理論上,所有的中文問(wèn)題應(yīng)該不會(huì)出現(xiàn)才對(duì),結(jié)果,還是發(fā)現(xiàn)某些狀況下,中文還是變成亂碼!
經(jīng)過(guò)分析整理,我們發(fā)現(xiàn)問(wèn)題出在 QueryString 的解析,以前在 Tomcat 4.x 時(shí)代,無(wú)論 SUBMIT 時(shí)採(cǎi)用 GET or POST,Tomcat server 對(duì) parameters 的處理都採(cǎi)用相同的編碼,但在 Tomcat 5.x 版,不知何故,卻將 QueryString 的解析獨(dú)立出來(lái),目前確認(rèn),F(xiàn)orm 的 Method 採(cǎi)用 GET 及直接將參數(shù)寫在 URL 上的中文,上傳到 Tomcat 時(shí),無(wú)論如何轉(zhuǎn)碼,都會(huì)變成亂碼,那怕你事先作過(guò) URLEncode 也一樣。
網(wǎng)站上,有人針對(duì)這個(gè)問(wèn)題,建議將所有中文改採(cǎi)用 base64 編碼,到了 server 上,程式將自行土 base64 decode 回來(lái),確保中文不會(huì)發(fā)生問(wèn)題。這樣作法當(dāng)然可以解決這個(gè)問(wèn)題,但是所有網(wǎng)頁(yè)變成限定要採(cǎi)用 POST,且程式設(shè)計(jì)師要隨時(shí)分清楚,那個(gè)參數(shù)是採(cǎi)用 GET 上傳,那個(gè)參數(shù)是採(cǎi)用 POST 上傳,然後再針對(duì)不同的方式採(cǎi)用不同的解析,這樣的程式一點(diǎn)兒移植性都沒(méi)有,更別提跨平臺(tái)、跨國(guó)際語(yǔ)言了。
研究 Tomcat 的文件及原始碼,我們找到了問(wèn)題所在及解決的方法,只有按著以下的作法,才能使 Form submit 的資料完全按著 ISO8859-1 的編碼,當(dāng)然,若是全照著 Tomcat 的文件說(shuō)明去作,肯定還是不行,你還是得加上這個(gè)參數(shù)到 server.xml 中才行。
解決方案
請(qǐng)先研究 $TOMCAT_HOME/webapps/tomcat-docs/config/http.html 這個(gè)說(shuō)明檔,擷錄重點(diǎn)如下:
URIEncoding:This specifies the character encoding used to decode the URI bytes, after %xx decoding the URL. If not specified, ISO-8859-1 will be used.
useBodyEncodingForURI:This specifies if the encoding specified in contentType should be used for URI query parameters, instead of using the URIEncoding. This setting is present for compatibility with Tomcat 4.1.x, where the encoding specified in the contentType, or explicitely set using Request.setCharacterEncoding method was also used for the parameters from the URL. The default value is false.
上述二個(gè) Tomcat 參數(shù),是設(shè)定在 server.xml 中的 http <Connector /> 區(qū)塊,要解決 QueryString 中文變成亂碼的問(wèn)題,你必須至少設(shè)定這二個(gè)參數(shù)其中之一。
URIEncoding 請(qǐng)?jiān)O(shè)定為 URIEncoding="ISO-8859-1" 指定為 "ISO-8859-1" 編碼,讓 QueryString 的字元編碼與 post body 相同。
useBodyEncodingForURI 這是用來(lái)相容 Tomcat 4.x 版的,設(shè)定的值是 "true" or "false",意思是指 "要不要讓 QueryString 與 POST BODY 採(cǎi)用相同的字元編碼 ?",若是設(shè)成 true,那也可達(dá)到 "ISO-8859-1" 編碼的需求。
建議,採(cǎi)用 URIEncoding 的設(shè)定,畢竟 useBodyEncodingForURI 的作法是為了相容 Tomcat 4.X。不過(guò)若照原文的說(shuō)明,理論上這二個(gè)參數(shù)都不設(shè),Tomcat 也該採(cǎi)用 "ISO-8859-1" 的編碼,那為什麼還是會(huì)有問(wèn)題呢 ? 我們由 Tomcat Source Code 來(lái)看就清楚了。
1
2
3
4
5
6
7
8
9
10
11
12
13
14
15
16
17
18
19
20
21
22
23
24
25
26
27
28
29
|
// 這一段碼是 Tomcat 用來(lái)解 QueryString 的程式,
// 在 org.apache.tomcat.util.http.Parameters 這個(gè) class 裡。
private String urlDecode(ByteChunk bc, String enc)
  throws IOException {
  if( urlDec==null ) {
     urlDec=new UDecoder();
  }
  urlDec.convert(bc);
  String result = null;
  if (enc != null) {
    bc.setEncoding(enc);
    result = bc.toString();
  }
  else {
    CharChunk cc = tmpNameC;
    cc.allocate(bc.getLength(), -1);
    // Default encoding: fast conversion
    byte[] bbuf = bc.getBuffer();
    char[] cbuf = cc.getBuffer();
    int start = bc.getStart();
    for (int i = 0; i < bc.getLength(); i++) {
      cbuf[i] = (char) (bbuf[i + start] & 0xff);
    }
    cc.setChars(cbuf, 0, bc.getLength());
    result = cc.toString();
    cc.recycle();
  }
  return result;
}
|
請(qǐng)?zhí)貏e注意紅色區(qū)塊,當(dāng) Tomcat 發(fā)現(xiàn) QueryString 並沒(méi)有設(shè)定 encode 時(shí),並非像文件中所說(shuō)預(yù)設(shè)採(cǎi)用 ISO-8859-1 的編碼,而是用一段 fast conversion 來(lái)處理,才會(huì)造成中文問(wèn)題,所以,還是必須在 Server.xml 中,加上 URLEncoding 的參數(shù)設(shè)定才行哦。
Connector 的設(shè)定範(fàn)例:
1
2
3
4
5
6
7
8
9
10
11
12
13
14
15
|
<Connector
debug="0"
acceptCount="100"
connectionTimeout="20000"
disableUploadTimeout="true"
port="80"
redirectPort="8443"
enableLookups="false"
minSpareThreads="25"
maxSpareThreads="75"
maxThreads="150"
maxPostSize="0"
URIEncoding="ISO-8859-1"
>
</Connector>
|
文章來(lái)至:
http://www.javaworld.com.tw/jute/post/view?bid=9&id=44042&sty=1&tpg=1&age=0
posted @
2007-04-26 10:33 小小~咖啡豆 閱讀(7034) |
評(píng)論 (0) |
編輯 收藏絕對(duì)的最強(qiáng)的java ide的7.0M1已經(jīng)出了,快去試試把,
http://www.jetbrains.com/idea/nextversion/
http://www.jscud.com/srun/news/viewhtml/4_2005_1/26.htm
posted @
2007-03-28 15:36 小小~咖啡豆 閱讀(1465) |
評(píng)論 (0) |
編輯 收藏用StrutsTestCase能很好的對(duì)Struts來(lái)進(jìn)行測(cè)試,可是如果時(shí)用Spring來(lái)管理Struts的action的時(shí)候,用StrutsTestCase的常規(guī)方式是不能進(jìn)行測(cè)試的,以下的一個(gè)文章對(duì)此有很好的說(shuō)明:
http://www.jetmaven.net/contents/documents/p_spring_junit_combination.php
webwork的IOC(基于2.1.X版本)
webwork的ioc其實(shí)在webwork中使用起來(lái)挺方便的,雖然其功能不算強(qiáng)大,但是已經(jīng)能很好的滿足我們一般的需要了,就算我們使用spring 的ioc,如果不使用特別的功能,其一般我們也是基于接口,然后有個(gè)set方法,通過(guò)set來(lái)注入,沒(méi)有太多的區(qū)別,不同的是webwork的ioc需要依賴xwork,而spring卻是依賴spring這個(gè)容器。
webwork的ioc是怎么進(jìn)行注入的了,我們從代碼中進(jìn)行分析:
首先看看攔截器的代碼:
public class ComponentInterceptor extends AroundInterceptor {
//~ Static fields/initializers /////////////////////////////////////////////
public static final String COMPONENT_MANAGER = "com.opensymphony.xwork.interceptor.component.ComponentManager";
//~ Methods ////////////////////////////////////////////////////////////////
protected void after(ActionInvocation dispatcher, String result) throws Exception {
}
protected void before(ActionInvocation dispatcher) throws Exception {
ComponentManager container = (ComponentManager) ActionContext.getContext().get(COMPONENT_MANAGER);
if (container != null) {
container.initializeObject(dispatcher.getAction());
}
}
}
主要的代碼用黑體標(biāo)注出來(lái)了,container實(shí)際就是組件管理器,這里是一個(gè)ComponentManager接口的實(shí)現(xiàn) DefaultComponentManager,然后調(diào)用了該類的方法initializeObject(dispatcher.getAction ());而dispatcher.getAction()實(shí)際就是所調(diào)用的action對(duì)象,我們?cè)賮?lái)看看 DefaultComponentManager做了什么。
public void initializeObject(Object obj) {
loadResource(obj, obj.getClass(), this);
}
private Class loadResource(Object resource, Class clazz, DefaultComponentManager dcm) {
// ~由此來(lái)判斷是否要進(jìn)行依賴注入
boolean resourceNotLoaded = !dcm.loadOrder.contains(resource);
if (resourceNotLoaded) {
Map resources = getResourceDependencies(clazz);
for (Iterator iterator = resources.entrySet().iterator();
iterator.hasNext();) {
Map.Entry mapEntry = (Map.Entry) iterator.next();
Class depResource = (Class) mapEntry.getKey();
DefaultComponentManager newDcm = (DefaultComponentManager) mapEntry.getValue();
try {
ResourceEnablerPair pair = setupAndOptionallyCreateResource(newDcm, depResource);
setupResource(resource, pair.enabler, pair.resource);
} catch (Exception e) {
e.printStackTrace();
if (log.isDebugEnabled()) {
log.debug("Error loading or setting up resource: " + resources.getClass().getName(), e);
}
}
}
dcm.alreadyLoaded.add(clazz);
if (resource instanceof Initializable) {
Initializable initializable = (Initializable) resource;
initializable.init();
}
dcm.resourceInstances.put(clazz, resource);
dcm.loadOrder.add(resource);
}
// now return this class's enabler
Class enabler = (Class) dcm.enablers2.get(clazz);
return enabler;
}
private Map getResourceDependencies(Class resourceClass) {
List interfaces = new ArrayList();
//~ 將所有的interface放入interfaces鏈表中
addAllInterfaces(resourceClass, interfaces);
Map dependencies = new HashMap();
for (Iterator iterator = interfaces.iterator(); iterator.hasNext();) {
Class anInterface = (Class) iterator.next();
DefaultComponentManager dcm = this;
while (dcm != null) {
Class possibleResource = (Class) dcm.enablers.get(anInterface);
if (possibleResource != null) {
dependencies.put(possibleResource, dcm);
break;
}
dcm = dcm.fallback;
}
}
return dependencies;
}
private void addAllInterfaces(Class clazz, List allInterfaces) {
if (clazz == null) {
return;
}
Class[] interfaces = clazz.getInterfaces();
allInterfaces.addAll(Arrays.asList(interfaces));
addAllInterfaces(clazz.getSuperclass(), allInterfaces);
}
重要的代碼都用黑體進(jìn)行了標(biāo)注,方法initializeObject中所調(diào)用的loadResource(obj, obj.getClass(), this);就執(zhí)行了查找接口,并注入接口實(shí)現(xiàn)類整個(gè)過(guò)程。
loadResource首先調(diào)用了getResourceDependencies(clazz);而getResourceDependencies又調(diào)用了addAllInterfaces(resourceClass, interfaces);addAllInterfaces作用就是取得這個(gè)類包括這個(gè)類的父類的所有實(shí)現(xiàn)的接口,而getResourceDependencies方法就是對(duì)這個(gè)接口進(jìn)行過(guò)濾,返回只是在配置中有的接口。setupAndOptionallyCreateResource(newDcm, depResource);進(jìn)行的就是創(chuàng)建這些接口的實(shí)現(xiàn)類的對(duì)象,這個(gè)代碼的內(nèi)容如下:
private ResourceEnablerPair setupAndOptionallyCreateResource(DefaultComponentManager newDcm, Class depResource) throws Exception {
ResourceEnablerPair pair = new ResourceEnablerPair();
Object newResource = newDcm.resourceInstances.get(depResource);
if (newResource == null) {
newResource = ObjectFactory.getObjectFactory().buildBean(depResource);
}
pair.resource = newResource;
Class enabler = loadResource(newResource, depResource, newDcm);
pair.enabler = enabler;
return pair;
}
因?yàn)闇?zhǔn)備創(chuàng)建出來(lái)的接口實(shí)現(xiàn)類對(duì)象的接口可能又實(shí)現(xiàn)了其他的接口,因此再調(diào)用了loadResource(newResource, depResource, newDcm)。對(duì)象創(chuàng)建了,然后就是注入這個(gè)對(duì)象,setupResource(resource, pair.enabler, pair.resource)就是起這個(gè)作用的。代碼如下:
private void setupResource(Object resource, Class enabler, Object newResource) {
if (enabler == null) {
return;
}
try {
enabler.getMethods()[0].invoke(resource, new Object[] {newResource});
} catch (Exception e) {
e.printStackTrace();
if (log.isDebugEnabled()) {
log.debug("Error invoking method for resource: " + resource.getClass().getName(), e);
}
}
}
每個(gè)接口只有一個(gè)set方法,通過(guò)反射機(jī)制調(diào)用這個(gè)方法將創(chuàng)建出來(lái)的接口實(shí)現(xiàn)對(duì)象注入進(jìn)去。整個(gè)IOC就完成了。
http://www.scriptviewer.com/story.php?title=IntelliJ-IDEA-60-aeae
Idea6.0默認(rèn)是用的自帶的jdk5啟動(dòng)的,如果想用jdk6可以按如下辦法操作:
1.將idea目錄下的jre目錄改名
2.將安裝jdk6目錄中的jre目錄拷貝到idea目錄下,然后在將jdk6目錄中的jdk\lib\tools.jar拷貝到j(luò)re\lib下
3.修改idea.exe.vmoptions文件中的啟動(dòng)參數(shù)(這個(gè)不是必須的,只是提高idea的響應(yīng)速度)
C/C++ Source Add Block Comment Ctrl+Shift+/ C/C++ Editor
C/C++ Source Add Include Ctrl+Shift+N C/C++ Editor
C/C++ Source Comment Ctrl+/ C/C++ Editor
C/C++ Source Find Declaration Ctrl+G C/C++ Editor
C/C++ Source Find References Ctrl+Shift+G C/C++ Editor
C/C++ Source Format Ctrl+Shift+F C/C++ Editor
C/C++ Source Go to Matching Bracket Ctrl+Shift+P C/C++ Editor
C/C++ Source Go to next C/C++ member Ctrl+Shift+向下鍵 C/C++ Editor
C/C++ Source Go to previous C/C++ member Ctrl+Shift+向上鍵 C/C++ Editor
C/C++ Source Open Declaration F3 C/C++ Editor
C/C++ Source Open Definition Ctrl+F3 C/C++ Editor
C/C++ Source Open Type Ctrl+Shift+T C/C++ Editor
C/C++ Source Remove Block Comment Ctrl+Shift+\ C/C++ Editor
C/C++ Source Show outline Ctrl+O C/C++ Editor
C/C++ Source Uncomment Ctrl+\ C/C++ Editor
Makefile Source Comment Ctrl+/ Makefile Editor
Makefile Source Open declaration F3 Makefile Editor
Makefile Source Uncomment Ctrl+\ Makefile Editor
Refactor - C/C++ Redo - Refactoring Alt+Shift+Y C/C++ Editor
Refactor - C/C++ Rename - Refactoring Alt+Shift+R C/C++ Editor
Refactor - C/C++ Undo - Refactoring Alt+Shift+Z C/C++ Editor
View Zoom In Ctrl+= 在窗口中
View Zoom Out Ctrl+- 在窗口中
搜索 工作空間中的聲明 Ctrl+G 在窗口中
搜索 工作空間中的引用 Ctrl+Shift+G 在窗口中
搜索 打開(kāi)"搜索"對(duì)話框 Ctrl+H 在窗口中
搜索 顯示"文件中的出現(xiàn)位置"快速菜單 Ctrl+Shift+U 在窗口中
文件 "新建"菜單 Alt+Shift+N 在窗口中
文件 保存 Ctrl+S 在窗口中
文件 全部保存 Ctrl+Shift+S 在窗口中
文件 全部關(guān)閉 Ctrl+Shift+F4 在窗口中
文件 全部關(guān)閉 Ctrl+Shift+W 在窗口中
文件 關(guān)閉 Ctrl+F4 在窗口中
文件 關(guān)閉 Ctrl+W 在窗口中
文件 刷新 F5 在窗口中
文件 屬性 Alt+Enter 在窗口中
文件 打印 Ctrl+P 在窗口中
文件 新建 Ctrl+N 在窗口中
文件 重命名 F2 在窗口中
文本編輯 上一個(gè)詞語(yǔ) Ctrl+左箭頭 編輯文本
文本編輯 上滾行 Ctrl+向上鍵 編輯文本
文本編輯 下一個(gè)詞語(yǔ) Ctrl+右箭頭 編輯文本
文本編輯 下滾行 Ctrl+向下鍵 編輯文本
文本編輯 全部展開(kāi) Ctrl+Numpad_Multiply 編輯文本
文本編輯 切換折疊 Ctrl+Numpad_Divide 編輯文本
文本編輯 刪除上一個(gè)詞語(yǔ) Ctrl+Backspace 編輯文本
文本編輯 刪除下一個(gè)詞語(yǔ) Ctrl+Delete 編輯文本
文本編輯 刪除至行末 Ctrl+Shift+Delete 編輯文本
文本編輯 刪除行 Ctrl+D 編輯文本
文本編輯 在當(dāng)前行上面插入行 Ctrl+Shift+Enter 編輯文本
文本編輯 在當(dāng)前行下面插入行 Shift+Enter 編輯文本
文本編輯 復(fù)制行 Ctrl+Alt+向下鍵 編輯文本
文本編輯 將行上移 Alt+向上鍵 編輯文本
文本編輯 將行下移 Alt+向下鍵 編輯文本
文本編輯 展開(kāi) Ctrl+Numpad_Add 編輯文本
文本編輯 折疊 Ctrl+Numpad_Subtract 編輯文本
文本編輯 改寫切換 Insert 編輯文本
文本編輯 更改為大寫 Ctrl+Shift+X 編輯文本
文本編輯 更改為小寫 Ctrl+Shift+Y 編輯文本
文本編輯 選擇上一個(gè)詞語(yǔ) Ctrl+Shift+左箭頭 編輯文本
文本編輯 選擇下一個(gè)詞語(yǔ) Ctrl+Shift+右箭頭 編輯文本
文本編輯 重復(fù)行 Ctrl+Alt+向上鍵 編輯文本
查看 Java 包資源管理器 Alt+Shift+Q,P 在窗口中
查看 Java 聲明 Alt+Shift+Q,D 在窗口中
查看 Java 類型層次結(jié)構(gòu) Alt+Shift+Q,T 在窗口中
查看 Javadoc Alt+Shift+Q,J 在窗口中
查看 變量 Alt+Shift+Q,V 在窗口中
查看 同步 Alt+Shift+Q,Y 在窗口中
查看 備忘單 Alt+Shift+Q,H 在窗口中
查看 控制臺(tái) Alt+Shift+Q,C 在窗口中
查看 搜索 Alt+Shift+Q,S 在窗口中
查看 斷點(diǎn) Alt+Shift+Q,B 在窗口中
查看 顯示視圖 (查看: 大綱) Alt+Shift+Q,O 在窗口中
查看 顯示視圖 (查看: 問(wèn)題) Alt+Shift+Q,X 在窗口中
瀏覽 &Quick Cross References Alt+Shift+P 編輯 Java 源代碼
瀏覽 Open AspectJ Type Alt+Shift+A 在窗口中
瀏覽 Open AspectJ Type in Hierarchy Alt+Shift+H 在窗口中
瀏覽 "顯示位置"菜單 Alt+Shift+W 在窗口中
瀏覽 上一個(gè)編輯位置 Ctrl+Q 在窗口中
瀏覽 下一頁(yè) Ctrl+. 在窗口中
瀏覽 前一頁(yè) Ctrl+, 在窗口中
瀏覽 前移歷史記錄 Alt+右箭頭 在窗口中
瀏覽 后退歷史記錄 Alt+左箭頭 在窗口中
瀏覽 在層次結(jié)構(gòu)中打開(kāi)類型 Ctrl+Shift+H 在窗口中
瀏覽 快速大綱 Ctrl+O 編輯 Java 源代碼
瀏覽 快速層次結(jié)構(gòu) Ctrl+T 編輯 Java 源代碼
瀏覽 打開(kāi)聲明 F3 在窗口中
瀏覽 打開(kāi)外部 Javadoc Shift+F2 在窗口中
瀏覽 打開(kāi)類型 Ctrl+Shift+T 在窗口中
瀏覽 打開(kāi)類型層次結(jié)構(gòu) F4 在窗口中
瀏覽 打開(kāi)結(jié)構(gòu) Ctrl+F3 編輯 Java 源代碼
瀏覽 打開(kāi)調(diào)用層次結(jié)構(gòu) Ctrl+Alt+H 在窗口中
瀏覽 打開(kāi)資源 Ctrl+Shift+R 在窗口中
瀏覽 轉(zhuǎn)至上一個(gè)成員 Ctrl+Shift+向上鍵 編輯 Java 源代碼
瀏覽 轉(zhuǎn)至下一個(gè)成員 Ctrl+Shift+向下鍵 編輯 Java 源代碼
瀏覽 轉(zhuǎn)至匹配的方括號(hào) Ctrl+Shift+P 編輯 Java 源代碼
瀏覽 轉(zhuǎn)至行 Ctrl+L 編輯文本
源代碼 切換 Ant 標(biāo)記出現(xiàn) Alt+Shift+O 編輯 Ant 構(gòu)建文件
源代碼 切換標(biāo)記出現(xiàn) Alt+Shift+O 編輯 Java 源代碼
源代碼 切換注釋 Ctrl+/ 編輯 Java 源代碼
源代碼 切換注釋 Ctrl+7 編輯 Java 源代碼
源代碼 切換注釋 Ctrl+Shift+C 編輯 Java 源代碼
源代碼 在文件中重命名 Alt+Shift+R 編輯 Ant 構(gòu)建文件
源代碼 快速輔助 - 在文件中重命名 Ctrl+2,R 編輯 Java 源代碼
源代碼 快速輔助 - 指定給字段 Ctrl+2,F(xiàn) 編輯 Java 源代碼
源代碼 快速輔助 - 指定給局部變量 Ctrl+2,L 編輯 Java 源代碼
源代碼 打開(kāi)外部文檔 Shift+F2 編輯 Ant 構(gòu)建文件
源代碼 顯示工具提示描述 F2 編輯 Ant 構(gòu)建文件
源代碼 顯示源代碼快速菜單 Alt+Shift+S 在窗口中
源代碼 格式 Ctrl+Shift+F 編輯 Ant 構(gòu)建文件
源代碼 格式化 Ctrl+Shift+F 編輯 Java 源代碼
源代碼 添加 Javadoc 注釋 Alt+Shift+J 在窗口中
源代碼 添加塊注釋 Ctrl+Shift+/ 編輯 Java 源代碼
源代碼 添加導(dǎo)入 Ctrl+Shift+M 編輯 Java 源代碼
源代碼 組織導(dǎo)入 Ctrl+Shift+O 在窗口中
源代碼 縮進(jìn)行 Ctrl+I 編輯 Java 源代碼
源代碼 除去出現(xiàn)注釋 Alt+Shift+U 編輯 Java 源代碼
源代碼 除去塊注釋 Ctrl+Shift+\ 編輯 Java 源代碼
源代碼 添加 try catch 塊 Alt+Shift+Z + Y 編輯 Java 源代碼
窗口 上一個(gè)編輯器 Ctrl+Shift+F6 在窗口中
窗口 上一個(gè)視圖 Ctrl+Shift+F7 在窗口中
窗口 上一個(gè)透視圖 Ctrl+Shift+F8 在窗口中
窗口 下一個(gè)編輯器 Ctrl+F6 在窗口中
窗口 下一個(gè)視圖 Ctrl+F7 在窗口中
窗口 下一個(gè)透視圖 Ctrl+F8 在窗口中
窗口 切換至編輯器 Ctrl+Shift+E 在窗口中
窗口 將活動(dòng)視圖或編輯器最大化 Ctrl+M 在窗口中
窗口 打開(kāi)編輯器下拉列表 Ctrl+E 在窗口中
窗口 顯示標(biāo)尺上下文菜單 Ctrl+F10 編輯文本
窗口 顯示系統(tǒng)菜單 Alt+- 在窗口中
窗口 顯示視圖菜單 Ctrl+F10 在窗口中
窗口 顯示鍵輔助 Ctrl+Shift+L 在對(duì)話框和窗口中
窗口 激活編輯器 F12 在窗口中
編輯 Add Block Comment Ctrl+Shift+/ Editing in Structured Text Editors
編輯 Format Active Elements Ctrl+I Editing in Structured Text Editors
編輯 Format Document Ctrl+Shift+F Editing in Structured Text Editors
編輯 Move Alt+Shift+V Editing JSP Source
編輯 Occurrences in File Ctrl+Shift+A Editing in Structured Text Editors
編輯 Open Selection F3 Editing in Structured Text Editors
編輯 Quick Fix Ctrl+1 Editing in Structured Text Editors
編輯 Remove Block Comment Ctrl+Shift+\ Editing in Structured Text Editors
編輯 Rename Alt+Shift+R Editing JSP Source
編輯 Rename XSD element Alt+Shift+R Editing XSD context
編輯 Restore Last Selection Alt+Shift+向下鍵 Editing in Structured Text Editors
編輯 Select Enclosing Element Alt+Shift+向上鍵 Editing in Structured Text Editors
編輯 Select Next Element Alt+Shift+右箭頭 Editing in Structured Text Editors
編輯 Select Previous Element Alt+Shift+左箭頭 Editing in Structured Text Editors
編輯 Show Tooltip Description F2 Editing in Structured Text Editors
編輯 Toggle Comment Ctrl+Shift+C Editing in Structured Text Editors
編輯 "快速差別"開(kāi)關(guān) Ctrl+Shift+Q 編輯文本
編輯 上下文信息 Alt+? 在窗口中
編輯 上下文信息 Alt+Shift+? 在窗口中
編輯 內(nèi)容輔助 Alt+/ 在對(duì)話框和窗口中
編輯 切換插入方式 Ctrl+Shift+Insert 編輯文本
編輯 刪除 Delete 在窗口中
編輯 剪切 Ctrl+X 在對(duì)話框和窗口中
編輯 剪切 Shift+Delete 在對(duì)話框和窗口中
編輯 增量查找 Ctrl+J 編輯文本
編輯 增量逆向查找 Ctrl+Shift+J 編輯文本
編輯 復(fù)制 Ctrl+C 在對(duì)話框和窗口中
編輯 復(fù)制 Ctrl+Insert 在對(duì)話框和窗口中
編輯 復(fù)原上一個(gè)選擇 Alt+Shift+向下鍵 編輯 Java 源代碼
編輯 快速修正 Ctrl+1 在窗口中
編輯 撤消 Ctrl+Z 在窗口中
編輯 文字補(bǔ)全 Ctrl+Alt+/ 編輯文本
編輯 顯示工具提示描述 F2 編輯 Java 源代碼
編輯 查找上一個(gè) Ctrl+Shift+K 編輯文本
編輯 查找下一個(gè) Ctrl+K 編輯文本
編輯 查找并替換 Ctrl+F 在窗口中
編輯 粘貼 Ctrl+V 在對(duì)話框和窗口中
編輯 粘貼 Shift+Insert 在對(duì)話框和窗口中
編輯 選擇上一個(gè)元素 Alt+Shift+左箭頭 編輯 Java 源代碼
編輯 選擇下一個(gè)元素 Alt+Shift+右箭頭 編輯 Java 源代碼
編輯 選擇全部 Ctrl+A 在對(duì)話框和窗口中
編輯 選擇外層元素 Alt+Shift+向上鍵 編輯 Java 源代碼
編輯 重做 Ctrl+Y 在窗口中
運(yùn)行/調(diào)試 Debug AspectJ/Java Application Alt+Shift+D,C 在窗口中
運(yùn)行/調(diào)試 Debug on Server Alt+Shift+D,R 在窗口中
運(yùn)行/調(diào)試 EOF Ctrl+Z 在控制臺(tái)中
運(yùn)行/調(diào)試 Profile on Server Alt+Shift+P,R 在窗口中
運(yùn)行/調(diào)試 Run AspectJ/Java Application Alt+Shift+X,C 在窗口中
運(yùn)行/調(diào)試 Run on Server Alt+Shift+X,R 在窗口中
運(yùn)行/調(diào)試 切換單步執(zhí)行過(guò)濾器 Shift+F5 在窗口中
運(yùn)行/調(diào)試 切換行斷點(diǎn) Ctrl+Shift+B 在窗口中
運(yùn)行/調(diào)試 單步跳入 F5 調(diào)試
運(yùn)行/調(diào)試 單步跳入選擇的內(nèi)容 Ctrl+F5 調(diào)試
運(yùn)行/調(diào)試 單步跳過(guò) F6 調(diào)試
運(yùn)行/調(diào)試 單步返回 F7 調(diào)試
運(yùn)行/調(diào)試 執(zhí)行 Ctrl+U 在窗口中
運(yùn)行/調(diào)試 顯示 Ctrl+Shift+D 在對(duì)話框和窗口中
運(yùn)行/調(diào)試 檢查 Ctrl+Shift+I 在對(duì)話框和窗口中
運(yùn)行/調(diào)試 繼續(xù) F8 調(diào)試
運(yùn)行/調(diào)試 調(diào)試 Ant 構(gòu)建 Alt+Shift+D,Q 在窗口中
運(yùn)行/調(diào)試 調(diào)試 Eclipse 應(yīng)用程序 Alt+Shift+D,E 在窗口中
運(yùn)行/調(diào)試 調(diào)試 JUnit 插件測(cè)試 Alt+Shift+D,P 在窗口中
運(yùn)行/調(diào)試 調(diào)試 JUnit 測(cè)試 Alt+Shift+D,T 在窗口中
運(yùn)行/調(diào)試 調(diào)試 Java Applet Alt+Shift+D,A 在窗口中
運(yùn)行/調(diào)試 調(diào)試 Java 應(yīng)用程序 Alt+Shift+D,J 在窗口中
運(yùn)行/調(diào)試 調(diào)試 SWT 應(yīng)用程序 Alt+Shift+D,S 在窗口中
運(yùn)行/調(diào)試 調(diào)試上次啟動(dòng) F11 在窗口中
運(yùn)行/調(diào)試 運(yùn)行 Ant 構(gòu)建 Alt+Shift+X,Q 在窗口中
運(yùn)行/調(diào)試 運(yùn)行 Eclipse 應(yīng)用程序 Alt+Shift+X,E 在窗口中
運(yùn)行/調(diào)試 運(yùn)行 JUnit 插件測(cè)試 Alt+Shift+X,P 在窗口中
運(yùn)行/調(diào)試 運(yùn)行 JUnit 測(cè)試 Alt+Shift+X,T 在窗口中
運(yùn)行/調(diào)試 運(yùn)行 Java Applet Alt+Shift+X,A 在窗口中
運(yùn)行/調(diào)試 運(yùn)行 Java 應(yīng)用程序 Alt+Shift+X,J 在窗口中
運(yùn)行/調(diào)試 運(yùn)行 SWT 應(yīng)用程序 Alt+Shift+X,S 在窗口中
運(yùn)行/調(diào)試 運(yùn)行上次啟動(dòng) Ctrl+F11 在窗口中
運(yùn)行/調(diào)試 運(yùn)行至行 Ctrl+R 調(diào)試
重構(gòu) - Java 內(nèi)聯(lián) Alt+Shift+I 在窗口中
重構(gòu) - Java 將局部變量轉(zhuǎn)換為字段 Alt+Shift+F 編輯 Java 源代碼
重構(gòu) - Java 抽取局部變量 Alt+Shift+L 在窗口中
重構(gòu) - Java 抽取方法 Alt+Shift+M 在窗口中
重構(gòu) - Java 撤銷 - 重構(gòu) Alt+Shift+Z 在窗口中
重構(gòu) - Java 顯示重構(gòu)快速菜單 Alt+Shift+T 在窗口中
重構(gòu) - Java 更改方法特征符 Alt+Shift+C 在窗口中
重構(gòu) - Java 移動(dòng) - 重構(gòu) Alt+Shift+V 在窗口中
重構(gòu) - Java 重做 - 重構(gòu) Alt+Shift+Y 在窗口中
重構(gòu) - Java 重命名 - 重構(gòu) Alt+Shift+R 在窗口中
項(xiàng)目 全部構(gòu)建 Ctrl+B 在窗口中
JDK的開(kāi)源已經(jīng)發(fā)布了
https://openjdk.dev.java.net/
common mail是一個(gè)小而方便的mail包,他實(shí)現(xiàn)了對(duì)Java Mail的封裝,使用起來(lái)十分的方便,但是我在使用他的時(shí)候發(fā)現(xiàn),使用純文本的內(nèi)容發(fā)送,結(jié)果是亂碼,代碼如下:
public class TestCommonMail {
public static void main(String[] args) throws EmailException, MessagingException {
SimpleEmail email = new SimpleEmail();
email.setCharset("GB2312");
email.setHostName("smtp.163.com");
email.setSubject("test");
email.addTo("test@163.com");
email.setFrom("test@163.com");
email.setMsg("我的測(cè)試");
email.setAuthentication("test", "test");
email.send();
}
}
分析了一下commons mail的源碼找到了原因。源碼如下:
public class SimpleEmail extends Email
{
public Email setMsg(String msg) throws EmailException, MessagingException
{
if (EmailUtils.isEmpty(msg))
{
throw new EmailException("Invalid message supplied");
}
setContent(msg, TEXT_PLAIN);
return this;
}
}
Email代碼片段
public void setContent(Object aObject, String aContentType)
{
this.content = aObject;
if (EmailUtils.isEmpty(aContentType))
{
this.contentType = null;
}
else
{
// set the content type
this.contentType = aContentType;
// set the charset if the input was properly formed
String strMarker = "; charset=";
int charsetPos = aContentType.toLowerCase().indexOf(strMarker);
if (charsetPos != -1)
{
// find the next space (after the marker)
charsetPos += strMarker.length();
int intCharsetEnd =
aContentType.toLowerCase().indexOf(" ", charsetPos);
if (intCharsetEnd != -1)
{
this.charset =
aContentType.substring(charsetPos, intCharsetEnd);
}
else
{
this.charset = aContentType.substring(charsetPos);
}
}
}
}
email.send();的send方法將調(diào)用
public void buildMimeMessage() throws EmailException
{
try
{
this.getMailSession();
this.message = new MimeMessage(this.session);
if (EmailUtils.isNotEmpty(this.subject))
{
if (EmailUtils.isNotEmpty(this.charset))
{
this.message.setSubject(this.subject, this.charset);
}
else
{
this.message.setSubject(this.subject);
}
}
// ========================================================
// Start of replacement code
if (this.content != null)
{
this.message.setContent(this.content, this.contentType);
}
// end of replacement code
// ========================================================
else if (this.emailBody != null)
{
this.message.setContent(this.emailBody);
}
else
{
this.message.setContent("", Email.TEXT_PLAIN);
}
if (this.fromAddress != null)
{
this.message.setFrom(this.fromAddress);
}
else
{
throw new EmailException("Sender address required");
}
if (this.toList.size() + this.ccList.size() + this.bccList.size() == 0)
{
throw new EmailException(
"At least one receiver address required");
}
if (this.toList.size() > 0)
{
this.message.setRecipients(
Message.RecipientType.TO,
this.toInternetAddressArray(this.toList));
}
if (this.ccList.size() > 0)
{
this.message.setRecipients(
Message.RecipientType.CC,
this.toInternetAddressArray(this.ccList));
}
if (this.bccList.size() > 0)
{
this.message.setRecipients(
Message.RecipientType.BCC,
this.toInternetAddressArray(this.bccList));
}
if (this.replyList.size() > 0)
{
this.message.setReplyTo(
this.toInternetAddressArray(this.replyList));
}
if (this.headers.size() > 0)
{
Iterator iterHeaderKeys = this.headers.keySet().iterator();
while (iterHeaderKeys.hasNext())
{
String name = (String) iterHeaderKeys.next();
String value = (String) headers.get(name);
this.message.addHeader(name, value);
}
}
if (this.message.getSentDate() == null)
{
this.message.setSentDate(getSentDate());
}
if (this.popBeforeSmtp)
{
Store store = session.getStore("pop3");
store.connect(this.popHost, this.popUsername, this.popPassword);
}
}
catch (MessagingException me)
{
throw new EmailException(me);
}
}
由代碼可以知道純文本方式最終調(diào)用了Java Mail的
message.setContent(this.content, this.contentType);
content是內(nèi)容
contentType是類型,如text/plain,
(我們可以試試直接用Java mail發(fā)郵件,設(shè)置文本內(nèi)容不使用setText方法,也使用setContent("測(cè)試", "text/plain")方式,你可以看到內(nèi)容也是亂碼)
關(guān)鍵就在于text/plain,我們改成text/plain;charset=gb2312,ok亂碼解決了。在commons mail我們看SimpleEmail 類中setMsg方法調(diào)用的就是 setContent(msg, TEXT_PLAIN);我們只需要將Email類中的常量TEXT_PLAIN修改一下加入 charset=你的字符集 ,重新打包jar,這樣就可以了
posted @
2006-09-18 09:54 小小~咖啡豆 閱讀(1379) |
評(píng)論 (0) |
編輯 收藏