有機(jī)肥

          綠色

          dump

          Mysql導(dǎo)出表結(jié)構(gòu)及表數(shù)據(jù) mysqldump用法

              命令行下具體用法如下:  mysqldump -u用戶名 -p密碼 -d 數(shù)據(jù)庫(kù)名 表名 腳本名;

              1、導(dǎo)出數(shù)據(jù)庫(kù)為dbname的表結(jié)構(gòu)(其中用戶名為root,密碼為dbpasswd,生成的腳本名為db.sql)
              mysqldump -uroot -pdbpasswd -d dbname >db.sql;

              2、導(dǎo)出數(shù)據(jù)庫(kù)為dbname某張表(test)結(jié)構(gòu)
              mysqldump -uroot -pdbpasswd -d dbname test>db.sql;

              3、導(dǎo)出數(shù)據(jù)庫(kù)為dbname所有表結(jié)構(gòu)及表數(shù)據(jù)(不加-d)
              mysqldump -uroot -pdbpasswd  dbname >db.sql;

              4、導(dǎo)出數(shù)據(jù)庫(kù)為dbname某張表(test)結(jié)構(gòu)及表數(shù)據(jù)(不加-d)
              mysqldump -uroot -pdbpasswd dbname test>db.sql;

          D:\MyDrivers\software\mysql-5.6.26-winx64\bin>mysqldump -h192.168.2.4 -uroot -p -d dy cotton>ee.sql

          posted @ 2017-09-04 09:38 有機(jī)肥 閱讀(221) | 評(píng)論 (0)編輯 收藏

          solr常用命令

          查看幫助
          bin/solr -help     
                  可以看到solr有哪些子命令,如 start, stop, restart, status, healthcheck, create, create_core, create_collection, delete, version
          啟動(dòng)start
          bin/solr start  -help    查看start幫助
          bin/solr start        啟動(dòng)單機(jī)版
          bin/solr start -f           前臺(tái)啟動(dòng)
          bin/solr start -p 8984        指定端口啟動(dòng)
          bin/solr start -cloud        啟動(dòng)分布式版本
          bin/solr start -e cloud -noprompt         -e表示要啟動(dòng)一個(gè)現(xiàn)有的例子,例子名稱是cloud,cloud這個(gè)例子是以SolrCloud方式啟動(dòng)的
          bin/solr restart          重啟項(xiàng)目

          create
          如果是單機(jī)版要?jiǎng)?chuàng)建core,如果是分布式的要?jiǎng)?chuàng)建collection
          bin/solr create -help     查看create幫助
          bin/solr create -c abc
                  abc是core或collection的名字,取決于solr是單機(jī)版還是cloud版本;刷新http://localhost:8983/solr ,可以看到core selector中多了一個(gè)abc
                  abc目錄的位置創(chuàng)建在solr.solr.home(默認(rèn)是solr的server/solr目錄目錄下

          post提交數(shù)據(jù)生成索引
          bin/post -c abc docs/
                  向名為abccore或collection提交數(shù)據(jù),數(shù)據(jù)源在docs/目錄中

          刪除
          bin/solr delete -c abc     刪除一個(gè)core或collection

          刪除索引
          bin/post -c abc  -d "<delete><id>/home/matthewi/software/solr-5.4.1/docs/solr-morphlines-core/allclasses-noframe.html</id></delete>"
          重新執(zhí)行上面的搜索可以看到搜索結(jié)果的數(shù)量少了一條:numFound列

          bin/post -c abc -d "<delete><query>*:*</query></delete>"
          刪除所有數(shù)據(jù)

          停止solr
          bin/solr stop -all

          狀態(tài)
          bin/solr status

          posted @ 2017-08-08 17:28 有機(jī)肥 閱讀(138) | 評(píng)論 (0)編輯 收藏

          使用Nginx后如何在web應(yīng)用中獲取用戶ip及原理解釋(轉(zhuǎn))

               摘要: nginx.conf配置:location / { proxy_pass http://127.0.0.1:8080/myweb/;proxy_redirect off;proxy_set_header Host $host;proxy_set_header X-Real-IP $remote_addr;proxy_set_header X-Forwarded-For $proxy_ad...  閱讀全文

          posted @ 2017-08-02 14:41 有機(jī)肥 閱讀(119) | 評(píng)論 (0)編輯 收藏

          HttpClient4.4.1模擬登錄知乎(轉(zhuǎn)自http://blog.csdn.net/gaopu12345/article/details/45509387)

               摘要: 一,登錄要Post的表單數(shù)據(jù)是什么這部分可以使用Wireshark工具來(lái)抓包就可以了,發(fā)現(xiàn)需要以下數(shù)據(jù):“_xsrf” = xxxx(這是一個(gè)變動(dòng)的數(shù)據(jù),需要先活取獲取知乎首頁(yè)源碼來(lái)獲得) “email” = 郵箱 “password” = 密碼 “rememberme” ...  閱讀全文

          posted @ 2017-07-10 17:50 有機(jī)肥| 編輯 收藏

          CloseableHttpResponse的使用

          public class ClientFormLogin {
           
              public static void main(String[] args) throws Exception {
                  BasicCookieStore cookieStore = new BasicCookieStore();
                  CloseableHttpClient httpclient = HttpClients.custom()
                          .setDefaultCookieStore(cookieStore)
                          .build();
                  try {
                      HttpGet httpget = new HttpGet("http://...");
                      CloseableHttpResponse response1 = httpclient.execute(httpget);
                      try {
                          HttpEntity entity = response1.getEntity();
           
                          System.out.println("Login form get: " + response1.getStatusLine());
           
                          System.out.println("Initial set of cookies:");
                          List<Cookie> cookies = cookieStore.getCookies();
                          if (cookies.isEmpty()) {
                              System.out.println("None");
                          } else {
                              for (int i = 0; i < cookies.size(); i++) {
                                  System.out.println("- " + cookies.get(i).toString());
                              }
                          }
                           
                          //輸出網(wǎng)頁(yè)源碼          
                          String result = EntityUtils.toString(response1.getEntity(), "utf-8"); 
                          System.out.println(result);                   
                              EntityUtils.consume(entity);
                              } finally {
                          response1.close();
                          }
                            }           
                         }

          posted @ 2017-07-10 17:39 有機(jī)肥 閱讀(2075) | 評(píng)論 (0)編輯 收藏

          HttpClient4.X的代理添加實(shí)現(xiàn)(轉(zhuǎn)自http://blog.csdn.net/hblfyla/article/details/54962898)

          package org.yla.test;

          import java.net.URI;
          import java.util.ArrayList;
          import java.util.List;

          import org.apache.commons.httpclient.HttpClient;
          import org.apache.commons.httpclient.methods.GetMethod;
          import org.apache.http.Header;
          import org.apache.http.HttpEntity;
          import org.apache.http.HttpHost;
          import org.apache.http.auth.AuthScope;
          import org.apache.http.auth.Credentials;
          import org.apache.http.auth.UsernamePasswordCredentials;
          import org.apache.http.client.CredentialsProvider;
          import org.apache.http.client.entity.UrlEncodedFormEntity;
          import org.apache.http.client.methods.CloseableHttpResponse;
          import org.apache.http.client.methods.HttpGet;
          import org.apache.http.client.methods.HttpPost;
          import org.apache.http.impl.client.BasicCredentialsProvider;
          import org.apache.http.impl.client.CloseableHttpClient;
          import org.apache.http.impl.client.HttpClientBuilder;
          import org.apache.http.impl.client.HttpClients;
          import org.apache.http.message.BasicNameValuePair;
          import org.apache.http.util.EntityUtils;
          import org.junit.Test;

          public class HttpClientTest {
              String url = "xxxxxxxxxxxxxxxxxxxxxxxxx";
              String ip = "202.107.233.85";
              int port = 8080;
              String username = "";
              String password = "";

              /**
               * 使用HttpClient4實(shí)現(xiàn)代理 202.107.233.85 8080
               *
               * @throws Exception
               */
              @Test
              public void test1() throws Exception {
                  HttpClientBuilder build = HttpClients.custom();
                  HttpHost proxy = new HttpHost(ip, port);
                  CloseableHttpClient client = build.setProxy(proxy).build();
                  HttpGet request = new HttpGet(url);
                  CloseableHttpResponse response = client.execute(request);
                  HttpEntity entity = response.getEntity();
                  System.out.println(EntityUtils.toString(entity));
              }

              /**
               * 使用httpclient3實(shí)現(xiàn)代理
               *
               * @throws Exception
               */
              @Test
              public void test2() throws Exception {
                  HttpClient httpClient = new HttpClient();
                  httpClient.getHostConfiguration().setProxy(ip, port);
                  GetMethod method = new GetMethod(url);
                  httpClient.executeMethod(method);
                  String result = new String(method.getResponseBody());
                  System.out.println(result);
              }

              /**
               * 使用httpclient4實(shí)現(xiàn)代理(帶密碼的代理)
               *
               * @throws Exception
               */
              @Test
              public void test3() throws Exception {
                  HttpClientBuilder build = HttpClients.custom();
                  CredentialsProvider credentialsProvider = new BasicCredentialsProvider();
                  AuthScope authscope = new AuthScope(ip, port);
                  Credentials credentials = new UsernamePasswordCredentials(username,
                          password);
                  credentialsProvider.setCredentials(authscope, credentials);
                  CloseableHttpClient client = build.setDefaultCredentialsProvider(
                          credentialsProvider).build();
                  HttpGet request = new HttpGet(url);
                  CloseableHttpResponse response = client.execute(request);
                  HttpEntity entity = response.getEntity();
                  System.out.println(EntityUtils.toString(entity));
              }

              /**
               * 使用httpclient3實(shí)現(xiàn)代理(帶密碼的代理)
               *
               * @throws Exception
               */
              @Test
              public void test4() throws Exception {
                  HttpClient httpClient = new HttpClient();
                  org.apache.commons.httpclient.auth.AuthScope authscope = new org.apache.commons.httpclient.auth.AuthScope(
                          ip, port);
                  org.apache.commons.httpclient.Credentials credentials = new org.apache.commons.httpclient.UsernamePasswordCredentials(
                          username, password);
                  httpClient.getState().setProxyCredentials(authscope, credentials);
                  GetMethod method = new GetMethod(url);
                  httpClient.executeMethod(method);
                  String result = new String(method.getResponseBody());
                  System.out.println(result);
              }

              /**
               * 模擬登錄官網(wǎng)(http://mis.pyc.com.cn??
               *
               * @throws Exception
               */
              @Test
              public void testLogin() throws Exception {
                  HttpClientBuilder build = HttpClients.custom();
                  CloseableHttpClient client = build.build();
                  HttpPost post = new HttpPost("http://mis.pyc.com.cn/login.aspx");
                  List<BasicNameValuePair> params = new ArrayList<BasicNameValuePair>();
                  params.add(new BasicNameValuePair("__VIEWSTATE",
                          "/wEPDwUJNjUwNzE0MTM4ZGQzh+vF2xGjdG8Q15kIqgR0CpxhmPucdCqZOPcglRZr/w=="));
                  params.add(new BasicNameValuePair(
                          "__EVENTVALIDATION",
                          "/wEWBQLYtKSdCALEhISFCwKd+7qdDgKC3IeGDAK7q7GGCOqhJpRD8S8yy3ZAlPTSsmPzRUoXMK0mQvGgzlk6hm+G"));
                  params.add(new BasicNameValuePair("txtName", "xxxxx"));
                  params.add(new BasicNameValuePair("txtPwd", "xxxxxx"));
                  params.add(new BasicNameValuePair("btnLogin", "xxxx"));
                  HttpEntity entity = new UrlEncodedFormEntity(params, "UTF-8");
                  post.setEntity(entity);
                  CloseableHttpResponse response = client.execute(post);
                  int statusCode = response.getStatusLine().getStatusCode();
                  System.err.println("狀態(tài)" + statusCode);
                  if (statusCode == 302) {
                      Header[] location = response.getHeaders("location");
                      String rediretUrl = null;
                      if (location.length == 1) {
                          rediretUrl = "http://mis.pyc.com.cn" + location[0].getValue();
                          System.err.println("跳轉(zhuǎn)地址: " + rediretUrl);
                      }
                      Header[] allHeaders = response.getAllHeaders();
                      System.out.println("==================response===================");
                      for (Header header : allHeaders) {
                          System.err.println(header.getName() + ": " + header.getValue());
                      }
                      Header cookieHeader = response.getFirstHeader("Set-Cookie");
                      String cookie = cookieHeader.getValue();
                      System.out.println("cookie: " + cookie);
                      HttpGet httpGet = new HttpGet(rediretUrl);
                      httpGet.addHeader("Accept",
                              "text/html,application/xhtml+xml,application/xml;q=0.9,image/webp,*/*;q=0.8");
                      // httpGet.addHeader("Accept-Encoding", "gzip, deflate, sdch");
                      // httpGet.addHeader("Accept-Language", "zh-CN,zh;q=0.8");
                      httpGet.addHeader("Connection", "keep-alive");
                      httpGet.addHeader("Cookie", cookie);
                      httpGet.addHeader("Host", "mis.pyc.com.cn");
                      httpGet.addHeader("Referer", "http://mis.pyc.com.cn/login.aspx");
                      httpGet.addHeader(
                              "User-Agent",
                              "ozilla/5.0 (Windows NT 6.1; WOW64) AppleWebKit/537.36 (KHTML, like Gecko) Chrome/40.0.2214.115 Safari/537.36");
                      response = client.execute(httpGet);
                      HttpEntity entity2 = response.getEntity();
                      System.out
                              .println("----------------------------------------------");
                      System.out.println(EntityUtils.toString(entity2));
                  }
              }
          }

          posted @ 2017-07-10 17:27 有機(jī)肥| 編輯 收藏

          centos7 mysql數(shù)據(jù)庫(kù)安裝和配置(轉(zhuǎn)http://www.cnblogs.com/starof/p/4680083.html)

          一、系統(tǒng)環(huán)境

          yum update升級(jí)以后的系統(tǒng)版本為

          [root@yl-web yl]# cat /etc/redhat-release  CentOS Linux release 7.1.1503 (Core) 

          二、mysql安裝

          # wget http://dev.mysql.com/get/mysql-community-release-el7-5.noarch.rpm # rpm -ivh mysql-community-release-el7-5.noarch.rpm # yum install mysql-community-server

          安裝成功后重啟mysql服務(wù)。

          # service mysqld restart

          初次安裝mysql,root賬戶沒(méi)有密碼。

          復(fù)制代碼
          [root@yl-web yl]# mysql -u root  Welcome to the MySQL monitor.  Commands end with ; or \g. Your MySQL connection id is 3 Server version: 5.6.26 MySQL Community Server (GPL)  Copyright (c) 2000, 2015, Oracle and/or its affiliates. All rights reserved.  Oracle is a registered trademark of Oracle Corporation and/or its affiliates. Other names may be trademarks of their respective owners.  Type 'help;' or '\h' for help. Type '\c' to clear the current input statement.  mysql> show databases; +--------------------+ | Database           | +--------------------+ | information_schema | | mysql              | | performance_schema | | test               | +--------------------+ 4 rows in set (0.01 sec)  mysql> 
          復(fù)制代碼

          設(shè)置密碼

          mysql> set password for 'root'@'localhost' =password('password'); Query OK, 0 rows affected (0.00 sec)  mysql> 

          不需要重啟數(shù)據(jù)庫(kù)即可生效。

          三、配置mysql

          1、編碼

          mysql配置文件為/etc/my.cnf

          最后加上編碼配置

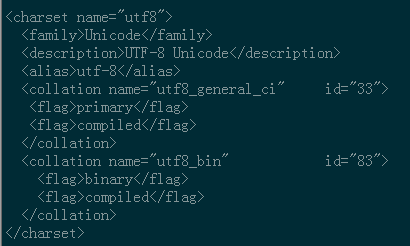
          [mysql] default-character-set =utf8

          這里的字符編碼必須和/usr/share/mysql/charsets/Index.xml中一致。

          2、遠(yuǎn)程連接設(shè)置

          把在所有數(shù)據(jù)庫(kù)的所有表的所有權(quán)限賦值給位于所有IP地址的root用戶。

          mysql> grant all privileges on *.* to root@'%'identified by 'password';

          如果是新用戶而不是root,則要先新建用戶

          mysql>create user 'username'@'%' identified by 'password';  

          此時(shí)就可以進(jìn)行遠(yuǎn)程連接了。

          posted @ 2017-03-01 10:20 有機(jī)肥 閱讀(164) | 評(píng)論 (0)編輯 收藏

          linux zip

          linux zip命令

          zip -r myfile.zip ./*
          將當(dāng)前目錄下的所有文件和文件夾全部壓縮成myfile.zip文件,-r表示遞歸壓縮子目錄下所有文件.

          2.unzip
          unzip -o -d /home/sunny myfile.zip
          把myfile.zip文件解壓到 /home/sunny/
          -o:不提示的情況下覆蓋文件;
          -d:-d /home/sunny 指明將文件解壓縮到/home/sunny目錄下;

          3.其他
          zip -d myfile.zip smart.txt
          刪除壓縮文件中smart.txt文件
          zip -m myfile.zip ./rpm_info.txt
          向壓縮文件中myfile.zip中添加rpm_info.txt文件
          -------------------------------------------------------------------------------

          要使用 zip 來(lái)壓縮文件,在 shell 提示下鍵入下面的命令:

          zip -r filename.zip filesdir
           

          在這個(gè)例子里,filename.zip 代表你創(chuàng)建的文件,filesdir 代表你想放置新 zip 文件的目錄。-r 選項(xiàng)指定你想遞歸地(recursively)包括所有包括在 filesdir 目錄中的文件。

          要抽取 zip 文件的內(nèi)容,鍵入以下命令:

          unzip filename.zip
           

          你可以使用 zip 命令同時(shí)處理多個(gè)文件和目錄,方法是將它們逐一列出,并用空格間隔:

          zip -r filename.zip file1 file2 file3 /usr/work/school
           

          上面的命令把 file1、file2、 file3、以及 /usr/work/school 目錄的內(nèi)容(假設(shè)這個(gè)目錄存在)壓縮起來(lái),然后放入 filename.zip 文件中。

          posted @ 2016-12-07 14:39 有機(jī)肥 閱讀(116) | 評(píng)論 (0)編輯 收藏

          jquery 對(duì) Json 的各種遍歷

          原文鏈接:http://caibaojian.com/jquery-each-json.html

          概述

          JSON(javascript Object Notation) 是一種輕量級(jí)的數(shù)據(jù)交換格式,采用完全獨(dú)立于語(yǔ)言的文本格式,是理想的數(shù)據(jù)交換格式。同時(shí),JSON是 JavaScript 原生格式,這意味著在 JavaScript 中處理 JSON數(shù)據(jù)不須要任何特殊的 API 或工具包。

          via在JSON中,有兩種結(jié)構(gòu):對(duì)象和數(shù)組。

          1.對(duì)象

          一個(gè)對(duì)象以“{”開(kāi)始,“}”結(jié)束。每個(gè)“key”后跟一“:”,“‘key/value’ 對(duì)”之間運(yùn)用 “,”分隔。

          packJson = {"name":"caibaojian.com", "password":"111"}

          2.數(shù)組

          packJson = [{"name":"caibaojian.com", "password":"111"}, {"name":"tony", "password":"111"}];

          數(shù)組是值的有序集合。一個(gè)數(shù)組以“[”開(kāi)始,“]”結(jié)束。值之間運(yùn)用 “,”分隔。

          JSON對(duì)象和JSON字符串的轉(zhuǎn)換

          在數(shù)據(jù)傳輸流程中,json是以文本,即字符串的形式傳遞的,而JS操作的是JSON對(duì)象,所以,JSON對(duì)象和JSON字符串之間的相互轉(zhuǎn)換是關(guān)鍵。例如:

          JSON字符串:

          var jsonStr = '{"name":"caibaojian", "password":"1111"}';

          JSON對(duì)象:

          var jsonObj = {"name":"caibaojian.com", "password":"1111"};

          1、String轉(zhuǎn)換為Json對(duì)象

          var jsonObj = eval('(' + jsonStr + ')');

          2.Json對(duì)象轉(zhuǎn)換為String字符串

          var jsonStr = jsonObj.toJSONString();

          jQuery遍歷json對(duì)象

          grep

          <script type='text/javascript' src="/jquery.js"></script> <script type="text/javascript"> $().ready( function(){ var array = [1,2,3,4,5,6,7,8,9]; var filterarray = $.grep(array,function(value){ return value > 5;//篩選出大于5的 }); for(var i=0;i<filterarray.length;i++){ alert(filterarray[i]); } for (key in filterarray){ alert(filterarray[key]); } } ); </script>

          each

          <script type='text/javascript' src="/jquery.js"></script> <script type="text/javascript"> $().ready( function(){ var anObject = {one:1,two:2,three:3};//對(duì)json數(shù)組each $.each(anObject,function(name,value) { alert(name); alert(value); }); var anArray = ['one','two','three']; $.each(anArray,function(n,value){ alert(n); alert(value); } ); } ); </script>

          inArray

          <script type='text/javascript' src="/jquery.js"></script> <script type="text/javascript"> $().ready( function(){ var anArray = ['one','two','three']; var index = $.inArray('two',anArray); alert(index);//返回該值在數(shù)組中的鍵值,返回1 alert(anArray[index]);//value is two } ); </script>

          map

          <script type='text/javascript' src="/jquery.js"></script> <script type="text/javascript"> $().ready( function(){ var strings = ['0','1','2','3','4','S','6']; var values = $.map(strings,function(value){ var result = new Number(value); return isNaN(result) ? null:result;//isNaN:is Not a Number的縮寫(xiě) } ); for (key in values) { alert(values[key]); } } ); </script>

          原生js遍歷json對(duì)象

          遍歷json對(duì)象

          無(wú)規(guī)律:

          <script> var json = [{dd:'SB',AA:'東東',re1:123},{cccc:'dd',lk:'1qw'}]; for(var i=0,l=json.length;i<l;i++){ for(var key in json[i]){ alert(key+':'+json[i][key]); } } </script>

          有規(guī)律:

          packJson = [  {"name":"nikita", "password":"1111"},  {"name":"tony", "password":"2222"}  ];  for(var p in packJson){//遍歷json數(shù)組時(shí),這么寫(xiě)p為索引,0,1     alert(packJson[p].name + " " + packJson[p].password);  }

          也可以用這個(gè):

          for(var i = 0; i < packJson.length; i++){     alert(packJson[i].name + " " + packJson[i].password);  }

          遍歷json對(duì)象

          myJson = {"name":"caibaojian", "password":"1111"};  for(var p in myJson){//遍歷json對(duì)象的每個(gè)key/value對(duì),p為key     alert(p + " " + myJson[p]);  }
          //code from http://caibaojian.com/jquery-each-json.html 有如下 json對(duì)象: var obj ={"name":"馮娟","password":"123456","department":"技術(shù)部","sex":"女","old":30}; 遍歷方法: for(var p in obj){ str = str+obj[p]+’,'; return str; }
          zhuan:前端開(kāi)發(fā)博客 (http://caibaojian.com/jquery-each-json.html)

          posted @ 2016-09-26 15:04 有機(jī)肥| 編輯 收藏

          linux 局域網(wǎng)內(nèi)文件傳送

          Linux scp命令用于Linux之間復(fù)制文件和目錄,具體如何使用這里好好介紹一下,從本地復(fù)制到遠(yuǎn)程、從遠(yuǎn)程復(fù)制到本地是兩種使用方式。這里有具體舉例:

          ==================

          Linux scp 命令

          ==================

          scp 可以在 2個(gè) linux 主機(jī)間復(fù)制文件;

          命令基本格式:

          scp [可選參數(shù)] file_source file_target

          ======

          從 本地 復(fù)制到 遠(yuǎn)程

          ======

          * 復(fù)制文件:

          * 命令格式:

          scp local_file remote_username@remote_ip:remote_folder

          或者

          scp local_file remote_username@remote_ip:remote_file

          或者

          scp local_file remote_ip:remote_folder

          或者

          scp local_file remote_ip:remote_file

          第1,2個(gè)指定了用戶名,命令執(zhí)行后需要再輸入密碼,第1個(gè)僅指定了遠(yuǎn)程的目錄,文件名字不變,第2個(gè)指定了文件名;

          第3,4個(gè)沒(méi)有指定用戶名,命令執(zhí)行后需要輸入用戶名和密碼,第3個(gè)僅指定了遠(yuǎn)程的目錄,文件名字不變,第4個(gè)指定了文件名;

          * 例子:

          scp /home/space/music/1.mp3 root@www.cumt.edu.cn:/home/root/others/music

          scp /home/space/music/1.mp3 root@www.cumt.edu.cn:/home/root/others/music/001.mp3

          scp /home/space/music/1.mp3 www.cumt.edu.cn:/home/root/others/music

          scp /home/space/music/1.mp3 www.cumt.edu.cn:/home/root/others/music/001.mp3

          * 復(fù)制目錄:

          * 命令格式:

          scp -r local_folder remote_username@remote_ip:remote_folder

          或者

          scp -r local_folder remote_ip:remote_folder

          第1個(gè)指定了用戶名,命令執(zhí)行后需要再輸入密碼;

          第2個(gè)沒(méi)有指定用戶名,命令執(zhí)行后需要輸入用戶名和密碼;

          * 例子:

          scp -r /home/space/music/ root@www.cumt.edu.cn:/home/root/others/

          scp -r /home/space/music/ www.cumt.edu.cn:/home/root/others/

          上面 命令 將 本地 music 目錄 復(fù)制 到 遠(yuǎn)程 others 目錄下,即復(fù)制后有 遠(yuǎn)程 有 ../others/music/ 目錄

          ======

          從 遠(yuǎn)程 復(fù)制到 本地

          ======

          從 遠(yuǎn)程 復(fù)制到 本地,只要將 從 本地 復(fù)制到 遠(yuǎn)程 的命令 的 后2個(gè)參數(shù) 調(diào)換順序 即可;

          例如:

          scp root@www.cumt.edu.cn:/home/root/others/music /home/space/music/1.mp3

          scp -r www.cumt.edu.cn:/home/root/others/ /home/space/music/

          最簡(jiǎn)單的應(yīng)用如下 :

          scp 本地用戶名 @IP 地址 : 文件名 1 遠(yuǎn)程用戶名 @IP 地址 : 文件名 2

          [ 本地用戶名 @IP 地址 :] 可以不輸入 , 可能需要輸入遠(yuǎn)程用戶名所對(duì)應(yīng)的密碼 .

          可能有用的幾個(gè)參數(shù) :

          -v 和大多數(shù) linux 命令中的 -v 意思一樣 , 用來(lái)顯示進(jìn)度 . 可以用來(lái)查看連接 , 認(rèn)證 , 或是配置錯(cuò)誤 .

          -C 使能壓縮選項(xiàng) .

          -P 選擇端口 . 注意 -p 已經(jīng)被 rcp 使用 .

          -4 強(qiáng)行使用 IPV4 地址 .

          -6 強(qiáng)行使用 IPV6 地址 .

          Linux scp命令的使用方法應(yīng)該可以滿足大家對(duì)Linux文件和目錄的復(fù)制使用了。

          posted @ 2016-09-18 17:53 有機(jī)肥| 編輯 收藏

          僅列出標(biāo)題
          共3頁(yè): 上一頁(yè) 1 2 3 下一頁(yè) 
          <2025年6月>
          25262728293031
          1234567
          891011121314
          15161718192021
          22232425262728
          293012345

          導(dǎo)航

          統(tǒng)計(jì)

          常用鏈接

          留言簿

          隨筆檔案

          搜索

          最新評(píng)論

          閱讀排行榜

          評(píng)論排行榜

          主站蜘蛛池模板: 泸州市| 高青县| 隆回县| 共和县| 景泰县| 华坪县| 始兴县| 曲沃县| 电白县| 昌平区| 长泰县| 封开县| 富民县| 昌宁县| 同德县| 隆安县| 六盘水市| 土默特右旗| 三穗县| 开原市| 页游| 平顺县| 读书| 二连浩特市| 密山市| 嘉荫县| 肃南| 泸水县| 通城县| 车险| 黄冈市| 浑源县| 新田县| 夏津县| 山丹县| 平乡县| 于都县| 富民县| 威信县| 玛纳斯县| 新乡县|