1. 交換機支持的命令:
交換機基本狀態:
switch: ;ROM狀態, 路由器是rommon>
hostname> ;用戶模式
hostname# ;特權模式
hostname(config)# ;全局配置模式
hostname(config-if)# ;接口狀態
交換機口令設置:
switch>enable ;進入特權模式
switch#config terminal ;進入全局配置模式
switch(config)#hostname ;設置交換機的主機名
switch(config)#enable secret xxx ;設置特權加密口令
switch(config)#enable password xxa ;設置特權非密口令
switch(config)#line console 0 ;進入控制臺口
switch(config-line)#line vty 0 4 ;進入虛擬終端
switch(config-line)#login ;允許登錄
switch(config-line)#password xx ;設置登錄口令xx
switch#exit ;返回命令
交換機VLAN設置:
switch#vlan database ;進入VLAN設置
switch(vlan)#vlan 2 ;建VLAN 2
switch(vlan)#no vlan 2 ;刪vlan 2
switch(config)#int f0/1 ;進入端口1
switch(config-if)#switchport access vlan 2 ;當前端口加入vlan 2
switch(config-if)#switchport mode trunk ;設置為干線
switch(config-if)#switchport trunk allowed vlan 1,2 ;設置允許的vlan
switch(config-if)#switchport trunk encap dot1q ;設置vlan 中繼
switch(config)#vtp domain ;設置發vtp域名
switch(config)#vtp password ;設置發vtp密碼
switch(config)#vtp mode server ;設置發vtp模式
switch(config)#vtp mode client ;設置發vtp模式
交換機設置IP地址:
switch(config)#interface vlan 1 ;進入vlan 1
switch(config-if)#ip address ;設置IP地址
switch(config)#ip default-gateway ;設置默認網關
switch#dir flash: ;查看閃存
交換機顯示命令:
switch#write ;保存配置信息
switch#show vtp ;查看vtp配置信息
switch#show run ;查看當前配置信息
switch#show vlan ;查看vlan配置信息
switch#show interface ;查看端口信息
switch#show int f0/0 ;查看指定端口信息
2. 路由器支持的命令:
路由器顯示命令:
router#show run ;顯示配置信息
router#show interface ;顯示接口信息
router#show ip route ;顯示路由信息
router#show cdp nei ;顯示鄰居信息
router#reload ;重新起動
路由器口令設置:
router>enable ;進入特權模式
router#config terminal ;進入全局配置模式
router(config)#hostname ;設置交換機的主機名
router(config)#enable secret xxx ;設置特權加密口令
router(config)#enable password xxb ;設置特權非密口令
router(config)#line console 0 ;進入控制臺口
router(config-line)#line vty 0 4 ;進入虛擬終端
router(config-line)#login ;要求口令驗證
router(config-line)#password xx ;設置登錄口令xx
router(config)#(Ctrl+z) ; 返回特權模式
router#exit ;返回命令
路由器配置:
router(config)#int s0/0 ;進入Serail接口
router(config-if)#no shutdown ;激活當前接口
router(config-if)#clock rate 64000 ;設置同步時鐘
router(config-if)#ip address ;設置IP地址
router(config-if)#ip address second ;設置第二個IP
router(config-if)#int f0/0.1 ;進入子接口
router(config-subif.1)#ip address ;設置子接口IP
router(config-subif.1)#encapsulation dot1q ;綁定vlan中繼協議
router(config)#config-register 0x2142 ;跳過配置文件
router(config)#config-register 0x2102 ;正常使用配置文件
router#reload ;重新引導
路由器文件操作:
router#copy running-config startup-config ;保存配置
router#copy running-config tftp ;保存配置到tftp
router#copy startup-config tftp ;開機配置存到tftp
router#copy tftp flash: ;下傳文件到flash
router#copy tftp startup-config;下載配置文件
ROM狀態:
Ctrl+Break ;進入ROM監控狀態
rommon>confreg 0x2142 ;跳過配置文件
rommon>confreg 0x2102 ;恢復配置文件
rommon>reset ;重新引導
rommon>copy xmodem: flash: ;從console傳輸文件
rommon>IP_ADDRESS=10.65.1.2 ;設置路由器IP
rommon>IP_SUBNET_MASK=255.255.0.0 ;設置路由器掩碼
rommon>TFTP_SERVER=10.65.1.1 ;指定TFTP服務器IP
rommon>TFTP_FILE=c2600.bin ;指定下載的文件
rommon>tftpdnld ;從tftp下載
rommon>dir flash: ;查看閃存內容
rommon>boot ;引導IOS
靜態路由:
ip route ;命令格式
router(config)#ip route 2.0.0.0 255.0.0.0 1.1.1.2 ;靜態路由舉例
router(config)#ip route 0.0.0.0 0.0.0.0 1.1.1.2 ;默認路由舉例
動態路由:
router(config)#ip routing ;啟動路由轉發
router(config)#router rip ;啟動RIP路由協議。
router(config-router)#network ;設置發布路由
router(config-router)#negihbor ;點對點幀中繼用。
幀中繼命令:
router(config)#frame-relay switching ;使能幀中繼交換
router(config-s0)#encapsulation frame-relay ;使能幀中繼
router(config-s0)#fram-relay lmi-type cisco ;設置管理類型
router(config-s0)#frame-relay intf-type DCE ;設置為DCE
router(config-s0)#frame-relay dlci 16 ;
router(config-s0)#frame-relay local-dlci 20 ;設置虛電路號
router(config-s0)#frame-relay interface-dlci 16 ;
router(config)#log-adjacency-changes ;記錄鄰接變化
router(config)#int s0/0.1 point-to-point ;設置子接口點對點
router#show frame pvc ;顯示永久虛電路
router#show frame map ;顯示映射
基本訪問控制列表:
router(config)#access-list permit|deny
router(config)#interface ;default:deny any
router(config-if)#ip access-group in|out ;default:ut
例1:
router(config)#access-list 4 permit 10.8.1.1
router(config)#access-list 4 deny 10.8.1.0 0.0.0.255
router(config)#access-list 4 permit 10.8.0.0 0.0.255.255
router(config)#access-list 4 deny 10.0.0.0 0.255.255.255
router(config)#access-list 4 permit any
router(config)#int f0/0
router(config-if)#ip access-group 4 in
擴展訪問控制列表:
access-list permit|deny icmp
wild>[type]
access-list permit|deny tcp
wild>[port]
例3:
router(config)#access-list 101 deny icmp any 10.64.0.2 0.0.0.0 echo
router(config)#access-list 101 permit ip any anyrouter(config)#int s0/0
router(config-if)#ip access-group 101 in
例3:
router(config)#access-list 102 deny tcp any 10.65.0.2 0.0.0.0 eq 80
router(config)#access-list 102 permit ip any any
router(config)#interface s0/1
router(config-if)#ip access-group 102 out
協議 路由協議 路由器配置 交換機配置 加密 上一頁 1 2
QQread.com 推出Windows2003教程
win2003安裝介紹 win2003網絡優化 win2003使用技巧
win2003系統故障 服務器配置 專家答疑
幀中繼命令:
router(config)#frame-relay switching ;使能幀中繼交換router(config-s0)#encapsulation frame-relay ;使能幀中繼router(config-s0)#fram-relay lmi-type cisco ;設置管理類型router(config-s0)#frame-relay intf-type DCE ;設置為DCErouter(config-s0)#frame-relay dlci 16 ;router(config-s0)#frame-relay local-dlci 20 ;設置虛電路號router(config-s0)#frame-relay interface-dlci 16 ;router(config)#log-adjacency-changes ;記錄鄰接變化router(config)#int s0/0.1 point-to-point ;設置子接口點對點router#show frame pvc ;顯示永久虛電路router#show frame map ;顯示映射
基本訪問控制列表:
router(config)#access-list permit|deny router(config)#interface ;default:deny anyrouter(config-if)#ip access-group in|out ;default:ut
例1:
router(config)#access-list 4 permit 10.8.1.1
router(config)#access-list 4 deny 10.8.1.0 0.0.0.255
router(config)#access-list 4 permit 10.8.0.0 0.0.255.255
router(config)#access-list 4 deny 10.0.0.0 0.255.255.255
router(config)#access-list 4 permit any
router(config)#int f0/0
router(config-if)#ip access-group 4 in
擴展訪問控制列表: access-list permit|deny icmp wild>[type]access-list permit|deny tcp wild>[port]例3:router(config)#access-list 101 deny icmp any 10.64.0.2 0.0.0.0 echorouter(config)#access-list 101 permit ip any anyrouter(config)#int s0/0router(config-if)#ip access-group 101 in例3:router(config)#access-list 102 deny tcp any 10.65.0.2 0.0.0.0 eq 80router(config)#access-list 102 permit ip any anyrouter(config)#interface s0/1router(config-if)#ip access-group 102 out
刪除訪問控制例表:
router(config)#no access-list 102
router(config-if)#no ip access-group 101 in
路由器的nat配置
Router(config-if)#ip nat inside ;當前接口指定為內部接口
Router(config-if)#ip nat outside ;當前接口指定為外部接口
Router(config)#ip nat inside source static [p] <私有IP><公網IP> [port]
Router(config)#ip nat inside source static 10.65.1.2 60.1.1.1
Router(config)#ip nat inside source static tcp 10.65.1.3 80 60.1.1.1 80
Router(config)#ip nat pool p1 60.1.1.1 60.1.1.20 255.255.255.0
Router(config)#ip nat inside source list 1 pool p1
Router(config)#ip nat inside destination list 2 pool p2
Router(config)#ip nat inside source list 2 interface s0/0 overload
Router(config)#ip nat pool p2 10.65.1.2 10.65.1.4 255.255.255.0 type rotary
Router#show ip nat translationrotary 參數是輪流的意思,地址池中的IP輪流與NAT分配的地址匹配。overload參數用于PAT 將內部IP映射到一個公網IP不同的端口上。
外部網關協議配置:
routerA(config)#router bgp 100
routerA(config-router)#network 19.0.0.0
routerA(config-router)#neighbor 8.1.1.2 remote-as 200
配置PPP驗證:
RouterA(config)#username password
RouterA(config)#int s0
RouterA(config-if)#ppp authentication {chap|pap}
3.PIX防火墻命令
Pix525(config)#nameif ethernet0 outside security0 ;命名接口和級別
Pix525(config)#interface ethernet0 auto ;設置接口方式
Pix525(config)#interface ethernet1 100full ;設置接口方式
Pix525(config)#interface ethernet1 100full shutdown
Pix525(config)#ip address inside 192.168.0.1 255.255.255.0
Pix525(config)#ip address outside 133.0.0.1 255.255.255.252
Pix525(config)#global (if_name) natid ip-ip ;定義公網IP區間
Pix525(config)#global (outside) 1 7.0.0.1-7.0.0.15 ;例句
Pix525(config)#global (outside) 1 133.0.0.1 ;例句
Pix525(config)#no global (outside) 1 133.0.0.1 ;去掉設置
Pix525(config)#nat (if_name) nat_id local_ip [netmark]
Pix525(config)#nat (inside) 1 0 0內網所有主機(0代表0.0.0.0)可以訪問global 1指定的外網。
Pix525(config)#nat (inside) 1 172.16.5.0 255.255.0.0內網172.16.5.0/16網段的主機可以訪問global 1指定的外網。
Pix525(config)#route if_name 0 0 gateway_ip [metric] ;命令格式
Pix525(config)#route outside 0 0 133.0.0.1 1 ;例句
Pix525(config)#route inside 10.1.0.0 255.255.0.0 10.8.0.1 1 ;例句
Pix525(config)#static (inside, outside) 133.0.0.1 192.168.0.8表示內部ip地址192.168.0.8,訪問外部時被翻譯成133.0.0.1全局地址。
Pix525(config)#static (dmz, outside) 133.0.0.1 172.16.0.8中間區域ip地址172.16.0.8,訪問外部時被翻譯成133.0.0.1全局地址。
posted @
2008-06-28 18:30 wahaha 閱讀(321) |
評論 (0) |
編輯 收藏
!---字符代表交換機收到一個回應應答;
. ---請求超時;
U ---目的地不能達到;
?---不可知的數據包類型;
& ---數據包超出生存時間;
C ---接收的數據包經歷了擁塞;
I ---用戶中斷測試;
posted @
2008-05-30 09:29 wahaha 閱讀(344) |
評論 (0) |
編輯 收藏
在接觸交換機伊始,我是從了解交換機的命令開始的。
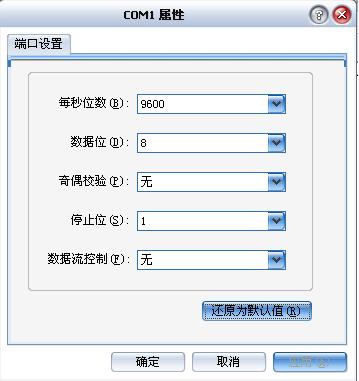
1. Cisco Catalyst 所有交換機都是用以下參數建立到控制臺的連接。
2. 用戶模式與特權模式的切換。
用戶模式---------------提供了對命令的監控(show)的有限訪問,不允許執行任何配置命令。
特權模式(啟用模式)---提供所有配置、管理和監控的完全訪問。
switch>enable
3. 驗證系統配置
show version 顯示硬件和軟件版本及其他信息/show module 顯示基于底板的硬件模塊信息。
4. 配置系統標識
Cisic IOS
配置工作在配置模式中進行enable--->配置模式又必須進入特權模式privileged mode-->特權模式下的基本配置模式被稱為全局配置模式(global configuration mode)--->全局模式必須在特權模式中使用configure terminal命令進入。
完成以上操作后,交換機顯示提示為:switch(config)#
配置主機名:hostname Switch-A
注意:將運行配置文件保存到啟動配置文件中:copy running-config startup-config
顯示內存中保存的當前配置命令:show running-config 查看啟動配置文件: show startup-config
CatOS
在CatOS中,所有配置都在特權訪問模式中完成。幾乎所有配置命令都從關鍵字set開始,用clear來重置一些配置參數。
配置主機名:set system name Switch-B
注意:不用保存,可以用show config命令來驗證配置
posted @
2008-05-30 09:21 wahaha 閱讀(266) |
評論 (0) |
編輯 收藏
元素的開始 /元素的結束/ 元素的功能
<!--注釋的內容> <!> 注釋標記
<A> </A> 錨元素,定義超文本連接點
<ADDRESS> </ADDRESS> 地址信息起止點
<B> </B> 字體顏色加深
<BASE> 基本屬性,如基本連接,打開方式等
<BLINK> </BLINK> 字體閃爍
<BLOCKQUOTE> </BLOCKQUOTE> 塊引用
<BODY> </BODY> 超文本的正文主體的起止
<BR> 回車換行
<CAPTION> </CAPTION> 標題,多用與表格
<CENTER> </CENTER> 元素間的內容居中
<CITE> </CITE> 表明其間的內容是引文或者列證
<CODE> </CODE> 代碼
<DD> 文字縮格
<DL> 線縮格
<DT> 回車換行,但不縮格
<EM> </EM> 強調,斜體且顏色加重
<FONT> </FONT> 變化字體大小和顏色
<form> </form> 交互項元素的起止
<Frame> </Frame> 展示頁的版面的分割
<HEAD> </HEAD> 超文本件頭的起止
<HEADER> <HEADER> 與<head>和</head>等價
<HR> 面水平線的隔線
<Hn> </Hn> 定義標題字體大小,n值為1--6
<HTML> </HTML> 超文本的開始和結束
<I> </I> 字體為斜體
<IMG> (</IMG>) 插入圖形圖象文件
<INPUT> 輸入信息元素
<LI> 清單條目,多用語目錄列表
<LIST> </LIST> 顯示文本內容,但不執行標記命令
<MARQUEE> </MARQUEE> 字符移動方式控制
<META> 資料說明
<NEXTD> 下一個標識
<OL> </OL> 用序號顯示一級標題
<P> </P> 段落的起止,也可以加空行
<PRE> </PER> 按原文格式
<S> </S> 中化線
<SMALL> </SMALL> 用小號字顯示
<STRONG> </STRONG> 字體顏色加重
<SUB> </SUB> 下角標
<SUP> </SUP> 上角標
<TABLE> </TABLE> 表格的起止,圖文混排時也使用
<TD> </TD> 表格中一欄內容的起止
<TEXTAREA> </TEXTAREA> 用文本區輸入信息
<TH> </TH> 表頭的起止
<TITLE> </TITLE> 超文本標題起止
<TR> </TR> 表中一行的起止
<TT> </TT> 固定寬度
<U> </U> 下劃線
<UL> </UL> 同一級標題的限定,無序號
<VAR> </VAR> 變量
<XMP> </XMP> 功能<LIST>.字體略小
posted @
2007-11-26 11:09 wahaha 閱讀(169) |
評論 (0) |
編輯 收藏
在實現電話號碼查詢功能的程序中,為了改變xxx表一列中的某些值,我如是實現:
| id |
username |
password |
| 001 |
name1 |
沒有 |
| 002 |
name2 |
是 |
| 003 |
name3 |
沒有 |
update xxx set password='無' where password='沒有'
posted @
2007-11-20 23:49 wahaha 閱讀(244) |
評論 (0) |
編輯 收藏
今天,從上周就捆饒我的問題終于在下班前被我搞定!小得意了一下.
我的電腦上之前安裝了Oracle 10g database,配置完變量用PL/SQL操作一切OK .當又安裝完Oracle 10g client后,問題出現了,用PL/SQL登陸時反復提示:ORA-12154: TNS: could not resolve the connect identifier specified
對于初學者,我反復的在"Oracle - OraDb10g_home3"下的"配置和移植工具"中的"Net Manager"中查找問題所在.請教高手,也沒有召見問題的原因.我郁悶了,隨后自己決定來搞定這個問題.
我做了大量的反復的資料查看和自我檢查,靈感在下班的時候出現,我突然意識到我的"環境變量"一直被忽視.
打開后我發現我當前的環境變量這樣設置的:
path == E:\
oraclient_2;E:\oracle\oradata\bin;E:\oracle\bin;E:\Program Files\Java\jdk1.5.0_04\bin;E:\Tomcat5028\bin;%SystemRoot%\system32;%SystemRoot%;%SystemRoot%\System32\Wbem
問題出現了.隨后我該成如下:
path == E:\
oracle;E:\oracle\oradata\bin;E:\oracle\bin;E:\Program Files\Java\jdk1.5.0_04\bin;E:\Tomcat5028\bin;%SystemRoot%\system32;%SystemRoot%;%SystemRoot%\System32\Wbem
OK !!! 問題在最后的關頭被我解決了!!!不錯.
這就是: "不拋棄 不放棄"
posted @
2007-11-19 17:59 wahaha 閱讀(144477) |
評論 (69) |
編輯 收藏
上下文:機器上安裝了一個Oracle817服務器,但是都是最小安裝,然后想通過這臺機器的SqlPlus連接其他機器 的Oracle8i服務器
現象:通過Net8 Assistant可以測試通過,但是使用SqlPlus則不行,報ORA-12154的錯誤
解決方式:檢查$Oracle_Home\network\admin\tnsname.ora文件,看看配置的TNS在不在
檢查$Oracle_Home\network\admin\sqlnet.ora,看看NAMES.DIRECTORY_PATH這個常量的值。需要設置為:NAMES.DIRECTORY_PATH= (TNSNAMES, ONAMES, HOSTNAME)
然后就打開SqlPlus就Ok了
原因:估計是NAMES.DIRECTORY_PATH常量是查詢服務的方式。我沒有修改這個之前NAMES.DIRECTORY_PATH= (HOSTNAME)是這個樣子的,所以可能他僅僅查詢本機器的服務。加上TNSAMES 可能就是增加解析TNS的功能。NND,也許是吧
posted @
2007-11-19 17:17 wahaha 閱讀(7696) |
評論 (2) |
編輯 收藏 在安裝完Oracle 10g后 ,有兩種登陸方式進入Oracle 10g 頁面,揭開它神秘的面紗。
在Web瀏覽器中輸入:
(1 ) http//localhost:5500/em
(2 ) http://Ip地址:5500/em
引出內容:
tomcat安裝完成后在瀏覽器中輸入:
(1 ) http//localhost:8080(我的修改端口后9090)
(2 ) http://Ip地址:8080(我的修改端口后9090)
(備注: 創建全局數據庫名:orcl
數據庫口令:orcl
用戶名:sys 口令:orcl 連接身份: sysdba
Enterprise Manager Database Control URL - (orcl) :http://XXGS09:1158/em數據庫配置文件已經安裝到f:\oracle\product\10.2.0,同時其他選定的安裝組件也已經安裝到 f:\oracle\product\10.2.0\db_1。iSQL*Plus URL 為:http://XXGS09:5560/isqlplusiSQL*Plus DBA URL 為:http://XXGS09:5560/isqlplus/dba
創建數據庫名:emp
用戶名:sys 口令:sys 連接身份: sysdba
用戶名:sysman 口令:sysman 連接身份: normal
http://XXGS09:5500/em
)
參考文章:http://hi.baidu.com/freesky505/blog/item/b6c9dcedc6b36e4c79f05569.html
posted @
2007-11-13 15:04 wahaha 閱讀(3261) |
評論 (0) |
編輯 收藏 今天學習Oracle 的過程中,在網上查相關資料的過程中,看了好多別人在Blog中寫的資料。突然感覺自己也應該把自己的學習中的一些經歷記錄下來!
記錄的目的有二:
首先: 我想把我出現疑問的地方給自己做出記錄,幫自己以后注意這些問題。
其次: 我感覺自學東西,如果有一點點東西你走入誤區,因為你初學,那將給你學習的進度帶來非常大的阻力。所以我想讓我的記錄能幫助后來的其他人。
希望我寫的東西夠出彩!!!
posted @
2007-11-13 12:33 wahaha 閱讀(211) |
評論 (0) |
編輯 收藏