skyful

            BlogJava :: 首頁 :: 聯系 :: 聚合  :: 管理
            16 Posts :: 0 Stories :: 45 Comments :: 0 Trackbacks

          2006年5月19日 #

          <body onLoad="page_onload();">

          function page_onload(){
           if(typeof(initPage)=='function'){
            initPage();
           }
          }


          function initPage(){
           for(var i=0;i<document.forms[0].elements.length;i++)
          {
           if (document.forms[0].elements[i].type=="checkbox" && document.forms[0].elements[i].name.substring(0,22)=="hotelRoom.cardTypeItem"){
           document.forms[0].elements[i].checked=true;
          }
          }
          }
          posted @ 2007-04-06 10:13 氓氓 閱讀(1454) | 評論 (0)編輯 收藏

          Struts作為MVC 2的Web框架,自推出以來不斷受到開發者的追捧,得到用廣泛的應用。作為最成功的Web框架,Struts自然擁有眾多的優點:
          • MVC 2模型的使用
          • 功能齊全的標志庫(Tag Library)
          • 開放源代碼

          但是,所謂“金無赤金,人無完人”,Struts自身也有不少的缺點:

          • 需要編寫的代碼過多,容易引起“類爆炸”
          • 單元測試困難

          這些缺點隨著Web的發展越來越明顯。這就促生了Struts 2.0,它的誕生能很好的解決上述問題。 好啦,廢話就不多說了,現在就讓我們感受一下的Struts 2.0的魅力吧。

          1. 搭建開發和運行環境
            1. 到Apache下載Struts 2.0包

            2. 打開Eclipse 3.2新建Web工程

              點擊菜單File\New\Project,出現如圖1所示對話框
              圖1 新建工程對話框
              圖1 新建工程對話框
              選擇Web\Dynamic Web Project,點擊“Next”,出現圖2對話框

              圖2 新建動態Web工程對話框
              圖2 新建動態Web工程對話框
              在“Project Name”中鍵入Struts2_HelloWorld,點擊“New”,出現以下對話框

              圖3 新建服務器運行時對話框
              圖3 新建服務器運行時對話框
              選擇“Apache\Apache Tomat v5.5”,點擊“Next”,出現以下對話框

              圖4新建服務器運行時對話框
              圖4新建服務器運行時對話框
              點擊“Finish”,關閉對話框。

            3. 將Struts 2.0 lib下的jar文件加到工程的構建路徑(build path)

              圖5 Struts 2.0的lib目錄
              圖5 Struts 2.0的lib目錄
              按ctr+a全選,復制,再轉到Eclipse窗口,在“Project Explorer”子窗口中選中Struts2_HelloWorld\WebContent\WEB-INF\lib,然后粘貼。經過Eclipse自動刷新“Project Explorer”子窗口,剛才所粘貼的jar文件應該會出現在Struts2_HelloWorld\Java Resources: src\Libraries\Web App Libraries下,如圖6所示:

              圖6 Project Explorer子窗口
              圖6 Project Explorer子窗口

            4. 打開web.xml文件,將其修改為以下代碼:
              <?xml?version="1.0"?encoding="ISO-8859-1"?>
              <!DOCTYPE?web-app?PUBLIC?"-//Sun?Microsystems,?Inc.//DTD?Web?Application?2.3//EN"?"http://java.sun.com/dtd/web-app_2_3.dtd">
              <web-app>
              ????
              <display-name>Struts?2.0?Hello?World</display-name>
              ????
              <filter>
              ????????
              <filter-name>struts2</filter-name>????????<filter-class>org.apache.struts2.dispatcher.FilterDispatcher</filter-class>
              ????
              </filter>
              ????
              <filter-mapping>
              ????????
              <filter-name>struts2</filter-name>
              ????????
              <url-pattern>/*</url-pattern>
              ????
              </filter-mapping>
              ????
              <welcome-file-list>
              ????????
              <welcome-file>index.html</welcome-file>
              ????
              </welcome-file-list>
              </web-app>

            5. 新建struts.xml文件

              右鍵點擊,Struts2_HelloWorld\Java Resources: src,出現如圖7所示菜單
              圖7 新建Other菜單
              圖7 新建Other菜單
              點擊“Other”,出現新建對話框,如圖8所示

              圖8 新建對話框
              圖8 新建對話框
              點擊“Next”,出現新建文件對話框,如圖9所示

              圖9 新建文件對話框
              圖9 新建文件對話框
              在“File name”中鍵入sturts.xml,點擊“Finish”,然后將struts.xml的內容修改為:

              <!DOCTYPE?struts?PUBLIC
              ????????"-//Apache?Software?Foundation//DTD?Struts?Configuration?2.0//EN"
              ????????"http://struts.apache.org/dtds/struts-2.0.dtd"
              >
              <struts>
              ????
              <include?file="struts-default.xml"/>
              </struts>

            6. 新建index.html文件

              右鍵點擊Struts2_HelloWorld\WebContent,出現如圖10所示的菜單
              圖10 新建Other菜單
              圖10 新建Other菜單
              點擊“Other”,出現新建對話框,如圖11所示

              圖11 新建對話框
              圖11 新建對話框
              選擇Web\HTML,點擊“Next”出現如圖12所示的對話框

              圖12 新建HTML頁面對話框
              圖12 新建HTML頁面對話框
              在“File Name”中鍵入index.html,點擊“Next”,出現如圖13所示的對話框

              圖13 模板選擇對話框
              圖13 模板選擇對話框
              點擊“Finish”,將index.html的內容修改為以下內容:

              <!DOCTYPE?HTML?PUBLIC?"-//W3C//DTD?HTML?4.01?Transitional//EN">
              <html>
              <head>
              <meta?http-equiv="Content-Type"?content="text/html;?charset=UTF-8">
              <title>Hello?World</title>
              </head>
              <body>
              <h3>Hello?World!</h3>
              </body>
              </html>

            7. 將應用程序打包到tomcat上

              右鍵點擊Struts_HelloWorld,出現如圖14所示的菜單
              圖14 工程菜單
              圖14 工程菜單
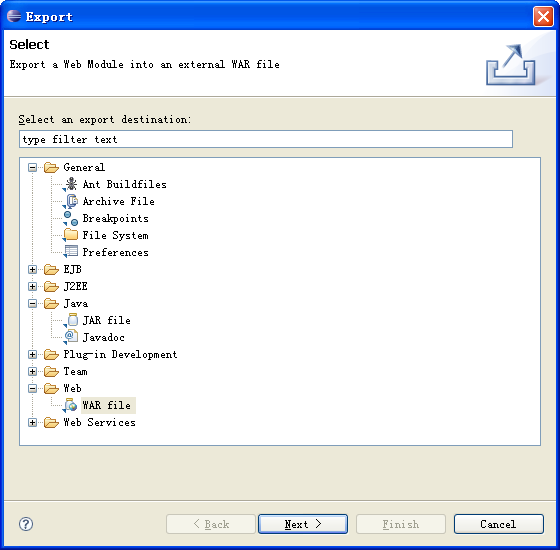
              點擊“Export\WAR file”,出現如圖15所示的對話框

              圖15 輸出對話框
              圖15 輸出對話框
              選擇“Web\WAR file”,點擊“Next”,出現如圖16所示的對話框

              圖16 輸出路徑對話框
              圖16 輸出路徑對話框
              輸入war文件的路徑(如%tomcat%\webapps\Struts2_HelloWorld.war),點擊“Finish”關閉對話框。

            8. 啟動tomcat,運行應用程序

              打開你的Internet Explorer,鍵入http://localhost:8080/Struts2_HelloWorld/,窗口輸出如圖17所示
              圖17 Hello World窗口
              圖17 Hello World窗口

          2. 第一個Struts 2.0應用程序——Hello World
            1. 新建類包(package)

              右鍵點擊Struts2_HelloWorld\Java Resources: src,出現如圖18所示菜單
              圖18 新建菜單
              圖18 新建菜單"
              點擊“New\Package”,出現如圖19所示對話框

              圖19新建Java類包對話框
              圖19新建Java類包對話框
              在“Name”鍵入tutorial,點擊“Finish”關閉對話框。

            2. 新建HelloWorld.java文件

              右鍵點擊Struts2_HelloWorld\Java Resources: src\tutorial,出現如圖20所示菜單
              圖20 新建菜單
              圖20 新建菜單
              點擊“New\Class”,出現如圖21所示對話框

              圖21 新建Java類對話框
              圖21 新建Java類對話框
              在“Name”中鍵入HelloWorld,在“Superclass”中鍵入com.opensymphony.xwork2.ActionSupport,點擊“Finish”關閉對話框。將HelloWorld.java的內容修改為:

              package?tutorial;

              import?com.opensymphony.xwork2.ActionSupport;

              public?class?HelloWorld?extends?ActionSupport?{
              ????
              private?String?name;
              ????
              ????
              public?String?getName()?{
              ????????
              return?name;
              ????}

              ????
              ????
              public?void?setName(String?name)?{
              ????????
              this.name?=?name;
              ????}

              ????
              ????
              public?String?execute()?{
              ????????name?
              =?"Hello,?"?+?name?+?"!";?
              ????????
              return?SUCCESS;
              ????}

              }

            3. 在struts.xml中添加action映射(mapping)
              <!DOCTYPE?struts?PUBLIC
              ????????"-//Apache?Software?Foundation//DTD?Struts?Configuration?2.0//EN"
              ????????"http://struts.apache.org/dtds/struts-2.0.dtd"
              >
              <struts>
              ????
              <include?file="struts-default.xml"/>
              ????
              <package?name="tutorial"?extends="struts-default">
              ????????
              <action?name="HelloWorld"?class="tutorial.HelloWorld">
              ????????????
              <result>HelloWorld.jsp</result>
              ????????
              </action>
              ????
              </package>
              </struts>

            4. 新建SayHello.jsp

              參考“新建index.html文件”步驟,彈出如圖22所示對話框
              圖22 新建對話框
              圖22 新建對話框
              點擊“Next”, 進入下一步,如圖23所示

              圖23 新建JSP對話框
              圖23 新建JSP對話框
              在“File name”鍵入SayHello.jsp,點擊“Next”進入下一步,如圖24所示

              圖24 模板選擇對話框
              圖24 模板選擇對話框
              點擊“Finish”關閉對話框,并將SayHello.jsp的內容修改為:

              <%@?page?contentType="text/html;?charset=UTF-8"?%>
              <%@?taglib?prefix="s"?uri="/struts-tags"?%>
              <!DOCTYPE?HTML?PUBLIC?"-//W3C//DTD?HTML?4.01?Transitional//EN">
              <html>
              ????
              <head>
              ????????
              <title>Say?Hello</title>
              ????
              </head>
              ????
              <body>
              ????????
              <h3>Say?"Hello"?to:?</h3>
              ????????
              <s:form?action="HelloWorld">
              ????????????Name:?
              <s:textfield?name="name"?/>
              ????????????
              <s:submit?/>
              ????????
              </s:form>
              ????
              </body>
              </html>

            5. 新建HelloWorld.jsp(請參考上一步),HelloWorld.jsp的內容為:
              <%@?page?contentType="text/html;?charset=UTF-8"?%>
              <%@?taglib?prefix="s"?uri="/struts-tags"?%>
              <!DOCTYPE?HTML?PUBLIC?"-//W3C//DTD?HTML?4.01?Transitional//EN">
              <html>
              ????
              <head>
              ????????
              <title>Hello</title>
              ????
              </head>
              ????
              <body>
              ????????
              <h3><s:property?value="name"?/></h3>
              ????
              </body>
              </html>

            6. 重新打包發布應用程序

              先停止tomcat, 再將tomcat里webapps下的Struts2_HelloWorld.war和Struts2_HelloWorld文件夾刪除,參照“將應用程序打包到tomcat上”重新發布應用程序。

            7. 啟動tomcat,運行測試

              打開Internet Explorer,鍵入http://localhost:8080/Struts2_HelloWorld/SayHello.jsp,窗口輸出如圖25所示
              圖25 SayHello.jsp
              圖25 SayHello.jsp
              在“Name”鍵入字符串(如World),點擊Submit,轉到HelloWorld.jsp頁面,如圖26所示

              圖26 HelloWorld.jsp
              圖26 HelloWorld.jsp

          3. 單元測試Hello World

            在文章開始的時候提及,單元測試困難是Struts一大缺點。現在讓我們在體驗一下,在Struts 2.0中是如何進行測試的。

            1. 新建JUnit單元測試

              右鍵點擊Struts2_HelloWorld\Java Resources: src\tutorial,彈出如圖27所示對話框
              圖27 新建菜單
              圖27 新建菜單
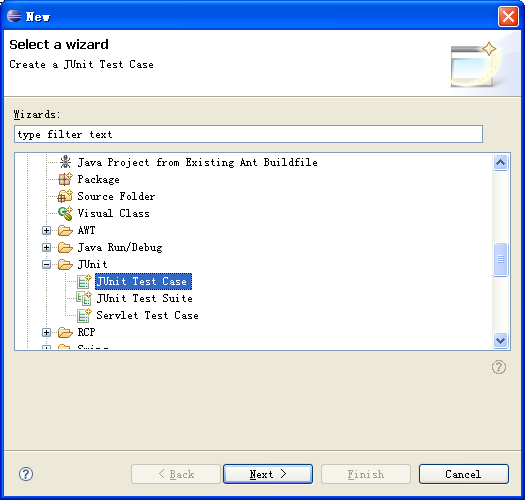
              點擊“Next\Other”

              圖28 新建對話框
              圖28 新建對話框
              選擇“Java\JUnit\JUnit Test Case”,點擊“Next”

              圖29 新建JUnit 測試用例對話框
              圖29 新建JUnit 測試用例對話框
              選擇“New JUnit 4 test”,在“Name”中鍵入HelloWorldTest,在“Class under test”鍵入tutorial.HelloWorld,點擊“Next”

              圖30 選擇方法對話框
              圖30 選擇方法對話框
              選中HelloWorld\execute方法,點擊Finish。如果生成的HelloWorldTest.java文件的圖標(Icon)出現紅色交叉標志,請進行以下步驟添加JUnit 4的jar包。

              右鍵點擊Struts2_HelloWorld,出現如圖所示菜單。 圖31 新建菜單
              圖31 新建菜單
              點擊“Build Path\Add Libararis”,彈出圖32對話框

              圖32 添加庫對話框
              圖32 添加庫對話框
              選中“JUnit”,點擊“Next”

              圖33 選擇版本對話框
              圖33 選擇版本對話框
              選擇“JUnit 4”,點擊“Finish”關閉對話框,并將HelloWorldTest.java的內容修改為:

              package?tutorial;

              import?static?org.junit.Assert.assertTrue;

              import?org.junit.Test;

              import?com.opensymphony.xwork2.ActionSupport;

              public?class?HelloWorldTest?{

              ????@Test
              ????
              public?void?testExecute()?{
              ????????HelloWorld?hello?
              =?new?HelloWorld();
              ????????hello.setName(
              "World");
              ????????String?result?
              =?hello.execute();
              ????????
              ????????assertTrue(
              "Expected?a?success?result!",?ActionSupport.SUCCESS.equals(result));
              ????????
              ????????
              final?String?msg?=?"Hello,?World!";
              ????????assertTrue(
              "Expected?the?default?message!",?msg.equals(hello.getName()));
              ????}


              }

            2. 運行單元測試

              右鍵點擊Struts2_HelloWorld\Java Resources: src\tutorial\HelloWorldTest.java,彈出如圖34所示菜單
              圖34 運行為菜單
              圖34 運行為菜單
              點擊“Run As\JUnit Test”,出現JUnit子窗口如圖35所示

              圖35 JUnit子窗口
              圖35 JUnit子窗口
              圖35的綠色矩形表示,所有單元測試通過。

          4. 總結

            上面的例子簡單地演示了,Web 應用程序的基本操作,也即是,頁面輸入->Action處理->再輸出到另外頁面。Struts 2.0的簡單易用、方便測試相信也會給大家留下不錯的印象吧。我相信,Struts 2.0作為一個全新的Web架構,將會再次掀起Web開發的熱潮。 不過,Struts 2.0還在測試中,正式版的發布還需些時日,所以文檔方面可能有所欠缺。請大家繼續留意我的博客,我會盡我所能為大家寫更多關于Struts 2.0的文章。

          posted @ 2007-03-17 15:58 氓氓 閱讀(497) | 評論 (0)編輯 收藏

          今天在eclipse+myeclipse+tomcat5 下,寫個中文亂碼轉碼filter,就報
          2007-3-13 17:43:46 org.apache.catalina.core.StandardContext start
          嚴重: Error filterStart
          2007-3-13 17:43:46 org.apache.catalina.core.StandardContext start
          嚴重: Context startup failed due to previous errors
          ?錯誤,所屬項目也就啟動不了,web。xml配置為 :
          <filter>
          ? ?<filter-name>CharsetEncodingFilter</filter-name>
          ? ?<filter-class>com.changyou.filter.CharsetEncodingFilter</filter-class>
          ? ?<init-param>
          ? ??<param-name>encoding</param-name>
          ? ??<param-value>UTF-8</param-value>
          ? ?</init-param>
          ? </filter>
          ? <filter-mapping>
          ? ?<filter-name>CharsetEncodingFilter</filter-name>
          ? ?<url-pattern>/*</url-pattern>
          ? </filter-mapping>
          百思不得其解,問題出在哪里。
          在google搜索,有人提出這么幾個解決方案:
          1、試著把tomat/server/lib目錄下的commons-digester.jar,commons-beanutils.jar拷貝到common/lib/目錄??--經測試不行
          2、里有個文章說tomcat里的bug,沒有實現javax.servlet.Filter的Filter會報這樣的錯誤,看來tomcat在啟動就初始化Filter實例,但是在filter中又沒有看到那段代碼沒有實現Filter,或者有代碼在啟動時沒有實例化。--沒發現問題。

          這個問題網上也得不到解決方案,真是郁悶得緊
          ****************************************
          終于解決了,原來是在web.xml初始化參數過程少初始化了一個,導致filter啟動失敗。大汗~~~~

          如果以后出現tomcat 嚴重: Error filterStart 錯誤,一般原因為:1、xml配置失誤(如我) 2、filter中某段代碼為實例化(這個情況是出現最多的,要仔細檢查) 3、試著把tomat/server/lib目錄下的commons-digester.jar,commons-beanutils.jar拷貝到common/lib/目錄,有些包在部署是沒有被包含
          ?

          posted @ 2007-03-13 17:53 氓氓 閱讀(26654) | 評論 (40)編輯 收藏

          這里以Eclipse 3.1.2為例給介紹!

          一、下載 Eclipse 3.1.2 和語言包:
          ??
          ?? Eclipse 3.1.2:點此處下載eclipse-SDK-3.1.2-win32.zip
           
          ?? 語言包:點擊下載NLpack1-eclipse-SDK-3.1.1a-win32.zip

          二、解壓縮 eclipse-SDK-3.1.2-win32.zip 到 D:\eclipse(我放的路徑,閣下可以自己選擇)

          ??在 eclipse 目錄中新建一個名為 language 和 links 的目錄,并將下載下來的語言包 NLpack1-eclipse-SDK-3.1.1a-win32.zip 解壓縮到 language 目錄中,然后在 links 目錄里新建一個文本文件,命名為 language.link ,在文件里寫入下列信息:path=D:\\eclipse\\language 其中 D 為閣下所使用的盤符,設置 path 指向 language 目錄,保存即可。

          三,OK了,啟動 Eclipse 3.1.2,已經是中文的了!

          其他版本同理,下載對應語言包即可,網址:http://download.eclipse.org/eclipse/downloads/
          posted @ 2006-08-02 14:17 氓氓 閱讀(515) | 評論 (0)編輯 收藏

          學習在java中計算基本的時間段
          概述
          如果你知道怎樣在java中使用日期,那么使用時間和它才不多一樣簡單。這篇文章告訴你怎樣把他們的差別聯系起來。Robert Nielsen還告訴你怎樣使用java來計算抵達航班和制造過程的時間。
          作者:Robert Nielsen
          翻譯:Cocia Lin

          ?

          這篇文章是在我發表過的<計算Java時間>(譯者:已經翻譯完成)的基礎上的。在這里,我列出那篇文章幾個你應該熟悉得關鍵點。如果這幾點你不太清楚,我建議你讀一下<計算Java時間>,了解一下。
          1. Java計算時間依靠1970年1月1日開始的毫秒數.??????????????????????????????????????????????????????????????????????????????????????????????????????????????????????????????????????????????????????????????
          2. Date類的構造函數Date()返回代表當前創建的時刻的對象。Date的方法getTime()返回一個long值在數值上等于1970年1月1日之前或之后的時刻。
          3. DateFormat類用來轉換Date到String,反之亦然。靜態方法getDateInstance()返回DateFormat的缺省格式;getDateInstance(DateFormat.FIELD)返回指定的DateFormat對象格式。Format(Date d)方法返回String表示日期,例如"January 1,2002."反過來,parse(String s)方法返回以參數字符串表示的Date對象。
          4. format()方法返回的字符串格式根據不同地區的時間設置而有所不同。
          5. GregorianCalendear類有兩個重要的構造函數:GregorianCalerdar(),返回代表當前創建時間的對象;GregorianCalendar(int year,int month,int date)返回代表任意日期的對象。GregorianCalendar類的getTime()方法返回日期對象。Add(int field,int amount)方法通過加或減時間單位,象天數,月數或年數來計算日期。
          GregorianCalendar和 時間
          ?兩個GregorianCalendar的構造函數可以用來處理時間。前者創建一個表示日期,小時和分鐘的對象:

          GregorianCalendar(int year, int month, int date, int hour, int minute)

          第二個創建一個表示一個日期,小時,分鐘和秒:

          GregorianCalendar(int year, int month, int date, int hour, int minute, int second)

          首先,我應該提醒一下,每一個構造函數需要時間信息中的日期信息(年,月,日)。如果你想說2:30 p.m.,你必須指出日期。
          同樣,每一個GregorianCalendar構造函數創建一個在時間上使用毫秒計算的對象。所以,如果你的構造函數只提供年,月,日參數,那小時,分鐘,秒和毫秒的值將被置0.
          DateFormat和時間
          你可以使用靜態方法getDateTimeInstance(int dateStyle,int timeStyle)來建立DateFormat對象來顯示時間和日期。這個方法表明你想要的日期和時間格式。如果你喜歡使用缺省格式,可以使用getDateTimeInstance()來代替它。
          你可以使用靜態方法getTimeInstance(int timeStyle)創建DateFormat對象來顯示正確的時間。
          下面的程序示范了getDateTimeInstance()和getTimeInstance()怎樣工作:

          import java.util.*;
          import java.text.*;

          public class Apollo {
          ?? public static void main(String[] args) {
          ????? GregorianCalendar liftOffApollo11 = new GregorianCalendar(1969, Calendar.JULY, 16, 9, 32);
          ????? Date d = liftOffApollo11.getTime();
          ????? DateFormat df1 = DateFormat.getDateTimeInstance(DateFormat.MEDIUM, DateFormat.MEDIUM);
          ????? DateFormat df2 = DateFormat.getTimeInstance(DateFormat.SHORT);
          ????? String s1 = df1.format(d);
          ????? String s2 = df2.format(d);
          ????? System.out.println(s1);
          ????? System.out.println(s2);
          ?? }
          }??
          ???????
          在我的電腦上,上面的程序顯示如下:

          Jul 16, 1969 9:32:00 AM
          9:32 AM
          (輸出根據你所在得地區有所不同)

          計算時間間隔
          ???? 你可能有時需要計算過去的時間;例如,給你開始和結束時間,你想知道制造流程的持續時間。一個出租公司按小時或天數出租東西,計算時間對他們也很有用。同樣的,在金融界,經常需要計算重要的支付時間。
          將問題復雜化,人類至少是用兩種方法計算時間。你可以說一天已經結束當24小時過去了,或者日歷從今天翻到明天。我們將討論我們想到的這兩種情況。
          時間段,情況 1:嚴格時間單位
          在這種情況中,只有24小時過去,這天才過去,60分鐘過去,這個小時才過去,60秒過去,這個分鐘才過去,以此類推。在這個方法中,23小時的時間將被認為是0天。
          使用這種方法計算時間段,你從計算過去的毫秒開始。為了做到這一點,首先轉換每個日期為從1970年1月1日起得毫秒數。你可以從第二個毫秒值中減去第一個毫秒值。這里有一個簡單的計算:

          import java.util.*;

          public class ElapsedMillis {
          ?? public static void main(String[] args) {
          ????? GregorianCalendar gc1 = new GregorianCalendar(1995, 11, 1, 3, 2, 1);
          ????? GregorianCalendar gc2 = new GregorianCalendar(1995, 11, 1, 3, 2, 2);
          ????? // the above two dates are one second apart
          ????? Date d1 = gc1.getTime();
          ????? Date d2 = gc2.getTime();
          ????? long l1 = d1.getTime();
          ????? long l2 = d2.getTime();
          ????? long difference = l2 - l1;
          ????? System.out.println("Elapsed milliseconds: " + difference);
          ?? }
          }????

          上面的程序打印如下:

          Elapsed milliseconds: 1000

          這個程序也帶來一點混淆。GregorianCalendar類的getTime()返回一個Date對象,Date類的getTime()方法返回從1970年1月1日到這個時間的long類型的毫秒數值。雖然他們的方法名字相同,返回值卻不一樣!
          下面的程序片斷用簡單的整數除法轉換毫秒到秒:

          long milliseconds = 1999;
          long seconds = 1999 / 1000;

          這種方法舍去小數部分轉換毫秒到秒,所以1,999毫秒等于1秒,2,000毫秒等于2秒。
          計算更大的單位-例如天數,小時和分鐘-給定一個時間數值,可以使用下面的過程:
          1. 計算最大的單位,減去這個數值的秒數
          2. 計算第二大單位,減去這個數值的秒數
          3. 重復操作直到只剩下秒
          例如,如果你的時間的10,000秒,你想知道這個數值相應的是多少小時,多少分鐘,多少秒,你從最大的單位開始:小時。10,000除以3600(一個小時的秒數)得到小時數。使用整數除法,答案是2小時(整數除法中小數舍去)計算剩下的秒數,10,000-(3,600 x 2) = 2,800秒。所以你有2小時和2,800秒。
          將2,800秒轉換成分鐘,2,800除以60。使用整數除法,答案是46。2,800 - (60 x 46) = 40秒。最后答案是2小時,46分,40秒。
          下面的Java程序使用上面的計算方法:

          import java.util.*;

          public class Elapsed1 {
          ?? public void calcHMS(int timeInSeconds) {
          ????? int hours, minutes, seconds;
          ????? hours = timeInSeconds / 3600;
          ????? timeInSeconds = timeInSeconds - (hours * 3600);
          ????? minutes = timeInSeconds / 60;
          ????? timeInSeconds = timeInSeconds - (minutes * 60);
          ????? seconds = timeInSeconds;
          ????? System.out.println(hours + " hour(s) " + minutes + " minute(s) " + seconds + " second(s)");
          ?? }

          ?? public static void main(String[] args) {
          ????? Elapsed1 elap = new Elapsed1();
          ????? elap.calcHMS(10000);
          ?? }
          }?

          輸出結果如下:

          2 hour(s) 46 minute(s) 40 second(s)

          上面的程序甚至在時間少于一個小時也可以正確的計算小時數。例如,你用上面的程序計算1,000秒,輸出入下:
          0 hour(s) 16 minute(s) 40 second(s)
          舉一個現實世界的例子,下面的程序計算阿波羅11飛到月球使用得時間:

          import java.util.*;

          public class LunarLanding {

          ?? public long getElapsedSeconds(GregorianCalendar gc1, GregorianCalendar gc2) {
          ????? Date d1 = gc1.getTime();
          ????? Date d2 = gc2.getTime();
          ????? long l1 = d1.getTime();
          ????? long l2 = d2.getTime();
          ????? long difference = Math.abs(l2 - l1);
          ????? return difference / 1000;
          ?? }

          ?? public void calcHM(long timeInSeconds) {
          ????? long hours, minutes, seconds;
          ????? hours = timeInSeconds / 3600;
          ????? timeInSeconds = timeInSeconds - (hours * 3600);
          ????? minutes = timeInSeconds / 60;
          ????? System.out.println(hours + " hour(s) " + minutes + " minute(s)" );
          ?? }

          ?? public static void main(String[] args) {
          ????? GregorianCalendar lunarLanding = new GregorianCalendar(1969, Calendar.JULY, 20, 16, 17);
          ????? GregorianCalendar lunarDeparture = new GregorianCalendar(1969, Calendar.JULY, 21, 13, 54);
          ????? GregorianCalendar startEVA = new GregorianCalendar(1969, Calendar.JULY, 20, 22, 56);
          ????? GregorianCalendar endEVA = new GregorianCalendar(1969, Calendar.JULY, 21, 1, 9);

          ????? LunarLanding apollo = new LunarLanding();

          ????? long eva = apollo.getElapsedSeconds(startEVA, endEVA);
          ????? System.out.print("EVA duration = ");
          ????? apollo.calcHM(eva);

          ????? long lunarStay = apollo.getElapsedSeconds(lunarLanding, lunarDeparture);
          ????? System.out.print("Lunar stay = ");
          ????? apollo.calcHM(lunarStay);
          ?? }
          }?????????

          上面程序輸出如下:

          EVA duration = 2 hour(s) 13 minute(s)
          Lunar stay = 21 hour(s) 37 minute(s)

          目前為止,我們計算的基礎公式是這樣的:1分鐘=60秒,1小時=60分,1天=24小時。
          "1個月=?天,1年=?天"怎么辦?
          月份的天數有28,29,30,31;一年可以是365或366天。因此,當你試圖計算嚴格單位的月份和年時,問題就產生了。例如,如果你使用月份的平均天數(近似30.4375),并且計算下面的時間間隔:

          * July 1, 2:00 a.m. to July 31, 10:00 p.m.
          * February 1, 2:00 a.m. to February 29, 10:00 p.m.

          第一個計算結果是1個月;第二個結果是0個月!
          所以,在計算嚴格單位時間的月份和年份是要想好。
          時間段,情況 2:時間單位變化
          時間單位的變化相當的簡單:如果你要統計天數,你可以簡單的統計日期變化次數。例如,如果某事15日開始,17日結束,經過2天。(日期先是便到16,再到17)同樣的,一個步驟下午3:25開始,4:10 p.m結束,歷時1個小時,因為小時數值變了一次(從3到4)。
          圖書館經常使用這種習慣計算時間。例如,如果你從圖書館接一本書,我不能占有這本書最少24小時,會認為圖書館這樣才給你算一天。而是,我的賬號上記錄我借書的日期。日期以變成下一天,我就已經結這本書一天了,即使總計不足24小時。
          當使用單位的變化來計算時間段,通常感覺計算的時間沒有多于一個時間單位。例如,如果9:00 p.m.我借了一本圖書館的書,第二天中午還回去,我能算出我借了這本書一天了。可是,有一種感覺在問:"1天和幾個小時呢?"這本說總計借出15個小時,答案是一天還差9個小時呢?因此,這篇文章里,我將以一個時間單位變化計算時間。
          單位變化的時間算法
          ?這是你怎樣計算兩個日期的時間變化:
          1. 制作兩個日期的拷貝。Close()方法能制作拷貝。
          2. 使用日期拷貝,將所有的小于時間單位變化的部分設置成它的最小單位。例如,如果計算天數,那么將小時,分鐘,秒和毫秒設置成0。這種情況中,使用clear()方法將時間值設置稱他們各自的最小值。
          3. 取出較早的日期,將你要計算的單位加1,重復直到兩個日期相等。你加1的次數就是答案。可以使用before()和after()方法,他們返回boolean值,來判斷是否一個日期在另一個日期之前或之后。
          下面的類的方法用來計算天數和月數。

          import java.util.*;

          public class ElapsedTime {

          ?? public int getDays(GregorianCalendar g1, GregorianCalendar g2) {
          ????? int elapsed = 0;
          ????? GregorianCalendar gc1, gc2;

          ????? if (g2.after(g1)) {
          ???????? gc2 = (GregorianCalendar) g2.clone();
          ???????? gc1 = (GregorianCalendar) g1.clone();
          ????? }
          ????? else?? {
          ???????? gc2 = (GregorianCalendar) g1.clone();
          ???????? gc1 = (GregorianCalendar) g2.clone();
          ????? }

          ????? gc1.clear(Calendar.MILLISECOND);
          ????? gc1.clear(Calendar.SECOND);
          ????? gc1.clear(Calendar.MINUTE);
          ????? gc1.clear(Calendar.HOUR_OF_DAY);

          ????? gc2.clear(Calendar.MILLISECOND);
          ????? gc2.clear(Calendar.SECOND);
          ????? gc2.clear(Calendar.MINUTE);
          ????? gc2.clear(Calendar.HOUR_OF_DAY);

          ????? while ( gc1.before(gc2) ) {
          ???????? gc1.add(Calendar.DATE, 1);
          ???????? elapsed++;
          ????? }
          ????? return elapsed;
          ?? }

          ?? public int getMonths(GregorianCalendar g1, GregorianCalendar g2) {
          ????? int elapsed = 0;
          ????? GregorianCalendar gc1, gc2;

          ????? if (g2.after(g1)) {
          ???????? gc2 = (GregorianCalendar) g2.clone();
          ???????? gc1 = (GregorianCalendar) g1.clone();
          ????? }
          ????? else?? {
          ???????? gc2 = (GregorianCalendar) g1.clone();
          ???????? gc1 = (GregorianCalendar) g2.clone();
          ????? }

          ????? gc1.clear(Calendar.MILLISECOND);
          ????? gc1.clear(Calendar.SECOND);
          ????? gc1.clear(Calendar.MINUTE);
          ????? gc1.clear(Calendar.HOUR_OF_DAY);
          ????? gc1.clear(Calendar.DATE);

          ????? gc2.clear(Calendar.MILLISECOND);
          ????? gc2.clear(Calendar.SECOND);
          ????? gc2.clear(Calendar.MINUTE);
          ????? gc2.clear(Calendar.HOUR_OF_DAY);
          ????? gc2.clear(Calendar.DATE);

          ????? while ( gc1.before(gc2) ) {
          ???????? gc1.add(Calendar.MONTH, 1);
          ???????? elapsed++;
          ????? }
          ????? return elapsed;
          ?? }
          }

          你可以在上面的類中補充另外的方法來處理小時和分鐘。同樣,計算時間段的算法能更高效一些,尤其是時間相隔很長。可是,作為介紹目的,這個算法有短小和簡單的優勢。
          下面的例子使用ElapsedTime類來計算兩個日期之間的天使,而后是月數:

          import java.util.*;

          public class Example {
          ?? public static void main(String[] args) {
          ????? GregorianCalendar gc1 = new GregorianCalendar(2001, Calendar.DECEMBER, 30);
          ????? GregorianCalendar gc2 = new GregorianCalendar(2002, Calendar.FEBRUARY, 1);

          ????? ElapsedTime et = new ElapsedTime();
          ????? int days = et.getDays(gc1, gc2);
          ????? int months = et.getMonths(gc1, gc2);

          ????? System.out.println("Days = " + days);
          ????? System.out.println("Months = " + months);
          ?? }
          }

          當計算時,上面的程序可能有用,例如,最近的航班。它顯示下面的輸出:

          Days = 33
          Months = 2

          (OK,關于航班的計算有些夸張;這個天數算法很適合像圖書館借書這樣的應用,你看到了她怎樣工作)
          告誡
          在進行時間工作時要謹慎:你看到的時間段的例子,你精確仔細的考慮非常重要。本文介紹了兩種通常計算時間段的想法,但是人們能想到的時間段的計算方法僅僅受到人類想象力的限制。
          所以,當寫一個Java程序的時候,確信你的精確度能讓使用和以來這些程序的人滿意。同樣,徹底的測試程序對處理時間的程序非重重要。
          總結
          本文是在我的前一篇文章 Java時間計算介紹怎樣使用GregorianCalendar 和 DateFormat類處理時間問題的基礎上的。你已經看到了兩種方法來思考時間段問題和兩種相應的途徑使用Java來處理時間問題。這里提供的信息,很基礎,提供給你一個在Java中處理時間問題的有力工具。

          關于作者
          ?Robert Nielsen是SCJP。他擁有碩士學位,專攻計算機教育,并且在計算機領域執教多年。他也在各樣的雜志上發表過很多計算機相關的文章。
          關于譯者
          Cocia Lin(cocia@163.com)是程序員。它擁有學士學位,現在專攻Java相關技術,剛剛開始在計算機領域折騰。

          ?


          posted @ 2006-06-02 16:18 氓氓 閱讀(732) | 評論 (0)編輯 收藏

          <!DOCTYPE HTML PUBLIC "-//W3C//DTD HTML 4.01 Transitional//EN""<html>
          <head>
          <meta http-equiv="Content-Type" content="text/html; charset=gb2312">
          <script language="javascript">
          ?function roundFun(numberRound,roundDigit) //四舍五入,保留位數為roundDigit ,供計算時用

          ? {
          ?? if (numberRound>=0)
          ?? {
          ???var tempNumber = parseInt((numberRound * Math.pow(10,roundDigit)+0.5))/Math.pow(10,roundDigit);
          ???return tempNumber;
          ??}
          ??else
          ?? {
          ???numberRound1=-numberRound
          ???var tempNumber = parseInt((numberRound1 * Math.pow(10,roundDigit)+0.5))/Math.pow(10,roundDigit);
          ???return -tempNumber;
          ??}

          ???? }

          </script>
          <title>Test</title>
          </head>

          <form name="form1">
          <input name="num1" type="text" id="num1" maxlength="10">
          <input type="button" name="Submit" value="Click Me" onclick="javascript:this.form.num1.value=roundFun(this.form.num1.value,2)">
          </form>

          </body>
          </html>

          ?


          主站蜘蛛池模板: 南木林县| 灵丘县| 江油市| 华安县| 阜城县| 泰宁县| 裕民县| 日喀则市| 许昌县| 北安市| 雷州市| 湟中县| 秦皇岛市| 如东县| 大渡口区| 林周县| 图木舒克市| 岳阳市| 南华县| 田东县| 阳春市| 四川省| 巫溪县| 江西省| 馆陶县| 敦煌市| 同仁县| 水城县| 哈尔滨市| 甘南县| 额济纳旗| 措勤县| 辽中县| 鄯善县| 淮北市| 金阳县| 红桥区| 明光市| 安福县| 郁南县| 简阳市|