專題五:Spring + Hibernate 編程實例
本實例中,使用Spring作為WEB層和業務邏輯層的容器,Hibernate作為持久層,另外使用JAX-WS2.1做WebService部件,為瘦客戶端提供服務。其結構如下圖所示:
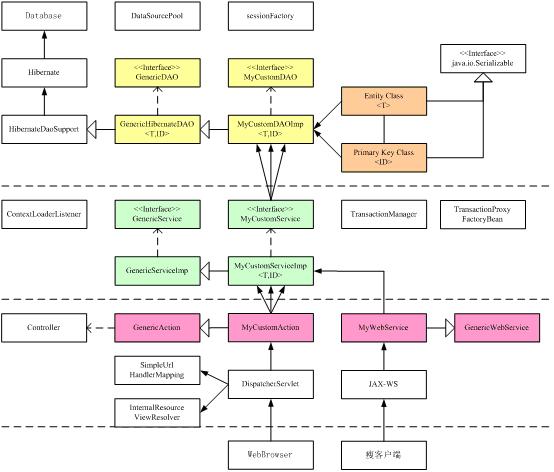
從這個總圖可以看出,這個框架需要完成下列任務:
l 編寫實體類和實體主鍵類
l 編寫實體類的持久化操作類及其接口
l 編寫業務邏輯類及其接口
l 編寫Web界面操作類
l 編寫WebService類(給瘦客戶端)
l 編寫相應的配置文件
本實例使用一個簡單的地址本管理應用描述相關的內容。本實例設計工作在Tomcat和glassfish服務器上。建議使用glassfish服務器以獲得后續的發展,畢竟glassfish是SUN發布的全功能的應用服務器,而非只有Web容器。
1 環境準備
1.1 安裝系統軟件
l 安裝JDK 6.0 和JAVA EE 5;
l 安裝netbeans 6.0做開發工具,使用eclipse也可以;
l 安裝Tomcat 6.0做應用服務器;
l 安裝GlassFish 2.0做應用服務器
l 安裝數據庫,這里使用 MS SQL Server Express 2005
1.2 準備組件
l Spring 2.06
l Hibernate 3.2
l JAX-WS 2.1
l MS SQL Server JDBC 1.2
l 其他需要的JAR包
1.3 創建應用
l 使用netbeans創建WebApplication,命名為 AddressBook;
l 選擇Tomcat做服務器;
l JAVA平臺選擇 Java EE 5;
l 創建數據庫及數據表。
CREATE DATABASE addressbook;
CREATE TABLE db_address
{
email char(20) not null primary key,
name char(20) not null,
password char(20) not null,
workphone char(20) not null,
homephone char(20) not null,
mobile char(20) not null,
};
1.4 添加基礎配置
1.4.1 WEB-INF/web.xml
web.xml文件放置到WEB-INF目錄;
l 配置Spring ApplicationContext文件;
l 配置Spring ApplicationContext加載器;
l 配置log4j的文件;
l 配置Spring過慮器防止漢字亂碼。
|
<?xml version="1.0" encoding="UTF-8"?>
<web-app version="2.5" xmlns="http://java.sun.com/xml/ns/javaee" xmlns:xsi="http://www.w3.org/2001/XMLSchema-instance" xsi:schemaLocation="http://java.sun.com/xml/ns/javaee http://java.sun.com/xml/ns/javaee/web-app_2_5.xsd">
<description>地址本管理應用范例</description>
<display-name>AddressBook</display-name>
<context-param>
<description>Spring main config</description>
<param-name>contextConfigLocation</param-name>
<param-value>/WEB-INF/applicationContext.xml</param-value>
</context-param>
<context-param>
<param-name>log4jConfigLocation</param-name>
<param-value>/WEB-INF/log4j.properties</param-value>
</context-param>
<listener>
<description>Spring applicationContext loader</description>
<listener-class>
org.springframework.web.context.ContextLoaderListener
</listener-class>
</listener>
<filter>
<filter-name>encodingFilter</filter-name>
<filter-class>
org.springframework.web.filter.CharacterEncodingFilter
</filter-class>
<init-param>
<param-name>encoding</param-name>
<param-value>GB18030</param-value>
</init-param>
<init-param>
<param-name>forceEncoding</param-name>
<param-value>true</param-value>
</init-param>
</filter>
<filter-mapping>
<filter-name>encodingFilter</filter-name>
<servlet-name>AddressBookWeb</servlet-name>
<url-pattern>*.do</url-pattern>
</filter-mapping>
<session-config>
<session-timeout>
30
</session-timeout>
</session-config>
<welcome-file-list>
<welcome-file>index.jsp</welcome-file>
</welcome-file-list>
</web-app>
|
1.4.2 WEB-INF/classes/applicationContext.xml
applicationContext.xml放置到Source目錄,編譯時被IDE自動放置到WEB-INF/classes目錄。(放置到此處JUnit測試才能通過,否則報加載配置文件錯)
l 配置數據庫連接池(c3p0DataSource);
l 配置Hibernate Session管理器(sessionFactory);
l 配置數據庫事務管理器(transactionManager);
l 配置Spring配置式事務代理(txProxyTemplate)。
|
<?xml version="1.0" encoding="UTF-8"?>
<beans xmlns="http://www.springframework.org/schema/beans"
xmlns:xsi="http://www.w3.org/2001/XMLSchema-instance"
xmlns:aop="http://www.springframework.org/schema/aop"
xsi:schemaLocation=
"http://www.springframework.org/schema/beans
http://www.springframework.org/schema/beans/spring-beans.xsd
http://www.springframework.org/schema/aop
http://www.springframework.org/schema/aop/spring-aop.xsd">
<bean id="c3p0DataSource"
class="com.mchange.v2.c3p0.ComboPooledDataSource"
destroy-method="close">
<property name="driverClass">
<value>com.microsoft.sqlserver.jdbc.SQLServerDriver</value>
</property>
<property name="jdbcUrl">
<value>
jdbc:sqlserver://localhost:1433;databaseName=AddressBook
</value>
</property>
<property name="user">
<value>sa</value>
</property>
<property name="password">
<value>welcome</value>
</property>
<property name="minPoolSize">
<value>10</value>
</property>
<property name="acquireIncrement">
<value>10</value>
</property>
<property name="maxPoolSize">
<value>200</value>
</property>
</bean>
<bean id="sessionFactory"
class="org.springframework.orm.hibernate3.LocalSessionFactoryBean">
<property name="dataSource">
<ref bean="c3p0DataSource" />
</property>
<property name="mappingDirectoryLocations">
<list>
<!-- Hibernate Configure file location -->
<value>classpath*:model</value>
</list>
</property>
<property name="hibernateProperties">
<props>
<prop key="hibernate.dialect">
org.hibernate.dialect.SQLServerDialect
</prop>
<prop key="hibernate.show_sql">false</prop>
<prop key="hibernate.format_sql">true</prop>
<prop key="hibernate.default_schema"></prop>
<prop key="hibernate.cache.provider_class">
org.hibernate.cache.EhCacheProvider
</prop>
</props>
</property>
</bean>
<bean id="transactionManager"
class="org.springframework.orm.hibernate3.HibernateTransactionManager">
<property name="sessionFactory">
<ref local="sessionFactory"/>
</property>
</bean>
<bean id="txProxyTemplate"
class="org.springframework.transaction.interceptor.TransactionProxyFactoryBean" abstract="true">
<property name="transactionManager" ref="transactionManager"/>
<property name="transactionAttributes">
<props>
<prop key="select*">PROPAGATION_REQUIRED,readOnly</prop>
<prop key="find*">PROPAGATION_REQUIRED,readOnly</prop>
<prop key="load*">PROPAGATION_REQUIRED,readOnly</prop>
<prop key="save*">PROPAGATION_REQUIRED</prop>
<prop key="update*">PROPAGATION_REQUIRED</prop>
<prop key="remove*">PROPAGATION_REQUIRED</prop>
<prop key="del*">PROPAGATION_REQUIRED</prop>
</props>
</property>
</bean>
</beans>
|
注意:
(1)以上系統級基礎Bean均是單例的;
(2)txProxyTemplate 是一個抽象的定義,全部業務邏輯Bean的定義將繼承其定義,從而獲得Spring的配置式事務能力;
(3)此處指定Hibernate的配置文件要放置到WEB-INF/classes/model目錄下。
1.4.3 WEB-INF/classes/log4j.properties
|
# TraceLevel: OFF、FATAL、ERROR、WARN、INFO、DEBUG、ALL
# Appender: ConsoleAppender、FileAppender、DailyRollingAppender、RollingFileAppender、WriterAppender
# Layout: HTMLLayout、PatternLayout、SimpleLayout、TTCCLayout
# ConversionPattern: %m(message)、%p(TraceLevel)、%r(時間片-毫秒數)、%c(類名)、%t(線程號)、%n("n)、%d{DateFmt}(日期)、%l(全信息)
# log4j.appender.A2.File=dglog.txt
#
# log4j.appender.A2=org.apache.log4j.DailyRollingFileAppender
# log4j.appender.A2.file=dglog
# log4j.appender.A2.DatePattern='.'yyyy-MM-dd
# log4j.appender.A2.layout=org.apache.log4j.PatternLayout
# log4j.appender.A2.layout.ConversionPattern= %5r %-5p %c{2} - %m%n
#
# log4j.appender.R=org.apache.log4j.RollingFileAppender
# log4j.appender.R.File= dglog.log
# log4j.appender.R.MaxFileSize=100KB
# log4j.appender.R.MaxBackupIndex=30
# log4j.appender.R.layout=org.apache.log4j.PatternLayout
# log4j.appender.R.layout.ConversionPattern=%p %t %c - %m%n
#
log4j.rootLogger=ERROR,A1,A2
log4j.appender.A1=org.apache.log4j.ConsoleAppender
log4j.appender.A1.layout=org.apache.log4j.PatternLayout
log4j.appender.A1.layout.ConversionPattern=[%d{yyyy-MM-dd HH":mm":ss}] [%c %M] %-5p %c(line":%L) %x-%m%n
#
log4j.appender.A2=org.apache.log4j.RollingFileAppender
log4j.appender.A2.File=addressbook.log
log4j.appender.A2.MaxFileSize=1024KB
log4j.appender.A2.MaxBackupIndex=7
log4j.appender.A2.layout=org.apache.log4j.PatternLayout
log4j.appender.A2.layout.ConversionPattern=[%-5p] [%d{yyyy-MM-dd HH":mm":ss}] [%c %M] %c(line":%L) %x-%m%n
|
1.5 測試
發布應用到服務器,檢查服務器的日志信息,確認數據庫連接是否成功,是否缺少JAR包,日志輸出是否正常。
2 創建實體類及主鍵類
由于派生或替換實體類及主鍵類的可能性不大,因此對實體類及主鍵類不必定義接口。每個業務數據對象均需要設計實體類及主鍵類。此外,業務邏輯層與WEB層交換的model對象,如果無法使用數據庫實體,則也應為其定義一個實體類(例如進行多表數據編輯。――多表數據輸出則不必定義實體,只需要將多個實體對象放置到模型中即可)。
應注意的是,盡管實體的主鍵可能是單鍵,可以使用簡單數據類型,但考慮到編碼的一致性,建議統一使用主鍵類作為各實體的主鍵。
實體類與主鍵類通常放置到model包中,可以根據實體的數量和性質劃分更細的包。
實體類及主鍵類是普通的JavaBean,只包含數據及其構造方法、Setter和Getter方法,且實現Serializable接口。實體類及主鍵類必須定義無參構造方法、equals方法、hashCode方法,主鍵類應定義一個帶參構造方法。實體類及實體主鍵類必須對全部屬性進行初始化,確保各屬性的值合法,這可以避免很多意外的錯誤。
2.1 model.key.Address.AddressId
|
/*
* To change this template, choose Tools | Templates
* and open the template in the editor.
*/
package model.key.Address;
import java.io.Serializable;
/**
*
* @author
*/
public class AddressId implements Serializable
{
private String id = "";
public AddressId()
{
}
public AddressId(String id)
{
this.id = id.trim();
}
@Override
public boolean equals(Object obj)
{
if (obj == null)
{
return false;
}
if (getClass() != obj.getClass())
{
return false;
}
final AddressId other = (AddressId) obj;
if (this.id == null || !this.id.equals(other.id))
{
return false;
}
return true;
}
@Override
public int hashCode()
{
int hash = 5;
hash = 97 * hash + (this.id != null ? this.id.hashCode() : 0);
return hash;
}
public String getId()
{
return id.trim();
}
public void setId(String id)
{
this.id = id.trim();
}
}
|
2.2 model.entity.Address.Address
|
/*
* To change this template, choose Tools | Templates
* and open the template in the editor.
*/
package model.entity.Address;
import java.io.Serializable;
import model.key.Address.AddressId;
/**
*
* @author
*/
public class Address implements Serializable
{
private AddressId id = new AddressId("");
private String name = "";
private String password = "";
private String workphone = "";
private String homephone = "";
private String mobile = "";
public Address()
{
}
@Override
public boolean equals(Object obj)
{
if (obj == null)
{
return false;
}
if (getClass() != obj.getClass())
{
return false;
}
final Address other = (Address) obj;
if (this.id != other.id && (this.id == null || !this.id.equals(other.id)))
{
return false;
}
return true;
}
@Override
public int hashCode()
{
int hash = 3;
hash = 97 * hash + (this.id != null ? this.id.hashCode() : 0);
return hash;
}
public AddressId getid()
{
return id;
}
public void setid(AddressId id)
{
this.id = id;
}
public String getHomephone()
{
return homephone.trim();
}
public void setHomephone(String homephone)
{
this.homephone = homephone.trim();
}
public String getMobile()
{
return mobile.trim();
}
public void setMobile(String mobile)
{
this.mobile = mobile.trim();
}
public String getName()
{
return name.trim();
}
public void setName(String name)
{
this.name = name.trim();
}
public String getPassword()
{
return password.trim();
}
public void setPassword(String password)
{
this.password = password.trim();
}
public String getWorkphone()
{
return workphone.trim();
}
public void setWorkphone(String workphone)
{
this.workphone = workphone.trim();
}
}
|
注意:各屬性值的trim()可以避免變長字段很多意外情況的發生。
2.3 model/Address.hbm.xml
實體類的Hibernate映射文件放置到model目錄下(見1.4.2節的配置)。每個實體類一個文件。文件命令規則為實體類名.hbm.xml。
|
<?xml version="1.0"?>
<!DOCTYPE hibernate-mapping PUBLIC "-//Hibernate/Hibernate Mapping DTD 3.0//EN"
"http://hibernate.sourceforge.net/hibernate-mapping-3.0.dtd">
<hibernate-mapping>
<class name="model.entity.Address.Address" table="db_address"
dynamic-insert="true" dynamic-update="true" lazy="true">
<composite-id name="id" class="model.key.Address.AddressId">
<key-property name="id" type="string">
<column name="email" length="20" />
</key-property>
</composite-id>
<property name="name" type="string">
<column name="name" length="20" not-null="true" />
</property>
<property name="workphone" type="string">
<column name="workphone" length="20" not-null="true" />
</property>
<property name="homephone" type="string">
<column name="homephone" length="20" not-null="true" />
</property>
<property name="mobile" type="string">
<column name="mobile" length="20" not-null="true" />
</property>
<property name="password" type="string">
<column name="password" length="20" not-null="true" />
</property>
</class>
</hibernate-mapping>
|
2.4 WEB-INF/classes/applicationContext.xml
實體類通過其屬性存儲持久化數據,因此應是多例的。
|
<bean id="Address" class="model.entity.Address.Address" scope="prototype">
<property name="name" value= "name"/>
</bean>
<bean id="AddressId" class="model.key.Address.AddressId" scope="prototype">
<property name="id" value= "email"/>
</bean>
注意:增加屬性值的目的是為JUnit測試。
|
2.5 單元測試
Spring的spring-mock.jar提供了脫離Web容器的環境下測試Spring框架的功能,因此需將spring-mock.jar包加入測試包,并創建Spring測試類繼承AbstractTransactionalSpringContextTests類,覆蓋getConfigLocations()方法和runTest()方法。AbstractTransactionalSpringContextTests類提供了加載Spring環境的能力和數據庫事務管理能力,它會在測試結束時自動回滾測試中的數據庫事務,確保不會對數據形成影響。如果測試中需要提交數據庫事務,可以調用setComplete()或setDefaultRollback(boolean defaultRollback)。
2.5.1 Case.SpringTest
|
/*
* To change this template, choose Tools | Templates
* and open the template in the editor.
*/
package Case;
import model.entity.Address.Address;
import model.key.Address.AddressId;
import org.springframework.test.AbstractTransactionalSpringContextTests;
import static org.junit.Assert.*;
/**
*
* @author
*/
public class SpringTest extends AbstractTransactionalSpringContextTests
{
@Override
protected String[] getConfigLocations()
{
return new String [] {"classpath*:applicationContext.xml"};
}
public void TestEntity()
{
System.out.println("TestEntity() start ..");
System.out.println("AddressId ..");
AddressId id = (AddressId) applicationContext.getBean("AddressId");
assertNotNull(id);
assertEquals(id.getId(), "email");
System.out.println("Address ..");
Address address = (Address) applicationContext.getBean("Address");
assertNotNull(address);
assertEquals(address.getName(), "name");
System.out.println("TestEntiry() end.");
}
}
|
2.5.2 Test.JUnitTest
|
/*
* To change this template, choose Tools | Templates
* and open the template in the editor.
*/
package Test;
import Case.SpringTest;
import org.junit.Test;
import static org.junit.Assert.*;
/**
*
* @author
*/
public class JUnitTest
{
@Test
public void main() throws Throwable
{
System.out.println("Start Test ...");
SpringTest t = new SpringTest();
t.setName("TestEntiry");
t.runBare();
}
}
|
3 編寫實體類的持久化操作類及其接口
為簡化實體類的持久化操作類編寫,我們創建持久化基礎類完成大部分的持久化任務。各實體類的持久化類均繼承持久化基礎類。本例中的持久化任務是通過Hibernate完成的,因此持久化基礎類以Spring提供的事務和HibernateDaoSupport作為基礎的組件。網絡上有比較成熟的持久化基礎類,可以下載來使用。
為支持各個實體類,持久化基礎類使用了JDK5.0增加的泛性類。
持久化各類均放置在dao包中。
3.1 dao.GenericDao
|
/*
* To change this template, choose Tools | Templates
* and open the template in the editor.
*/
package dao;
import java.io.Serializable;
import java.util.List;
/**
*
* @author
*/
public interface GenericDao<T extends Serializable, PK extends Serializable>
{
public T Select(PK id);
public List<T> SelectAll();
public void Insert(T entity);
public void Update(T entity);
public void Delete(PK id);
}
|
3.2 dao.GenericHibernateDao
|
/*
* To change this template, choose Tools | Templates
* and open the template in the editor.
*/
package dao;
import java.io.Serializable;
import java.lang.reflect.ParameterizedType;
import java.lang.reflect.Type;
import java.util.List;
import org.springframework.orm.hibernate3.support.HibernateDaoSupport;
/**
*
* @author
*/
public class GenericHibernateDao<T extends Serializable, PK extends Serializable>
extends HibernateDaoSupport implements GenericDao<T,PK>
{
private Class<T> entityClass;
public GenericHibernateDao()
{
this.entityClass = null;
Class c = getClass();
Type t = c.getGenericSuperclass();
if(t instanceof ParameterizedType)
{
Type[] p = ((ParameterizedType) t).getActualTypeArguments();
this.entityClass = (Class) p[0];
}
}
public void Delete(PK id)
{
getHibernateTemplate().delete(this.Select(id));
}
public void Insert(T entity)
{
getHibernateTemplate().save(entity);
}
public void Update(T entity)
{
getHibernateTemplate().update(entity);
}
public T Select(Serializable id)
{
return (T) getHibernateTemplate().load(entityClass, id);
}
public List<T> SelectAll()
{
List<T> list;
list = getHibernateTemplate().loadAll(entityClass);
return list;
}
}
|
3.3 dao.AddressDao
實體持久化類接口繼承持久化基礎類接口,將泛性轉換為確定的實體類型。
|
/*
* To change this template, choose Tools | Templates
* and open the template in the editor.
*/
package dao;
import model.entity.Address.Address;
import model.key.Address.AddressId;
/**
*
* @author
*/
public interface AddressDao extends GenericDao<Address, AddressId>
{
}
|
3.4 dao.AddressDaoImp
實體持久化類繼承持久化基礎類,實現實體持久化類接口。
|
/*
* To change this template, choose Tools | Templates
* and open the template in the editor.
*/
package dao;
import model.entity.Address.Address;
import model.key.Address.AddressId;
/**
*
* @author
*/
public class AddressDaoImp extends GenericHibernateDao<Address, AddressId> implements AddressDao
{
}
|
3.5 WEB-INF/classes/applicationContext.xml
實體持久化類需在Spring的上下文配置中定義,以便業務邏輯類可以從Spring環境中獲取并使用。由于實體持久化類沒有存儲任何狀態數據,因此應使用單例模式。
|
<bean id="AddressDao" class="dao.AddressDaoImp">
<property name="sessionFactory">
<ref bean="sessionFactory"/>
</property>
</bean>
|
3.6 單元測試
持久化類的測試在實體類測試的基礎上進行,需在Spring測試類中增加持久化測試的相關內容。注意如果Dao類還沒有納入事務管理而hibernate配置實體是延遲加載的,則執行select時會出現could not initialize proxy - the owning Session was closed錯誤,此時可以臨時關閉實體類的延時加載選項或將Dao類納入事務管理(見2.5.1)。
3.6.1 Case.SpringTest
|
public void TestDao()
{
System.out.println("TestDao() start ..");
System.out.println("測試AddressDao配置 ..");
AddressDao dao = (AddressDao) applicationContext.getBean("AddressDao");
assertNotNull(dao);
System.out.println("測試AddressDao.insert() ..");
AddressId id = (AddressId) applicationContext.getBean("AddressId");
id.setId("_email");
Address address = (Address) applicationContext.getBean("Address");
address.setid(id);
address.setName("_name");
address.setHomephone("_homephone");
address.setWorkphone("_workphone");
address.setMobile("_mobile");
address.setPassword("_password");
dao.Insert(address);
System.out.println("測試AddressDao.select() ..");
address = dao.Select(id);
assertNotNull(address);
assertEquals(address.getid().getId(), "_email");
assertEquals(address.getName(), "_name");
assertEquals(address.getHomephone(), "_homephone");
assertEquals(address.getWorkphone(), "_workphone");
assertEquals(address.getMobile(), "_mobile");
assertEquals(address.getPassword(), "_password");
System.out.println("測試AddressDao.update() ..");
address.setName("_newname");
dao.Update(address);
Address addressnew = dao.Select(id);
assertNotNull(addressnew);
assertEquals(address.getName(), addressnew.getName());
System.out.println("測試AddressDao.delete() ..");
dao.Delete(id);
System.out.println("TestDao() end.");
}
|
注意:測試時Spring會自動執行回滾操作取消對數據庫的更改。但如果需要在數據庫存儲測試的數據,結束測試前可以調用setComplete()提交數據庫事務。
3.6.2 Test.JUnitTest
|
@Test
public void main() throws Throwable
{
System.out.println("Start Test ...");
SpringTest t = new SpringTest();
t.setName("TestDao");
t.runBare();
}
|
4 編寫業務邏輯類及其接口
業務邏輯類從界面獲取數據,進行業務處理后存儲到數據庫;或接受界面的請求,從數據庫獲取數據提交給界面操作。業務邏輯和實體類、Dao類均存在交互。由于實體類是多例的,Dao類是單例的,為減少系統的開銷,盡量將業務邏輯類設計為單例的,因此業務邏輯類可以使用Dao類、其他單例類作為屬性,但不能使用實體類作為屬性。實體類只能在方法中或參數中、Session環境中使用。
為避免重復設計通用化的業務功能部分,建議設計業務邏輯基礎類作為其他業務邏輯類的基類,并定義相應的接口。基礎類是抽象類,因此不必在Spring中進行配置(因為不會創建其實例)。
業務邏輯類放置到business包及其子包。
4.1 business.GenericService
|
/*
* To change this template, choose Tools | Templates
* and open the template in the editor.
*/
package business;
/**
*
* @author
*/
public interface GenericService
{
}
|
4.2 business.GenericServiceImp
|
/*
* To change this template, choose Tools | Templates
* and open the template in the editor.
*/
package business;
/**
*
* @author
*/
public class GenericServiceImp implements GenericService
{
}
|
4.3 business.Address.AddressService
|
/*
* To change this template, choose Tools | Templates
* and open the template in the editor.
*/
package business.Address;
import business.GenericService;
import java.util.List;
import model.entity.Address.Address;
import model.key.Address.AddressId;
/**
*
* @author
*/
public interface AddressService extends GenericService
{
public void save(Address address);
public Address select(AddressId id);
public List<Address> selectAll();
public void update(Address address);
public void delete(AddressId id);
}
|
4.4 business.Address.AddressServiceImp
|
/*
* To change this template, choose Tools | Templates
* and open the template in the editor.
*/
package business.Address;
import business.GenericServiceImp;
import dao.AddressDao;
import java.util.List;
import model.entity.Address.Address;
import model.key.Address.AddressId;
import org.hibernate.Hibernate;
/**
*
* @author
*/
public class AddressServiceImp extends GenericServiceImp implements AddressService
{
private AddressDao dao;
public void setDao(AddressDao dao)
{
this.dao = dao;
}
public void save(Address address)
{
dao.Insert(address);
}
public Address select(AddressId id)
{
Address address = dao.Select(id);
Hibernate.initialize(address);
return address;
}
public List<Address> selectAll()
{
List<Address> list = dao.SelectAll();
Hibernate.initialize(list);
return list;
}
public void update(Address address)
{
dao.Update(address);
}
public void delete(AddressId id)
{
dao.Delete(id);
}
}
|
注意:由于實體類配置為延遲加載的(見2.3),即從數據庫獲取時Hibernate為提高性能,僅返回了實體的代理對象,當應用訪問代理對象的數據時,才真正從數據庫檢索數據。為避免延遲檢索數據時出現could not initialize proxy - the owning Session was closed,本例中使用Hibernate. initialize()代理業務邏輯操作,模擬業務邏輯中的使用代理對象數據,以便該實例數據能夠被Hibernate從數據庫中加載。
4.5 WEB-INF/classes/applicationContext.xml
業務邏輯類我們將實施Spring的配置化事務,因此其配置應擴展txProxyTemplate的配置,同時應注意業務邏輯類的方法命名應匹配txProxyTemplate定義的方法名,否則Spring無法使用AOP機制插入事務處理。
|
<bean id="AddressServiceTarget" class="business.Address.AddressServiceImp">
<property name="dao">
<ref bean="AddressDao"/>
</property>
</bean>
<bean id="AddressService" parent="txProxyTemplate">
<property name="target">
<ref bean="AddressServiceTarget"/>
</property>
</bean>
|
4.6 單元測試
4.6.1 Case.SpringTest
|
public void TestService()
{
System.out.println("TestService() start ..");
System.out.println("測試AddressService配置 ..");
AddressService svr = (AddressService) applicationContext.getBean("AddressService");
assertNotNull(svr);
System.out.println("測試AddressService.save() ..");
AddressId id = (AddressId) applicationContext.getBean("AddressId");
id.setId("_email");
Address address = (Address) applicationContext.getBean("Address");
address.setid(id);
address.setName("_name");
address.setHomephone("_homephone");
address.setWorkphone("_workphone");
address.setMobile("_mobile");
address.setPassword("_password");
svr.save(address);
System.out.println("測試AddressService.select() ..");
address = svr.select(id);
assertNotNull(address);
assertEquals(address.getid().getId(), "_email");
assertEquals(address.getName(), "_name");
assertEquals(address.getHomephone(), "_homephone");
assertEquals(address.getWorkphone(), "_workphone");
assertEquals(address.getMobile(), "_mobile");
assertEquals(address.getPassword(), "_password");
System.out.println("測試AddressService.update() ..");
address.setName("_newname");
svr.update(address);
Address addressnew = svr.select(id);
assertNotNull(addressnew);
assertEquals(address.getName(), addressnew.getName());
// this.setComplete();
System.out.println("測試AddressService.delete() ..");
svr.delete(id);
System.out.println("TestService() end.");
}
|
4.6.2 Test.JUnitTest
|
@Test
public void main() throws Throwable
{
System.out.println("Start Test ...");
SpringTest t = new SpringTest();
t.setName("TestService");
t.runBare();
}
|
5 編寫Web界面操作類
本例中使用Spring作為Web界面部分,功能也很簡單,僅提供Address實體的CRUD操作功能。Spring提供了一套創建Web MVC的類,本例中M使用實體類的實體,V使用JSP文件,輸入型視圖的C繼承Spring的SimpleFormController,輸出型視圖的C實現Spring的Controller。
Spring的WEB MVC的關系圖如下:
5.1 配置Spring Web MVC
Spring Web MVC需在Web.xml中配置Spring前端控制器Servlet及地址映射,同時增加Web MVC自己的上下文配置文件。
5.1.1 WEB-INF/web.xml
配置web.xml裝載Spring WEB的控制器及其上下文配置,定義地址匹配,以及字符集編碼轉換。
|
<servlet>
<servlet-name>AddressBookWeb</servlet-name>
<servlet-class>
org.springframework.web.servlet.DispatcherServlet
</servlet-class>
<init-param>
<param-name>contextConfigLocation</param-name>
<param-value>/WEB-INF/applicationContext-web.xml</param-value>
</init-param>
</servlet>
<servlet-mapping>
<servlet-name>AddressBookWeb</servlet-name>
<url-pattern>*.do</url-pattern>
</servlet-mapping>
<filter>
<filter-name>encodingFilter</filter-name>
<filter-class>
org.springframework.web.filter.CharacterEncodingFilter
</filter-class>
<init-param>
<param-name>encoding</param-name>
<param-value>GB18030</param-value>
</init-param>
<init-param>
<param-name>forceEncoding</param-name>
<param-value>true</param-value>
</init-param>
</filter>
<filter-mapping>
<filter-name>encodingFilter</filter-name>
<servlet-name>AddressBookWeb</servlet-name>
<url-pattern>*.do</url-pattern>
</filter-mapping>
|
5.1.2 WEB-INF/applicationContext-web.xml
本文件配置活動類、視圖、模型、校驗器等。
|
<?xml version="1.0" encoding="UTF-8"?>
<beans xmlns="http://www.springframework.org/schema/beans"
xmlns:xsi="http://www.w3.org/2001/XMLSchema-instance"
xmlns:aop="http://www.springframework.org/schema/aop"
xsi:schemaLocation=
"http://www.springframework.org/schema/beans
http://www.springframework.org/schema/beans/spring-beans.xsd
http://www.springframework.org/schema/aop
http://www.springframework.org/schema/aop/spring-aop.xsd">
<bean id="viewResolver"
class="org.springframework.web.servlet.view.InternalResourceViewResolver">
<property name="viewClass">
<value>org.springframework.web.servlet.view.JstlView</value>
</property>
<property name="prefix">
<value>/WEB-INF/jsp/</value>
</property>
<property name="suffix">
<value>.jsp</value>
</property>
</bean>
<bean id="urlMapping"
class="org.springframework.web.servlet.handler.SimpleUrlHandlerMapping">
<property name="mappings">
<props>
<prop key="/append.do">AppendAction</prop>
<prop key="/select.do">SelectAction</prop>
<prop key="/delete.do">DeleteAction</prop>
<prop key="/update.do">UpdateAction</prop>
<prop key="/doUpdate.do">doUpdateAction</prop>
</props>
</property>
</bean>
<!-- Application custom configure --->
<bean id="AppendAction" class="web.inAction.AppendAction">
<property name="sessionForm"><value>true</value></property>
<property name="commandName"><value>Address</value></property>
<property name="commandClass">
<value>model.entity.Address.Address</value>
</property>
<property name="formView"><value>append</value></property>
<property name="successView"><value>show</value></property>
<property name="svr">
<ref bean="AddressService" />
</property>
</bean>
<bean id="SelectAction" class="web.inAction.SelectAction">
<property name="sessionForm"><value>true</value></property>
<property name="commandName"><value>AddressId</value></property>
<property name="commandClass">
<value>model.key.Address.AddressId</value>
</property>
<property name="formView"><value>select</value></property>
<property name="successView"><value>show</value></property>
<property name="svr">
<ref bean="AddressService" />
</property>
</bean>
<bean id="UpdateAction" class="web.inAction.UpdateAction">
<property name="sessionForm"><value>true</value></property>
<property name="commandName"><value>AddressId</value></property>
<property name="commandClass">
<value>model.key.Address.AddressId</value>
</property>
<property name="formView"><value>update</value></property>
<property name="successView"><value>doUpdate.do</value></property>
<property name="svr">
<ref bean="AddressService" />
</property>
</bean>
<bean id="doUpdateAction" class="web.inAction.doUpdateAction">
<property name="sessionForm"><value>true</value></property>
<property name="commandName"><value>Address</value></property>
<property name="commandClass">
<value>model.entity.Address.Address</value>
</property>
<property name="formView"><value>modify</value></property>
<property name="successView"><value>show</value></property>
<property name="svr">
<ref bean="AddressService" />
</property>
</bean>
<bean id="DeleteAction" class="web.inAction.DeleteAction">
<property name="sessionForm"><value>true</value></property>
<property name="commandName"><value>AddressId</value></property>
<property name="commandClass"><value>model.key.Address.AddressId</value></property>
<property name="formView"><value>delete</value></property>
<property name="successView"><value>show</value></property>
<property name="svr">
<ref bean="AddressService" />
</property>
</bean>
</beans>
|
注意:此處注冊的Action Bean應與后續開發的活動類配套,而且ActionBean僅使用業務邏輯層對象作屬性。ActionBean應設計為單例的。由于Web訪問的并發性,因此ActionBean應注意使用的model應是Session級別的。如果model中包含了非Session或多例的bean時,操作model的該段代碼應實施多線程保護。設計ActionBean時,應避免在model中使用單例對象,除非確有必要。
如果需要在多個ActionBean中共享或交換數據,可以將該數據放置到請求的屬性、參數或Session環境中,通過HttpServletRequest的屬性getAttribute()或參數getParameter()或arg0.getSession().getAttribute()進行訪問。
5.2 編寫Web活動類
活動類放置到web包。
5.2.1 web.inAction.inGenericAction
|
/*
* To change this template, choose Tools | Templates
* and open the template in the editor.
*/
package web.inAction;
import org.springframework.web.servlet.mvc.SimpleFormController;
/**
*
* @author
*/
public class inGenericAction extends SimpleFormController
{
}
|
5.2.2 web.outAction.outGenericAction
|
/*
* To change this template, choose Tools | Templates
* and open the template in the editor.
*/
package web.outAction;
import javax.servlet.http.HttpServletRequest;
import javax.servlet.http.HttpServletResponse;
import org.springframework.web.servlet.ModelAndView;
import org.springframework.web.servlet.mvc.Controller;
/**
*
* @author
*/
public class outGenericAction implements Controller
{
public ModelAndView handleRequest(HttpServletRequest arg0, HttpServletResponse arg1) throws Exception
{
throw new UnsupportedOperationException("Not supported yet.");
}
}
|
5.2.3 web.inAction.SelectAction
SelectAction根據select.jsp輸入的AddressId的email值,從數據庫檢索數據,存儲在show.jsp的模型中,供show.jsp顯示。如果沒有指定值,則檢索全部數據。
|
/*
* To change this template, choose Tools | Templates
* and open the template in the editor.
*/
package web.inAction;
import business.Address.AddressService;
import java.util.HashMap;
import java.util.List;
import java.util.Vector;
import model.entity.Address.Address;
import model.key.Address.AddressId;
import org.springframework.web.servlet.ModelAndView;
/**
*
* @author
*/
public class SelectAction extends inGenericAction
{
private AddressService svr;
public void setSvr(AddressService svr)
{
this.svr = svr;
}
@Override
protected ModelAndView onSubmit(Object arg0)
{
List<Address> list;
AddressId id = (AddressId) arg0;
try
{
if(id.getId().equals(""))
{
list = svr.selectAll();
}
else
{
list = new Vector<Address>();
Address address = svr.select(id);
list.add(address);
}
}
catch(Exception e)
{
list = new Vector<Address>();
}
HashMap model = new HashMap();
model.put("AddressList", list);
return new ModelAndView(getSuccessView(), model);
}
}
|
注意:此處是Action返回視圖,而非重新定向,因此model是輸出的一部分,供Spring生成輸出視圖時使用。
5.2.4 web.inAction.AppendAction
AppendAction根據append.jsp視圖輸入的數據,創建Address對象,調用業務邏輯類將其存儲到數據庫中,然后從數據庫獲取全部數據,提交給show.jsp視圖顯示。
Spring 視圖與控制間可以交換一個命令對象,如果需要從界面輸入多個對象的值時,可以創建一個界面輸入專用的實體類,或者將部分對象的值通過沒有綁定的單獨變量存儲(這些值成為HttpServletRequest的屬性或參數),在提交處理中賦值給相應的對象。
|
.jsp
<td>email:</td>
<td>
<input type="text" name="_PK" value="">
</td>
.java
String id = (String) arg0.getParameter("_PK");
|
本活動類定義的命令對象是Address。但Address類的主鍵是AddressId類,必須進行初始化,否則生成輸入界面時報錯。
|
/*
* To change this template, choose Tools | Templates
* and open the template in the editor.
*/
package web.inAction;
import business.Address.AddressService;
import java.util.HashMap;
import java.util.List;
import java.util.Map;
import javax.servlet.http.HttpServletRequest;
import javax.servlet.http.HttpServletResponse;
import model.entity.Address.Address;
import model.key.Address.AddressId;
import org.springframework.validation.BindException;
import org.springframework.validation.Errors;
import org.springframework.web.servlet.ModelAndView;
/**
*
* @author
*/
public class AppendAction extends inGenericAction
{
private AddressService svr;
public void setSvr(AddressService svr)
{
this.svr = svr;
}
@Override
protected Map referenceData(HttpServletRequest arg0, Object arg1, Errors arg2) throws Exception
{
Address address = (Address) arg1;
address.setid(new AddressId(""));
address.setName("");
address.setHomephone("");
address.setWorkphone("");
address.setMobile("");
address.setPassword("");
return null;
}
@Override
protected ModelAndView onSubmit(HttpServletRequest arg0, HttpServletResponse arg1, Object arg2, BindException arg3) throws Exception
{
Address address = (Address) arg2;
svr.save(address);
List<Address> list = svr.selectAll();
HashMap model = new HashMap();
model.put("AddressList", list);
return new ModelAndView(getSuccessView(), model);
}
}
|
5.2.5 web.inAction.UpdateAction
UpdateAction分兩個步驟,第1步驟從界面獲取要修改的email;第2步驟根據email從數據庫檢索數據供編輯。
本步驟將界面指定的email存儲在新視圖的模型中,然后重定向到編輯界面。此處使用session屬性傳遞參數,還可以使用HttpServletRequest參數傳遞。
|
/*
* To change this template, choose Tools | Templates
* and open the template in the editor.
*/
package web.inAction;
import business.Address.AddressService;
import java.util.HashMap;
import javax.servlet.http.HttpServletRequest;
import javax.servlet.http.HttpServletResponse;
import model.entity.Address.Address;
import model.key.Address.AddressId;
import org.springframework.validation.BindException;
import org.springframework.web.servlet.ModelAndView;
import org.springframework.web.servlet.view.RedirectView;
/**
*
* @author
*/
public class UpdateAction extends inGenericAction
{
private AddressService svr;
public void setSvr(AddressService svr)
{
this.svr = svr;
}
@Override
protected ModelAndView onSubmit(HttpServletRequest arg0, HttpServletResponse arg1, Object arg2, BindException arg3) throws Exception
{
AddressId id = (AddressId) arg2;
HashMap model = new HashMap();
arg0.getSession().setAttribute("AddressId", id);
return new ModelAndView(new RedirectView(getSuccessView()), model);
}
}
|
5.2.6 web.inAction.doUpdateAction
本步驟先從模型中得到email,然后根據email從數據庫檢索address數據供編輯,然后將編輯的數據存儲到數據庫。
|
/*
* To change this template, choose Tools | Templates
* and open the template in the editor.
*/
package web.inAction;
import business.Address.AddressService;
import java.util.HashMap;
import java.util.List;
import java.util.Map;
import javax.servlet.http.HttpServletRequest;
import javax.servlet.http.HttpServletResponse;
import model.entity.Address.Address;
import model.key.Address.AddressId;
import model.key.Address.AddressId;
import model.key.Address.AddressId;
import org.springframework.validation.BindException;
import org.springframework.validation.Errors;
import org.springframework.web.servlet.ModelAndView;
/**
*
* @author
*/
public class doUpdateAction extends inGenericAction
{
private AddressService svr;
public void setSvr(AddressService svr)
{
this.svr = svr;
}
@Override
protected Map referenceData(HttpServletRequest arg0, Object arg1, Errors arg2) throws Exception
{
Address address = (Address) arg1;
AddressId id = (AddressId) arg0.getSession().getAttribute("AddressId");
Address old = svr.select(id);
address.setid(old.getid());
address.setName(old.getName());
address.setHomephone(old.getHomephone());
address.setWorkphone(old.getWorkphone());
address.setMobile(old.getMobile());
address.setPassword(old.getPassword());
return null;
}
@Override
protected ModelAndView onSubmit(HttpServletRequest arg0, HttpServletResponse arg1, Object arg2, BindException arg3) throws Exception
{
Address address = (Address) arg2;
svr.update(address);
List<Address> list = svr.selectAll();
HashMap model = new HashMap();
model.put("AddressList", list);
return new ModelAndView(getSuccessView(), model);
}
}
|
5.2.7 web.inAction.DeleteAction
|
/*
* To change this template, choose Tools | Templates
* and open the template in the editor.
*/
package web.inAction;
import business.Address.AddressService;
import java.util.HashMap;
import java.util.List;
import java.util.Vector;
import model.entity.Address.Address;
import model.key.Address.AddressId;
import org.springframework.web.servlet.ModelAndView;
/**
*
* @author
*/
public class DeleteAction extends inGenericAction
{
private AddressService svr;
public void setSvr(AddressService svr)
{
this.svr = svr;
}
@Override
protected ModelAndView onSubmit(Object arg0)
{
List<Address> list;
AddressId id = (AddressId) arg0;
try
{
if(!id.getId().equals(""))
{
svr.delete(id);
}
list = svr.selectAll();
}
catch(Exception e)
{
list = new Vector<Address>();
}
HashMap model = new HashMap();
model.put("AddressList", list);
return new ModelAndView(getSuccessView(), model);
}
}
|
5.3 編寫視圖
本例使用JSP作為視圖。非Spring管理的視圖應放置到WebRoot的相對各目錄下。由Spring管理的視圖,應放置到WEB-INF/jsp目錄下(參見5.1.2配置)。
5.3.1 WebRoot/index.jsp
index.jsp提供執行增加、修改、刪除、檢索的連接,應放置到WebRoot。
|
<%@page contentType="text/html;charset=GB18030"%>
<html>
<head>
<title>AddressBook Application</title>
</head>
<body>
<h2 align="center">AddressBook Application</h2>
<hr width="100%" size="2">
<a href="select.do">檢索</a>
<a href="append.do">添加</a>
<a href="update.do">修改</a>
<a href="delete.do">刪除</a>
</body>
</html>
|
5.3.2 WEB-INF/jsp/select.jsp
select.jsp提供檢索條件輸入。
|
<%@page contentType="text/html" pageEncoding="GB18030"%>
<%@taglib prefix="c" uri="http://java.sun.com/jsp/jstl/core" %>
<%@taglib prefix="fmt" uri="http://java.sun.com/jsp/jstl/fmt" %>
<%@taglib prefix="spring" uri="http://www.springframework.org/tags" %>
<%@taglib prefix="form" uri="http://www.springframework.org/tags/form" %>
<html>
<head><title>Select Address</title></head>
<body><font size="6"><strong>
Which email do you want to select?</strong></font>
<form method="post">
<table width="440" height="27">
<tr>
<td>email:</td>
<td>
<spring:bind path="AddressId.id">
<input type="text" name="${status.expression}" value="${status.value}">
</spring:bind>
<input type="submit" alignment="center" value="Select"> </td>
</tr>
</table>
</form>
</body>
</html>
|
path定義視圖的模型。
注意:如果實體類沒有初始化其各屬性,且Action也沒有調用referenceData()初始化該對象的各屬性,則不能指定綁定路徑為AddressId.id,也不能在<input>的name項使用${status.expression}。
5.3.3 WEB-INF/jsp/show.jsp
Show.jsp顯示獲取的Address數據。其數據均由其他Action類從數據庫獲取后填寫到其模型中,供Show.jsp輸出。此視圖是所有活動的輸出視圖,只使用了JTSL標記庫。
|
<%@ page session="false"%>
<%@ taglib prefix="c" uri="http://java.sun.com/jsp/jstl/core" %>
<%@ taglib prefix="spring" uri="http://www.springframework.org/tags" %>
<html>
<head><title>Selected Address List</title></head>
<body>
<h2 align="center">Selected Address List</h2><hr width="100%" size="2">
<table width="733" border="1" height="56">
<tbody>
<tr>
<td><strong>Email</strong></td>
<td><strong>Name</strong></td>
<td><strong>HomePhone</strong></td>
<td><strong>WorkPhone</strong></td>
<td><strong>Mobile</strong></td>
<td><strong>Password</strong></td>
</tr>
<c:forEach items="${AddressList}" var="address">
<tr>
<td><c:out value="${address.id.id}" /> </td>
<td><c:out value="${address.name}" /></td>
<td><c:out value="${address.homephone}" /></td>
<td><c:out value="${address.workphone}" /></td>
<td> <c:out value="${address.mobile}" /></td>
<td><c:out value="${address.password}" /> </td>
</tr>
</c:forEach>
</tbody>
</table>
</body>
</html>
|
5.3.4 WEB-INF/jsp/append.jsp
|
<%@page contentType="text/html;charset=GB18030"%>
<%@taglib prefix="c" uri="http://java.sun.com/jsp/jstl/core" %>
<%@taglib prefix="fmt" uri="http://java.sun.com/jsp/jstl/fmt" %>
<%@taglib prefix="spring" uri="http://www.springframework.org/tags" %>
<%@taglib prefix="form" uri="http://www.springframework.org/tags/form" %>
<html>
<head>
<title>AddressBook Application</title>
</head>
<body><font size="6">
<strong>Append New Address</strong></font>
<spring:hasBindErrors name="Address">
<br>
<spring:bind path="Address.*">
<font color="red">
<b>${status.errorMessage}</b>
</font><br>
</spring:bind>
<br>
</spring:hasBindErrors>
<form method="post">
<table width="440" height="27">
<tr>
<td>email:</td>
<td>
<spring:bind path="Address.id.id">
<input type="text" name="${status.expression}" value="${status.value}">
</spring:bind>
</td>
</tr>
<tr>
<td>name:</td>
<td>
<spring:bind path="Address.name">
<input type="text" name="${status.expression}" value="${status.value}">
</spring:bind>
</td>
</tr>
<tr>
<td>workphone:</td>
<td>
<spring:bind path="Address.workphone">
<input type="text" name="${status.expression}" value="${status.value}">
</spring:bind>
</td>
</tr>
<tr>
<td>homephone:</td>
<td>
<spring:bind path="Address.homephone">
<input type="text" name="${status.expression}" value="${status.value}">
</spring:bind>
</td>
</tr>
<tr>
<td>mobile:</td>
<td>
<spring:bind path="Address.mobile">
<input type="text" name="${status.expression}" value="${status.value}">
</spring:bind>
</td>
</tr>
<tr>
<td>password:</td>
<td>
<spring:bind path="Address.password">
<input type="text" name="${status.expression}" value="${status.value}">
</spring:bind>
</td>
</tr>
<tr>
<input type="submit" alignment="center" value="Append">
</tr>
</table>
</form>
</body>
</html>
|
5.3.5 WEB-INF/jsp/update.jsp
|
<%@page contentType="text/html" pageEncoding="GB18030"%>
<%@taglib prefix="c" uri="http://java.sun.com/jsp/jstl/core" %>
<%@taglib prefix="fmt" uri="http://java.sun.com/jsp/jstl/fmt" %>
<%@taglib prefix="spring" uri="http://www.springframework.org/tags" %>
<%@taglib prefix="form" uri="http://www.springframework.org/tags/form" %>
<html>
<head><title>Select Address</title></head>
<body><font size="6"><strong>
Which email do you want to update?</strong></font>
<form method="post">
<table width="440" height="27">
<tr>
<td>email:</td>
<td>
<spring:bind path="AddressId">
<input type="text" name="${status.expression}" value="${status.value}">
</spring:bind>
<input type="submit" alignment="center" value="Update"> </td>
</tr>
</table>
</form>
</body>
</html>
|
5.3.6 WEB-INF/jsp/modify.jsp
|
<%@page contentType="text/html" pageEncoding="GB18030"%>
<%@taglib prefix="c" uri="http://java.sun.com/jsp/jstl/core" %>
<%@taglib prefix="fmt" uri="http://java.sun.com/jsp/jstl/fmt" %>
<%@taglib prefix="spring" uri="http://www.springframework.org/tags" %>
<%@taglib prefix="form" uri="http://www.springframework.org/tags/form" %>
<html>
<head><title>Modify Address</title></head>
<body><font size="6">
<strong>Modify Address</strong></font>
<spring:hasBindErrors name="Address">
<br>
<spring:bind path="Address.*">
<font color="red">
<b>${status.errorMessage}</b>
</font><br>
</spring:bind>
<br>
</spring:hasBindErrors>
<form method="post">
<table width="440" height="27">
<tr>
<td>email:</td>
<td>
<spring:bind path="Address.id.id">
<input type="text" name="${status.expression}" value="${status.value}" disabled>
</spring:bind>
</td>
</tr>
<tr>
<td>name:</td>
<td>
<spring:bind path="Address.name">
<input type="text" name="${status.expression}" value="${status.value}">
</spring:bind>
</td>
</tr>
<tr>
<td>workphone:</td>
<td>
<spring:bind path="Address.workphone">
<input type="text" name="${status.expression}" value="${status.value}">
</spring:bind>
</td>
</tr>
<tr>
<td>homephone:</td>
<td>
<spring:bind path="Address.homephone">
<input type="text" name="${status.expression}" value="${status.value}">
</spring:bind>
</td>
</tr>
<tr>
<td>mobile:</td>
<td>
<spring:bind path="Address.mobile">
<input type="text" name="${status.expression}" value="${status.value}">
</spring:bind>
</td>
</tr>
<tr>
<td>password:</td>
<td>
<spring:bind path="Address.password">
<input type="text" name="${status.expression}" value="${status.value}">
</spring:bind>
</td>
</tr>
<tr>
<input type="submit" alignment="center" value="Modify">
</tr>
</table>
</form>
</body>
</html>
|
5.3.7 WEB-INF/jsp/delete.jsp
|
<%@ page language="java" pageEncoding="GB18030"%>
<%@taglib prefix="c" uri="http://java.sun.com/jsp/jstl/core" %>
<%@taglib prefix="fmt" uri="http://java.sun.com/jsp/jstl/fmt" %>
<%@taglib prefix="spring" uri="http://www.springframework.org/tags" %>
<%@taglib prefix="form" uri="http://www.springframework.org/tags/form" %>
<html lang="true">
<head><title>Select Address</title></head>
<body><font size="6"><strong>
Which email do you want to delete?</strong></font>
<form method="post">
<table width="440" height="27">
<tr>
<td>email:</td>
<spring:bind path="AddressId.id">
<input type="text" name="${status.expression}" value="${status.value}">
</spring:bind>
<input type="submit" alignment="center" value="Delete">
</tr>
</table>
</form>
</body>
</html>
|
6 編寫WebService類(給瘦客戶端)
本例使用JAX-WS作為WebService的發布工具。
由于WebService調用業務邏輯類完成業務處理,而業務邏輯類是由Spring管理的,因此必須將JAX-WS與Spring進行集成。(如果在WebService中脫離Spring管理直接創建業務邏輯類對象,由于業務邏輯類缺少Spring賦予的依賴關系,將導致創建的業務邏輯類對象無法工作或無法使用Spring環境的其他特性,如配置式事務)。
將JAX-WS與Spring進行集成,方法一就是在WebService中獲取Spring的applicationContext,然后通過applicationContext訪問Spring環境的各對象。方法二是使用jaxws-spring.jar工具包。該包使用com.sun.xml.ws.transport.http. servlet.WSSpringServlet替換JAX-WS默認的com.sun.xml.ws.transport.http. servlet .WSServlet,實現在Spring環境下創建WebService對象,從而使得WebService對象可以訪問Spring環境的其他對象,包括業務邏輯類對象。jaxws-spring.jar需要xbean-spring.jar作為支持包。
方法一可以在Tomcat和glassfish中使用,但WebService對象本身是脫離Spring管理的,因此不能使用Spring的各種服務,只能通過applicationContext訪問Spring環境中的對象。方法二WebService對象本身是受Spring管理的,因此可以使用Spring的各種服務,但在glassfish不支持此模式。本例中使用方法一即可滿足要求。
6.1 方法一
6.1.1 Tomcat
使用netbeans創建AddressWebService,如果運行環境是Tomcat,則netbeans創建JAX-WS WebService時,會自動進行下列修改:
6.1.1.1 WEB-INF/web.xml
Web.xml增加JAX-WS的監聽器、Servlet及地址映射。
|
<listener>
<listener-class>
com.sun.xml.ws.transport.http.servlet.WSServletContextListener
</listener-class>
</listener>
<servlet>
<servlet-name>AddressWebService</servlet-name>
<servlet-class>
com.sun.xml.ws.transport.http.servlet.WSServlet
</servlet-class>
<load-on-startup>1</load-on-startup>
</servlet>
<servlet-mapping>
<servlet-name>AddressWebService</servlet-name>
<url-pattern>/AddressWebService</url-pattern>
</servlet-mapping>
|
6.1.1.2 WEB-INF/sun-jaxws.xml
JAX-WS使用本文件配置環境中存在的WebService,而該WebService具有的功能(WSDL),則是根據Java 5風格的注釋信息自動生成的。
|
<?xml version="1.0" encoding="UTF-8"?>
<endpoints version="2.0" xmlns="http://java.sun.com/xml/ns/jax-ws/ri/runtime">
<endpoint implementation="websrv.AddressWebService" name="AddressWebService" url-pattern="/AddressWebService"/>
</endpoints>
|
6.1.1.3 websrv/AddressWebService
本例中我們創建下列服務:
l public Address Select(AddressId id);
l public void Delete(AddressId id);
l public void Append(Address address);
l public void Modify(Address address);
l public List<Address> SelectAll().
|
/*
* To change this template, choose Tools | Templates
* and open the template in the editor.
*/
package websrv;
import business.Address.AddressService;
import java.util.List;
import javax.annotation.Resource;
import javax.jws.Oneway;
import javax.jws.WebMethod;
import javax.jws.WebParam;
import javax.jws.WebService;
import javax.servlet.ServletContext;
import javax.xml.ws.WebServiceContext;
import javax.xml.ws.handler.MessageContext;
import model.entity.Address.Address;
import model.key.Address.AddressId;
import org.springframework.web.context.WebApplicationContext;
import org.springframework.web.context.support.WebApplicationContextUtils;
/**
*
* @author
*/
@WebService()
public class AddressWebService
{
@Resource
private WebServiceContext context;
/**
* Select Address from database.
* @param id
* @return
*/
@WebMethod(operationName = "Select")
public Address Select(@WebParam(name = "id") AddressId id)
{
ServletContext servletContext = (ServletContext) context.getMessageContext().get(MessageContext.SERVLET_CONTEXT);
WebApplicationContext applicationContext = WebApplicationContextUtils.getRequiredWebApplicationContext(servletContext);
AddressService svr = (AddressService) applicationContext.getBean("AddressService");
Address address = svr.select(id);
return address;
}
/**
* Web service operation
* @param address
*/
@WebMethod(operationName = "Update")
public void Update(@WebParam(name = "address") Address address)
{
ServletContext servletContext = (ServletContext) context.getMessageContext().get(MessageContext.SERVLET_CONTEXT);
WebApplicationContext applicationContext = WebApplicationContextUtils.getRequiredWebApplicationContext(servletContext);
AddressService svr = (AddressService) applicationContext.getBean("AddressService");
svr.update(address);
}
/**
* Web service operation
* @param address
*/
@WebMethod(operationName = "Insert")
public void Insert(@WebParam(name = "address") Address address)
{
ServletContext servletContext = (ServletContext) context.getMessageContext().get(MessageContext.SERVLET_CONTEXT);
WebApplicationContext applicationContext = WebApplicationContextUtils.getRequiredWebApplicationContext(servletContext);
AddressService svr = (AddressService) applicationContext.getBean("AddressService");
svr.save(address);
}
/**
* Web service operation
* @param id
*/
@WebMethod(operationName = "Delete")
public void Delete(@WebParam(name = "id") AddressId id)
{
ServletContext servletContext = (ServletContext) context.getMessageContext().get(MessageContext.SERVLET_CONTEXT);
WebApplicationContext applicationContext = WebApplicationContextUtils.getRequiredWebApplicationContext(servletContext);
AddressService svr = (AddressService) applicationContext.getBean("AddressService");
svr.delete(id);
}
/**
* Web service operation
* @return
*/
@WebMethod(operationName = "SelectAll")
public List<Address> SelectAll()
{
ServletContext servletContext = (ServletContext) context.getMessageContext().get(MessageContext.SERVLET_CONTEXT);
WebApplicationContext applicationContext = WebApplicationContextUtils.getRequiredWebApplicationContext(servletContext);
AddressService svr = (AddressService) applicationContext.getBean("AddressService");
return svr.selectAll();
}
}
|
@resource注釋指示容器創建WebService對象時自動將指定的資源注入對象中。
6.1.2 glassfish
glassfish自身包含了JAX-WS包,部署在glassfish時不必使用JAX-WS包,而且不必加載JAX-WS的Servlet。調整如下:
(1) 刪除JAX-WS包;
(2) 編輯WEB-INF/web.xml取消JAX-WS的監聽器、Servlet、地址映射;
|
<!--
<listener>
<listener-class>
com.sun.xml.ws.transport.http.servlet.WSServletContextListener
</listener-class>
</listener>
<servlet>
<servlet-name>AddressWebService</servlet-name>
<servlet-class>
com.sun.xml.ws.transport.http.servlet.WSServlet
</servlet-class>
<load-on-startup>0</load-on-startup>
</servlet>
<servlet-mapping>
<servlet-name>AddressWebService</servlet-name>
<url-pattern>/AddressWebService</url-pattern>
</servlet-mapping>
-->
|
6.2 方法二
方法二使用jaxws-spring.jar和xbean-spring.jar,將創建WebService對象任務委托給Spring,因此可以使用Spring的各種服務,但WebService的發布模式與glassfish沖突,因此無法在glassfish中使用。
6.2.1 WEB-INF/web.xml
使用com.sun.xml.ws.transport.http. servlet.WSSpringServlet替換JAX-WS默認的com.sun.xml.ws.transport.http. servlet .WSServlet。
|
<servlet>
<servlet-name>AddressWebService</servlet-name>
<servlet-class>
com.sun.xml.ws.transport.http.servlet.WSSpringServlet
</servlet-class>
<load-on-startup>0</load-on-startup>
</servlet>
<servlet-mapping>
<servlet-name>AddressWebService</servlet-name>
<url-pattern>/AddressWebServiceService</url-pattern>
</servlet-mapping>
|
注意:glassfish自動生成的服務名為AddressWebServiceService,為避免更換應用服務器導致客戶端修改,因此此處修改Tomcat下的服務名保持與glassfish一致。此外,還需修改WEB-INF/sun-jaxws.xml與之配套。
|
<endpoint
implementation="websrv.AddressWebService"
name="AddressWebService"
url-pattern="/AddressWebServiceService"/>
|
6.2.2 WEB-INF/classes/applicationContext.xml
本文件注冊WebService對象為bean,并由Spring注入業務邏輯層對象。
|
<beans
xmlns="http://www.springframework.org/schema/beans"
xmlns:xsi="http://www.w3.org/2001/XMLSchema-instance"
xmlns:aop="http://www.springframework.org/schema/aop"
xmlns:ws="http://jax-ws.dev.java.net/spring/core"
xmlns:wss="http://jax-ws.dev.java.net/spring/servlet"
xsi:schemaLocation="
http://www.springframework.org/schema/beans
http://www.springframework.org/schema/beans/spring-beans-2.0.xsd
http://www.springframework.org/schema/aop
http://www.springframework.org/schema/aop/spring-aop.xsd"
http://jax-ws.dev.java.net/spring/core
http://jax-ws.dev.java.net/spring/core.xsd
http://jax-ws.dev.java.net/spring/servlet
http://jax-ws.dev.java.net/spring/servlet.xsd">
......
<wss:binding url="/AddressWebServiceService">
<wss:service>
<ws:service bean="#AddressWebService" />
</wss:service>
</wss:binding>
<bean id="AddressWebService" class="websrv.AddressWebService" >
<property name="svr">
<ref bean="AddressService" />
</property>
</bean>
|
6.2.2.1 websrv/AddressWebService
|
/*
* To change this template, choose Tools | Templates
* and open the template in the editor.
*/
package websrv;
import business.Address.AddressService;
import java.util.List;
import javax.annotation.Resource;
import javax.jws.Oneway;
import javax.jws.WebMethod;
import javax.jws.WebParam;
import javax.jws.WebService;
import javax.servlet.ServletContext;
import javax.xml.ws.WebServiceContext;
import javax.xml.ws.handler.MessageContext;
import model.entity.Address.Address;
import model.key.Address.AddressId;
import org.springframework.web.context.WebApplicationContext;
import org.springframework.web.context.support.WebApplicationContextUtils;
/**
*
* @author
*/
@WebService()
public class AddressWebService
{
AddressService svr;
public void setSvr(AddressService svr)
{
this.svr = svr;
}
/**
* Select Address from database.
* @param id
* @return
*/
@WebMethod(operationName = "Select")
public Address Select(@WebParam(name = "id") AddressId id)
{
return svr.select(id);
}
/**
* Web service operation
* @param address
*/
@WebMethod(operationName = "Update")
public void Update(@WebParam(name = "address") Address address)
{
svr.update(address);
}
/**
* Web service operation
* @param address
*/
@WebMethod(operationName = "Insert")
public void Insert(@WebParam(name = "address") Address address)
{
svr.save(address);
}
/**
* Web service operation
* @param id
*/
@WebMethod(operationName = "Delete")
public void Delete(@WebParam(name = "id") AddressId id)
{
svr.delete(id);
}
/**
* Web service operation
* @return
*/
@WebMethod(operationName = "SelectAll")
public List<Address> SelectAll()
{
return svr.selectAll();
}
}
|
7 異常處理
Java包含兩大類異常,即RuntimeException和Checked Exception異常。
Checked Exception是程序必須進行處理的異常。如果某方法調用拋出Checked Exception異常的方法,則此方法要么捕獲該異常,要么聲明自身可能拋出該異常。而RuntimeException異常則方法可以不必捕獲或繼續聲明。換句話說,如果應用必須對某異常進行特殊的處理,則應將該異常定義為Checked Exception;而應用只需知道發生了異常,并不關心該異常是什么異常時,則應將該異常定義為RuntimeException。因此,業務需求規定的異常情況應定義為Checked Exception。
Spring的配置式事務環境規定,僅在Spring捕獲到RuntimeException異常時才會觸發事務回滾。通常情況下發生系統級或業務級異常時,均應回滾事務,顯然Spring默認的模式不滿足要求,需要進行調整。調整的做法是修改applicationContext.xml配置,指明當發生某Checked Exception異常時,Spring也應做回滾處理。(參見org.springframework. transaction.interceptor. TransactionAttribute)
|
<bean id="txProxyTemplate"
class="org.springframework.transaction.interceptor.TransactionProxyFactoryBean" abstract="true">
<property name="transactionManager" ref="transactionManager"/>
<property name="transactionAttributes">
<props>
<prop key="select*">PROPAGATION_REQUIRED,readOnly</prop>
<prop key="find*">PROPAGATION_REQUIRED,readOnly</prop>
<prop key="load*">PROPAGATION_REQUIRED,readOnly</prop>
<prop key="save*">PROPAGATION_REQUIRED,-Exception</prop>
<prop key="update*">PROPAGATION_REQUIRED,-Exception</prop>
<prop key="remove*">PROPAGATION_REQUIRED,-Exception</prop>
<prop key="del*">PROPAGATION_REQUIRED,-Exception</prop>
</props>
</property>
</bean>
|
更改配置后,所有的異常均會導致Spring執行事務回滾處理。如果方法中希望發生某異常時能提交事務,則應在方法中捕獲該異常,將其轉換為非配置列表的其他異常,從而觸發Spring提交事務(目前應沒有這樣的特殊要求)。
復雜的業務邏輯通常會有較多的業務級異常,這些異常的處理模式也基本相同,而且也需要將這些異常通知界面,以便操作員清楚發生了什么異常。如果完全使用返回碼,則程序處處都需要對返回碼進行處理,影響程序的質量和可靠性,因此應盡量使用拋出異常模式。
業務級異常有兩種可選的方案:一是僅使用一種異常類,由異常對象的錯誤碼判斷發生了什么異常;二是為每種異常設計一個異常類,從而形成一個異常體系。前者適合需要特殊處理的異常較多的情況,后者適合個別異常需要特殊處理的情況。由于業務需求的不確定性,系統設計時很難確定需進行特別處理的異常,因此建議使用單異常類多錯誤碼的模式,這樣也可以簡化程序的設計,僅需要捕獲一種異常即可。
7.1 通用異常類
7.2 業務邏輯層異常處理
7.3 WEB層異常處理
7.4 WebService層異常處理
MVC
如果想在另一個頁面中顯示錯誤,則可以:
|
@Override
protected ModelAndView onSubmit(HttpServletRequest arg0, HttpServletResponse arg1, Object arg2, BindException arg3) throws Exception
{
arg3.reject("AddressId", "…error message…"); // 創建錯誤對象
Map model = arg3.getModel();
model.put("AddressId", arg2); // 添加Command對象到模型
model.put("errors", arg3); // 添加錯誤到模型
return new ModelAndView(getFormView(), model);
}
|
如果想在同一個頁面中顯示錯誤,則可以:
|
@Override
protected ModelAndView onSubmit(HttpServletRequest arg0, HttpServletResponse arg1, Object arg2, BindException arg3) throws Exception
{
arg3.reject("AddressId.id", "沒有此數據!");
return showForm(arg0, arg1, arg3);
}
|
JSP:
|
<spring:hasBindErrors name="AddressId">
<br>
<spring:bind path="AddressId">
<font color="red">
<b>${status.errorMessage}</b>
</font><br>
</spring:bind>
<br>
</spring:hasBindErrors>
|
錯誤頁:
8 總結
l 如果某個類可能變更實現方法,則應為其設計接口,以便調用者可以不必修改即可使用新的實現。因此Dao類與業務邏輯類應設計接口,而實體類、主鍵類、活動類不必設計接口。
l 帶狀態的bean應配置為多例(prototype),而無狀態的bean應配置為單例(single),Web MVC環境下需在多個視圖間共享的bean應配置為session,單個視圖中使用的bean應配置為request。
l session和request類型的bean應定義代理類;
l 實體類和主鍵類是多例的,其他非WEB MVC的類是單例的;
l 為每個數據庫對象建立一個實體類和主鍵類;
l 實體類與主鍵類必須初始化所有的域;字符串域應trim()。
l 主鍵類必須提供一個帶參的構造函數初始化主鍵;
l 繼承框架類時應增加一個基礎類隔離框架類與應用類;
l 實體類、主鍵類、Dao類不必處理異常;業務邏輯類應截獲并處理所有的異常,并將全部異常包括(系統級的異常)轉換為應用級異常然后再拋出,以避免影響Spring的配置式事務;Web應截獲并處理全部異常,根據異常類型決定顯示在當前頁做提示,還是顯示給專門的錯誤頁面。WebService應將異常轉換為返回碼、錯誤碼與錯誤信息,傳遞給客戶端。
posted on 2007-11-20 11:55
飛鷹 閱讀(4962)
評論(1) 編輯 收藏