class Poll(models.Model):
question = models.CharField(max_length=200)
pub_date = models.DateTimeField('date published')
class Choice(models.Model):
poll = models.ForeignKey(Poll)
choice = models.CharField(max_length=200)
votes = models.IntegerField()
ŚģČŤ£ÖDjango
ŚĽÝôģģŚģČŤ£Öpython2.5ŚŹäšĽ•šłäÁČąśú¨ÔľĆšĹÜšłćŚĽÝôģģšĹŅÁĒ®python3.0„Ä?/h2>
śēįśćģŚļāśěúšč…ÁĒ®sqlliteŚQĆpythonŚ∑≤ÁĽŹŚÜ֌双QĆšłćťúÄŚŹ¶Ť°ĆŚģČŤ£ÖŚQĆŚ¶āśěúťúÄŤ¶Āšč…ÁĒ®myslqśąĖŚÖ∂šĽĖśēįśćģŚļďŚQĆťúÄŤ¶ĀŤá™Ť°ĆŚģČŤ£Ö„Ä?br />
śé•šłčśĚ•ŚģČŤ£ÖDjangoŚQąŚú®widnwosšłčԾȌQ?br />
1„ÄĀšĽéhttp://www.djangoproject.com/download/šłčŤĚ≤Django
2„ÄĀŚú®windwosšłčšč…ÁĒ®python setup.py install ŚģČŤ£ÖŚQąśąĎŚéüśÉ≥šĹŅÁĒ®python setup.py developŚģČŤ£ÖŚQĆś≤°śąźŚäüŚQČԾƌČ朏źśėĮŤģĺĺ|ģŚ•ĹpythonÁéĮŚĘÉŚíĆŚ∑≤ŚģČŤ£Ösetuptools„Ä?br />
3„ÄĀŚįÜpythonŚģČŤ£ÖÁõģŚĹēšłčlib\site-packages\django\bin\django-admin.py Ś§ćŚą∂ŚąįpythonŚģČŤ£ÖÁõģŚĹēšłčÁöĄ\scripts\ÁõģŚĹē„Ä?br />
šłčťĚĘŚŹĮšĽ•čĻčŤĮēšłÄšłčԾƌźĮŚä®cmdĹHóŚŹ£ŚQ?br />
C:\Documents and Settings\Administrator>python
>>> import django
>>> django.VERSION
(1, 2, 0, 'rc', 1)
ŚģČŤ£ÖOK„ÄāŚľÄŚß茹õŚĽļÁ¨¨šłÄšł™projectŚźß„Ä?br />
1„ÄĀťÄČŚģöšłÄšł™ÁõģŚĹēԾƌźĮŚä®cmdĹHóŚŹ£ŚQ?br />
F:\temp>django-admin.py startproject mysite2
F:\temp>
ėqôŚįÜŚú®ŚĹďŚČćÁõģŚĹēšłčśĖįŚĺŹšłÄšł™projectŚQĆŚźćŚ≠óšōďmysite2ŚQąś≥®śĄŹšłćŤ¶Āšč…ÁĒ?django"Ĺ{ČšŅĚÁēôŚ≠óšĹúšōďprojectŚźćÁßįŚQČÔľĆÁõģŚĹēĺlďśěĄšłļÔľö
2010-05-30 13:29 <DIR> .
2010-05-30 13:29 <DIR> ..
2010-05-30 13:29 557 manage.py
2010-05-30 13:29 3,387 settings.py
2010-05-30 13:29 561 urls.py
2010-05-30 13:29 0 __init__.py
4 šł™śĖᚼ?nbsp; 4,505 Ś≠óŤäā
2 šł™ÁõģŚĹ?29,717,716,992 ŚŹĮÁĒ®Ś≠óŤäā
- __init__.py:śöāśó∂śėĮÁ©ļÁöĄÔľĆś†áŤĮÜėqôšł™ÁõģŚĹēśėĮšłÄšł™python package„Ä?/li>
- manage.py: DjangoÁöĄŚĎĹšĽ§Ť°ĆŚ∑•ŚÖ∑ťõÜԾƚĹŅÁĒ®śĖ“é≥ēŚQöpython manage.py ***
- settings.py: project ÁöĄťÖćĺ|ģśĖᚼ?/li>
- urls.py: projectÁöĄurlŤ∑ĮŚĺĄĹé°ÁźÜťÖćÁĹģśĖášög
ŚÖąšļÜŤß£ŤŅôšĻąŚ§öŚźßԾƍĮ¶ÁĽÜÁöĄśĖᚼ∂ŚÜÖŚģĻŚćēÁ訌ÜćŤĮī„Ä?br />
2„ÄĀŚźĮŚä®http server:
F:\temp\mysite2>python manage.py runserver
Validating models...
0 errors found
Django version 1.2 rc 1, using settings 'mysite2.settings'
Development server is running at http://127.0.0.1:8000/
Quit the server with CTRL-BREAK.
śČÄweb browserŚQĆŤĺďŚÖ•ŚúįŚĚÄhttp://127.0.0.1:8000/ŚQĆŚŹĮšĽ•Áú茹įserverŚ∑≤ÁĽŹŚźĮŚä®šļÜ„ÄāŚĹďÁĄ”ěľĆŚ¶āśěúšĹ†ŚłĆśúõśćĘšłÄšł™ÁęĮŚŹ£ÔľĆŚŹĮšĽ•šĹŅÁĒ®ŚQ?span style="font-family: monospace;">
python manage.py runserver ÁęĮŚŹ£ŚŹ?br />
3„ÄĀśé•ÁĚÄťÖćÁĹģdatabaseŚQ?br />
śČÄsettings.pyŚQĆŚú®databaseŤäāÁāĻšłčÔľö
-
ENGINE śēįśćģŚļēśď錟ćŅUéÕľĆŚŹĮšĽ•śė?/span>'django.db.backends.postgresql_psycopg2'śą? 'django.db.backends.mysql' śą? 'django.db.backends.sqlite3'
-
NAME śēįśćģŚļćŅUéÕľĆ Ś¶āśěúšĹŅÁĒ®sqliteŚQĆŤŅôťáĆŚįĪśėĮdbśĖášögĺlĚŚĮĻŤ∑ĮŚĺĄŚQĆśĮĒŚ¶āf:/temp/mysite/data.db
-
USER śēįśćģŚļďÁĒ®śą∑ŚźćŚQĆsqlitešłćťúÄŤ¶?/p>
-
PASSWORD ŚĮÜÁ†ĀŚQĆsqlitešłćťúÄŤ¶?/p>
-
HOST śēįśćģŚļďšłĽśúļipŚQĆsqlitešłćťúÄŤ¶?/p>
ŚĽÝôģģšĹŅÁĒ®sqlite„ÄāŚ¶āśěúšč…ÁĒ®ŚÖ∂šĽĖŚ¶āPostgerSQL„ÄĀMySQLĹ{ČԾƌú®ťÖćĺ|ģšĻčŚČ捶ĀľčģšŅĚŚÖąŚú®śēįśćģŚļďšł≠Ś∑≤ŚĺŹÁęčÁõłŚÖ≥ť°ĻÁõģ„Ä?br />
Śú®setting.pyšł≠ÁöĄINSTALLED_APPSŤäāÁāĻšłčԾƝĽėŤģ§śúČšĽ•šłčšłÄšł™APPŚQ?br /> 'django.contrib.auth',ÁĒ®śą∑Ťģ§ŤĮĀ'django.contrib.contenttypes',ŚÜÖŚģĻĹé°ÁźÜ?
'django.contrib.sessions',sessionśéߌą∂
'django.contrib.sites',Ś§ösiteĹé°ÁźÜ
Ś¶āśěúÁĒ®šłćŚąįŤĮ•appŚQĆŚŹĮšĽ•ś≥®ťáäśéČŚQĆŤŅôěģÜšłćŚú®databasešł≠ŚĺŹÁęčÁõłŚÖ≥Áģ°ÁźÜtables„ÄāÁĄ∂Śźéšč…ÁĒ®Ôľö
python manage.py syncdb
ŚĽļÁęčÁõłŚļĒÁöĄtables„Ä?br />
4„ÄĀŚú®mysite2ÁõģŚĹēšłčԾƜĖįŚĺŹšłÄšł™Ťá™Ś∑řqöĄappŚQ?br /> python manage.py startapp polls
ěģÜśĖįŚĽřZłÄšł™pollsÁõģŚĹēŚQĆŚÜÖŚģĻŚ¶āšłčÔľö
2010-05-30 14:07 <DIR> .
2010-05-30 14:07 <DIR> ..
2010-05-30 14:07 60 models.py
2010-05-30 14:07 537 tests.py
2010-05-30 14:07 27 views.py
2010-05-30 14:07 0 __init__.py
5„ÄĀŚąõŚĽļmodelsŚQ?br /> ĺ~ĖŤĺĎmodels.py,ŚÜÖŚģĻŚ¶āšłčŚQ?br />
from django.db import models
class Poll(models.Model):
question = models.CharField(max_length=200)
pub_date = models.DateTimeField('date published')
class Choice(models.Model):
poll = models.ForeignKey(Poll)
choice = models.CharField(max_length=200)
votes = models.IntegerField()
ėqôťáĆśúČšł§šł™modelŚQĆPollŚíĆChoiceŚQĆŤŅėŚ≠ėŚú®šłÄšł™one Poll to many ChoiceŚÖ≥Á≥Ľ„Ä?br />
Śú®setting.py šł≠ŚįÜpolls Śä†ŚÖ•Śąįinstalled app ŤäāÁāĻšł≠ÔľĆÁĄ∂ŚźéšĹŅÁĒ®python manage.py syncdb ěģÜŚú®databasešł≠śĖįŚĽļÁõłŚļĒÁöĄtables„Ä?span style="font-family: sans-serif;">table name ŚąÜŚąęśėĮÔľö
polls_poll,polls_choice„Ä?br />
ŚĹďÁĄ∂ėqėśúČŚÖ∂šĽĖšłÄšļõmanage command:
- python manage.py validate -- ś†°ť™ĆmodelŚÜÖŚģĻśėĮŚź¶ś≠£Á°ģ
- python manage.py sqlcustom polls -- ŤĺďŚáļpolls appšł≠ÁöĄmodelÁõłŚÖ≥ÁöĄsqlÁõłŚÖ≥ŤĮ≠ŚŹ•
- python manage.py sqlclear polls -- ŤĺďŚáļŚą†ťô§tableÁöĄÁõłŚÖ≥sql
- python manage.py sqlindexes polls -- ŤĺďŚáļŚĽļÁęčindexÁöĄÁõłŚÖ≥sql
- python manage.py sqlall polls -- śė?/span>sql, sqlcustom, and sqlindexes ŤĺďŚáļŚÜÖŚģĻÁöĄÁĽĄŚź?br />
6„ÄĀšč…ÁĒ®django shellŚQ?br />
python manage.py shell
ėqôšł™cmdŤÉĆŚźéŚĀöšļÜšł§šögšļčÔľöšłÄśėĮŚįÜmysite2Śä†ŚÖ•Śąįsys.pathšł≠ŚéĽŚQõšļĆśėĮśĖįŚĽřZļÜDJANGO_SETTINGS_MODULEÁéĮŚĘÉŚŹėťáŹŚQĆŚŹĮšĽ•ŚľēÁĒ®settings.pyšł≠ÁöĄťÖćÁĹģŚÜÖŚģĻ„Ä?br />
śé•šłčśĚ•ŚįĪŚŹĮšĽ•čĻčŤĮēšļÜ„Ä?br />
BTWŚQöŚ¶āśěúśúČŚ•ĹÁöĄŚú®ÁļŅĺėĽŤĮĎÚqõ_ŹįŚQƌĹćÁü•śąĎšłÄŚ£į„Ä?br />
os.environ['DJANGO_SETTINGS_MODULE'] = 'myproject.settings'
address = [
('Śľ†šłČ', 'ŚúįŚĚÄšłÄ'),
('śĚéŚõõ', 'ŚúįŚĚÄšļ?)
]
ťā£šĻąŚŹĮšĽ•Śú®templateśĖášögcsv.htmlšł≠šč…ÁĒ?br />row.0....śĖĻŚľŹŚľēÁĒ®„Ä?br />ÁĒ◊Éļéś≠§ŚČ朹ϚĽéšłäšłÄŤģ≤Ś§ćŚą∂šļÜaddressÁöĄŚģöšĻČÔľö
address=[
{'name':'Śľ†šłČ','address':'čzõťė≥ś†Ď÷∑Ě'},
{'name':'ťáĆśĖĮ','address':'śēīśēīĺlúśē£ĺl?}
]
śČÄšĽ•šč…ÁĒ®row.0śĖĻŚľŹŚľēÁĒ®śó”ěľĆdjangošłćšľöśä•ťĒôŚQĆšĹÜěģĪśėĮšĽÄšĻąŚÜÖŚģĻšĻüś≤°śúČŚQĆšč…ÁĒ®row.nameśĖĻŚľŹŚļĒÁĒ®Śźéś≠£Śłł„Ä?br />
Django Generic Views: CRUD
Published by Matt Croydon August 17th, 2005 in Projects, Python, DjangoNote:
There are lots of gems buried in Django that are slowly coming to light. Generic views and specifically the CRUD (create, update, delete) generic views are extremely powerful but underdocumented. This brief tutorial will show you how to make use of CRUD generic views in your Django application.
One of my first encounters with Rails was the simple todo list tutorial which managed to relate lots of useful information by creating a simple yet useful application. While I will do my best to point out interesting and useful things along the way, it is probably best that you be familiar with the official Django tutorials. Now would also probably be a good time to mention that this tutorial works for me using MySQL and revision 524. Django is under constant development, so things may change. I’ll do my best to keep up with changes.
Getting Started
As with all Django projects, the best place to start is to start with django-admin.py startproject todo. Make sure that the directory you created your project in is in your PYTHONPATH, then edit todo/settings/main.py to point to the database of your choice. Now would be a good time to set your DJANGO_SETTINGS_MODULE to "todo.settings.main". Next move to your apps/ dir and create a new application: django-admin.py startapp tasks and django-admin.py init. The initial setup process is covered in much more detail in tutorial 1.
The Model
Now that we have the project set up, let’s take a look at our rather simple model (todo/apps/tasks/models/tasks.py):
from django.core import meta

# Create your models here.

class Task(meta.Model):
  fields = (
    meta.CharField('title', maxlength=200),
    meta.TextField('description'),
    meta.DateTimeField('create_date', 'date created'),
    meta.DateTimeField('due_date', 'date due'),
    meta.BooleanField('done'),
  )

  admin = meta.Admin(
    list_display = ( 'title', 'description', 'create_date', 'due_date', 'done' ),
    search_fields = ['title', 'description'],
    date_hierarchy = 'due_date',
  )

  def __repr__(self):
    return self.title
The model is short and sweet, storing a title, description, two dates, and if the task is done or not. To play with your model in the admin, add the following to INSTALLD_APPS in todo/settings/main.py: 'todo.apps.tasks',
Feel free to play around with your model using the admin site. For details, see tutorial 2.
URL Configuration
Now let’s configure our URLs. We’ll fill in the code behind these URLs as we go. I edited todo/settings/urls/main.py directly, but you’re probably best off decoupling your URLs to your specific app as mentiond in tutorial 3.
from django.conf.urls.defaults import *

info_dict = {
  'app_label': 'tasks',
  'module_name': 'tasks',
}

urlpatterns = patterns('',
  (r'^tasks/?$', 'todo.apps.tasks.views.tasks.index'),
  (r'^tasks/create/?$', 'django.views.generic.create_update.create_object',
  dict(info_dict, post_save_redirect="/tasks/") ),
  (r'^tasks/update/(?P<object_id>d+)/?$',
  'django.views.generic.create_update.update_object', info_dict),
  (r'^tasks/delete/(?P<object_id>d+)/?$',
  'django.views.generic.create_update.delete_object',
  dict(info_dict, post_delete_redirect="/tasks/new/") ),
  (r'^tasks/complete/(?P<object_id>d+)/?$',
  'todo.apps.tasks.views.tasks.complete'),
)
Note: I had to alter the formatting of the urlpatterns in order to make them fit. It looks a lot better in its original formatting.
We use the info_dict to pass information about our application and module to the generic view handlers . The CRUD generic views need only provide these two pieces of information, but some generic views need more. See the generic views documentation for an explanation.
Let’s look at each of these URLs one at a time, along with the code behind them.
Index
(r'^tasks/?$', 'todo.apps.tasks.views.tasks.index'),
This points to our index view, which is an index function in todo/apps/tasks/views/tasks.py:
from django.core import template_loader
from django.core.extensions import DjangoContext as Context
from django.utils.httpwrappers import HttpResponse, HttpResponseRedirect
from django.models.tasks import tasks
from django.core.exceptions import Http404

def index(request):
  notdone_task_list = tasks.get_list(order_by=['-due_date'], done__exact=False)
  done_task_list = tasks.get_list(order_by=['-due_date'], done__exact=True)
  t = template_loader.get_template('tasks/index')
  c = Context(request, {
    'notdone_tasks_list': notdone_task_list,
    'done_tasks_list': notdone_task_list,
  })
  return HttpResponse(t.render(c))
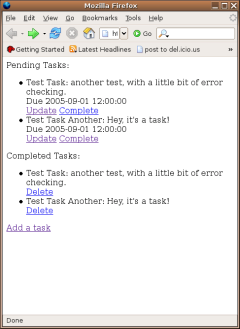
This view creates two lists for us to work with in our template, notdone_tasks_list is (not suprisingly) a list of tasks that are not done yet. Similarly, done_tasks_list contains a list of tasks that have been completed. We will use the template tasks/index.html to render this view.
Make sure that you have a template directory defined in todo.settings.main (this refers to todo/settings/main.py). Here’s mine:
TEMPLATE_DIRS = (
 "/home/mcroydon/django/todo/templates",
)
Now let’s take a look at the template that I’m using for the index:
{% if notdone_tasks_list %}
    <p>Pending Tasks:</p>
    <ul>
    {% for task in notdone_tasks_list %}
        <li>{{ task.title }}: {{ task.description }} <br/>
          Due {{ task.due_date }} <br/>
          <a href="/tasks/update/{{ task.id }}/">Update</a>
          <a href="/tasks/complete/{{ task.id }}/">Complete</a>
        </li>
    {% endfor %}
    </ul>
{% else %}
    <p>No tasks pending.</p>
{% endif %}
    <p>Completed Tasks:</p>
    <ul>
{% if done_tasks_list %}
    {% for task in done_tasks_list %}
        <li>{{ task.title }}: {{ task.description }} <br/>
          <a href="/tasks/delete/{{ task.id }}/">Delete</a>
        </li>
    {% endfor %}
    </ul>
{% else %}
    <p>No completed pending.</p>
{% endif %}
<p><a href="/tasks/create/">Add a task</a></p>
Don’t let this index scare you, it’s just a little bit of logic, a little looping, and some links to other parts of the application. See the template authoring guide if you have questions. Here’s a picture to give you a better idea as to how the above barebones template renders in Firefox:
Create Generic View
Now let’s take a look at the following URL pattern:
(r'^tasks/create/?$', 'django.views.generic.create_update.create_object', dict(info_dict, post_save_redirect="/tasks/") ),
There’s a lot of magic going on here that’s going to make your life really easy. First off, we’re going to call the create_object generic view every time we visit /tasks/create/. If we arrive there with a GET request, the generic view displays a form. Specifically it’s looking for module_name_form.html. In our case it will be looking for tasks_form. It knows what model to look for because of the information we gave it in info_dict. If however we reach this URL via a POST, the create_object generic view will create a new object for us and then redirect us to the URL of our choice (as long as we give it a post_save_redirect).
Here’s the template that I am using for tasks_form.html:
{% block content %}

{% if object %}
<h1>Update task:</h1>
{% else %}
<h1>Create a Task</h1>
{% endif %}

{% if form.has_errors %}
<h2>Please correct the following error{{ form.errors|pluralize }}:</h2>
{% endif %}

<form method="post" action=".">
<p><label for="id_title">Title:</label> {{ form.title }}
{% if form.title.errors %}*** {{ form.title.errors|join:", " }}{% endif %}</p>
<p><label for="id_description">Description:</label> {{ form.description }}
{% if form.description.errors %}*** {{ form.description.errors|join:", " }}{% endif %}</p>
<p><label for="id_create_date_date">Create Date:</label> {{ form.create_date_date }}
{% if form.create_date_date.errors %}*** {{ form.create_date_date.errors|join:", " }}{% endif %}</p>
<p><label for="id_create_date_time">Create Time:</label> {{ form.create_date_time }}
{% if form.create_date_time.errors %}*** {{ form.create_date_time.errors|join:", " }}{% endif %}</p>
<p><label for="id_due_date_date">Due Date:</label> {{ form.due_date_date }}
{% if form.due_date_date.errors %}*** {{ form.due_date_date.errors|join:", " }}{% endif %}</p>
<p><label for="id_due_date_time">Due Time:</label> {{ form.due_date_time }}
{% if form.due_date_time.errors %}*** {{ form.due_date_time.errors|join:", " }}{% endif %}</p>
<p><label for="id_done">Done:</label> {{ form.done }}
{% if form.done.errors %}*** {{ form.done.errors|join:", " }}{% endif %}</p>
<input type="submit" />
</form>
<!--
This is a lifesaver when debugging!
<p> {{ form.error_dict }} </p>
-->

{% endblock %}
Here’s what the create template looks like rendered:
If we fill out the form without the proper (or correctly formatted) information, we’ll get an error:

Update
(r'^tasks/update/(?P<object_id>\d+)/?$', 'django.views.generic.create_update.update_object', info_dict),
This URL pattern handles updates. The beautiful thing is it sends requests to tasks_form.html, so with a little logic, 90% of the form can be exactly the same as the create form. If we go to /tasks/create/, we get the blank form. If we visit /tasks/update/1/ we will go to the same form but it will be prepopulated with the data from the task with the ID of 1. Here’s the logic that I used to change the header:
{% if object %}
<h1>Update task:</h1>
{% else %}
<h1>Create a Task</h1>
{% endif %}
So if there’s no object present, we’re creating. If there’s an object present, we’re updating. Same form. Pretty cool.
Warning: It looks like form.create_date_date and form.create_date_time have broken between the time I wrote this and wrote it up. This form will not prepopulate the form with the stored information. There’s a ticket for this, and I’ll update as neccesary when it has been fixed.
Delete
Here’s the URL pattern to delte a task:
(r'^tasks/delete/(?P<object_id>\d+)/?$', 'django.views.generic.create_update.delete_object', dict(info_dict, post_delete_redirect="/tasks/new/") ),
There’s another little Django gem in the delete function. If we end up at /tasks/delete/1 using a GET request, Django will automatically send us to the tasks_form_delete.html template. This allows us to make sure that the user really wanted to delete the task. here’s my very simple tasks_form_delete.html template:
<form method="post" action=".">
<p>Are you sure?</p>
<input type="submit" />
</form>
Once this form is submitted, the actual delete takes place and we are redirected to the main index page (because we set post_delete_redirect.
CRUD Generic Views And the Rest of Your Application
That pretty much covers the basics of the CRUD generic views. The great thing about generic views is that you can use them along side your custom views. There’s no need to do a ton of custom programming for list/detail, date-based, or CRUD since those generic views are available to you. Because we set up our URL patterns, we can make sure that we craft URLs that look pretty and make sense.
For my sample tasks application I decided that I wanted to create links that would immediately set a task as complete and then redirect to the index. This is pretty much trivial and can be accomplished by adding the following URL pattern and backing it up with the appropriate view. Here’s the pattern:
(r'^tasks/complete/(?P<object_id>\d+)/?$', 'todo.apps.tasks.views.tasks.complete'),
And here’s the view that goes along with it (from todo/apps/tasks/models/tasks.py):
def complete(request, object_id):
  try:
    t = tasks.get_object(pk=object_id)
  except:
    # do something better than this
    raise Http404
  try:
    t.done=True
    t.save()
    return HttpResponseRedirect('/tasks/')
  except:
    # do something better than this
    raise Http404
I do plan to actually handle errors and respond accordingly, but it was late last night and I just wanted to see it work (and it does).
Conclusion
Django rocks. Generic views rock. The framework and specifically the generic views make your life easy. My little tasks app took a few hours to put together, but a significant portion of that was reading up on the documentation, trying to figure out generic views using the existing docs and reading the source, and of course pestering the DjangoMasters about generic views and other stuff on #django (thanks all).
I hope this overview of CRUD generic views helps, but if anything confuses you, don’t hesitate to comment or get in touch with me (matt at ooiio dot com). Also expect to see updates to this tutorial as APIs change and I get a little more time to clean up my code.
Feel free to download and play with my little todo app: todo-tutorial.tar.gz or todo-tutorial.zip. Consider them released under a BSD-style license. Above all, don’t sue me.
24 Responses to ‚ÄúDjango Generic Views: CRUD‚Ä?/h4>
django-admin.py and manage.py
This covers Django version 0.95 and the development version. Old docs: 0.90, 0.91
django-admin.py is Django's command-line utility for administrative tasks. This document outlines all it can do.
django-admin.pyśėĮDjangoÁöĄŚĎĹšĽ§Ť°ĆĹé°ÁźÜĺp»ĚĽüŚQĆŤŅôĹčáśĖáś°£ŚįÜŤĮ¶ÁĽÜšĽčÁĽćšĽĖÁöĄŚäüŤÉĹ„Ä?/p>
In addition, manage.py is automatically created in each Django project. manage.py is a thin wrapper around django-admin.py that takes care of two things for you before delegating to django-admin.py:
ŚģěťôÖšłäԾƜĖášögmanage.pyšľöŚú®śĮŹšł™DjangoŚ∑•Á®čŚąõÁęčÁöĄśó∂ŚÄôŤá™Śä®ŚĺŹÁęčÔľĆmanage.pyśėĮdjango-admin.pyŚäüŤÉĹÁöĄšłÄšł™ÁģÄŚćēŚįĀŤ£ÖԾƌģÉšľöšłļdjango-admin.pyŚźĮÁĒ®šĻčŚČćŚĀöŚ•Ĺšł§ť°ĻŚ∑•šĹúŚQ?/p>
- It puts your project's package on sys.path.
- ěģÜŚ∑•ĹEčŚĆÖśĖášögśĒĎ÷Ö•sys.pathŤ∑ĮŚĺĄ
- It sets the DJANGO_SETTINGS_MODULE environment variable so that it points to your project's settings.py file.
- ŤģĄ°ĹģDJANGO_SETTINGS_MODULEŚŹėťáŹśĆጟϚņŚąõÁęčŚ∑•ĹEčšł≠ÁöĄsettings.pyśĖášög„Ä?/li>
The django-admin.py script should be on your system path if you installed Django via its setup.py utility. If it's not on your path, you can find it in site-packages/django/bin within your Python installation. Consider symlinking to it from some place on your path, such as /usr/local/bin.
Ś¶āśěúšĹ†ťÄöŤŅásetup.pyśĖĻŚľŹŚģČŤ£ÖDjangoŚQĆdjango-admin.pyŤĄöśú¨šľöŤĘęŚä†ŚÖ•ŚąįÁ≥ĽĺlüŤĶ\ŚĺĄ„ÄāŚ¶āśěúšłćŚú®Á≥ĽĺlüŤĶ\ŚĺĄÔľĆšĹ†ŚŹĮšĽ•Śú®PythonŚģČŤ£ÖŤ∑ĮŚĺĄšłčÁöĄsite-packages/django/binÁõģŚĹēšłčśČ匹éÕľĆÚq∂ŚįÜšĽĖŚä†ŚÖ•ŚąįšĹ†ÁöĄĺp»ĚĽüŤ∑ĮŚĺĄšłč„Ä?/p>
Generally, when working on a single Django project, it's easier to use manage.py. Use django-admin.py with DJANGO_SETTINGS_MODULE, or the --settings command line option, if you need to switch between multiple Django settings files.
šłÄŤą¨śÉÖŚÜĶšłčŚQĆŚĮĻŚćēšł™Django projectŚQĆšč…ÁĒ®manage.pyś≤°śúČšĽÄšĻąťóģťĘėԾƌ¶āśěúšĹ†ťúÄŤ¶ĀŚú®šłćŚźĆÁöĄDjango projectťóīšč…ÁĒ®django-admin.pyŚQĆťā£šĻąťúÄŤ¶Āšč…ÁĒ®DJANGO_SETTINGS_MODULEśą?-settingsŚĎĹš◊oŤ°ĆŚŹāśēį„Ä?/p>
Usage
django-admin.py action [options]
manage.py action [options]
action should be one of the actions listed in this document. options, which is optional, should be zero or more of the options listed in this document.
Run django-admin.py --help to display a help message that includes a terse list of all available actions and options.
Most actions take a list of appname``s. An ``appname is the basename of the package containing your models. For example, if your INSTALLED_APPS contains the string 'mysite.blog', the appname is blog.
Available actions
adminindex [appname appname ...]
Prints the admin-index template snippet for the given appnames.
Use admin-index template snippets if you want to customize the look and feel of your admin's index page. See Tutorial 2 for more information.
createcachetable [tablename]
Creates a cache table named tablename for use with the database cache backend. See the cache documentation for more information.
dbshell
Runs the command-line client for the database engine specified in your DATABASE_ENGINE setting, with the connection parameters specified in your DATABASE_USER, DATABASE_PASSWORD, etc., settings.
- For PostgreSQL, this runs the psql command-line client.
- For MySQL, this runs the mysql command-line client.
- For SQLite, this runs the sqlite3 command-line client.
This command assumes the programs are on your PATH so that a simple call to the program name (psql, mysql, sqlite3) will find the program in the right place. There's no way to specify the location of the program manually.
diffsettings
Displays differences between the current settings file and Django's default settings.
śĮĒŤĺÉŚĹďŚČćsettingsśĖášögŚíĆDjangoĺ~ļÁúĀsettingsśĖášögšĻčťóīÁöĄŚ∑ģŚľā„Ä?/p>
Settings that don't appear in the defaults are followed by "###". For example, the default settings don't define ROOT_URLCONF, so ROOT_URLCONF is followed by "###" in the output of diffsettings.
Śú®ÁľļÁúĀsettingsšł≠šłćŚ≠ėŚú®ÁöĄšĽ•"###"ś†áŤĮÜ„Ä?/p>
Note that Django's default settings live in django/conf/global_settings.py, if you're ever curious to see the full list of defaults.
inspectdb
Introspects the database tables in the database pointed-to by the DATABASE_NAME setting and outputs a Django model module (a models.py file) to standard output.
Use this if you have a legacy database with which you'd like to use Django. The script will inspect the database and create a model for each table within it.
As you might expect, the created models will have an attribute for every field in the table. Note that inspectdb has a few special cases in its field-name output:
- If inspectdb cannot map a column's type to a model field type, it'll use TextField and will insert the Python comment 'This field type is a guess.' next to the field in the generated model.
- If the database column name is a Python reserved word (such as 'pass', 'class' or 'for'), inspectdb will append '_field' to the attribute name. For example, if a table has a column 'for', the generated model will have a field 'for_field', with the db_column attribute set to 'for'. inspectdb will insert the Python comment 'Field renamed because it was a Python reserved word.' next to the field.
This feature is meant as a shortcut, not as definitive model generation. After you run it, you'll want to look over the generated models yourself to make customizations. In particular, you'll need to rearrange models' order, so that models that refer to other models are ordered properly.
Primary keys are automatically introspected for PostgreSQL, MySQL and SQLite, in which case Django puts in the primary_key=True where needed.
inspectdb works with PostgreSQL, MySQL and SQLite. Foreign-key detection only works in PostgreSQL and with certain types of MySQL tables.
install [appname appname ...]
Executes the equivalent of sqlall for the given appnames.
runserver [optional port number, or ipaddr:port]
Starts a lightweight development Web server on the local machine. By default, the server runs on port 8000 on the IP address 127.0.0.1. You can pass in an IP address and port number explicitly.
If you run this script as a user with normal privileges (recommended), you might not have access to start a port on a low port number. Low port numbers are reserved for the superuser (root).
DO NOT USE THIS SERVER IN A PRODUCTION SETTING. It has not gone through security audits or performance tests. (And that's how it's gonna stay. We're in the business of making Web frameworks, not Web servers, so improving this server to be able to handle a production environment is outside the scope of Django.)
The development server automatically reloads Python code for each request, as needed. You don't need to restart the server for code changes to take effect.
When you start the server, and each time you change Python code while the server is running, the server will validate all of your installed models. (See the validate command below.) If the validator finds errors, it will print them to standard output, but it won't stop the server.
You can run as many servers as you want, as long as they're on separate ports. Just execute django-admin.py runserver more than once.
Note that the default IP address, 127.0.0.1, is not accessible from other machines on your network. To make your development server viewable to other machines on the network, use its own IP address (e.g. 192.168.2.1) or 0.0.0.0.
Examples:
Port 7000 on IP address 127.0.0.1:
django-admin.py runserver 7000
Port 7000 on IP address 1.2.3.4:
django-admin.py runserver 1.2.3.4:7000
Serving static files with the development server
By default, the development server doesn't serve any static files for your site (such as CSS files, images, things under MEDIA_ROOT_URL and so forth). If you want to configure Django to serve static media, read the serving static files documentation.
Turning off auto-reload
To disable auto-reloading of code while the development server is running, use the --noreload option, like so:
Ś¶āśěúŤ¶ĀŚú®śúćŚä°Ś∑≤ŚźĮŚä®ŚźéľõĀś≠ʍᙌ䮌䆍Ě≤šĽ£Á†ĀŚäüŤÉĹŚQĆŚŹĮšĹŅÁĒ®--noreloadŚŹāśēį„Ä?/p>
django-admin.py runserver --noreload
shell
Starts the Python interactive interpreter.
Django will use IPython, if it's installed. If you have IPython installed and want to force use of the "plain" Python interpreter, use the --plain option, like so:
django-admin.py shell --plain
sql [appname appname ...]
Prints the CREATE TABLE SQL statements for the given appnames.
sqlall [appname appname ...]
Prints the CREATE TABLE and initial-data SQL statements for the given appnames.
Refer to the description of sqlinitialdata for an explanation of how to specify initial data.
sqlclear [appname appname ...]
Prints the DROP TABLE SQL statements for the given appnames.
sqlindexes [appname appname ...]
Prints the CREATE INDEX SQL statements for the given appnames.
sqlinitialdata [appname appname ...]
Prints the initial INSERT SQL statements for the given appnames.
For each model in each specified app, this command looks for the file <appname>/sql/<modelname>.sql, where <appname> is the given appname and <modelname> is the model's name in lowercase. For example, if you have an app news that includes a Story model, sqlinitialdata will attempt to read a file news/sql/story.sql and append it to the output of this command.
Each of the SQL files, if given, is expected to contain valid SQL. The SQL files are piped directly into the database after all of the models' table-creation statements have been executed. Use this SQL hook to populate tables with any necessary initial records, SQL functions or test data.
sqlreset [appname appname ...]
Prints the DROP TABLE SQL, then the CREATE TABLE SQL, for the given appnames.
sqlsequencereset [appname appname ...]
Prints the SQL statements for resetting PostgreSQL sequences for the given appnames.
See http://simon.incutio.com/archive/2004/04/21/postgres for more information.
startapp [appname]
Creates a Django app directory structure for the given app name in the current directory.
startproject [projectname]
Creates a Django project directory structure for the given project name in the current directory.
syncdb
Creates the database tables for all apps in INSTALLED_APPS whose tables have not already been created.
Use this command when you've added new applications to your project and want to install them in the database. This includes any apps shipped with Django that might be in INSTALLED_APPS by default. When you start a new project, run this command to install the default apps.
If you're installing the django.contrib.auth application, syncdb will give you the option of creating a superuser immediately.
test
New in Django development version
Discover and run tests for all installed models. See Testing Django applications for more information.
validate
Validates all installed models (according to the INSTALLED_APPS setting) and prints validation errors to standard output.
Available options
--settings
Example usage:
django-admin.py syncdb --settings=mysite.settings
Explicitly specifies the settings module to use. The settings module should be in Python package syntax, e.g. mysite.settings. If this isn't provided, django-admin.py will use the DJANGO_SETTINGS_MODULE environment variable.
Note that this option is unnecessary in manage.py, because it takes care of setting DJANGO_SETTINGS_MODULE for you.
--pythonpath
Example usage:
django-admin.py syncdb --pythonpath='/home/djangoprojects/myproject'
Adds the given filesystem path to the Python import search path. If this isn't provided, django-admin.py will use the PYTHONPATH environment variable.
Note that this option is unnecessary in manage.py, because it takes care of setting the Python path for you.
--help
Displays a help message that includes a terse list of all available actions and options.
--noinput
New in Django development version
Inform django-admin that the user should NOT be prompted for any input. Useful if the django-admin script will be executed as an unattended, automated script.
--noreload
Disable the use of the auto-reloader when running the development server.
--version
Displays the current Django version.
Example output:
0.9.1
0.9.1 (SVN)
--verbosity
New in Django development version
Example usage:
django-admin.py syncdb --verbosity=2
Verbosity determines the amount of notification and debug information that will be printed to the console. '0' is no output, '1' is normal output, and 2 is verbose output.
verbosityŚÜõ_ģöėqźŤ°Ć„ÄĀŤįÉŤĮēšŅ°śĀĮśėĺĹCļÁŮĒŚąęÔľĆ0ŚQ暼ĚĻąšĻüšłćŤĺďŚáļÔľĆ1ŚQćś≠£ŚłłŤĺďŚáļÔľĆ2ŚQćŤĮ¶ĺlÜšŅ°śĀĮŤĺďŚá?/p>
--adminmedia
New in Django development version
- Example usage::
- django-admin.py manage.py --adminmedia=/tmp/new-admin-style/
Tells Django where to find the various CSS and JavaScript files for the admin interface when running the development server. Normally these files are served out of the Django source tree, but because some designers customize these files for their site, this option allows you to test against custom versions.
Extra niceties
Syntax coloring
The django-admin.py / manage.py commands that output SQL to standard output will use pretty color-coded output if your terminal supports ANSI-colored output. It won't use the color codes if you're piping the command's output to another program.
Bash completion
If you use the Bash shell, consider installing the Django bash completion script, which lives in extras/django_bash_completion in the Django distribution. It enables tab-completion of django-admin.py and manage.py commands, so you can, for instance...
- Type django-admin.py.
- Press [TAB] to see all available options.
- Type sql, then [TAB], to see all available options whose names start with sql.
Comments
Indy September 27, 2006 at 4:04 a.m.
A small addition:
"Note that the default IP address, 127.0.0.1, is not accessible from other machines on your network. To make your development server viewable to other machines on the network, use its own IP address (e.g. 192.168.2.1) or 0.0.0.0." ... _as start parameter (e.g. manage.py runserver 192.168.2.1:8000)_
Powered by Zoundry
ťöýNĀďŚŅÖť°ĽšĹŅÁĒ®Ťá™ŚģöšĻČÁöĄś®°śĚŅŤĮ≠Ť®ÄŚQ?br />
ś®°śĚŅ
1„ÄĀÁĒ® html śĖášögšŅĚŚ≠ėŚQĆŤģĺŤģ°ÁöĄŚŹėťáŹÁĒ?{{value_name}} Ś°ęŚÖÖ
2„ÄĀťúÄ from django.template import Template,Context ŚĮľŚÖ•Śļ?
3„ÄĀt=Template( ś®°śĚŅśĖášögŚź?)¬†
¬†c=Context( ś®°śĚŅŚŹėťáŹŚÜÖŚģĻ )
¬†t.render(c)# ŚŹĮšĽ•ŤĺďŚáļś®°śĚŅŚÜÖŚģĻ
4„ÄĀ¬†¬?šłčťĚĘėqôśģĶšłćÁźÜŤß£šĽÄšĻąśĄŹśÄ?
¬†To prevent this, set a function attribute alters_data on the method. The template system won ‚Ä?t execute a method if the method has alters_data=True set. For example:
 def delete(self):
  # Delete the account
 delete.alters_data = True
5„Ä?Context ŚĮĻŤĪ°śĒĮśĆĀ push()/pop() śĖ“é≥ē
6„Ä?ś®°śĚŅśĖášögšł≠ÁöĄś†áÁ≠ĺŚQ?
¬†ś≤°śúČ elseif;
¬†For Śĺ™ÁéĮšł≠ś≤°śú?break Śí?continue
¬†For Śĺ™ÁéĮšł≠ÁöĄŚá†šł™ŚĪěśÄßÔľö
¬†¬†¬† forloop.counter¬†¬†¬†¬† # ŚĹďŚČćŚĺ™ÁéĮÁöĄś¨°śēéÕľĆšĽ?1 ŚľÄŚß?
¬†¬†¬† forloop.counter0¬†¬†¬† # ŚĹďŚČćŚĺ™ÁéĮÁöĄś¨°śēéÕľĆšĽ?0 ŚľÄŚß?
¬†¬†¬† forloop.revcounter¬†¬†¬†¬†¬†¬†¬† # ŚĹďŚČćŚĺ™ÁéĮŚČ©šĹôč∆°śēįŚQĆšĽéśÄ’dů@ÁéĮś¨°śēįťÄíŚáŹ
¬†¬†¬† forloop.revcounter0¬†¬†¬†¬†¬†¬† # ŚĹďŚČćŚĺ™ÁéĮŚČ©šĹôč∆°śēįŚQĆšĽéśÄ’dů@ÁéĮś¨°śē?-1 ťÄíŚáŹ
¬†¬†¬† forloop.first¬†¬†¬†¬†¬†¬†¬†¬†¬†¬†¬†¬† #boolean ŚÄŻ|ľĆŚ¶āśěúšłļÁ¨¨šłÄč∆°Śů@ÁéĮԾƌĝgōďÁú?
¬†¬†¬† forloop.last¬†¬†¬†¬†¬†¬†¬†¬†¬†¬†¬†¬†¬† # ŚźĆšłä
¬†¬†¬† forloop.parentloop¬†¬†¬†¬†¬†¬†¬† # ŚľēÁĒ®Áą∂Śů@ÁéĮÁöĄ forloop ŚĮĻŤĪ°
¬†ifequal A B¬† ŚQ?AB ŚŹ™ŤÉĹśėĮś®°śĚŅŚŹėťáŹ„ÄĀŚ≠óĹW¶šł≤„ÄĀśēįŚ≠?
¬†¬†¬† pass ŚQÉŚ¶āśě?A B ÁõłÁ≠ČŚąôśČߍ°?
 else
¬†¬†¬† pass ŚQÉŚź¶ŚąôśČߍ°?
 endifequal
¬†{#¬†¬† #}¬†¬†¬†¬†¬† ŚQÉś≥®ťá?
¬†{{A|B:‚ÄĚs‚ÄĚ}}¬†¬†¬†¬†¬†¬†¬†¬† # ŚĮ?A śČߍ°Ć B ėqáś◊oŚQ?B ėqáś◊oŚŹĮšĽ•śúČŚŹāśē?
¬†¬† Śá†šł™ėqáś◊oŚô®Ôľö
¬†¬† addslashes¬†¬†¬† Śä†ŚŹćśĖúśĚ†
¬†¬† Date¬†¬†¬†¬†¬†¬†¬†¬†¬† ś†ľŚľŹŚĆĖśó•śúüšōďŚ≠óÁ¨¶šł?
¬†¬† escape¬†¬†¬†¬†¬†¬†¬† ŤĹ¨śćĘšłļÁĹĎôŚŽäľĖÁ†?
¬†¬† length¬†¬†¬†¬†¬†¬†¬† ťēŅŚļ¶
7„Ä?ś®°śĚŅšłćŤÉĹŚĽļÁę蚳Ěł™ŚŹėťáŹśąĖŤÄÖśĒĻŚŹėšłÄšł™ŚŹėťáŹÁöĄŚÄŻ|ľõšłćŤÉĹŤįÉÁĒ®ŚéüÁĒüÁö?python šĽ£Á†Ā
8„Ä?Śú?setting.py šł≠Śą∂Śģöś®°śĚŅśĖᚼ∂Ś≠ėśĒĄ°öĄÁõģŚĹēŚQ?EMPLATE_DIRS ŚQČԾƚĺčÔľö
 TEMPLATE_DIRS = (
  '/home/django/mysite/templates',
 )
¬†šłćŤ¶ĀŚŅėšļÜśúÄŚźéÁöĄťÄóŚŹ∑ŚQĆťô§ťĚěšĹ†ěģÜŚļŹŚąóÔľąŚQČśćĘśąźŚąóŤ°?[] ŚQĆšĹÜśēąÁéášľöťôćšĹéÔľõÁõģŚĹēÁĒ?/ ťóīťöĒ
9„Ä?šĹŅÁĒ®ś®°śĚŅŚQ?
 from django.shortcuts import render_to_response
 import datetime
 def current_datetime(request):
  now = datetime.datetime.now()
 return render_to_response('current_datetime.html', {'current_date': now})
¬†ŚŹĮšĽ•ěģÜŚ°ęŚÖÖŚąįś®°śĚŅÁöĄŚŹėťáŹśćĘšłļlocals()ŚQĆšĹÜśÄߍÉĹšľöśúČśČÄšłčťôćŚQĆŚ¶ā
 def current_datetime(request):
  current_date = datetime.datetime.now()
    return render_to_response('current_datetime.html', locals())
10„ÄĀŚ¶āśěúŤ¶ĀŚľēÁĒ®ŤģĎ÷ģöÁöĄś®°śĚŅÁõģŚĹēšł≠Ś≠źÁõģŚĹēÁöĄś®°śĚŅśĖášög ;
 t = get_template('dateapp/current_datetime.html')
11„ÄĀś®°śĚŅŚŹĮŚĶĆŚ•óŚQĆś®°śĚŅśĖᚼ∂ŚźćŚŹĮÁĒ®ŚŹėťáŹ
 {% include 'includes/nav.html' %}
 {% include template_name %}
12„ÄĀś®°śĚŅÁĎŰśČŅԾƚĹŅÁĒ® extends ŚíĆšłÄšł™ÁČĻĆDäÁöĄś†áÁ≠ĺ block ŚQĆšĺčŚQ?
¬†ŚQÉbase.html
 <head>
 <title>
¬†¬†{% block title %}ś†áťĘė{% endblock %}
 </title>
 </head>
 <body>
¬†{% block content %}ŚÜÖŚģĻ{% endblock %}
¬†{% block footer %} ôŚĶŚįĺ{% endblock %}
 </body>
 </html>
¬† šłčťĚĘÁöĄś®°śĚŅÁĎŰśČŅŤá™ base.html
¬†{% extends "base.html" %}¬†¬†¬†¬† ŚQÉŤŅôšłÄŤ°ĆŚŅÖôŚņLėĮĹW¨šłÄšł™ś®°śĚŅś†áĹ{印Ć
¬†{% block title %} śąĎÁöĄś†áťĘė {% endblock %}
 {% block content %}
¬†¬†<p> śąĎÁöĄŚÜÖŚģĻ </p>
¬†{% endblock %}¬†¬† ŚQÉšłćšłÄŚģöŤ¶ĀťáćśĖįŚģöšĻČÁą∂ś®°śĚŅšł≠ÁöĄśĮŹšł™ś®°śĚŅŚĚó
¬†ťÄöŤŅá block.super ŚľēÁĒ®Áą∂ś®°śĚŅŚĚóŚÜÖŚģĻ
http://groups.google.com/group/django-users djangoÁöĄgoogleŤģļŚĚõŚąóŤ°®
http://www.djangoproject.com/documentation/ djangoŚģėśĖĻśĖáś°£
http://code.djangoproject.com/browser/django/trunk/docs djangoŚģėśĖĻśúÄśĖįśĖáś°?ŚŹĮšłčŤĹ?/p>
šĽ•ŚČćÁúčŤŅáŚQĆťáćśĖįśł©šĻ†ÔľĆŚľÄŚßčÁúčpythonś°Üśě∂DjangoŚQĆŚ∑≤ĺlŹŚģČŤ£ÖԾƝĽėŤģ§ŚąĚŚßčč∆ĘŤŅéÁēĆťĚĘŚ∑≤ÁĽŹŚáļÁéįšļÜԾƜ†“éćģhttp://www.woodpecker.org.cn/obp/django/django-stepbystep/newtest/doc/#id3šĽčÁĽćŚÜÖŚģĻŚ≠¶šĻ†ŚQĆŚćīŚáļÁéįšļÜťĒôŤĮĮÔľö
Could not import newtest.helloworld. Error was: No module named httpwrappers
śü•Áúčdjango libŚQĆÁ°ģŚģěś≤°śúČŤŅôšł™ÁĪĽŚQĆśü•śČĎ÷éüŚõ†ing‚Ä?.....
[24śó•Ť°•ŚÖÖ]
googleŚąÓCļÜŚéüŚõ†ŚQ?br />HttpResponseĺc÷MĽédjango.utils.httpwrapersśĒĻŚąįšļÜdjango.http
ŚŹāŤßĀŚQ?br />http://python.cn/pipermail/python-chinese/2006-April/023980.html
http://code.djangoproject.com/wiki/NamespaceSimplification
[ŚÜ捰•ŚÖÖ]
Ťá™śąĎśĄüŤßČdjÁöĄÁľļÁāĻÔľöŚćēÁč¨ÁöĄś†áĹ{Ď÷ļďŚQĆś≤°śúČŚģĆŚÖ®šč…ÁĒ®pythonŚQõś°Üśě∂ÁĽďśěĄšłćśėĮŚĺąśłÖśôįŚQĆšłćŚ¶ātapestryŚQ?br />
What would you think about making a screencast, a la Rails? That was a lot of Python to read, and I ended up skipping over it pretty quickly.
Cool stuff, but I noticed that the pluralize filter doesn’t work (see screenshot)
Dagur,
Yeah I noticed that but forgot to investigate it. I’ll let you know what I find out.
Steve,
Yeah, that would rock. I didn’t realize how much code I was going to have to escape and format before this post was done!
This is some cool stuff! It would be nice to have it as part of official Django documentation, if some small typos are corrected.
Unfortunately this example doesn’t work out of box.
1) Getting Started ‚Ä?make sure to create your database _before_ you run django-admin.py init. It is not going to be created for you. Official Tutorial 1 (which is mentioned after ‚Äúinit‚Ä? explains it in details.
2) The Model ‚Ä?before going to play with the model make sure to install it using django-admin.py install tasks. It is explained in Official Tutorial 1.
3) URL Configuration ‚Ä?probably urls should be decoupled as in Official Tutorial 3. It is better for novices to provide ready-made code instead of reference to Official Tutorial 3.
4) URL Configuration ‚Ä?update should have the same parameters as create. Otherwise it doesn‚Äôt know where to forward to after updating.
5) URL Configuration ‚Ä?most probably delete should forward to ‚Ä?tasks/‚Ä? ‚Ä?tasks/new/‚Ä?is not defined in your tutorial.
6) Index ‚Ä?the same list is passed as ‚Äėnotdone_tasks_list‚Ä?and ‚Äėdone_tasks_list‚Ä? The latter should be done_task_list.
7) Index ‚Ä?it should be noted that all template files are to be created in subdirectory ‚Äėtemplates/tasks/‚Ä? not directly in ‚Äėtemplates/‚Ä?
8) Create Generic View ‚Ä?by some reasons tasks_form template has all ‚Äė‚ÄĚ‚Ä?prepended with ‚Äė\\‚Ä? They should be removed, otherwise it doesn‚Äôt work.
9) Delete ‚Ä?tasks_form_delete template should be renamed to tasks_confirm_delete.
I’m pretty sure that these tiny bugs are due to ongoing changes in Django and naturally occurring typos. Thank you for great tutorial!
Eugene,
Hey thanks for the feedback, I’ll do my best to update the tutorial this weekend. I did my best to get from scratch to my working situation, but I sure missed a couple of things along the way.
Thanks again for taking the time to go throught the tutorial and pointing out the little things.
Be aware that there are some significant and backwards-incompatible syntax changes for the models that might be showing up shortly, but I’ll definitely update this tutorial when/if that happens.
Great article.
Few minor additions that will help others (newb->newb). (I’m running django revision 525, FYI.)
1. A little reminder to ‚Äúdjango-admin.py init tasks‚Ä?to create the database table in the initialized database would help just before the screen pic of the index.html.
2. (r‚Äô^tasks/delete/(?P\d+)/?$‚Ä? [‚Ķ] post_delete_redirect=‚Ä?tasks/new/‚Ä? ),
seems to work as
(r‚Äô^tasks/delete/(?P\d+)/?$‚Ä? [‚Ķ] post_delete_redirect=‚Ä?tasks/create/‚Ä? ),
instead.
3. tasks_form_delete.html template seems to work as tasks_confirm_delete.hmtl instead
-=-
Awesome bite-sized article. Thanks for sharing.
I forgot to mention django-admin.py createsuperuser.
Matt, thank you the tutorial. I tried it but stopped with
/tasks/create/
because in my MS Explorer there is no submit button shown. Only input field.
Is it a problem on my side( django installation or MS Explorer or similar)?
Thank you for your reply
@Lada
You need to edit the template ‚Äútasks_form.html‚Ä?and change all \‚Ä?to ‚Ä?
First of all , thank you Matt for the tutorial. I learnt a lot.
But I think that UPDATE should also have post_save_redirect like Create Generic View. For me it did not work without that.
Best regards,
Lad.
W A R N I N G ! ! ! :: This Tutorial is VERY MUCH OUT OF DATE!!!
So what is out of day ? can we have an updated tutorial ?
This article may be slightly out-of-date, but it had far more useful examples on generic views to extrapolate from then the ‚Äúofficial documentation‚Ä?on the topic.
Matt, many thanks!
hi
Prompt how to get rid of advertising?
Cool gay butts are online now. Gay Butts shows its http://www.gay-butts.be butts collection just in Febrary!
gay cock hugeWatch these horny sluts taking it in the ass for the first time and getting their virgin butts ripped wide open.
hot blonde huge dildoIt’s an experience they will never forget. Frenzied 3some and wild anal actions caught on video are waiting here for you.