本文介紹了一個簡單Stateless Session Bean的開發,及其在Jboss下的部署;并分別用java,jsp和servlet做為客戶端,測試了這個EJB。
2.1 創建目錄結構
① 在D:\下新建一個myprojects目錄,用于存放自己開發的項目;
② 在myprojects目錄下新建1個helloworld目錄;
③ 在helloworld目錄下新建3個目錄:jsp目錄,該目錄用于存放所有的jsp和html等文件;src目錄,該目錄用于存放所有的java源文件;build目錄,該目錄用于存放所有的class文件。
2.2 一個簡單的Stateless Session Bean
在EJB2.0中,開發一個Stateless Session Bean包括6個步驟:
① 實現Home接口(HelloHome.java)
② 實現Remote接口(Hello.java)
③ 實現EJB類(HelloBean.java)
④ 實現Localhome接口(HelloLocalHome.java)
⑤ 實現Local接口(helloLocal.java)
⑥ 編寫部署文件(ejb-jar.xml)
2.2.1 EJB的詳細開發過程
Home接口負責控制一個Bean的生命周期(生成、刪除和查找Bean)。我們需要為HelloworldHome接口定義一個create()
方法,用來獲得一個實例Bean的引用,返回的對象是Remote接口。HelloHome.java的代碼如下:
package
com.neptune.helloworld.ejb;
import
javax.ejb.EJBHome;
public
interface HelloHome extends EJBHome {
public
Helloworld create()
throws
javax.ejb.CreateException,
java.rmi.RemoteException;
}
Remote接口提供了EJB類的所有業務方法,但具體的方法在EJB類中實現。大部分方法已經在EJBObject中定義,在Remote接口中,我們只需要重申Bean類中的業務邏輯方法。Hello.java的代碼如下:
package
com.neptune.helloworld.ejb;
import
java.rmi.RemoteException;
import
javax.ejb.EJBObject;
public
interface Hello extends EJBObject {
public
String sayHello() throws RemoteException;
}
EJB類包含了業務邏輯的具體細節。HelloBean.java的代碼如下:
package com.neptune.helloworld.ejb;
import java.rmi.RemoteException;
import javax.ejb.EJBException;
import javax.ejb.SessionBean;
import javax.ejb.SessionContext;
public
class HelloBean implements SessionBean {
private
javax.ejb.SessionContext sessionCtx;
public
SessionContext getSessionContext(){
return
sessionCtx;
}
public void ejbActivate()
throws
EJBException, RemoteException {
}
public void ejbPassivate()
throws
EJBException, RemoteException {
}
public void ejbRemove()
throws
EJBException, RemoteException {
}
public void setSessionContext(SessionContext
_sessionCtx)
throws
EJBException, RemoteException {
this.sessionCtx
= _sessionCtx;
}
public void ejbCreate()
throws
javax.ejb.CreateException{
}
public String sayHello(){
String
str = "Hello World. This is my first EJB test!";
return str;
}
}
HelloLocalHome.java的代碼如下:
package
com.neptune.helloworld.ejb;
import
javax.ejb.EJBLocalHome;
public
interface HelloLocalHome extends EJBLocalHome {
HelloLocal
create() throws javax.ejb.CreateException;
}
HelloLocal.java的代碼如下:
package
com.neptune.helloworld.ejb;
import
javax.ejb.EJBLocalObject;
public
interface HelloLocal extends EJBLocalObject {
public
String sayHello();
}
現在,我們已經完成了所有EJB代碼的編寫。最后我們編寫一個HelloClient.java文件,來調用該EJB,內容如下:
package
com.neptune.helloworld;
import
com.neptune.helloworld.ejb.HelloHome;
import
com.neptune.helloworld.ejb.Hello;
import
java.io.FileInputStream;
import
java.util.Properties;
import
javax.naming.InitialContext;
import
javax.rmi.PortableRemoteObject;
import
javax.naming.Context;
public class
HelloClient {
public
String hello(){
try {
// For
jndi
Properties
env = new Properties();
//
Config.properties file
env.put(Context.INITIAL_CONTEXT_FACTORY,
"org.jnp.interfaces.NamingContextFactory");
env.put(Context.PROVIDER_URL,
"jnp://127.0.0.1:1099");
InitialContext ctx = new javax.naming.InitialContext(env);
//Get a
reference to the Interest Bean
Object ref =
ctx.lookup("Hello");
//Get a
reference from this to the Bean"s Home interface
HelloHome
home = (HelloHome)
PortableRemoteObject.narrow(ref,
HelloHome.class);
//Create an
Hello object from the Home interface
Hello hello =
home.create();
//call the
hello() method
return
hello.sayHello();
} catch
(Exception e) {
e.printStackTrace();
return
e.toString();
}
}
public
static void main(String[] args){
HelloClient
hc = new HelloClient();
System.out.println(hc.hello());
}
}
然后我們在D:\myproject\helloworld\build目錄下新建一個build.bat文件,文件的內容如下:
set SRC_HOME=d:\myprojects\helloworld
set
classpath=%classpath%;d:\lib\jboss-j2ee.jar
javac %SRC_HOME%\src\com\neptune\helloworld\ejb\*.java
-d %SRC_HOME%\build
javac %SRC_HOME%\src\com\neptune\helloworld\
*.java -d %SRC_HOME%\build
通過Run這個build.bat文件,這些java source就被編譯成class文件放在d:\myproject\helloworld\build目錄下。
2.2.2 EJB的部署
現在我們在jboss
-3.2.7\server\default\deploy目錄下新建一個helloworld目錄,然后在helloworld目下新建一個
hello.jar目錄,再在hello.jar目錄下新建一個META-INF目錄。建好以上3個目錄后,我們在META-INF目錄下新建一個ejb
-jar.xml文件,內容如下:
<?xml
version="1.0" encoding="gb2312"?>
<!DOCTYPE
ejb-jar PUBLIC "-//Sun Microsystems, Inc.//DTD Enterprise JavaBeans
2.0//EN" "http://java.sun.com/dtd/ejb-jar_2_0.dtd">
<ejb-jar>
<description>This
is Hello EJB example</description>
<display-name>helloEJB</display-name>
<enterprise-beans>
<session>
<display-name>Hello</display-name>
<ejb-name>Hello</ejb-name>
<home>com.neptune.helloworld.ejb.HelloHome</home>
<remote>com.neptune.helloworld.ejb.Hello</remote>
<local-home>com.neptune.helloworld.ejb.HelloLocalHome</local-home>
<local>com.neptune.helloworld.ejb.HelloLocal</local>
<ejb-class>com.neptune.helloworld.ejb.HelloBean</ejb-class>
<session-type>Stateless</session-type>
<transaction-type>Container</transaction-type>
</session>
</enterprise-beans>
</ejb-jar>
在該目錄中,再建一個jboss-service.xml文件,內容如下:
<?xml
version="1.0" encoding="gb2312"?>
<jboss>
<enterprise-beans>
<session>
<ejb-name>Hello</ejb-name>
<jndi-name>Hello</jndi-name>
</session>
<secure>true</secure>
</enterprise-beans>
<reource-managers/>
</jboss>
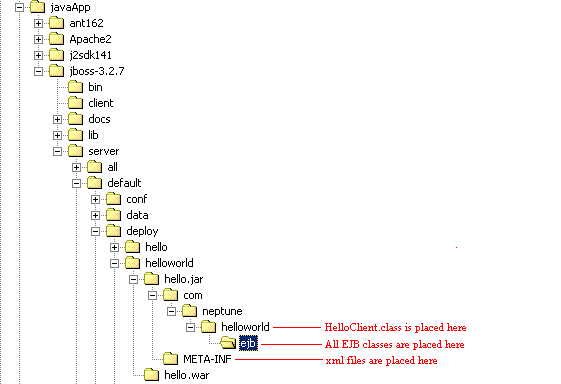
然后,我們把生成的class放到hello.jar目錄下。到目前為止,形成的目錄結構如下圖所示:
2.4 測試該EJB程序
2.4.1 通過jsp測試該EJB
在helloworld目錄下新建一hello.war目錄,然后在該目錄下新建一hello.jsp文件,內容如下:
<%@
page contentType="text/html; charset=gb2312"
language="java" %>
<HEAD>
<TITLE>hello.jsp</TITLE>
</HEAD>
<BODY
topMargin=0 marginheight="0">
<DIV
align=center style="width: 487; height: 138">
<%
com.neptune.helloworld.HelloClient
hc =
new
com.neptune.helloworld.HelloClient();
out.println(hc.hello());
%>
</DIV>
</BODY>
</HTML>
啟動Apache和Jboss,打開IE,在IE中輸入:
http://127.0.0.1/hello/hello.jsp
如果網頁顯示“Hello World. This is my first EJB test!”,則表示測試成功。如果測試不成功,請仔細檢查以上開發步驟;閱讀<<Win2k下Jboss,Tomcat和Apache的集成>>這篇文章。
2.4.2 通過Run HelloClient類測試該EJB
在hello.jar目錄下新建一個runclient.bat文件,內容如下:
set
JBOSS_CLIENT_PATH=C:\javaApp\jboss-3.2.7\client
set
JBOSS_SERV_PATH=C:\javaApp\jboss-3.2.7\server
set
classpath=%classpath%;c:\javaApp\j2sdk141\lib\tools.jar;%JBOSS_CLIENT_PATH%\jbossall-client.jar;%JBOSS_CLIENT_PATH%\jboss-j2ee.jar;
java
com.neptune.helloworld.HelloClient
Run
runclient.bat文件后,console將打印出“Hello
World. This is my first EJB test!”。如下圖所示:

2.4.3 通過servlet測試該EJB
HelloServlet.java的代碼如下:
import
com.neptune.helloworld.ejb.Hello;
import
com.neptune.helloworld.ejb.HelloHome;
import
java.io.IOException;
import
java.io.PrintWriter;
import
java.util.Properties;
import
javax.naming.Context;
import
javax.naming.InitialContext;
import
javax.rmi.PortableRemoteObject;
import
javax.servlet.ServletException;
import
javax.servlet.http.HttpServlet;
import
javax.servlet.http.HttpServletRequest;
import
javax.servlet.http.HttpServletResponse;
public
class HelloServlet extends HttpServlet {
public
void doPost(HttpServletRequest request,
HttpServletResponse
response)
throws IOException, ServletException {
response.setContentType("text/html");
PrintWriter out = response.getWriter();
out.println("<hr>");
out.println("Hello World! This is a
Servlet!");
try {
Properties
env = new Properties();
env.put(Context.INITIAL_CONTEXT_FACTORY,
"org.jnp.interfaces.NamingContextFactory");
env.put(Context.PROVIDER_URL,
"jnp://127.0.0.1:1099");
InitialContext ctx = new
javax.naming.InitialContext(env);
//Get a reference to the Interest Bean
Object ref =
ctx.lookup("Hello");
//Get a reference from this to the
Bean"s Home interface
HelloHome
home = (HelloHome)
PortableRemoteObject.narrow(ref,
HelloHome.class);
//Create an Hello object from the Home
interface
Hello hello = home.create();
//call the hello() method
out.println(hello.sayHello());
} catch (Exception e) {
e.printStackTrace();
out.println(e.toString());
}
out.println("<hr>");
}
public
void doGet(HttpServletRequest request,
HttpServletResponse
response)
throws
IOException, ServletException {
doPost(request,
response);
}
}
在helloworld目下新建一個hello.war目錄,再在hello.war目錄下新建一個WEB-INF目錄。然后在WEB-INF目錄下新建一個web.xml文件用于配置servlet,內容如下:
<?xml
version="1.0"?>
<!DOCTYPE
web-app PUBLIC
"-//Sun
Microsystems, Inc.//DTD Web Application 2.3//EN"
"http://java.sun.com/dtd/web-app_2_3.dtd">
<web-app>
<description>EJB
Test</description>
<servlet>
<servlet-name>helloServlet</servlet-name>
<servlet-class>HelloServlet</servlet-class>
<load-on-startup>1</load-on-startup>
</servlet>
<servlet-mapping>
<servlet-name>helloServlet</servlet-name>
<url-pattern>/helloServlet</url-pattern>
</servlet-mapping>
</web-app>
在WEB-INF目錄下新建一個classes目錄,把生成的HelloServlet.class拷貝到WEB-INF目錄。
啟動Apache和Jboss,打開IE,在IE中輸入:
http://127.0.0.1/hello/helloServlet
如果測試成功,網頁將顯示“Hello World! This is a Servlet! Hello World. This is my first EJB
test!”。
作者:蔡曉均
E-mail地址:neptunecai@yahoo.com.cn
版權所有,轉摘請注明:摘自www.aygfsteel.com/neptune