自己學(xué)軟件編程不久,在學(xué)習(xí)中總結(jié)和記錄啦一些學(xué)習(xí)的入門知識!有不足之處,請批評指正。
Hibernate入門指南
Mike zeseler
Hibernate的5個核心接口:
Session
SessionFactory
Transaction
Query
Configuration
對象“持久化”狹義理解:是把域?qū)ο笥谰帽4娴綌?shù)據(jù)庫中。
持久化和數(shù)據(jù)庫相關(guān)的各項(xiàng)操作:
保存:把域?qū)ο笥谰帽4娴綌?shù)據(jù)庫中
更新:更新數(shù)據(jù)庫中域?qū)ο蟀l(fā)的狀態(tài)。
刪除: 從數(shù)據(jù)庫中刪除一個域?qū)ο蟆?/span>
加載:根據(jù)特定的oid(對象標(biāo)示符)把一個域?qū)ο髲臄?shù)據(jù)庫加載到內(nèi)存中。
查詢:根據(jù)特定的查詢條件,把符合查詢條件的一個或多個域?qū)ο髲臄?shù)據(jù)庫加載到內(nèi)存中。
一:新建項(xiàng)目web java項(xiàng)目都可以
New——》project——》webproject——》T_user
截圖如:
為項(xiàng)目添加hibernateCapabilitise截圖如
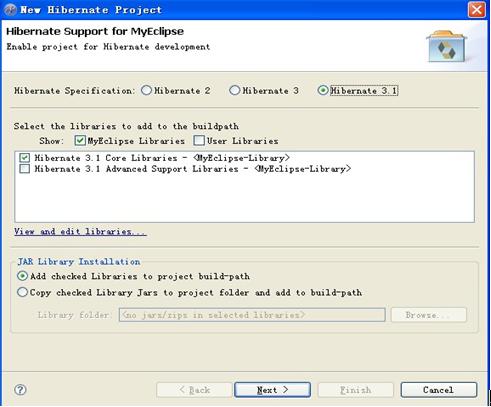
點(diǎn)擊next-à如圖:
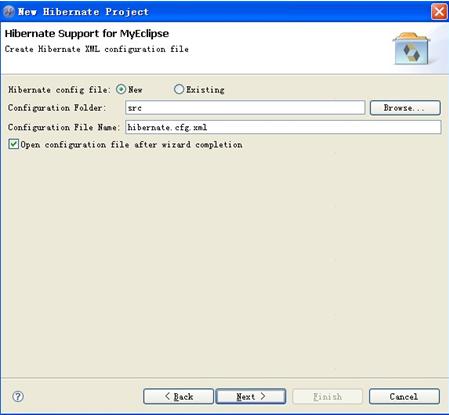
點(diǎn)擊--ànext如圖:這一步需要詳細(xì)的配置:
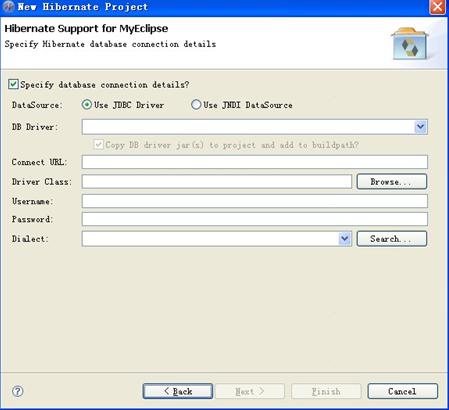
一:一般我們需要選擇mysql數(shù)據(jù)庫截圖:
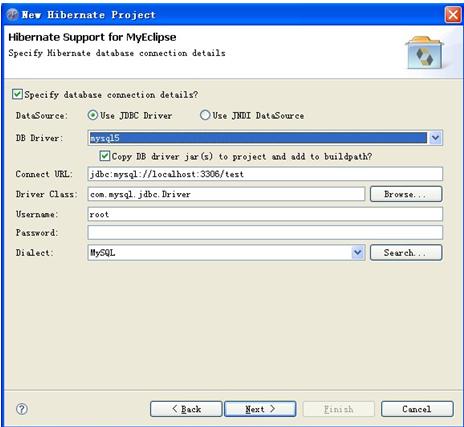
這里的配置需要給大家詳細(xì)的說下:具體情況操作完后慢慢詳細(xì)講解:myeclipse Database Explorer的使用:
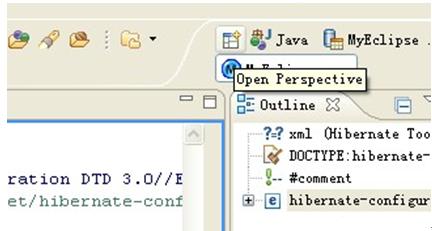
Java 前面有個窗口帶+號的標(biāo)示,點(diǎn)擊下就可以出現(xiàn)一個下拉菜單;看看有沒有Database Explorer這項(xiàng),沒有的話點(diǎn)擊other進(jìn)行下一步:
出現(xiàn)一個選框:我們選擇Database Explore這項(xiàng):
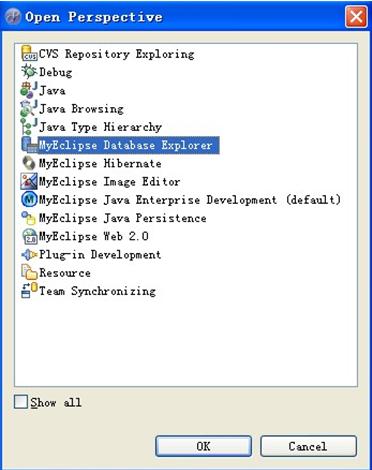
點(diǎn)擊ok 完成。
Database Explore的界面截圖:
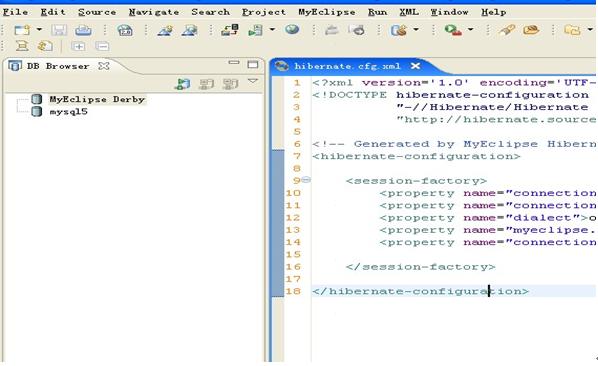
我們來連接一個數(shù)據(jù)庫。Myeclipse Derby 是myeclipse自帶的一個數(shù)據(jù)庫,它比mysql支持更好的事物(trasaction)。
右擊鼠標(biāo) new一個 newDatabase Connection Driver
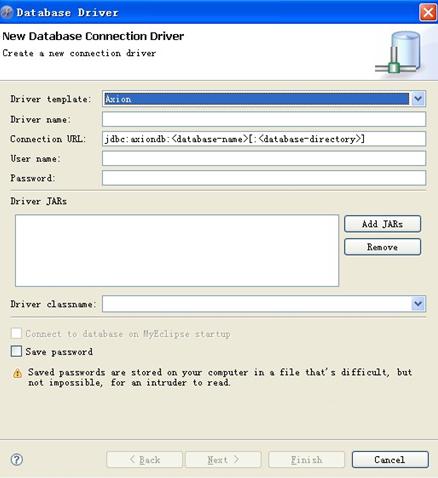
這里需要天相關(guān)的配置:
Driver template 選擇你裝好的數(shù)據(jù)庫名稱:我以mysql為例:
Driver name: mysql55 隨你的意思取就ok。
Connection url:jdbc:mysql://<hostname>[<:3306>]/<dbname>
我用的是mysql5則是:jdbc:mysql://localhost:3306/test.
(連接數(shù)據(jù)庫用戶名)username:root
Password: 我的密碼為空();
Driver jars 驅(qū)動類,不同的數(shù)據(jù)庫有不同的jar包,我用的是mysqljar包。
點(diǎn)擊Save password,Connection to database on我們不需要理會,配置好的的截圖:
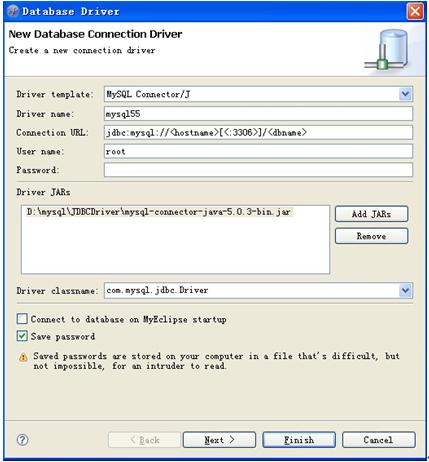
點(diǎn)擊next—》點(diǎn)擊finish ok完成,以上就是Database Explore。Easy吧。^_^
點(diǎn)擊next—》下一步截圖:
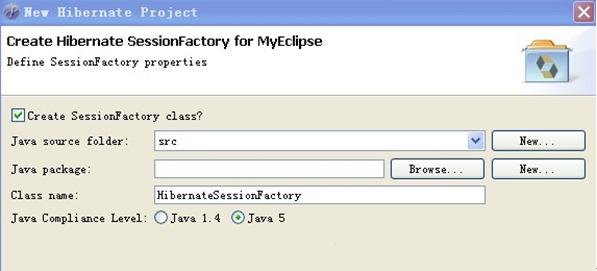
去掉create SessionFactory class 點(diǎn)擊finish完成。
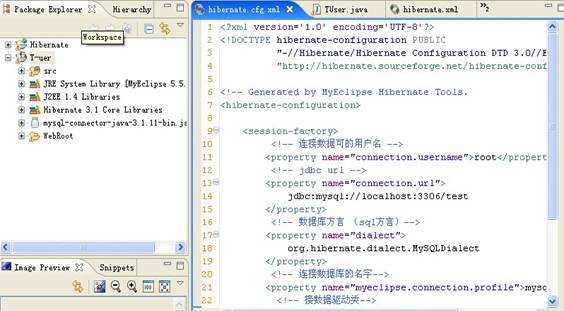
完成后的截圖
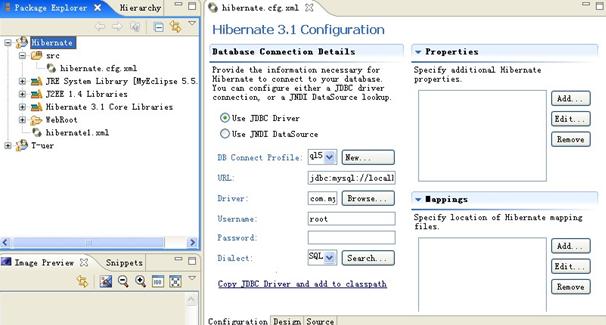
一般的hibernate.cfg.xml配置文件:
|
<?xml version="1.0" encoding="gbk"?><!DOCTYPE hibernate-configuration PUBLIC"-//Hibernate/Hibernate Configuration DTD 3.0//EN" "http://hibernate.sourceforge.net/hibernate-configuration-3.0.dtd">
<hibernate-configuration>
<session-factory>
<!—顯示實(shí)際操作數(shù)據(jù)庫時的sql(這里是mysql數(shù)據(jù)庫) -->
<property name="show_sql">true</property>
<!—將顯示的sql排版,方便觀看-->
<property name="format_sql">true</property>
<!—sql方言,這里設(shè)定的是mysql -->
<property name="dialect">org.hibernate.dialect.MySQLDialect</property>
<!—JDBC驅(qū)動類-->
<property name="connection.driver_class">com.mysql.jdbc.Driver</property>
<!-- JDBC URL -->
<property name="connection.url">jdbc:mysql://localhost/demo</property>
<!—連接數(shù)據(jù)庫用戶名 -->
<property name="connection.username">root</property>
<!—數(shù)據(jù)庫密碼(我的數(shù)據(jù)庫密碼為空) -->
<property name="connection.password"></property>
<!—下面的是數(shù)據(jù)庫要映射的文件-->
</session-factory>
</hibernate-configuration>
|
建表:建表語句
|
Create table T_user(
id bigint not null auto_increment,
name varchar(255),
age bigint,
primary key(id)
)engine=myisam default charset=gbk//支持中文防止插入數(shù)據(jù)出現(xiàn)亂碼
|
Hibernate.cfg.xml實(shí)例
|
<?xml version='1.0' encoding='UTF-8'?>
<!DOCTYPE hibernate-configuration PUBLIC
"-//Hibernate/Hibernate Configuration DTD 3.0//EN"
"http://hibernate.sourceforge.net/hibernate-configuration-3.0.dtd">
<!-- Generated by MyEclipse Hibernate Tools. -->
<hibernate-configuration>
<session-factory>
<!-- 連接數(shù)據(jù)可的用戶名 -->
<property name="connection.username">root</property>
<!-- jdbc url -->
<property name="connection.url">
jdbc:mysql://localhost:3306/test
</property>
<!-- 數(shù)據(jù)庫方言(sql方言)-->
<property name="dialect">
org.hibernate.dialect.MySQLDialect
</property>
<!-- 連接數(shù)據(jù)庫的名字-->
<property name="myeclipse.connection.profile">mysql5</property>
<!-- 接數(shù)據(jù)驅(qū)動類-->
<property name="connection.driver_class">
com.mysql.jdbc.Driver
</property>
<!-- 數(shù)據(jù)庫映射文件-->
<mapping resource="dao/TUser.hbm.xml" />
</session-factory>
</hibernate-configuration>
|
首先咋們建立一張表:如上的建表語句:打開database explorer連接數(shù)據(jù)庫,右擊Connected to mysql5,選擇New SQL Editor,寫上建表語句
截圖如下;
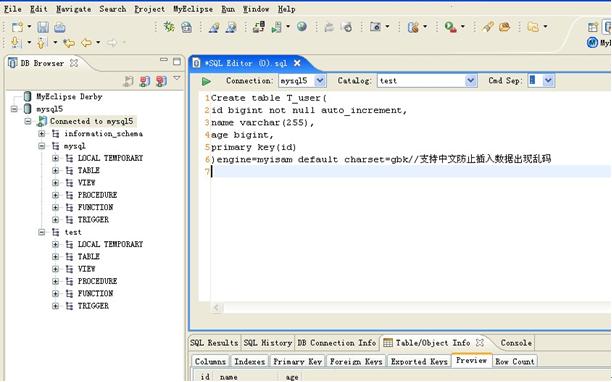
點(diǎn)擊綠色的三角符號,建表ok啦!
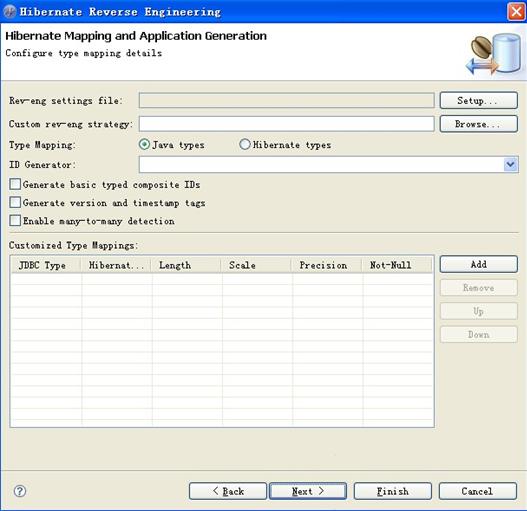
Ok進(jìn)行下一步:在建好的表上右擊:選擇Hibernate Reverse Engineering,這里需注意我進(jìn)行這步之前首先一定要關(guān)掉如上圖的sql Editor.
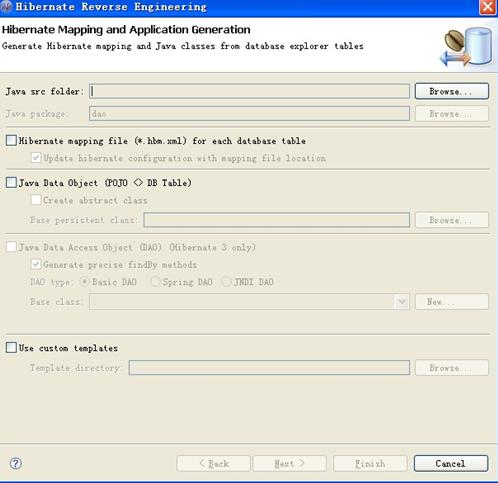 Java src folder: 點(diǎn)擊Browser
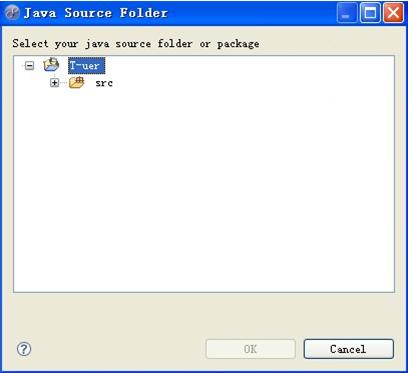
選擇T_user下的目錄src:點(diǎn)擊ok
進(jìn)行下一項(xiàng):java pakage 我們需填上個dao,名稱無所謂,但是我們要讓別人理解,更容易清楚我們的編程設(shè)計(jì)思想,編程不是讓別人看不懂,自己很牛,但是我們的編碼的最終思想是越來越簡單,不是所謂的越搞越復(fù)雜,讓別人更了解我們的程序。
具體的截圖如下:
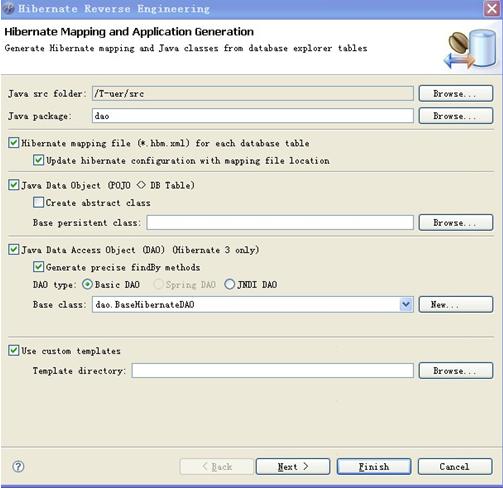 點(diǎn)擊下一步
 這步其實(shí)沒有什么可以填的,我們直接下一步:
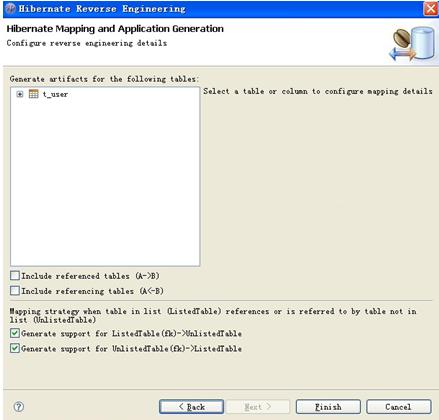
需要注意的是
1:include referenced table(A->B)
2:include referenced table(A<-B)
我們需要勾選他們:
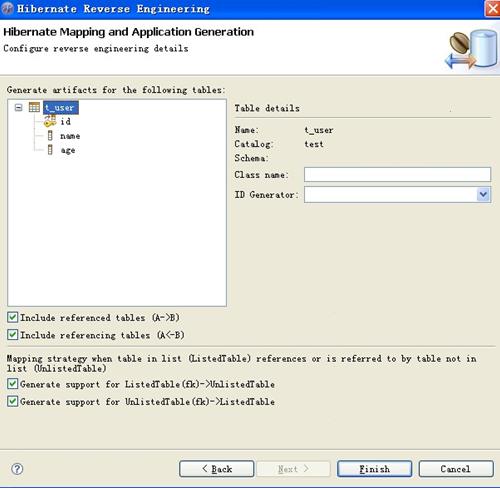
好一切ok啦^_^。咋們點(diǎn)擊finish完成。
生成的目錄
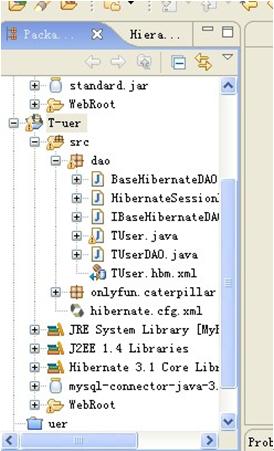
所限我們需要改的是:Tuser.hbm.xml
|
<?xml version="1.0" encoding="utf-8"?>
<!DOCTYPE hibernate-mapping PUBLIC "-//Hibernate/Hibernate Mapping DTD 3.0//EN"
"http://hibernate.sourceforge.net/hibernate-mapping-3.0.dtd">
<!--
Mapping file autogenerated by MyEclipse Persistence Tools
-->
<hibernate-mapping>
<class name="dao.TUser" table="t_user" catalog="test">
<id name="id" type="java.lang.Long">
<column name="id" />
<generator class="identity" />
</id>
<property name="name" type="java.lang.String">
<column name="name" />
</property>
<property name="age" type="java.lang.Long">
<column name="age" />
</property>
</class>
</hibernate-mapping>
|
<generator class="identity" />在各項(xiàng)需要改成前面的或是identity。
BaseHibernateDAO
|
package dao;
import org.hibernate.Session;
/**
*Dataaccessobject(DAO)fordomainmodel
*@authorMyEclipsePersistenceTools
*/
publicclass BaseHibernateDAO implements IBaseHibernateDAO {
public Session getSession() {
return HibernateSessionFactory.getSession();
}
}
|
|
|
IBaseHibernateDAO
|
package dao;
import org.hibernate.Session;
/**
*Dataaccessinterfacefordomainmodel
*@authorMyEclipsePersistenceTools
*/
publicinterface IBaseHibernateDAO {
public Session getSession();
}
|
HibernateSessionFactory
TUser
|
package dao;
/**
*TUsergeneratedbyMyEclipsePersistenceTools
*/
publicclass TUser implements java.io.Serializable {
// Fields
private Long id;
private String name;
private Long age;
// Constructors
/**defaultconstructor*/
public TUser() {
}
/**minimalconstructor*/
public TUser(Long id) {
this.id = id;
}
/**fullconstructor*/
public TUser(Long id, String name, Long age) {
this.id = id;
this.name = name;
this.age = age;
}
// Property accessors
public Long getId() {
returnthis.id;
}
publicvoid setId(Long id) {
this.id = id;
}
public String getName() {
returnthis.name;
}
publicvoid setName(String name) {
this.name = name;
}
public Long getAge() {
returnthis.age;
}
publicvoid setAge(Long age) {
this.age = age;
}
}
|
TUserDAO
測試代碼:HibernateDemo
|
package onlyfun.caterpillar;
import org.hibernate.Session;
import org.hibernate.Transaction;
import dao.HibernateSessionFactory;
import dao.TUser;
publicclass HibernateDemo {
publicstaticvoid main(String[] args) {
TUser tuser = new TUser();
tuser.setName("hibernate測試");
tuser.setAge(new Long(23));
// 開啟Session,相當(dāng)於開啟JDBC的Connection
Session session = HibernateSessionFactory.getSessionFactory().openSession();
// Transaction表示一組會話操作
Transaction tx= session.beginTransaction();
// 將物件映射至資料庫表格中儲存
session.save(tuser);
tx.commit();
session.close();
System.out.println("新增資料OK!請先用MySQL觀看結(jié)果!");
HibernateSessionFactory.shutdown();
}
}
|
測試結(jié)果:
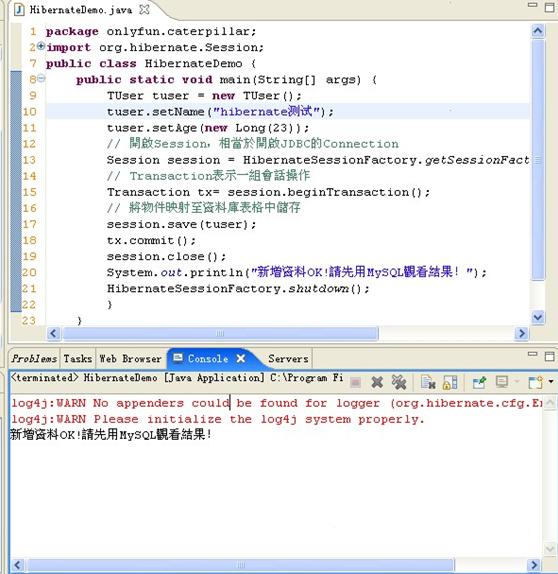
測試ok,呵呵。
還有個實(shí)例大家練習(xí)下我這里只給出建表語句:或測試代碼,其他的與上面的方法一樣:
建表語句:
|
Create table Student(
Id int not null auto_increment,
Uername varchar(200) not null,
Password vachar(20) not null,
Age int,
Primary key (id)
)engine = myisam default charset=gbk
|
測試代碼:
|
package HibernateTransaction;
import java.util.List;
import dao.Student;
import dao.StudentDAO;
publicclass HibernateDAOTest {
privatestatic Object results;
publicstaticvoid main(String [] args){
//實(shí)例化dao
StudentDAO dao = new StudentDAO();
//打開事務(wù)
org.hibernate.Transaction tran = dao.getSession().beginTransaction();
//生成普通java類
Student bean = new Student();
//設(shè)置屬性
bean.setUername("struts測試");
bean.setPassword("1234");
bean.setAge(100);
//插入數(shù)據(jù)
dao.save(bean);
//提交事務(wù)
tran.commit();
List<Student> results= dao.findAll();
for(Student o : results) {
System.out.println("編號:"+o.getId());
System.out.println("姓名:"+o.getId());
}
dao.getSession().close();
}
}
|