使用版本為Spring2.5.6

新建一個(gè)Java Project 命名為spring 并導(dǎo)入相關(guān)的jar包
配置Spring配置文件

在src下新建beans.xml配置文件
 <?xml version="1.0" encoding="UTF-8"?>
 <beans xmlns="http://www.springframework.org/schema/beans"
 xmlns:xsi="http://www.w3.org/2001/XMLSchema-instance"
 xsi:schemaLocation="http://www.springframework.org/schema/beans
 http://www.springframework.org/schema/beans/spring-beans-2.5.xsd">
 </beans>
實(shí)例化Spring容器 建議用方法一

新建一個(gè)單元測(cè)試SpringTest,并導(dǎo)入測(cè)試所用的包
 package junit.test;
 import org.junit.BeforeClass;
 import org.junit.Test;
 import org.springframework.context.ApplicationContext;
 import org.springframework.context.support.ClassPathXmlApplicationContext;
 import cn.itcast.service.PersonService;
 public class SpringTest {
 @BeforeClass
 public static void setUpBeforeClass() throws Exception {
 }
}
 @Test public void instanceSpring(){
 ApplicationContext ctx = new ClassPathXmlApplicationContext("beans.xml");
 }
} }
}
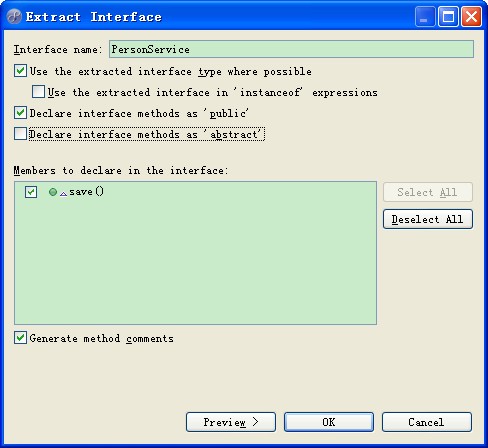
新建一個(gè)業(yè)務(wù)Bean,命名為PersonServiceBean;抽取PersonServiceBean的接口。
 package cn.itcast.service.impl;
 import cn.itcast.service.PersonService;
 public class PersonServiceBean implements PersonService {
 public void save(){
 System.out.println("我是save()方法");
 }
} }
}

 package cn.itcast.service;
 public interface PersonService {
 public void save();
 }
}<bean id="personService" class="cn.itcast.service.impl.PersonServiceBean"></bean>
注意:編寫spring配置文件時(shí),不能出現(xiàn)幫助信息 同通過(guò)如下方法解決

修改SpringTest代碼
 package junit.test;
 import org.junit.BeforeClass;
 import org.junit.Test;
 import org.springframework.context.ApplicationContext;
 import org.springframework.context.support.ClassPathXmlApplicationContext;
 import cn.itcast.service.PersonService;
 public class SpringTest {
 @BeforeClass
 public static void setUpBeforeClass() throws Exception {
 }
}
 @Test public void instanceSpring(){
 ApplicationContext ctx = new ClassPathXmlApplicationContext("beans.xml");
 PersonService personService = (PersonService)ctx.getBean("personService");
 personService.save();
 }
} }
}
執(zhí)行SpringTest文件 觀察控制臺(tái)輸出


以上證明本Spring程序運(yùn)行成功!
代碼參考 /Files/luckygino/spring.rar


