第五講
多線程
● 在多任務系統中,每個獨立執行的程序稱為進程��,也就是“正在進行的程序”。我們現在使用的操作系統一般都是多任務的��,即能夠同時執行多個應用程序�����,實際情況是�,操作系統負責CPU等設備的資源進行分配和管理�����,雖然這些設備某一時刻只能做一件事��,但以非常小的時間間隔交替執行多個程序,就可以給人以同時執行多個程序的感覺。
● 一個進程中又可以包含一個或多個線程��,一個線程就是一個程序內部的一條執行線索��,如果要一程序中實現多段代碼同時交替運行,就需產生多個線程���,并指定每個線程上所要運行的代碼段,這就是多線程��。
用Thread類創建線程
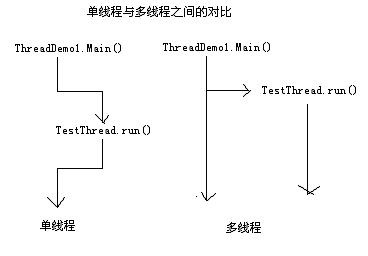
● 要將一段代碼在一個新的線程上運行�����,該代碼應該在一個類的run函數中��,并且run函數所在的類是Thread類的子類。倒過來看�,我們要實現多線程��,必須編寫一個繼承了Thread類的子類�,子類要覆蓋Thread類中的run函數��,在子類的run函數中調用想在新線程上運行的程序代碼�。
● 啟動一個新的線程�,我們不是直接調用Thread的子類對象的run方法,而是調用Thread子類對象的start(從Thread類中繼承到的)方法。Thread類對象的start方法將產生一個新的線程,并在該線程上運行該Thread類對象的run方法����。根據面向對象的運行時的多態性�����,在該線程上實際運行的是Thread子類(也就是我們寫的那個類)對象中的run方法。
● 由于線程的代碼段在run方法中,那么該方法執行完成以后線程也就相應的結束了�,因而我們可以通過控制run方法中的循環的條件來控制線程的結束�����。
class SubThread extends Thread
{
public void run()
{
while(true)
{
System.out.println("SubThread: "+Thread.currentThread().getName());
}
}
}
class TestThread
{
public static void main(String[]args)
{
//SubThread st=new SubThread();
//st.start();
new SubThread().start();
while(true)
{
System.out.println("main: "+Thread.currentThread().getName());
}
}
}
后臺線程與聯合線程
● 如果我們對某個線程對象在啟動(調用start方法)之前調用了setDaemon(true)方法,這個線程就變成了后臺線程。
● 對java程序來說���,只要還有一個前臺線程在運行�,這個進程就不會結束,如果一個進程中只有后臺線程運行���,這個進程就會結束。
class ThreadDemo1
{
public static void main(String[]args)
{
Thread tt=new TestThread();
tt.setDaemon(true);
tt.start();//run();
}
}
class TestThread extends Thread
{
public void run()
{
while(true)
{
System.out.println("run():"+Thread.currentThread().getName());
}
}
}
● pp.join()的作用是把pp所對應的線程合并到調用pp.join();語句的線程中��。
例如:
class ThreadDemo1
{
public static void main(String[]args)
{
Thread tt=new TestThread();
//tt.setDaemon(true);
tt.start();
int index=0;
//在index=100后���,tt線程join主線程中�����,主線程停止����。在tt線程運行10秒后�����,主線程和tt線程又交替運行��。join()中也可不帶參數。
while(true)
{
if(++index==100)
try{tt.join(10000);}catch(Exception e){}
System.out.println("mian():"+Thread.currentThread().getName());
}
}
}
class TestThread extends Thread
{
public void run()
{
while(true)
{
System.out.println("run():"+Thread.currentThread().getName());
}
}
}
實現Runnable接口的多線程方法
class ThreadDemo1
{
public static void main(String[]args)
{
//Thread tt=new TestThread();
//tt.setDaemon(true);
Thread tt=new Thread(new TestThread());
tt.start();
int index=0;
//在index=100后�����,tt線程join主線程中����,在tt線程運行10秒后,主線程和tt線程交替運行���。join()中也可不帶參數。
while(true)
{
if(++index==100)
try{tt.join(10000);}catch(Exception e){}
System.out.println("mian():"+Thread.currentThread().getName());
}
}
}
class TestThread implements Runnable//extends Thread
{
public void run()
{
while(true)
{
System.out.println("run():"+Thread.currentThread().getName());
}
}
}
使用Runnable接口創建多線程
● 適合多個相同程序代碼的線程去處理同一資源的情況���,把虛擬CPU(線程)同程序的代碼����、數據有效分離,較好地體現了面向對象的設計思想。
● 可以避免由于Java的單繼承性帶來的局限。我們經常碰到這樣一種情況����,即當我們要將已經繼承了其一個類的子類放入多線程中����,由于一個類不能同時有兩個父類��,所以不能繼承Thread類的方式�����,那么,這個類只能采用實現Runnable。
● 當線程被構造時,需要的代碼和數據通過一個對象作為構造函數的實參傳遞進去��,這個對象實現了Runnable接口的類的實例。
● 事實上���,幾乎所有多線程應用都可用Runnable接口方式。
class ThreadDemo1
{
public static void main(String[]args)
{
TestThread t=new TestThread();
new Thread(t).start();
new Thread(t).start();
new Thread(t).start();
new Thread(t).start();
}
}
class TestThread implements Runnable
{
//int tickets=100;
int tickets=1;
public void run()
{
/*while(true)
{
if(tickets>0)
System.out.println("run():"+Thread.currentThread().getName()+" "+tickets--);
} */
for(;tickets<101;tickets++)
{
System.out.println("run():"+Thread.currentThread().getName()+" "+tickets);
}
}
}
多線程的同步
● 使用同步代碼塊來實現線程的同步
class ThreadDemo1
{
public static void main(String[]args)
{
TestThread t=new TestThread();
new Thread(t).start();
new Thread(t).start();
new Thread(t).start();
new Thread(t).start();
}
}
class TestThread implements Runnable
{
String str=new String("");
int tickets=100;
//int tickets=1;
public void run()
{
while(true)
{
synchronized(str)
{
if(tickets>0)
{
try
{
Thread.sleep(10);
}catch(Exception e)
{
e.printStackTrace();
}
System.out.println("run():"+Thread.currentThread().getName()+" "+tickets--);
}
}
}
/*synchronized(str)
{
for(;tickets<101;tickets++)
{
try{Thread.sleep(10);}catch(Exception e){e.printStackTrace();}//讓線程暫停10毫秒
System.out.println("run():"+Thread.currentThread().getName()+" "+tickets);
}
}*/
}
}
● 使用同步函數來實現線程的同步
class ThreadDemo1
{
public static void main(String[]args)
{
TestThread t=new TestThread();
new Thread(t).start();
new Thread(t).start();
new Thread(t).start();
new Thread(t).start();
}
}
class TestThread implements Runnable
{
int tickets=100;
public void run()
{
while(true)
{
sale();
}
}
public synchronized void sale()
{
if(tickets>0)
{
try{Thread.sleep(10);}catch(Exception e){e.printStackTrace();}//讓線程暫停10毫秒
System.out.println("run():"+Thread.currentThread().getName()+" "+tickets--);
}
}
}
● 代碼塊與函數間的同步
class ThreadDemo1
{
public static void main(String[]args)
{
TestThread t=new TestThread();
new Thread(t).start();
try{Thread.sleep(1);}catch(Exception e){}
t.str="method";
new Thread(t).start();
}
}
class TestThread implements Runnable
{
String str=new String("");
int tickets=100;
public void run()
{
if(str.equals("method"))
{
while(true)
{
sale();
}
}
else
{
while(true)
{
synchronized(this)
{
if(tickets>0)
{
try{Thread.sleep(10);}catch(Exception e){e.printStackTrace();}//讓線程暫停10毫秒
System.out.println("run():"+Thread.currentThread().getName()+" "+tickets--);
}
}
}
}
}
public synchronized void sale()
{
if(tickets>0)
{
try{Thread.sleep(10);}catch(Exception e){e.printStackTrace();}//讓線程暫停10毫秒
System.out.println("method():"+Thread.currentThread().getName()+" "+tickets--);
}
}
}
線程間的通信
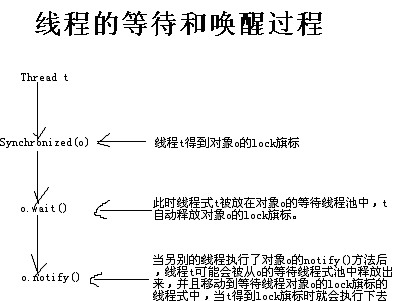
● wait:告訴當前線程放棄監視器并進入睡眠狀態直到其他線程進入同一監視器并調用notify為止��。
● notify:喚醒同一對象監視器中調用wait的第一線程�。用于類似飯館有一個空位后通知所有等候就餐的顧客中的第一位可以入座的情況。
● notifyAll:喚醒同一對象監視器中調用wait的所有線程��,具有最高優先級的線程首先被喚醒并執行�。
例:一線程向緩沖區中不斷放入”zhangsan”,”male”和”lisi”,”female”,另一線程不斷從緩沖中取走數據��。
線程通信例程1:(在下面例程2的基礎上修改而來)
class Producer implements Runnable
{
Q q;
public Producer(Q q)
{
this.q=q;
}
public void run()
{
int i=0;
while(true)
{
if(i==0)
{
q.put("zhangsan","male");
}
else
{
q.put("lisi","female");
}
i=(i+1)%2;
}
}
}
class Consumer implements Runnable
{
Q q;
public Consumer(Q q)
{
this.q=q;
}
public void run()
{
while(true)
{
q.get();
}
}
}
class Q
{
private String name="unknown";
private String sex="unknown";
private boolean bFull=false;//設置緩沖區狀態��,空
public synchronized void put(String name,String sex)
{
if(bFull)//如果緩沖區為滿(true)�,線程進入睡眠狀態
try{wait();}catch(Exception e){}
this.name=name;
try{Thread.sleep(1);}catch(Exception e){}
this.sex=sex;
bFull=true;
notify();
}
public synchronized void get()
{
if(!bFull)//如果緩沖區為空����,線程進入睡眠狀態
try{wait();}catch(Exception e){}
System.out.print(name);
System.out.println(":"+sex);
bFull=false;
notify();
}
}
class ThreadCommunation
{
public static void main(String[]args)
{
Q q=new Q();
new Thread(new Producer(q)).start();
new Thread(new Consumer(q)).start();
}
}
//sleep((int)(Math.random() * 100));
線程通信例程2:
class Producer implements Runnable
{
Q q;
public Producer(Q q)
{
this.q=q;
}
public void run()
{
int i=0;
while(true)
{
synchronized(q)
{
if(q.bFull)
try{q.wait();}catch(Exception e){}
//else
//{
if(i==0)
{
q.name="zhangsan";
try{Thread.sleep(1);}catch(Exception e){}
q.sex="male";
}
else
{
q.name="lisi";
q.sex="female";
}
q.bFull=true;
q.notify();
//}
}
i=(i+1)%2;
}
}
}
class Consumer implements Runnable
{
Q q;
public Consumer(Q q)
{
this.q=q;
}
public void run()
{
while(true)
{
synchronized(q)
{
if(!q.bFull)
try{q.wait();}catch(Exception e){}
//else不能用else語句�����。
//{
System.out.print(q.name);
System.out.println(":"+q.sex);
q.bFull=false;
q.notify();
//}
}
}
}
}
class Q
{
String name="unknown";
String sex="unknown";
boolean bFull=false;
}
class ThreadCommunation
{
public static void main(String[]args)
{
Q q=new Q();
new Thread(new Producer(q)).start();
new Thread(new Consumer(q)).start();
}
}
//sleep((int)(Math.random() * 100));
線程的生命的控制
● 程序中如何控制線程的生命
class ThreadTest implements Runnable
{
private boolean bStop=false;
public void stop()
{
bStop=true;
}
public void run()
{
while(!bStop)
{
System.out.println(Thread.currentThread().getName()+"is running.");
}
}
}
class TestThread
{
public static void main(String[]args)
{
ThreadTest tt=new ThreadTest();
new Thread(tt).start();
for(int i=0;i<100;i++)
{
if(i==50)
{
tt.stop();
}
System.out.println(Thread.currentThread().getName());
}
}
}