溜金歲月, 成長(zhǎng)點(diǎn)滴
no description
no description
先占個(gè)地兒
http://blog.csdn.net/boat1980/archive/2008/07/23/2698318.aspx
二,摘要
dbms_crypto.Hash(utl_i18n.string_to_raw('input'),dbms_crypto.MD5))
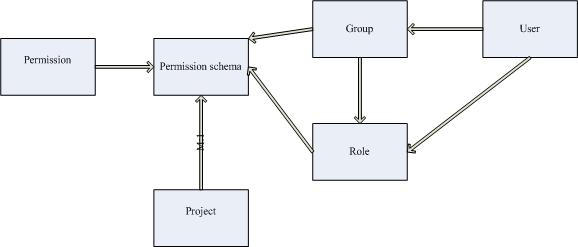
用了幾天jira管理對(duì)它的權(quán)限模式有了初步理解:

project和permission schema多對(duì)一,從而形成了permission schema的重用
而permission schema本身則代表了group/user和pemission之前的映射關(guān)系
另外,jira還有一個(gè)Project Role的概念更增加了jira權(quán)限管理的靈活性
其實(shí)它實(shí)質(zhì)上就是一個(gè)角色(RBAC中的R),可以和group/user多對(duì)多關(guān)聯(lián),
(當(dāng)然也可和Permission通過schema進(jìn)行關(guān)聯(lián))
使jira的權(quán)限配置更新靈活的同時(shí),也增加了相當(dāng)?shù)膹?fù)雜性
一,造libmysql.def文件
1, ${mysql_home}/include/libmySQL.def文件如果有直接用
2, 否則下載pexports工具,執(zhí)行pexprots libmySQL.dll> libmySQL.def(libmySQL.dll在${mysql_home}/bin目錄下一般會(huì)有)
二,轉(zhuǎn)換成靜態(tài)庫(kù)
dlltool --input-def libmySQL.def --dllname libmySQL.dll --output-lib libmysql.a -k
三,配置Eclipse(靜態(tài)庫(kù)和動(dòng)態(tài)庫(kù)加法都是-L${DIR} -l${libname},但誰(shuí)的優(yōu)先級(jí)高呢?)
1, 加上庫(kù)目錄,如"${workspace_loc:/hello_mysql/libs}"
2, 加上libmysql.a的庫(kù)名: mysql
3, 構(gòu)建,報(bào)錯(cuò): #ff0000 reference to `mysql_real_connect@32'之類的錯(cuò)
4, 修改def文件,將mysql_real_connect改成mysql_real_connect@32,其它錯(cuò)誤同理,并重新生成靜態(tài)庫(kù)
5, 重新構(gòu)建完成
四,示例程序(只須修改連接信息及表名)
一、安裝
1, 安裝xampp
2, 安裝zend studio[6]
二、配置調(diào)式
1,在http.conf中指定php.ini的位置
PhpIniDir "D:/xampp/php"
2, 在php.ini中的zend的部分指定以下內(nèi)容(ZendDebugger.dll是從zend studio中搜出來(lái)的)
[Zend]
zend_extension_ts = "D:\xampp\php\zendOptimizer\lib\ZendDebugger_5.2.12.dll"
;下面部分可選
zend_debugger.allow_hosts=127.0.0.1/32,127.0.0.1/24
zend_debugger.expose_remotely=allowed_hosts
放在/usr/local/bin下,挺好用
1,去http://rpm.pbone.net/下載下列rpm包并安裝
libnasl-2.2.9-1.fc5.i386.rpm
nessus-core-2.2.9-1.fc5.i386.rpm
nessus-core-debuginfo-2.2.9-1.fc5.i386.rpm(可選)
nessus-libraries-2.2.9-1.fc5.i386.rpm
nessus-server-2.2.9-1.fc5.i386.rpm
nessus-gui-2.2.9-1.fc5.i386.rpm
2, 找個(gè)能用的郵箱去http://www.nessus.org/plugins/index.php?view=register注冊(cè)一下
3, 按郵件中的方式運(yùn)行nessus-fetch --register ****
4, 運(yùn)行nessus-adduser增加一個(gè)沒有rule的用戶
5, 運(yùn)行nessus-mkcert造個(gè)證書
6, 運(yùn)行nessus-fetch --check檢查一下狀態(tài)
7, 如果前面沒啥問題,運(yùn)行service nessusd start
如果這一步除了成功沒啥別的輸出就ok啦
http://blog.csdn.net/boat1980/archive/2008/07/23/2698318.aspx
<html>
<head>
<script>
function overlay() {
el = document.getElementById("overlay");
el.style.visibility = (el.style.visibility == "visible") ? "hidden" : "visible";
}
</script>
<style>
body {
height:100%;
margin:0;
padding:0;
}
/*外層全部*/
#overlay{
visibility: hidden;
position: absolute;
left: 0px;
top: 0px;
width:100%;
height:100%;
text-align:center;
z-index: 1000;
background-color:#000;
filter: alpha(opacity=70); /*ie支持的半透明,下面兩名為ff支持的*/
-moz-opacity: 0.7;
opacity:.70;
}
/*外層的顯示區(qū)*/
#overlay div {
width:300px;
margin: 100px auto;
background-color: #FFFFFF;
border:1px solid #000;
padding:15px;
text-align:center;
}
</style>
</head>
<body id="body">
<div id="overlay">
<div>
用戶名:<input type="text" name="" /><br/>
密 碼:<input type="text" name="" /><br/>
<input type="button" value="關(guān)閉" onclick="overlay()" />
</div>
</div>
<a href='#' onclick='overlay()'>Click here to show the overlay</a>
</body>
</html>
一、DESede加密(對(duì)應(yīng)SunJCE不提供模式和填充的情況)<head>
<script>
function overlay() {
el = document.getElementById("overlay");
el.style.visibility = (el.style.visibility == "visible") ? "hidden" : "visible";
}
</script>
<style>
body {
height:100%;
margin:0;
padding:0;
}
/*外層全部*/
#overlay{
visibility: hidden;
position: absolute;
left: 0px;
top: 0px;
width:100%;
height:100%;
text-align:center;
z-index: 1000;
background-color:#000;
filter: alpha(opacity=70); /*ie支持的半透明,下面兩名為ff支持的*/
-moz-opacity: 0.7;
opacity:.70;
}
/*外層的顯示區(qū)*/
#overlay div {
width:300px;
margin: 100px auto;
background-color: #FFFFFF;
border:1px solid #000;
padding:15px;
text-align:center;
}
</style>
</head>
<body id="body">
<div id="overlay">
<div>
用戶名:<input type="text" name="" /><br/>
密 碼:<input type="text" name="" /><br/>
<input type="button" value="關(guān)閉" onclick="overlay()" />
</div>
</div>
<a href='#' onclick='overlay()'>Click here to show the overlay</a>
</body>
</html>
declare
result raw(2000);
l_mod number := dbms_crypto.ENCRYPT_3DES+dbms_crypto.CHAIN_ECB+dbms_crypto.PAD_PKCS5;
begin
result := dbms_crypto.Encrypt(src => utl_i18n.string_to_raw('wwww'),typ => l_mod,key => hextoraw('123456789012345678901234567890123456')
);
dbms_output.put_line(result);
end;
/
result raw(2000);
l_mod number := dbms_crypto.ENCRYPT_3DES+dbms_crypto.CHAIN_ECB+dbms_crypto.PAD_PKCS5;
begin
result := dbms_crypto.Encrypt(src => utl_i18n.string_to_raw('wwww'),typ => l_mod,key => hextoraw('123456789012345678901234567890123456')
);
dbms_output.put_line(result);
end;
/
二,摘要
dbms_crypto.Hash(utl_i18n.string_to_raw('input'),dbms_crypto.MD5))
用了幾天jira管理對(duì)它的權(quán)限模式有了初步理解:

project和permission schema多對(duì)一,從而形成了permission schema的重用
而permission schema本身則代表了group/user和pemission之前的映射關(guān)系
另外,jira還有一個(gè)Project Role的概念更增加了jira權(quán)限管理的靈活性
其實(shí)它實(shí)質(zhì)上就是一個(gè)角色(RBAC中的R),可以和group/user多對(duì)多關(guān)聯(lián),
(當(dāng)然也可和Permission通過schema進(jìn)行關(guān)聯(lián))
使jira的權(quán)限配置更新靈活的同時(shí),也增加了相當(dāng)?shù)膹?fù)雜性
一,造libmysql.def文件
1, ${mysql_home}/include/libmySQL.def文件如果有直接用
2, 否則下載pexports工具,執(zhí)行pexprots libmySQL.dll> libmySQL.def(libmySQL.dll在${mysql_home}/bin目錄下一般會(huì)有)
二,轉(zhuǎn)換成靜態(tài)庫(kù)
dlltool --input-def libmySQL.def --dllname libmySQL.dll --output-lib libmysql.a -k
三,配置Eclipse(靜態(tài)庫(kù)和動(dòng)態(tài)庫(kù)加法都是-L${DIR} -l${libname},但誰(shuí)的優(yōu)先級(jí)高呢?)
1, 加上庫(kù)目錄,如"${workspace_loc:/hello_mysql/libs}"
2, 加上libmysql.a的庫(kù)名: mysql
3, 構(gòu)建,報(bào)錯(cuò): #ff0000 reference to `mysql_real_connect@32'之類的錯(cuò)
4, 修改def文件,將mysql_real_connect改成mysql_real_connect@32,其它錯(cuò)誤同理,并重新生成靜態(tài)庫(kù)
5, 重新構(gòu)建完成
四,示例程序(只須修改連接信息及表名)
#include <stdio.h>
/*下面這一行一定要加上*/
#include <my_global.h>
#include <mysql.h>
int main() {
MYSQL mysql;
MYSQL_RES *result;
MYSQL_ROW row;
int numrows, numcols, c;
mysql_init(&mysql);
if (!mysql_real_connect(&mysql, "localhost", "opencart", "opencart", "opencart", 0, NULL, 0)) {
fprintf(stderr,"Failed to connect to database: Error %d:%s\n", mysql_errno(&mysql), mysql_error(&mysql));
}
char query[] = "SELECT * FROM product";
if (mysql_query(&mysql, query))
{
fprintf(stderr,"Error executing query: Error %d: %s\n", mysql_errno(&mysql), mysql_error(&mysql));
}
result = mysql_use_result(&mysql);
if (!result) {
fprintf(stderr,"Error executing query: Error %d: %s\n", mysql_errno(&mysql), mysql_error(&mysql));
}
numcols = mysql_num_fields(result);
while (row = mysql_fetch_row(result)) {
for (c = 0; c < numcols; c++) {
printf("%s\t", row[c]);
}
printf("\n");
}
}
一、安裝
1, 安裝xampp
2, 安裝zend studio[6]
二、配置調(diào)式
1,在http.conf中指定php.ini的位置
PhpIniDir "D:/xampp/php"
2, 在php.ini中的zend的部分指定以下內(nèi)容(ZendDebugger.dll是從zend studio中搜出來(lái)的)
[Zend]
zend_extension_ts = "D:\xampp\php\zendOptimizer\lib\ZendDebugger_5.2.12.dll"
;下面部分可選
zend_debugger.allow_hosts=127.0.0.1/32,127.0.0.1/24
zend_debugger.expose_remotely=allowed_hosts
放在/usr/local/bin下,挺好用
#!/bin/sh
# this script converts an rpm into a plain tarball
mkdir $$.cpio
rpm2cpio $@ > $$.cpio/foo
cd $$.cpio
cpio -i -m -d < foo
rm -f foo
find . -type d -perm 700 -exec chmod 755 {} \;
tar cvzf ../`basename $@ .rpm`.tar.gz .
cd ../
rm -rf $$.cpio
# this script converts an rpm into a plain tarball
mkdir $$.cpio
rpm2cpio $@ > $$.cpio/foo
cd $$.cpio
cpio -i -m -d < foo
rm -f foo
find . -type d -perm 700 -exec chmod 755 {} \;
tar cvzf ../`basename $@ .rpm`.tar.gz .
cd ../
rm -rf $$.cpio
1,去http://rpm.pbone.net/下載下列rpm包并安裝
libnasl-2.2.9-1.fc5.i386.rpm
nessus-core-2.2.9-1.fc5.i386.rpm
nessus-core-debuginfo-2.2.9-1.fc5.i386.rpm(可選)
nessus-libraries-2.2.9-1.fc5.i386.rpm
nessus-server-2.2.9-1.fc5.i386.rpm
nessus-gui-2.2.9-1.fc5.i386.rpm
2, 找個(gè)能用的郵箱去http://www.nessus.org/plugins/index.php?view=register注冊(cè)一下
3, 按郵件中的方式運(yùn)行nessus-fetch --register ****
4, 運(yùn)行nessus-adduser增加一個(gè)沒有rule的用戶
5, 運(yùn)行nessus-mkcert造個(gè)證書
6, 運(yùn)行nessus-fetch --check檢查一下狀態(tài)
7, 如果前面沒啥問題,運(yùn)行service nessusd start
如果這一步除了成功沒啥別的輸出就ok啦


