煩惱歲月

          付出總是有回報的 take action follow your heart , or follow your head
          posts - 40, comments - 5, trackbacks - 0, articles - 4

          導航

          <2025年6月>
          25262728293031
          1234567
          891011121314
          15161718192021
          22232425262728
          293012345

          常用鏈接

          留言簿(9)

          隨筆分類

          隨筆檔案

          文章分類

          文章檔案

          新聞檔案

          搜索

          •  

          最新評論

          閱讀排行榜

          評論排行榜

          最近研究了一下opencms的locale,總結如下:
          (1)opencms 在啟動的時候會設置locale為en。
          (2)可以在folder上面設置locale,如果本級locale沒有設置使用父級的,如果還是為空使用en。

          posted @ 2008-03-17 22:25 不需要解釋 閱讀(419) | 評論 (1)編輯 收藏


          本年度的學習主要圍繞當前的工作主題和自己比較有興趣的內容制定此計劃。

          2008-2

          1opencms

          進一步熟悉jsp170規范,比較opencms7比當前我們使用的opencms6.2.3的改進。熟悉opencms user manager,權限,模塊開發,site development

          2)整理,編寫opencms的開發文檔

          2008-3

          1sso,分析當前sso的現狀。了解使用sso帶來的好處。配置和使用cas做練習。

          2weblogic ssl配置。

          3openssl的使用。

          2008-4

          1jetspeed 學習jsr268規范,了解和jsr168的區別和改動。進一步分析jetspeedsso實現。porelet定制實現。

          2)研究mvnforum的配置和使用。

          3)企業門戶研究,研究企業門戶應該滿足那些功能,怎么更好的實現。

          2008-5

          1webservice,分析和學習apachewebservice實現。

          2etom模型的sid規范。

          2008-6

          1osgi,學習osgi的規范,在設計中應該怎么使用osgi思想。

          2008-7

          1jpa的使用和實現。


          posted @ 2008-03-08 22:30 不需要解釋 閱讀(252) | 評論 (0)編輯 收藏

               摘要:  # # Based upon the NCSA server configuration files originally by Rob McCool. # # This is the main Apache server configuration file.  It contains the # configuration directives that give...  閱讀全文

          posted @ 2007-11-22 10:35 不需要解釋 閱讀(1317) | 評論 (0)編輯 收藏

          通常,在一個設計良好的Web應用中,都會綜合使用Servlet和JSP技術。Servlet控制業務流轉,JSP則負責業務處理結果的顯示。此時,將大量用到重定向技術。

                  重定向技術可以分為兩類,一類是客戶端重定向,一類是服務器端重定向。客戶端重定向可以通過設置特定的HTTP頭,或者寫JavaScript腳本實現。本文主要探討服務器端重定向技術的實現。


          服務器端的重定向相關類
                  服務器端的重定向技術涉及到javax.servlet.ServletContext、javax.servlet.RequestDispatcher、javax.servlet.http.ServletRequest、javax.servlet.http.ServletResponse等幾個接口。
          服務器端的重定向方式
                  服務器端的重定向可以有兩種方式,一是使用HttpServletResponse的sendRedirect()方法,一是使用RequestDispatcher的forward()方法。下面對這兩種方式進行介紹。

          HttpServletResponse.sendRedirect()方法

          HttpServletResponse接口定義了可用于轉向的sendRedirect()方法。代碼如下:

          public void sendRedirect(java.lang.String location)throws java.io.IOException


                  這個方法將響應定向到參數location指定的、新的URL。location可以是一個絕對的URL,如response.sendRedirect("http://java.sun.com")也可以使用相對的URL。如果location以“/”開頭,則容器認為相對于當前Web應用的根,否則,容器將解析為相對于當前請求的URL。這種重定向的方法,將導致客戶端瀏覽器的請求URL跳轉。從瀏覽器中的地址欄中可以看到新的URL地址,作用類似于上面設置HTTP響應頭信息的實現。

          RequestDispatcher.forward()方法

                  RequestDispatcher是一個Web資源的包裝器,可以用來把當前request傳遞到該資源,或者把新的資源包括到當前響應中。RequestDispatcher接口中定義了兩個方法,參見如下代碼:

          public interface RequestDispatcher {
          void forward(ServletRequest request, ServletResponse response);
          void include(ServletRequest request, ServletResponse response);
          }

                  forward()方法將當前的request和response重定向到該RequestDispacher指定的資源。這在實際項目中大量使用,因為完成一個業務操作往往需要跨越多個步驟,每一步驟完成相應的處理后,轉向到下一個步驟。比如,通常業務處理在Servlet中處理,處理的結果轉向到一個JSP頁面進行顯示。這樣看起來類似于Servlet鏈的功能,但是還有一些區別。一個RequestDispatcher對象可以把請求發送到任意一個服務器資源,而不僅僅是另外一個Servlet。 include()方法將把Request Dispatcher資源的輸出包含到當前輸出中。

                  注意,只有在尚未向客戶端輸出響應時才可以調用forward()方法,如果頁面緩存不為空,在重定向前將自動清除緩存。否則將拋出一個IllegalStateException異常。


          如何得到RequestDispatcher


                  有三種方法可以得到Request Dispatcher對象。

          1.javax.servlet. ServletRequest的getRequestDispatcher(String path)方法,其中path可以是相對路徑,但不能越出當前Servlet上下文。如果path以“/”開頭,則解析為相對于當前上下文的根。

          2.javax.servlet. ServletContext的getRequestDispatcher(String path)方法,其中path必須以“/”開頭,路徑相對于當前的Servlet上下文。可以調用ServletContext的getContext(String uripath)得到另一個Servlet上下文,并可以轉向到外部上下文的一個服務器資源鏈接。

          3.使用javax.servlet. ServletContext的getNamedDispatcher(String name)得到名為name的一個Web資源,包括Servlet和JSP頁面。這個資源的名字在Web應用部署描述文件web.xml中指定。

          這三種方法的使用有細微的差別。比如,下面是一個應用的配置文件web.xml:

          <?xml version="1.0" ?>
          <!DOCTYPE web-app PUBLIC "-//Sun Microsystems, Inc.//DTD Web Application 2.2//EN"
          "http://java.sun.com/j2ee/dtds/web-app_2_2.dtd">
          <web-app>
          <servlet>
          <servlet-name>FirstServlet</servlet-name>
          <servlet-class>org. javaresearch.redirecttest.ServletOne</servlet-class>
          </servlet>
          <servlet>
          <servlet-name>SecondServlet</servlet-name>
          <servlet-class>org.javaresearch. redirecttest.ServletTwo</servlet-class>
          </servlet>
          <servlet-mapping>
          <servlet-name>FirstServlet</servlet-name>
          <url-pattern>/servlet/firstservlet/</url-pattern>
          </servlet-mapping>
          <servlet-mapping>
          <servlet-name>SecondServlet</servlet-name>
          <url-pattern>/servlet/secondservlet/</url-pattern>
          </servlet-mapping>
          </web-app>


                  其中定義了兩個Servlet,名字分別為FirstServlet和SecondServlet,對應的類分別為org.javaresearch. redirecttest.ServletOne和org. javaresearch.redirecttest.ServletTwo。可以在瀏覽器中通過類似于下面的鏈接訪問:

          http://localhost:8080/servlet/firstservlet/

          使用1中方法,例如在firstservlet可以寫入下面的代碼:

          RequestDispatcher rd = request.getRequestDispatcher("secondservlet");
          rd.forward(request, response);


          此時控制權將轉向到第二個Servlet了。

          使用2中的方法,可以從Servlet Context中得到RequestDispatcher代碼如下:

          RequestDispatcher rd = getServletContext().getRequest
          Dispatcher("/servlet/secondservlet");
          rd.forward(request, response);


          使用3中的方法,從上面的web. xml配置文件可以看到定義了兩個Servlet,名字分別為FirstServlet和SecondServlet,所以可以得到命名的Dispatcher:

          RequestDispatcher rd = getServletContext().getNamedDispatcher("SecondServlet");
          rd.forward(request, response);


          這樣也可以重定向到SecondServlet了。


          JSP頁面中的重定向


                  JSP在解析后編譯為一個Servlet運行,所以在JSP中也可以使用上面的重定向代碼,并且,JSP還提供了更便利的操作,如下:

          <jsp:forward page= "nextpage.jsp"/>


                  JSP頁面執行到這兒,將終止當前的處理,將控制權交由nextpage.jsp。


          如何選擇


                  RequestDispatcher.forward()方法和HttpServletResponse.sendRedirect()方法的區別是:前者僅是容器中控制權的轉向,在客戶端瀏覽器地址欄中不會顯示出轉向后的地址;后者則是完全的跳轉,瀏覽器將會得到跳轉的地址,并重新發送請求鏈接。這樣,從瀏覽器的地址欄中可以看到跳轉后的鏈接地址。所以,前者更加高效,在前者可以滿足需要時,盡量使用Request Dispatcher.forward()方法,并且,這樣也有助于隱藏實際的鏈接。在有些情況下,比如,需要跳轉到一個其它服務器上的資源,則必須使用HttpServletResponse.sendRequest()方法


          posted @ 2007-11-16 10:40 不需要解釋 閱讀(819) | 評論 (0)編輯 收藏

          Apache HTTP Server 插件概述

          Apache HTTP Server 插件允許將請求從 Apache HTTP Server 代理到 WebLogic Server。該插件允許 WebLogic Server 處理要求使用 WebLogic Server 動態功能的請求,從而增強了 Apache 安裝。

          該插件專用于某種環境,在這樣的環境中,Apache Server 提供靜態頁,而文檔樹的另一個部分(最好是由 HTTP Servlet 或 Java Server Page 生成的動態頁)會委托給可以在不同的進程中(可能在不同的主機上)進行操作的 WebLogic Server。對于最終用戶(瀏覽器),委托給 WebLogic Server 的 HTTP 請求看似仍然來自同一個來源。

          HTTP 隧道是一種技術,它允許 HTTP 請求和響應通過公司的防火墻進行訪問。它也可以通過插件操作,提供對 WebLogic Server 服務的非瀏覽器客戶端訪問。

          Apache HTTP Server 插件充當 Apache HTTP Server 中的 Apache 模塊。Apache 模塊由 Apache Server 在啟動時加載,然后某些 HTTP 請求會委托給它。Apache 模塊類似于 HTTP Servlet(除了 Apache 模塊是用平臺本地代碼編寫的之外)。

          有關支持 Apache HTTP Server 插件的配置的信息,請參閱 http://edocs.bea.com/platform/suppconfigs/configs92/92_over/add-ons.html

          Apache 2.0 版中的保持活動連接

          2.0 版的 Apache HTTP Server 插件通過使用從插件到 WebLogic Server 的可重用連接緩沖池提高了性能。該插件通過對來自同一客戶端的后續請求重用緩沖池中的同一連接,在插件和 WebLogic Server 之間實現了 HTTP 1.1 保持活動連接。如果連接處于非活動狀態的時間超過 30 秒(或用戶定義的時間),則會關閉該連接并將其返回到緩沖池中。可以根據需要禁用此功能。有關詳細信息,請參閱“KeepAliveEnabled”。

          代理請求

          插件根據指定的配置將請求代理到 WebLogic Server。可以根據請求的 URL(或 URL 的一個部分)代理請求。這稱為按路徑進行代理。還可以根據請求文件的 MIME 類型代理請求。或者可以使用這兩種方法的組合。如果請求同時符合這兩個條件,則按路徑代理請求。同時,可以為每種類型的請求指定其他參數,來定義插件的其他行為。有關詳細信息,請參閱配置 Apache HTTP Server 插件

          Apache 2.2

          盡管此文檔討論的是 Apache 2.0,您可應用同樣的說明來使用具有表 3-2 中所示的庫的 Apache 2.2。

          證書

          Linux、Solaris、Windows 和 HPUX11 平臺支持 Apache HTTP Server 插件。有關對特定 Apache 版本的支持信息,請參閱 http://edocs.bea.com/platform/suppconfigs/configs92/92_over/add-ons.html


          安裝 Apache HTTP Server 插件

          可將 Apache HTTP Server 插件作為 Apache HTTP Server 安裝中的 Apache 模塊進行安裝,并將其作為動態共享對象(Dynamic Shared Object,簡稱 DSO)進行鏈接。

          DSO 作為服務器在運行時動態加載的庫進行編譯,可以在不重新編譯 Apache 的情況下安裝。

          將 Apache HTTP Server 插件作為動態共享對象安裝

          Apache 插件作為 Solaris、Linux、Windows 和 HPUX11 平臺的共享對象 (.so) 分發。BEA WebLogic 提供因平臺、是否要在客戶端和 Apache 之間使用 SSL 以及 SSL 加密強度(常規或 128 位 - 只有在安裝 128 位版本的 WebLogic Server 時才會安裝 128 位版本)而異的共享對象文件版本。

          表 3-1 顯示包含各種平臺的共享對象文件的 WebLogic Server 安裝目錄(其中 WL_HOME 是 WebLogic 平臺的頂級安裝目錄)。

          表 3-2 針對不同版本的 Apache HTTP Server 和不同加密強度來標識 WebLogic Server Apache 插件模塊。

          表 3-1 插件共享對象文件的位置
          操作系統
          共享對象位置
          Solaris
          WL_HOME/weblogic92/server/plugin/solaris/sparc
          Linux
          WL_HOME/weblogic92/server/plugin/linux/i686
          WL_HOME/weblogic92/server/plugin/linux/ia64
          WL_HOME/weblogic92/server/plugin/linux/s390
          Windows(僅適用于 Apache 2.0)
          WL_HOME\weblogic92\server\plugin\win\32
          WL_HOME\weblogic92\server\plugin\win\64
          HPUX11
          WL_HOME/weblogic92/server/plugin/hpux11/IPF64
          WL_HOME/weblogic92/server/plugin/hpux11/PA_RISC
          警告: 如果在 HP-UX11 上運行 Apache 2.0.x Server,請在構建 Apache Server 之前設置下面緊鄰的環境變量。由于 HP-UX 上加載鏈接庫的順序問題,如果在生成之前未將加載順序預設為環境變量,則可能導致核心轉儲。設置下列環境變量,然后繼續 Apache configure, makemake install 步驟(在 Apache HTTP Server 文檔中描述了這些步驟,該文檔位于 http://httpd.apache.org/docs-2.1/install.html#configure):
          export EXTRA_LDFLAGS="-lstd -lstream -lCsup -lm -lcl -ldld -lpthread"

          從下表中選擇適當的插件共享對象版本:

          表 3-2 Apache 插件共享對象文件版本
          Apache 版本
          常規強度的加密
          128 位加密
          標準 Apache 2.0.x 版
          mod_wl_20.so
          mod_wl28_20.so
          標準 Apache 2.2.x 版
          mod_wl_22.so
          mod_wl28_22.so

          要將 Apache HTTP Server 插件作為動態共享對象安裝,請執行下列操作:

          1. 使用表 3-1 找到您的平臺的共享對象目錄。
          2. 表 3-2 中確定您的 Apache 版本的插件共享對象文件。
          3. 驗證是否已啟用 WebLogic Server Apache HTTP Server 插件 mod_so.c 模塊。

            Apache HTTP Server 插件將作為動態共享對象 (DSO) 安裝在 Apache HTTP Server 安裝中。Apache 中的 DSO 支持是基于模塊 mod_so.c 的,必須在加載 mod_wl_20.so 之前啟用該模塊。如果使用 Apache 提供的腳本安裝 Apache HTTP Server,則 mod_so.c已被啟用。通過執行以下命令,驗證是否已啟用 mod_so.c

            APACHE_HOME\bin\apache -l

            (其中 APACHE_HOME 是包含 Apache HTTP Server 安裝的目錄。)

            此命令會列出所有已啟用的模塊。如果未列出 mod_so.c,則必須重新生成 Apache HTTP Server,以確保配置下列選項:

            ...
            --enable-module=so
            --enable-rule=SHARED_CORE
            ...
            請參閱位于 
                http://httpd.apache.org/docs/2.0/dso.html 的“Apache 2.0 Shared Object (DSO) Support”。
          4. mod_wl_20.so 文件復制到 APACHE_HOME\modules 目錄中,并將以下行手工添加到 APACHE_HOME/conf/httpd.conf 文件中,為 Apache 2.0.x 版安裝 Apache HTTP Server 插件模塊:
            LoadModule weblogic_module     modules/mod_wl_20.so
          5. 為 Apache HTTP Server 插件定義任何其他參數。

            Apache HTTP Server 插件可識別 Web 服務器插件的常規參數中列出的參數。要修改 Apache HTTP Server 插件的行為,請在以下塊中定義這些參數:

            • Location 塊中,定義適用于按路徑進行的代理的參數
            • IfModule 塊中,定義適用于按 MIME 類型進行的代理的參數
          6. 使用下列命令驗證 APACHE_HOME\conf\httpd.conf 文件的語法:
            APACHE_HOME\bin\apachectl -t 

            此命令的輸出將報告 httpd.conf 文件中的任何錯誤或返回:

            Syntax OK
          7. 重新啟動 Weblogic Server。
          8. 啟動(或重新啟動,如果已更改配置)Apache HTTP Server。
          9. 通過打開瀏覽器并將 URL 設置為 Apache Server +“/weblogic/”(這將打開默認 WebLogic Server HTML 頁、歡迎文件或默認 Servlet,如 WebLogic Server 上對默認 Web 應用程序的定義)來測試插件。例如:
            http://myApacheserver.com/weblogic/


          配置 Apache HTTP Server 插件

          在 Apache HTTP Server 中安裝插件后,需要對 WebLogic Server Apache 插件進行配置并將服務器配置為使用該插件。本部分說明如何編輯 Apache httpd.conf 文件以指示 Apache 服務器為作為 Apache 模塊的插件加載 WebLogic Server 庫,并指定應由該模塊處理的應用程序請求。

          編輯 httpd.conf 文件

          編輯 Apache HTTP Server 安裝中的 httpd.conf 文件以配置 Apache HTTP Server 插件。

          本部分說明如何查找和編輯 httpd.conf 文件以實現下列操作:配置服務器以使用 WebLogic Server Apache 插件、按路徑或 MIME 類型代理請求、啟用 HTTP 隧道,以及使用其他 WebLogic Server 插件參數。

          1. 打開 httpd.conf 文件。

            該文件位于 APACHE_HOME\conf\httpd.conf(其中 APACHE_HOME 是 Apache HTTP Server 安裝的根目錄)。請參閱設置邊界身份驗證中的示例 httpd.conf 文件。

          2. 確保 Apache 2.0.x 中包含 WebLogic Server 模塊,手工將下面的行添加到 httpd.conf 文件中。
            LoadModule weblogic_module   modules\mod_wl_20.so
          3. 添加用于定義以下參數之一的 IfModule 塊:

            對于非群集 WebLogic Server:

            WebLogicHost 和 WebLogicPort 參數。

            對于 WebLogic Server 群集:

            WebLogicCluster 參數。

            例如:

            <IfModule mod_weblogic.c>
              WebLogicHost myweblogic.server.com
              WebLogicPort 7001
            </IfModule>
          4. 要按 MIME 類型代理請求,請將 MatchExpression 行添加到 IfModule 塊中。請注意,如果同時啟用按 MIME 類型進行的代理和按路徑進行的代理,則按路徑進行的代理優先于按 MIME 類型進行的代理。

            例如,以下針對非群集 WebLogic Server 的 IfModule 塊指定代理具有 MIME 類型 .jsp 的所有文件:

            <IfModule mod_weblogic.c>
              WebLogicHost myweblogic.server.com
              WebLogicPort 7001
              MatchExpression *.jsp
            </IfModule>

            也可以使用多個 MatchExpressions,例如:

            <IfModule mod_weblogic.c>
              WebLogicHost myweblogic.server.com
              WebLogicPort 7001
              MatchExpression *.jsp
              MatchExpression *.xyz
            </IfModule>

            如果要按 MIME 類型將請求代理到 WebLogic Server 群集,請使用 WebLogicCluster 參數,而不使用 WebLogicHostWebLogicPort 參數。例如:

            <IfModule mod_weblogic.c>
              WebLogicCluster w1s1.com:7001,w1s2.com:7001,w1s3.com:7001
              MatchExpression *.jsp
              MatchExpression *.xyz
            </IfModule>
          5. 要按路徑代理請求,請使用 Location 塊和 SetHandler 語句。SetHandler 指定Apache HTTP Server 插件模塊的處理程序。例如,以下位置塊代理 URL 中包含 /weblogic 的所有請求:
            <Location /weblogic>
            SetHandler weblogic-handler
            PathTrim /weblogic
            </Location>

            PathTrim 參數指定在將請求傳遞到 WebLogic Server 實例之前從 URL 的開始部分剪切的字符串(請參閱 Web 服務器插件的常規參數)。

          6. (可選)對 t3 或 IIOP 啟用 HTTP 隧道。
            1. 要在使用 t3 協議和 weblogic.jar 時啟用 HTTP 隧道,請將以下 Location 塊添加到 httpd.conf 文件中:
              <Location /HTTPClnt>
              SetHandler weblogic-handler
              </Location>
            2. 要在使用 IIOP(WebLogic Server 瘦客戶端 wlclient.jar使用的唯一協議)時啟用 HTTP 隧道,請將以下 Location 塊添加到 httpd.conf 文件中:
              <Location /iiop>
              SetHandler weblogic-handler
              </Location>
          7. 為 Apache HTTP Server 插件定義任何其他參數。

            Apache HTTP Server 插件可識別 Web 服務器插件的常規參數中列出的參數要修改 Apache HTTP Server 插件的行為,請在以下塊中定義這些參數:

            • Location 塊中,定義適用于按路徑進行的代理的參數
            • IfModule 塊中,定義適用于按 MIME 類型進行的代理的參數

          將 weblogic.conf 文件包括在 httpd.conf 文件中

          如果希望保留幾個單獨的配置文件,則可通過在 httpd.conf文件的 IfModule 塊中使用 Apache Include 指令,在名為 weblogic.conf 文件的單獨配置文件中定義參數:

          <IfModule mod_weblogic.c>
          # Config file for WebLogic Server that defines the parameters
          Include conf/weblogic.conf
          </IfModule>

          weblogic.conf 文件的語法與 httpd.conf 文件的語法相同。

          本部分描述如何創建 weblogic.conf 文件,并包括示例 weblogic.conf 文件。

          創建 weblogic.conf 文件

          構造 weblogic.conf 文件時,請注意下列事項:

          • 如果要在 Apache HTTP Server 插件和 WebLogic Server 之間使用 SSL,則無法在通過 Apache Include 指令訪問的文件(與 weblogic.conf文件一樣)中定義參數。
          • 在新行上輸入每一個參數。請不要在參數和參數值之間放置“=”。例如:
            PARAM_1 value1
            PARAM_2 value2
            PARAM_3 value3
          • 如果請求既與 IfModule 塊中的 MatchExpression 中指定的 MIME 類型匹配,又與 Location 塊中指定的路徑匹配,則 Location 塊指定的行為優先。
          • 如果要定義 CookieName 參數,則必須在 IfModule 塊中定義它。
          • 如果使用 Apache HTTP Server <VirtualHost> 塊,則必須在 <VirtualHost> 塊中包括虛擬主機的所有配置參數(例如 MatchExpression)(請參閱 Apache Virtual Host documentation)。
          • 如果希望只為環境中的所有虛擬主機配置一個日志文件,則可以使用全局屬性來實現。可以在 <IfModule> 標記中一次指定 Debug、WLLogFile 和 WLTempDir 屬性,而不是在每個虛擬主機中指定相同的 Debug、WLLogFile 和 WLTempDir 屬性。
          • 示例 httpd.conf 文件:
            <IfModule mod_weblogic.c>
              WebLogicCluster	agarwalp02:8005,agarwalp02:8006
              Debug 		ON
              WLLogFile             c:/tmp/global_proxy.log 
              WLTempDir             "c:/myTemp"
              DebugConfigInfo       On
              KeepAliveEnabled ON
              KeepAliveSecs  15
            </IfModule>
            <Location /jurl>
              SetHandler weblogic-handler
              WebLogicCluster agarwalp01:7001
            </Location>
            <Location /web>
              SetHandler weblogic-handler
              PathTrim		/web
              Debug 		OFF
              WLLogFile 		c:/tmp/web_log.log
            </Location>
            <Location /foo>
              SetHandler weblogic-handler
              PathTrim		/foo
              Debug 		ERR
              WLLogFile 		c:/tmp/foo_proxy.log
            </Location>
          • 與 /jurl/* 匹配的所有請求的“調試級別”都將設置為“ALL”,并會將日志消息記錄到 c:/tmp/global_proxy.log 文件中。與 /web/* 匹配的所有請求的“調試級別”都將設置為“OFF”,并且不會記錄任何日志消息。與 /foo/* 匹配的所有請求的“調試級別”都將設置為“ERR”,并會將日志消息記錄到 c:/tmp/foo_proxy.log 文件中。
          • BEA 建議使用 MatchExpression 語句,而不使用 <files> 塊。

          示例 weblogic.conf 配置文件

          以下示例 weblogic.conf 文件可以用作模板,您可以對其進行修改以滿足您的環境和服務器的需要。以 # 開始的行是注釋。

          使用 WebLogic 群集的示例
          # 這些參數對于定向到當前模塊 
          # 的 URL 是常用的。如果要替換每個 URL 的這些參數,
          # 可以在 <Location> 或 <Files> 模塊中重新設置
          # 它們。(WebLogicHost、
          # WebLogicPort、 WebLogicCluster 和 CookieName 除外。)
          <IfModule mod_weblogic.c>
            WebLogicCluster w1s1.com:7001,w1s2.com:7001,w1s3.com:7001
            ErrorPage http://myerrorpage.mydomain.com
            MatchExpression *.jsp
          </IfModule>
          ####################################################
          使用多 WebLogic 群集的示例

          在此示例中,用于表示文件名模式的 MatchExpression 參數語法、HTTP 請求應轉發到的 WebLogic Server 主機以及各種其他參數如下所示:

          MatchExpression [filename pattern] [WebLogicHost=host] | [paramName=value]

          下面的第一個 MatchExpression 參數指定文件名模式 *.jsp,然后命名單個 WebLogicHost。管道符號后的 paramName=value 組合指定 WebLogic Server 用于監聽連接請求的端口,同時激活“Debug”選項。第二個 MatchExpression 指定文件名模式 *.http 并標識 WebLogicCluster 主機及其端口。管道符號后的 paramName=value 組合指定群集的錯誤頁。

          # 這些參數對于定向到當前模塊 
          # 的 URL 是常用的。如果要替換每個 URL 的這些參數,
          # 可以在 <Location> 或 <Files> 模塊中重新設置
          # 它們。
          #(WebLogicHost、WebLogicPort、WebLogicCluster 和 CookieName 除外)
          <IfModule mod_weblogic.c>
            MatchExpression *.jsp WebLogicHost=myHost|WebLogicPort=7001|Debug=ON
            MatchExpression *.html WebLogicCluster=myHost1:7282,myHost2:7283|ErrorPage=
              http://www.xyz.com/error.html
          </IfModule>
          不使用 WebLogic 群集的示例
          # 這些參數對于定向到當前模塊 
          # 的 URL 是常用的。如果要替換每個 URL 的這些參數,
          # 可以在 <Location> 或 <Files> 模塊中重新設置
          # 它們。
          #(WebLogicHost、WebLogicPort、WebLogicCluster 和 CookieName 除外)
          <IfModule mod_weblogic.c>
            WebLogicHost myweblogic.server.com
            WebLogicPort 7001
            MatchExpression *.jsp
          </IfModule>
          配置多個基于名稱的虛擬主機的示例
          # VirtualHost1 = localhost:80
          <VirtualHost 127.0.0.1:80>
          DocumentRoot "C:/test/VirtualHost1"
          ServerName localhost:80 <IfModule mod_weblogic.c>
          #... WLS 參數 ...
          WebLogicCluster localhost:7101,localhost:7201
          # 示例:MatchExpression *.jsp <some additional parameter>
          MatchExpression *.jsp PathPrepend=/test2
          </IfModule>
          </VirtualHost>
          # VirtualHost2 = 127.0.0.2:80
          <VirtualHost 127.0.0.2:80>
          DocumentRoot "C:/test/VirtualHost1"
          ServerName 127.0.0.2:80
          <IfModule mod_weblogic.c>
          #... WLS 參數 ...
          WebLogicCluster localhost:7101,localhost:7201
          # 示例:MatchExpression *.jsp <some additional parameter>
          MatchExpression *.jsp PathPrepend=/test2
          #... WLS 參數 ...
          </IfModule>
          </VirtualHost> <IfModule mod_weblogic.c>

          必須為“ServerName”定義唯一值,否則某些插件參數將不能按預期工作。

          Apache HTTP Server httpd.conf 文件的模板

          本部分包含 Apache 2.0 的示例 httpd.conf 文件。您可將此示例用作模板,并對其進行修改以滿足您的環境和服務器的需要。以 # 開始的行是注釋。

          請注意,Apache HTTP Server 不區分大小寫。

          ####################################################
          APACHE-HOME/conf/httpd.conf file
          ####################################################
          LoadModule weblogic_module   libexec/mod_wl_20.so
          <Location /weblogic>
          SetHandler weblogic-handler
          PathTrim /weblogic
          ErrorPage http://myerrorpage1.mydomain.com
          </Location>
          <Location /servletimages>
          SetHandler weblogic-handler
          PathTrim /something
          ErrorPage http://myerrorpage1.mydomain.com
          </Location>
          <IfModule mod_weblogic.c>
            MatchExpression *.jsp
            WebLogicCluster w1s1.com:7001,w1s2.com:7001,w1s3.com:7001
            ErrorPage http://myerrorpage.mydomain.com
          </IfModule>


          設置邊界身份驗證

          使用邊界身份驗證可確保通過 Apache 插件訪問的 WebLogic Server 應用程序的安全。

          WebLogic 標識聲明提供程序對來自訪問 WebLogic Server 應用程序的外部系統的標記進行身份驗證,包括對通過 Apache HTTP Server 插件訪問 WebLogic Server 應用程序的用戶進行身份驗證。按照下列步驟,創建確保插件安全的標識聲明提供程序:

          1. 在 WebLogic Server 應用程序上創建一個自定義標識聲明提供程序。請參閱“開發 WebLogic Server 的安全提供程序”中的如何開發自定義標識聲明提供程序
          2. 配置自定義標識聲明提供程序以支持證書標記類型并使證書成為活動標記類型。請參閱“開發 WebLogic Server 的安全提供程序”中的如何創建新標記類型
          3. 在 Web 應用程序的 web.xml 部署描述符文件中將 clientCertProxy 設置為 True(如果使用群集,也可以選擇在管理控制臺中,依次選擇“群集”-->“配置”-->“常規”選項卡,在該選項卡上對整個群集將 Client Cert Proxy Enabled 特性設置為 True)。clientCertProxy 特性可與第三方代理服務器(如負載平衡器或 SSL 加速器)一起使用以啟用 2 向 SSL 身份驗證。有關 clientCertProxy 特性的詳細信息,請參閱“開發 WebLogic Server 的 Web 應用程序、Servlet 和 JSP”中的 context-param
          4. 設置了 clientCertProxy之后,請務必使用連接篩選器來確保 WebLogic Server 僅接受來自運行 Apache 插件的計算機的連接。請參閱“WebLogic 安全性編程”中的使用網絡連接篩選器
          5. Web 服務器插件需要可信證書頒發機構文件才能在插件和 WebLogic Server 之間使用 SSL。使用 Sun Microsystems 的 Keytool 實用工具可從駐留在 BEA_HOME/weblogic92/server/lib 中的 DemoTrust.jks 密鑰庫文件中導出可信證書頒發機構文件。
            1. 例如,要解壓縮 wlsdemoca 文件,可使用如下命令:
              keytool -export -file trustedcafile.der -keystore DemoTrust.jks -alias wlsdemoca

              更改別名以從密鑰庫中獲得不同的可信 CA 文件。

              要查看密鑰庫中的所有可信 CA 文件,請使用如下命令:
              keytool -list -keystore DemoTrust.jks

              如果提示輸入密碼,請按 Enter 鍵。

            2. 要將證書頒發機構文件轉換為 pem 格式,請使用如下命令:java utils.der2pem trustedcafile.der

          請參閱“開發 WebLogic Server 的安全提供程序”中的標識聲明提供程序


          將 SSL 與 Apache 插件一起使用

          可以使用安全套接口層(Secure Socket Layer,簡稱 SSL)協議保護 Apache HTTP Server 插件和 WebLogic Server 之間的連接。SSL 協議對 Apache HTTP Server 插件和 WebLogic Server 之間傳遞的數據提供機密性和完整性。

          Apache HTTP Server 插件不使用 HTTP 請求中(通常由瀏覽器)指定的傳輸協議(httphttps)來確定是否使用 SSL 協議來保護 Apache HTTP Server 插件和 WebLogic Server 之間的連接。

          雖然可以在 HTTP 客戶端和 Apache HTTP Server 之間使用雙向 SSL,但請注意,在 Apache HTTP Server 和 WebLogic Server 之間使用的是單向 SSL。

          配置 Apache HTTP Server 插件和 WebLogic Server 之間的 SSL

          要在 Apache HTTP Server 插件和 WebLogic Server 之間使用 SSL 協議,請執行下列操作:

          1. 針對 SSL 配置 WebLogic Server。有關詳細信息,請參閱配置 SSL
          2. 配置 WebLogic Server SSL 監聽端口。有關詳細信息,請參閱配置 SSL
          3. 在 Apache Server 中,將 httpd.conf 文件中的 WebLogicPort 參數設置為步驟 2 中配置的 WebLogic Server SSL 監聽端口。
          4. 在 Apache Server 中,將 httpd.conf 文件中的 SecureProxy 參數設置為 ON
          5. httpd.conf 文件中設置可定義有關 SSL 連接的信息的任何其他參數。有關可以為插件配置的 SSL 參數的完整列表,請參閱 Web 服務器插件的 SSL 參數

          SSL-Apache 配置的相關問題

          配置 Apache 插件以使用 SSL 時會出現以下已知問題:

          • 要準備插件配置,請雙擊鎖以進入證書路徑:

            * 選擇根 CA(在頂部)

            * 顯示它

            * 查看詳細信息,然后使用編碼的“基本

            64 X509”選項將此證書復制到文件中

            * 例如,將文件保存到 MyWeblogicCAToTrust.cer(此文件也是

            PEM 文件)

          • 參數 PathTrim(請參見 Web 服務器插件的常規參數)必須在 <Location> 標記內配置。

            以下配置不正確

            <Location /weblogic>
            SetHandler weblogic-handler
            </Location>
            <IfModule mod_weblogic.c>
            WebLogicHost localhost
            WebLogicPort 7001
            PathTrim /weblogic
            </IfModule>

            以下配置是正確設置:

            <Location /weblogic>
            SetHandler weblogic-handler
            PathTrim /weblogic
            </Location>
          • Include 指令不能與 Apache SSL 一起使用。必須在 httpd.conf 文件中直接配置所有參數。使用 SSL 時請不要使用以下配置:
            <IfModule mod_weblogic.c>
            MatchExpression *.jsp
            Include weblogic.conf
            </IfModule>
          • WebLogic Server Apache 插件的當前實現不支持對 Apache SSL 使用多個證書文件。


          連接錯誤和群集故障轉移

          當 Apache HTTP Server 插件嘗試連接到 WebLogic Server 時,插件使用幾個配置參數確定等待連接到 WebLogic Server 主機的時間長度,以及建立連接后插件等待響應的時間長度。如果插件無法連接或未收到響應,則插件將嘗試連接到群集中的其他 WebLogic Server 實例并向其發送請求。如果連接失敗或者沒有來自群集中任何 WebLogic Server 的響應,則會發送錯誤消息。

          圖 3-1 說明插件如何處理故障轉移。

          連接失敗的可能原因

          WebLogic Server 主機無法響應連接請求可能表明下列問題:

          • 主機計算機的物理問題
          • 網絡問題
          • 其他服務器故障

          所有 WebLogic Server 實例都無法響應可能表明下列問題:

          • WebLogic Server 未運行或不可用
          • 服務器掛起
          • 數據庫問題
          • 應用程序特定故障

          調整以減少 Connection_Refused 錯誤

          在有負載時,Apache 插件可能收到來自后端 WebLogic Server 實例的 CONNECTION_REFUSED 錯誤。可根據以下調整提示減少 CONNECTION_REFUSED 錯誤:

          • 提高WebLogic Server 域配置中的 AcceptBackLog 設置。
          • 在 Apache 2.0.x 上,將 httpd.conf 文件中的 KeepAlive 指令設置為 On。例如:
            # KeepAlive: Whether or not to allow persistent connections (more than
            # one request per connection). Set to "Off" to deactivate.
            #
            KeepAlive On

            請參閱位于 http://httpd.apache.org/docs-project/ 的 Apache HTTP Server 2.0 文檔。

          • 減少等待時間間隔。此設置因使用的操作系統而異。例如:
            • 在 Windows NT 上,將代理和 WebLogic Server 服務器上的 TcpTimedWaitDelay 設置為較低的值。通過編輯 HKEY_LOCAL_MACHINE 下的注冊表項來設置 Windows NT 中的 TIME_WAIT 時間間隔。
              SYSTEM\CurrentControlSet\Services\Tcpip\Parameters\TcpTimedWaitDelay 

              如果此項不存在,則可以將其作為 DWORD 值創建。數字值是要等待的秒數,可將其設置為介于 30 和 240 之間的任意值。如果未設置,默認情況下 Windows NT 會將 TIME_WAIT 設置為 240 秒。

            • 在 Windows 2000 上,通過編輯 HKEY_LOCAL_MACHINE 下的注冊表項降低 TcpTimedWaitDelay的值:
              SYSTEM\CurrentControlSet\Services\Tcpip\Parameters 
            • 在 Solaris 上,將設置 tcp_time_wait_interval 降低為一秒(如果可能,對 WebLogic Server 計算機和 Apache 計算機都進行此設置):
              $ndd /dev/tcp
                 param name to set - tcp_time_wait_interval
                 value=1000
          • 在您的計算機上提高打開文件描述符的限制。此限制因操作系統而異。使用 limit (.csh) 或 ulimit (.sh) 指令,可以制作一個腳本來提高此限制。例如:
            #!/bin/sh
            ulimit -S -n 100
            exec httpd 
          • 在 Solaris 上,提高 WebLogic Server 計算機上下列可調參數的值:
            • tcp_conn_req_max_q
            • tcp_conn_req_max_q0

          單個非群集 WebLogic Server 的故障轉移

          如果僅運行一個 WebLogic Server 實例,則插件僅嘗試連接到使用 WebLogicHost 參數定義的服務器。如果嘗試失敗,則會返回 HTTP 503 錯誤消息。插件繼續嘗試連接到該同一 WebLogic Server 實例,直到超出 ConnectTimeoutSecs。

          動態服務器列表

          使用 httpd.confweblogic.conf 文件中的 WebLogicCluster 參數指定 WebLogic Server 列表時,插件將該列表用作在群集成員之間進行負載平衡的起點。將第一個請求路由到這些服務器之一后,會返回一個動態服務器列表,其中包含群集中已更新的服務器列表。更新的列表添加群集中的任何新服務器并刪除不再屬于群集或無法響應請求的任何服務器。當群集中發生更改時,會使用 HTTP 響應自動更新此列表。

          故障轉移、Cookie 和 HTTP 會話

          當請求包含存儲在 Cookie 或 POST 數據中的會話信息或包含編碼到 URL 中的會話信息時,會話 ID 會包含對最初建立會話的特定服務器實例(稱為主服務器)的引用,并包含對復制原始會話的其他服務器(稱為次級服務器)的引用。包含 Cookie 的請求會嘗試連接到主服務器。如果該嘗試失敗,則會將該請求路由到次級服務器。如果主服務器和次級服務器均故障,則會話將丟失,插件將嘗試與動態群集列表中的其他服務器建立新的連接。請參閱圖 3-1 連接故障轉移

          注意: 如果 POST 數據大于 64K,插件將不會對 POST 數據進行解析以獲取會話 ID。因此,如果您將會話 ID 存儲在 POST 數據中,插件無法將請求路由到正確的主服務器或次級服務器,從而可能導致會話數據的丟失。
          圖 3-1 連接故障轉移

          連接故障轉移

          在上圖中,紅圈中允許的最大重試次數等于 ConnectTimeoutSecs 除以 ConnectRetrySecs


          安裝和配置 Apache HTTP Server 插件

          posted @ 2007-11-13 13:08 不需要解釋 閱讀(3096) | 評論 (0)編輯 收藏

          在很多應用下都可能有需要將用戶的真實IP記錄下來,這時就要獲得用戶的真實IP地址,在JSP里,獲取客戶端的IP地址的方法是:request.getRemoteAddr(),這種方法在大部分情況下都是有效的。但是在通過了Apache,Squid等反向代理軟件就不能獲取到客戶端的真實IP地址了。

            這段時間在做IP統計的程序設計,由于服務器作了集群,使用了反向代理軟件,將http://192.168.1.110:2046/的URL反向代理為http://www.xxx.com/的URL時,用request.getRemoteAddr()方法獲取的IP地址是:127.0.0.1 或 192.168.1.110,而并不是客戶端的真實IP。這是什么原因呢?

            這是反向代理的原因。經過代理以后,由于在客戶端和服務之間增加了中間層,因此服務器無法直接拿到客戶端的IP,服務器端應用也無法直接通過轉發請求的地址返回給客戶端。但是在轉發請求的HTTP頭信息中,增加了X-FORWARDED-FOR信息。用以跟蹤原有的客戶端IP地址和原來客戶端請求的服務器地址。當我們訪問http://www.xxx.com/index.jsp/時,其實并不是我們瀏覽器真正訪問到了服務器上的index.jsp文件,而是先由代理服務器去訪問http://192.168.1.110:2046/index.jsp,代理服務器再將訪問到的結果返回給我們的瀏覽器,因為是代理服務器去訪問index.jsp的,所以index.jsp中通過request.getRemoteAddr()的方法獲取的IP實際上是代理服務器的地址,并不是客戶端的IP地址。

            于是可得出獲得客戶端真實IP地址的方法一:

          1 public String getIpAddr(HttpServletRequest request) {
          2      String ip = request.getHeader("x-forwarded-for");
          3      if(ip == null || ip.length() == 0{
          4            ip = request.getRemoteAddr();
          5        }

          6        return ip;
          7    }

            可是當我訪問http://www.xxx.com/index.jsp/時,返回的IP地址始終是unknown,也并不是如上所示的127.0.0.1 或 192.168.1.110了,而我訪問http://192.168.1.110:2046/index.jsp時,則能返回客戶端的真實IP地址,寫了個方法去驗證。

            
           1<%@ page import="java.util.*" %>
           2<table border=1 cellspacing=0 cellpadding=0 align=center> 
           3<tr> 
           4<th>Name</th> 
           5<th>Value</th> 
           6</tr> 
           7<% 
           8Enumeration enumNames; 
           9String strName,strValue; 
          10
          11enumNames = request.getHeaderNames(); 
          12while(enumNames.hasMoreElements()){ 
          13    strName = (String)enumNames.nextElement(); 
          14    strValue = request.getHeader(strName); 
          15    
          %> 
          16    <tr> 
          17    <td><%=strName%></td> 
          18    <td><%=strValue%></td> 
          19    </tr> 
          20    <% 
          21
          22
          %>
          23<tr>
          24</table>
          25


            出來的結果:X-Forwarded-For: unknown 。X-Forwarded-For確實存在,但其值卻為unknown,繼續找原因。上網搜了搜,原因出在了Squid上。

          squid.conf 的配制文件 forwarded_for 項默認是為on,如果 forwarded_for 設成了 off  則:

          X-Forwarded-For: unknown

          一查,發現forwarded_for 項設為了off,原因找到了,把forwarded_for 項設為了on,重啟后,訪問http://www.xxx.com/index.jsp/ 獲得的IP是客戶端的真實IP。

            于是可得出獲得客戶端真實IP地址的方法二:

           1    public String getIpAddr(HttpServletRequest request) {
           2        String ip = request.getHeader("x-forwarded-for");
           3        if(ip == null || ip.length() == 0 || "unknown".equalsIgnoreCase(ip)) {
           4            ip = request.getHeader("Proxy-Client-IP");
           5        }

           6        if(ip == null || ip.length() == 0 || "unknown".equalsIgnoreCase(ip)) {
           7            ip = request.getHeader("WL-Proxy-Client-IP");
           8        }

           9        if(ip == null || ip.length() == 0 || "unknown".equalsIgnoreCase(ip)) {
          10            ip = request.getRemoteAddr();
          11        }

          12        return ip;
          13    }

          14


            可是,如果通過了多級反向代理的話,X-Forwarded-For的值并不止一個,而是一串Ip值,究竟哪個才是真正的用戶端的真實IP呢?

            答案是取X-Forwarded-For中第一個非unknown的有效IP字符串。

            如:
            X-Forwarded-For:192.168.1.110, 192.168.1.120, 192.168.1.130, 192.168.1.100
            用戶真實IP為: 192.168.1.110

          posted @ 2007-11-13 12:52 不需要解釋 閱讀(637) | 評論 (0)編輯 收藏

          High Performance Web Sites: The Importance of Front-End Performance

          In 2004, I started the Exceptional Performance group at Yahoo!. We're a small team chartered to measure and improve the performance of Yahoo!'s products. Having worked as a back-end engineer most of my career, I approached this as I would a code optimization project - I profiled web performance to identify where there was the greatest opportunity for improvement. Since our goal is to improve the end-user experience, I measured response times in a browser over various bandwidth speeds. What I saw is illustrated in the following chart showing HTTP traffic for http://www.yahoo.com.

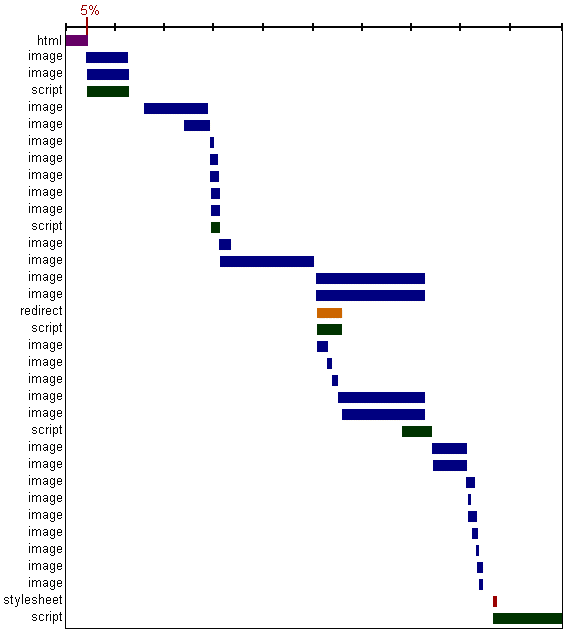
          In the figure above, the first bar, labeled "html", is the initial request for the HTML document. In this case, only 5% of the end-user response time is spent fetching the HTML document. This result holds true for almost all web sites. In sampling the top ten U.S. websites, all but one spend less than 20% of the total response time getting the HTML document. The other 80+% of the time is spent dealing with what's in the HTML document, namely, the front-end. That's why the key to faster web sites is to focus on improving front-end performance.

          There are three main reasons why front-end performance is the place to start.

          1. There is more potential for improvement by focusing on the front-end. Cutting it in half reduces response times by 40% or more, whereas cutting back-end performance in half results in less than a 10% reduction.
          2. Front-end improvements typically require less time and resources than back-end projects (redesigning application architecture and code, finding and optimizing critical code paths, adding or modifying hardware, distributing databases, etc.).
          3. Front-end performance tuning has been proven to work. Over fifty teams at Yahoo! have reduced their end-user response times by following our performance best practices, often by 25% or more.

          Our performance golden rule is: optimize front-end performance first, that's where 80% or more of the end-user response time is spent.

          Discuss the Importance of Front-End Performance

          1: Minimize HTTP Requests

          80% of the end-user response time is spent on the front-end. Most of this time is tied up in downloading all the components in the page: images, stylesheets, scripts, Flash, etc. Reducing the number of components in turn reduces the number of HTTP requests required to render the page. This is the key to faster pages.

          One way to reduce the number of components in the page is to simplify the page's design. But is there a way to build pages with richer content while also achieving fast response times? Here are some techniques for reducing the number of HTTP requests, while still supporting rich page designs.

          Image maps combine multiple images into a single image. The overall size is about the same, but reducing the number of HTTP requests speeds up the page. Image maps only work if the images are contiguous in the page, such as a navigation bar. Defining the coordinates of image maps can be tedious and error prone.

          CSS Sprites are the preferred method for reducing the number of image requests. Combine all the images in your page into a single image and use the CSS background-image and background-position properties to display the desired image segment.

          Inline images use the data: URL scheme to embed the image data in the actual page. This can increase the size of your HTML document. Combining inline images into your (cached) stylesheets is a way to reduce HTTP requests and avoid increasing the size of your pages.

          Combined files are a way to reduce the number of HTTP requests by combining all scripts into a single script, and similarly combining all stylesheets into a single stylesheet. It's a simple idea that hasn't seen wide adoption. The ten top U.S. web sites average 7 scripts and 2 stylesheets per page. Combining files is more challenging when the scripts and stylesheets vary from page to page, but making this part of your release process improves response times.

          Reducing the number of HTTP requests in your page is the place to start. This is the most important guideline for improving performance for first time visitors. As described in Tenni Theurer's blog Browser Cache Usage - Exposed!, 40-60% of daily visitors to your site come in with an empty cache. Making your page fast for these first time visitors is key to a better user experience.

          Discuss Rule 1

          2: Use a Content Delivery Network

          The user's proximity to your web server has an impact on response times. Deploying your content across multiple, geographically dispersed servers will make your pages load faster from the user's perspective. But where should you start?

          As a first step to implementing geographically dispersed content, don't attempt to redesign your web application to work in a distributed architecture. Depending on the application, changing the architecture could include daunting tasks such as synchronizing session state and replicating database transactions across server locations. Attempts to reduce the distance between users and your content could be delayed by, or never pass, this application architecture step.

          Remember that 80-90% of the end-user response time is spent downloading all the components in the page: images, stylesheets, scripts, Flash, etc. This is the Performance Golden Rule, as explained in The Importance of Front-End Performance. Rather than starting with the difficult task of redesigning your application architecture, it's better to first disperse your static content. This not only achieves a bigger reduction in response times, but it's easier thanks to content delivery networks.

          A content delivery network (CDN) is a collection of web servers distributed across multiple locations to deliver content more efficiently to users. The server selected for delivering content to a specific user is typically based on a measure of network proximity. For example, the server with the fewest network hops or the server with the quickest response time is chosen.

          Some large Internet companies own their own CDN, but it's cost-effective to use a CDN service provider, such as Akamai Technologies, Mirror Image Internet, or Limelight Networks. For start-up companies and private web sites, the cost of a CDN service can be prohibitive, but as your target audience grows larger and becomes more global, a CDN is necessary to achieve fast response times. At Yahoo!, properties that moved static content off their application web servers to a CDN improved end-user response times by 20% or more. Switching to a CDN is a relatively easy code change that will dramatically improve the speed of your web site.

          Discuss Rule 2

          3: Add an Expires Header

          Web page designs are getting richer and richer, which means more scripts, stylesheets, images, and Flash in the page. A first-time visitor to your page may have to make several HTTP requests, but by using the Expires header you make those components cacheable. This avoids unnecessary HTTP requests on subsequent page views. Expires headers are most often used with images, but they should be used on all components including scripts, stylesheets, and Flash components.

          Browsers (and proxies) use a cache to reduce the number and size of HTTP requests, making web pages load faster. A web server uses the Expires header in the HTTP response to tell the client how long a component can be cached. This is a far future Expires header, telling the browser that this response won't be stale until April 15, 2010.

                Expires: Thu, 15 Apr 2010 20:00:00 GMT


          If your server is Apache, use the ExiresDefault directive to set an expiration date relative to the current date. This example of the ExpiresDefault directive sets the Expires date 10 years out from the time of the request.

                ExpiresDefault "access plus 10 years"


          Keep in mind, if you use a far future Expires header you have to change the component's filename whenever the component changes. At Yahoo! we often make this step part of the build process: a version number is embedded in the component's filename, for example, yahoo_2.0.6.js.

          Using a far future Expires header affects page views only after a user has already visited your site. It has no effect on the number of HTTP requests when a user visits your site for the first time and the browser's cache is empty. The impact of this performance improvement depends, therefore, on how often users hit your pages with a primed cache. (A "primed cache" already contains all of the components in the page.) We measured this at Yahoo! and found the number of page views with a primed cache is 75-85%. By using a far future Expires header, you increase the number of components that are cached by the browser and re-used on subsequent page views without sending a single byte over the user's Internet connection.

          Discuss Rule 3

          4: Gzip Components

          The time it takes to transfer an HTTP request and response across the network can be significantly reduced by decisions made by front-end engineers. It's true that the end-user's bandwidth speed, Internet service provider, proximity to peering exchange points, etc. are beyond the control of the development team. But there are other variables that affect response times. Compression reduces response times by reducing the size of the HTTP response.

          Starting with HTTP/1.1, web clients indicate support for compression with the Accept-Encoding header in the HTTP request.

                Accept-Encoding: gzip, deflate

          If the web server sees this header in the request, it may compress the response using one of the methods listed by the client. The web server notifies the web client of this via the Content-Encoding header in the response.

                Content-Encoding: gzip

          Gzip is the most popular and effective compression method at this time. It was developed by the GNU project and standardized by RFC 1952. The only other compression format you're likely to see is deflate, but it's less effective and less popular.

          Gzipping generally reduces the response size by about 70%. Approximately 90% of today's Internet traffic travels through browsers that claim to support gzip. If you use Apache, the module configuring gzip depends on your version: Apache 1.3 uses mod_gzip while Apache 2.x uses mod_deflate.

          There are known issues with browsers and proxies that may cause a mismatch in what the browser expects and what it receives with regard to compressed content. Fortunately, these edge cases are dwindling as the use of older browsers drops off. The Apache modules help out by adding appropriate Vary response headers automatically.

          Servers choose what to gzip based on file type, but are typically too limited in what they decide to compress. Most web sites gzip their HTML documents. It's also worthwhile to gzip your scripts and stylesheets, but many web sites miss this opportunity. In fact, it's worthwhile to compress any text response including XML and JSON. Image and PDF files should not be gzipped because they are already compressed. Trying to gzip them not only wastes CPU but can potentially increase file sizes.

          Gzipping as many file types as possible is an easy way to reduce page weight and accelerate the user experience.

          Discuss Rule 4

          5: Put Stylesheets at the Top

          While researching performance at Yahoo!, we discovered that moving stylesheets to the document HEAD makes pages load faster. This is because putting stylesheets in the HEAD allows the page to render progressively.

          Front-end engineers that care about performance want a page to load progressively; that is, we want the browser to display whatever content it has as soon as possible. This is especially important for pages with a lot of content and for users on slower Internet connections. The importance of giving users visual feedback, such as progress indicators, has been well researched and documented. In our case the HTML page is the progress indicator! When the browser loads the page progressively the header, the navigation bar, the logo at the top, etc. all serve as visual feedback for the user who is waiting for the page. This improves the overall user experience.

          The problem with putting stylesheets near the bottom of the document is that it prohibits progressive rendering in many browsers, including Internet Explorer. Browsers block rendering to avoid having to redraw elements of the page if their styles change. The user is stuck viewing a blank white page. Firefox doesn't block rendering, which means when the stylesheet is done loading it's possible elements in the page will have to be redrawn, resulting in the flash of unstyled content problem.

          The HTML specification clearly states that stylesheets are to be included in the HEAD of the page: "Unlike A, [LINK] may only appear in the HEAD section of a document, although it may appear any number of times." Neither of the alternatives, the blank white screen or flash of unstyled content, are worth the risk. The optimal solution is to follow the HTML specification and load your stylesheets in the document HEAD.

          Discuss Rule 5

          6: Put Scripts at the Bottom

          Rule 5 described how stylesheets near the bottom of the page prohibit progressive rendering, and how moving them to the document HEAD eliminates the problem. Scripts (external JavaScript files) pose a similar problem, but the solution is just the opposite: it's better to move scripts from the top to as low in the page as possible. One reason is to enable progressive rendering, but another is to achieve greater download parallelization.

          With stylesheets, progressive rendering is blocked until all stylesheets have been downloaded. That's why it's best to move stylesheets to the document HEAD, so they get downloaded first and rendering isn't blocked. With scripts, progressive rendering is blocked for all content below the script. Moving scripts as low in the page as possible means there's more content above the script that is rendered sooner.

          The second problem caused by scripts is blocking parallel downloads. The HTTP/1.1 specification suggests that browsers download no more than two components in parallel per hostname. If you serve your images from multiple hostnames, you can get more than two downloads to occur in parallel. (I've gotten Internet Explorer to download over 100 images in parallel.) While a script is downloading, however, the browser won't start any other downloads, even on different hostnames.

          In some situations it's not easy to move scripts to the bottom. If, for example, the script uses document.write to insert part of the page's content, it can't be moved lower in the page. There might also be scoping issues. In many cases, there are ways to workaround these situations.

          An alternative suggestion that often comes up is to use deferred scripts. The DEFER attribute indicates that the script does not contain document.write, and is a clue to browsers that they can continue rendering. Unfortunately, Firefox doesn't support the DEFER attribute. In Internet Explorer, the script may be deferred, but not as much as desired. If a script can be deferred, it can also be moved to the bottom of the page. That will make your web pages load faster.

          Discuss Rule 6

          7: Avoid CSS Expressions

          CSS expressions are a powerful (and dangerous) way to set CSS properties dynamically. They're supported in Internet Explorer, starting with version 5. As an example, the background color could be set to alternate every hour using CSS expressions.

                background-color: expression( (new Date()).getHours()%2 ? "#B8D4FF" : "#F08A00" );


          As shown here, the expression method accepts a JavaScript expression. The CSS property is set to the result of evaluating the JavaScript expression. The expression method is ignored by other browsers, so it is useful for setting properties in Internet Explorer needed to create a consistent experience across browsers.

          The problem with expressions is that they are evaluated more frequently than most people expect. Not only are they evaluated when the page is rendered and resized, but also when the page is scrolled and even when the user moves the mouse over the page. Adding a counter to the CSS expression allows us to keep track of when and how often a CSS expression is evaluated. Moving the mouse around the page can easily generate more than 10,000 evaluations.

          One way to reduce the number of times your CSS expression is evaluated is to use one-time expressions, where the first time the expression is evaluated it sets the style property to an explicit value, which replaces the CSS expression. If the style property must be set dynamically throughout the life of the page, using event handlers instead of CSS expressions is an alternative approach. If you must use CSS expressions, remember that they may be evaluated thousands of times and could affect the performance of your page.

          Discuss Rule 7

          8: Make JavaScript and CSS External

          Many of these performance rules deal with how external components are managed. However, before these considerations arise you should ask a more basic question: Should JavaScript and CSS be contained in external files, or inlined in the page itself?

          Using external files in the real world generally produces faster pages because the JavaScript and CSS files are cached by the browser. JavaScript and CSS that are inlined in HTML documents get downloaded every time the HTML document is requested. This reduces the number of HTTP requests that are needed, but increases the size of the HTML document. On the other hand, if the JavaScript and CSS are in external files cached by the browser, the size of the HTML document is reduced without increasing the number of HTTP requests.

          The key factor, then, is the frequency with which external JavaScript and CSS components are cached relative to the number of HTML documents requested. This factor, although difficult to quantify, can be gauged using various metrics. If users on your site have multiple page views per session and many of your pages re-use the same scripts and stylesheets, there is a greater potential benefit from cached external files.

          Many web sites fall in the middle of these metrics. For these properties, the best solution generally is to deploy the JavaScript and CSS as external files. The only exception I've seen where inlining is preferable is with home pages, such as Yahoo!'s front page (http://www.yahoo.com) and My Yahoo! (http://my.yahoo.com). Home pages that have few (perhaps only one) page view per session may find that inlining JavaScript and CSS results in faster end-user response times.

          For front pages that are typically the first of many page views, there are techniques that leverage the reduction of HTTP requests that inlining provides, as well as the caching benefits achieved through using external files. One such technique is to inline JavaScript and CSS in the front page, but dynamically download the external files after the page has finished loading. Subsequent pages would reference the external files that should already be in the browser's cache.

          Discuss Rule 8

          9: Reduce DNS Lookups

          The Domain Name System (DNS) maps hostnames to IP addresses, just as phonebooks map people's names to their phone numbers. When you type www.yahoo.com into your browser, a DNS resolver contacted by the browser returns that server's IP address. DNS has a cost. It typically takes 20-120 milliseconds for DNS to lookup the IP address for a given hostname. The browser can't download anything from this hostname until the DNS lookup is completed.

          DNS lookups are cached for better performance. This caching can occur on a special caching server, maintained by the user's ISP or local area network, but there is also caching that occurs on the individual user's computer. The DNS information remains in the operating system's DNS cache (the "DNS Client service" on Microsoft Windows). Most browsers have their own caches, separate from the operating system's cache. As long as the browser keeps a DNS record in its own cache, it doesn't bother the operating system with a request for the record.

          Internet Explorer caches DNS lookups for 30 minutes by default, as specified by the DnsCacheTimeout registry setting. Firefox caches DNS lookups for 1 minute, controlled by the network.dnsCacheExpiration configuration setting. (Fasterfox changes this to 1 hour.)

          When the client's DNS cache is empty (for both the browser and the operating system), the number of DNS lookups is equal to the number of unique hostnames in the web page. This includes the hostnames used in the page's URL, images, script files, stylesheets, Flash objects, etc. Reducing the number of unique hostnames reduces the number of DNS lookups.

          Reducing the number of unique hostnames has the potential to reduce the amount of parallel downloading that takes place in the page. Avoiding DNS lookups cuts response times, but reducing parallel downloads may increase response times. My guideline is to split these components across at least two but no more than four hostnames. This results in a good compromise between reducing DNS lookups and allowing a high degree of parallel downloads.

          Discuss Rule 9

          10: Minify JavaScript

          Minification is the practice of removing unnecessary characters from code to reduce its size thereby improving load times. When code is minified all comments are removed, as well as unneeded white space characters (space, newline, and tab). In the case of JavaScript, this improves response time performance because the size of the downloaded file is reduced. Two popular tools for minifying JavaScript code are JSMin and YUI Compressor.

          Obfuscation is an alternative optimization that can be applied to source code. Like minification, it removes comments and white space, but it also munges the code. As part of munging, function and variable names are converted into smaller strings making the code more compact as well as harder to read. This is typically done to make it more difficult to reverse engineer the code. But munging can help performance because it reduces the code size beyond what is achieved by minification. The tool-of-choice is less clear in the area of JavaScript obfuscation. Dojo Compressor (ShrinkSafe) is the one I've seen used the most.

          Minification is a safe, fairly straightforward process. Obfuscation, on the other hand, is more complex and thus more likely to generate bugs as a result of the obfuscation step itself. Obfuscation also requires modifying your code to indicate API functions and other symbols that should not be munged. It also makes it harder to debug your code in production. Although I've never seen problems introduced from minification, I have seen bugs caused by obfuscation. In a survey of ten top U.S. web sites, minification achieved a 21% size reduction versus 25% for obfuscation. Although obfuscation has a higher size reduction, I recommend minifying JavaScript code because of the reduced risks and maintenance costs.

          In addition to minifying external scripts, inlined script blocks can and should also be minified. Even if you gzip your scripts, as described in Rule 4, minifying them will still reduce the size by 5% or more. As the use and size of JavaScript increases, so will the savings gained by minifying your JavaScript code.

          Discuss Rule 10

          11: Avoid Redirects

          Redirects are accomplished using the 301 and 302 status codes. Here's an example of the HTTP headers in a 301 response:

                HTTP/1.1 301 Moved Permanently
          Location: http://example.com/newuri
          Content-Type: text/html


          The browser automatically takes the user to the URL specified in the Location field. All the information necessary for a redirect is in the headers. The body of the response is typically empty. Despite their names, neither a 301 nor a 302 response is cached in practice unless additional headers, such as Expires or Cache-Control, indicate it should be. The meta refresh tag and JavaScript are other ways to direct users to a different URL, but if you must do a redirect, the preferred technique is to use the standard 3xx HTTP status codes, primarily to ensure the back button works correctly.

          The main thing to remember is that redirects slow down the user experience. Inserting a redirect between the user and the HTML document delays everything in the page since nothing in the page can be rendered and no components can start being downloaded until the HTML document has arrived.

          One of the most wasteful redirects happens frequently and web developers are generally not aware of it. It occurs when a trailing slash (/) is missing from a URL that should otherwise have one. For example, going to http://astrology.yahoo.com/astrology results in a 301 response containing a redirect to http://astrology.yahoo.com/astrology/ (notice the added trailing slash). This is fixed in Apache by using Alias or mod_rewrite, or the DirectorySlash directive if you're using Apache handlers.

          Connecting an old web site to a new one is another common use for redirects. Others include connecting different parts of a website and directing the user based on certain conditions (type of browser, type of user account, etc.). Using a redirect to connect two web sites is simple and requires little additional coding. Although using redirects in these situations reduces the complexity for developers, it degrades the user experience. Alternatives for this use of redirects include using Alias and mod_rewrite if the two code paths are hosted on the same server. If a domain name change is the cause of using redirects, an alternative is to create a CNAME (a DNS record that creates an alias pointing from one domain name to another) in combination with Alias or mod_rewrite.

          Discuss Rule 11

          12: Remove Duplicate Scripts

          It hurts performance to include the same JavaScript file twice in one page. This isn't as unusual as you might think. A review of the ten top U.S. web sites shows that two of them contain a duplicated script. Two main factors increase the odds of a script being duplicated in a single web page: team size and number of scripts. When it does happen, duplicate scripts hurt performance by creating unnecessary HTTP requests and wasted JavaScript execution.

          Unnecessary HTTP requests happen in Internet Explorer, but not in Firefox. In Internet Explorer, if an external script is included twice and is not cacheable, it generates two HTTP requests during page loading. Even if the script is cacheable, extra HTTP requests occur when the user reloads the page.

          In addition to generating wasteful HTTP requests, time is wasted evaluating the script multiple times. This redundant JavaScript execution happens in both Firefox and Internet Explorer, regardless of whether the script is cacheable.

          One way to avoid accidentally including the same script twice is to implement a script management module in your templating system. The typical way to include a script is to use the SCRIPT tag in your HTML page.

                script type="text/javascript" src="menu_1.0.17.js"></script>

          An alternative in PHP would be to create a function called insertScript.

                <?php insertScript("menu.js") ?>

          In addition to preventing the same script from being inserted multiple times, this function could handle other issues with scripts, such as dependency checking and adding version numbers to script filenames to support far future Expires headers.

          Discuss Rule 12

          13: Configure ETags

          Entity tags (ETags) are a mechanism that web servers and browsers use to determine whether the component in the browser's cache matches the one on the origin server. (An "entity" is another word for what I've been calling a "component": images, scripts, stylesheets, etc.) ETags were added to provide a mechanism for validating entities that is more flexible than the last-modified date. An ETag is a string that uniquely identifies a specific version of a component. The only format constraints are that the string be quoted. The origin server specifies the component's ETag using the ETag response header.

                HTTP/1.1 200 OK
          Last-Modified: Tue, 12 Dec 2006 03:03:59 GMT
          ETag: "10c24bc-4ab-457e1c1f"
          Content-Length: 12195


          Later, if the browser has to validate a component, it uses the If-None-Match header to pass the ETag back to the origin server. If the ETags match, a 304 status code is returned reducing the response by 12195 bytes for this example.

                GET /i/yahoo.gif HTTP/1.1
          Host: us.yimg.com
          If-Modified-Since: Tue, 12 Dec 2006 03:03:59 GMT
          If-None-Match: "10c24bc-4ab-457e1c1f"
          HTTP/1.1 304 Not Modified


          The problem with ETags is that they typically are constructed using attributes that make them unique to a specific server hosting a site. ETags won't match when a browser gets the original component from one server and later tries to validate that component on a different server, a situation that is all too common on Web sites that use a cluster of servers to handle requests. By default, both Apache and IIS embed data in the ETag that dramatically reduces the odds of the validity test succeeding on web sites with multiple servers.

          The ETag format for Apache 1.3 and 2.x is inode-size-timestamp. Although a given file may reside in the same directory across multiple servers, and have the same file size, permissions, timestamp, etc., its inode is different from one server to the next.

          IIS 5.0 and 6.0 have a similar issue with ETags. The format for ETags on IIS is Filetimestamp:ChangeNumber. A ChangeNumber is a counter used to track configuration changes to IIS. It's unlikely that the ChangeNumber is the same across all IIS servers behind a web site.

          The end result is ETags generated by Apache and IIS for the exact same component won't match from one server to another. If the ETags don't match, the user doesn't receive the small, fast 304 response that ETags were designed for; instead, they'll get a normal 200 response along with all the data for the component. If you host your web site on just one server, this isn't a problem. But if you have multiple servers hosting your web site, and you're using Apache or IIS with the default ETag configuration, your users are getting slower pages, your servers have a higher load, you're consuming greater bandwidth, and proxies aren't caching your content efficiently. Even if your components have a far future Expires header, a conditional GET request is still made whenever the user hits Reload or Refresh.

          If you're not taking advantage of the flexible validation model that ETags provide, it's better to just remove the ETag altogether. The Last-Modified header validates based on the component's timestamp. And removing the ETag reduces the size of the HTTP headers in both the response and subsequent requests. This Microsoft Support article describes how to remove ETags. In Apache, this is done by simply adding the following line to your Apache configuration file:

                FileETag none

          Discuss Rule 13

          14: Make Ajax Cacheable

          People ask whether these performance rules apply to Web 2.0 applications. They definitely do! This rule is the first rule that resulted from working with Web 2.0 applications at Yahoo!.

          One of the cited benefits of Ajax is that it provides instantaneous feedback to the user because it requests information asynchronously from the backend web server. However, using Ajax is no guarantee that the user won't be twiddling his thumbs waiting for those asynchronous JavaScript and XML responses to return. In many applications, whether or not the user is kept waiting depends on how Ajax is used. For example, in a web-based email client the user will be kept waiting for the results of an Ajax request to find all the email messages that match their search criteria. It's important to remember that "asynchronous" does not imply "instantaneous".

          To improve performance, it's important to optimize these Ajax responses. The most important way to improve the performance of Ajax is to make the responses cacheable, as discussed in Rule 3: Add an Expires Header. Some of the other rules also apply to Ajax:


          However, Rule 3 is the most important for speeding up the user experience. Let's look at an example. A Web 2.0 email client might use Ajax to download the user's address book for autocompletion. If the user hasn't modified her address book since the last time she used the email web app, the previous address book response could be read from cache if that Ajax response was made cacheable with a future Expires header. The browser must be informed when to use a previously cached address book response versus requesting a new one. This could be done by adding a timestamp to the address book Ajax URL indicating the last time the user modified her address book, for example, &t=1190241612. If the address book hasn't been modified since the last download, the timestamp will be the same and the address book will be read from the browser's cache eliminating an extra HTTP roundtrip. If the user has modified her address book, the timestamp ensures the new URL doesn't match the cached response, and the browser will request the updated address book entries.

          Even though your Ajax responses are created dynamically, and might only be applicable to a single user, they can still be cached. Doing so will make your Web 2.0 apps faster.

          Discuss Rule 14

          posted @ 2007-11-13 12:51 不需要解釋 閱讀(400) | 評論 (0)編輯 收藏

               摘要:   Jetspeed2.0最終release版本發布于2005年12月, 可以從以下網址下載源代碼和捆綁tomcat的壓縮文件: http://www.apache.org/dist/portals/jetspeed-2/   。 與Jetspeed1.x比較,Jetspeed2.0 (以下簡稱J2)的架構發生了很大變化, J1.x使用了Turbine,在J2中T...  閱讀全文

          posted @ 2007-11-13 11:10 不需要解釋 閱讀(5682) | 評論 (0)編輯 收藏

          通常,軟件的漏洞信息和特定版本是相關的,因此,版本號對黑客來說是最有價值的。
          默認情況下,系統會把Apache版本模塊都顯示出來(http返回頭)。如果列舉目錄的話,會顯示域名信息(文件列表正文),去除Apache版本號的方法是修改配置文件/etc/httpd.conf。找到關鍵字ServerSignature,將其設定為:
          ServerSignature Off
          ServerTokens Prod

          然后重新啟動Apache服務器。
          通過分析Web服務器的類型,大致可以推測出操作系統的類型,比如,Windows使用IIS來提供HTTP服務,而Linux中最常見的是Apache。
          默認的Apache配置里沒有任何信息保護機制,并且允許目錄瀏覽。通過目錄瀏覽,通常可以獲得類似“Apache/1.3.27 Server at apache.linuxforum.net Port 80”或“Apache/2.0.49 (Unix) PHP/4.3.8”的信息。
          通過修改配置文件中的ServerTokens參數,可以將Apache的相關信息隱藏起來。但是,Red Hat Linux運行的Apache是編譯好的程序,提示信息被編譯在程序里,要隱藏這些信息需要修改Apache的源代碼,然后,重新編譯安裝程序,以替換里面的提示內容。
          以Apache 2.0.50為例,編輯ap_release.h文件,修改“#define AP_SERVER_BASEPRODUCT \"Apache\"”為“#define AP_SERVER_BASEPRODUCT \"Microsoft-IIS/5.0\"”。編輯os/unix/os.h文件,修改“#define PLATFORM \"Unix\"”為“#define PLATFORM \"Win32\"”。修改完畢后,重新編譯、安裝Apache。
          Apache安裝完成后,修改httpd.conf配置文件,將“ServerTokens Full”改為“ServerTokens Prod”;將“ServerSignature On”改為“ServerSignature Off”,然后存盤退出。重新啟動Apache后,用工具進行掃描,發現提示信息中已經顯示操作系統為Windows。

          posted @ 2007-11-13 10:50 不需要解釋 閱讀(351) | 評論 (0)編輯 收藏

          Apache 2.XX中prefork.c模塊和worker.c模塊的比較

          空閑子進程:是指沒有正在處理請求的子進程。

          1、prefork.c模塊(一個非線程型的、預派生的MPM)
              prefork MPM 使用多個子進程,每個子進程只有一個線程。每個進程在某個確定的時間只能維持一個連接。在大多數平臺上,Prefork MPM在效率上要比Worker MPM要高,但是內存使用大得多。prefork的無線程設計在某些情況下將比worker更有優勢:它可以使用那些沒有處理好線程安全的第三方模塊,并且對于那些線程調試困難的平臺而言,它也更容易調試一些。

          <IfModule prefork.c>
          ServerLimit  20000
          StartServers  5
          MinSpareServers  5
          MaxSpareServers  10
          MaxClients  1000
          MaxRequestsPerChild 0
          </IfModule>

          ServerLimit     2000
          //默認的MaxClient最大是256個線程,如果想設置更大的值,就的加上ServerLimit這個參數。20000是ServerLimit這個參數的最大值。如果需要更大,則必須編譯apache,此前都是不需要重新編譯Apache。
          生效前提:必須放在其他指令的前面

          StartServers  5
          //指定服務器啟動時建立的子進程數量,prefork默認為5。

          MinSpareServers  5
          //指定空閑子進程的最小數量,默認為5。如果當前空閑子進程數少于MinSpareServers ,那么Apache將以最大每秒一個的速度產生新的子進程。此參數不要設的太大。

          MaxSpareServers  10
          //設置空閑子進程的最大數量,默認為10。如果當前有超過MaxSpareServers數量的空閑子進程,那么父進程將殺死多余的子進程。此參數不要設的太大。如果你將該指令的值設置為比MinSpareServers小,Apache將會自動將其修改成"MinSpareServers+1"。

          MaxClients  256
          //限定同一時間客戶端最大接入請求的數量(單個進程并發線程數),默認為256。任何超過MaxClients限制的請求都將進入等候隊列,一旦一個鏈接被釋放,隊列中的請求將得到服務。要增大這個值,你必須同時增大ServerLimit 。

          MaxRequestsPerChild 10000
          //每個子進程在其生存期內允許伺服的最大請求數量,默認為10000.到達MaxRequestsPerChild的限制后,子進程將會結束。如果MaxRequestsPerChild為"0",子進程將永遠不會結束。

          將MaxRequestsPerChild設置成非零值有兩個好處:
          1.可以防止(偶然的)內存泄漏無限進行,從而耗盡內存。
          2.給進程一個有限壽命,從而有助于當服務器負載減輕的時候減少活動進程的數量。

          工作方式:
          一個單獨的控制進程(父進程)負責產生子進程,這些子進程用于監聽請求并作出應答。Apache總是試圖保持一些備用的(spare)或者是空閑的子進程用于迎接即將到來的請求。這樣客戶端就不需要在得到服務前等候子進程的產生。在Unix系統中,父進程通常以root身份運行以便邦定80端口,而Apache產生的子進程通常以一個低特權的用戶運行。User和Group指令用于設置子進程的低特權用戶。運行子進程的用戶必須要對它所服務的內容有讀取的權限,但是對服務內容之外的其他資源必須擁有盡可能少的權限。


          2、worker.c模塊(支持混合的多線程多進程的多路處理模塊)
              worker MPM 使用多個子進程,每個子進程有多個線程。每個線程在某個確定的時間只能維持一個連接。通常來說,在一個高流量的HTTP服務器上,Worker MPM是個比較好的選擇,因為Worker MPM的內存使用比Prefork MPM要低得多。但worker MPM也由不完善的地方,如果一個線程崩潰,整個進程就會連同其所有線程一起"死掉".由于線程共享內存空間,所以一個程序在運行時必須被系統識別為"每個線程都是安全的"。

          <IfModule worker.c>
          ServerLimit  50
          ThreadLimit  200
          StartServers  5
          MaxClients  5000
          MinSpareThreads  25
          MaxSpareThreads  500
          ThreadsPerChild  100
          MaxRequestsPerChild 0
          </IfModule>

          ServerLimit 16
          //服務器允許配置的進程數上限。這個指令和ThreadLimit結合使用設置了MaxClients最大允許配置的數值。任何在重啟期間對這個指令的改變都將被忽略,但對MaxClients的修改卻會生效。

          ThreadLimit 64
          //每個子進程可配置的線程數上限。這個指令設置了每個子進程可配置的線程數ThreadsPerChild上限。任何在重啟期間對這個指令的改變都將被忽略,但對ThreadsPerChild的修改卻會生效。默認值是"64".

          StartServers 3
          //服務器啟動時建立的子進程數,默認值是"3"。

          MinSpareThreads 75
          //最小空閑線程數,默認值是"75"。這個MPM將基于整個服務器監視空閑線程數。如果服務器中總的空閑線程數太少,子進程將產生新的空閑線程。

          MaxSpareThreads 250
          //設置最大空閑線程數。默認值是"250"。這個MPM將基于整個服務器監視空閑線程數。如果服務器中總的空閑線程數太多,子進程將殺死多余的空閑線程。MaxSpareThreads的取值范圍是有限制的。Apache將按照如下限制自動修正你設置的值:worker要求其大于等于MinSpareThreads加上ThreadsPerChild的和

          MaxClients 400
          //允許同時伺服的最大接入請求數量(最大線程數量)。任何超過MaxClients限制的請求都將進入等候隊列。默認值是"400",16(ServerLimit)乘以25(ThreadsPerChild)的結果。因此要增加MaxClients的時候,你必須同時增加ServerLimit的值。

          ThreadsPerChild 25
          //每個子進程建立的常駐的執行線程數。默認值是25。子進程在啟動時建立這些線程后就不再建立新的線程了。

          MaxRequestsPerChild  0
          //設置每個子進程在其生存期內允許伺服的最大請求數量。到達MaxRequestsPerChild的限制后,子進程將會結束。如果MaxRequestsPerChild為"0",子進程將永遠不會結束。

          將MaxRequestsPerChild設置成非零值有兩個好處:
          1.可以防止(偶然的)內存泄漏無限進行,從而耗盡內存。
          2.給進程一個有限壽命,從而有助于當服務器負載減輕的時候減少活動進程的數量。
          注意
          對于KeepAlive鏈接,只有第一個請求會被計數。事實上,它改變了每個子進程限制最大鏈接數量的行為。

          工作方式:
          每個進程可以擁有的線程數量是固定的。服務器會根據負載情況增加或減少進程數量。一個單獨的控制進程(父進程)負責子進程的建立。每個子進程可以建立ThreadsPerChild數量的服務線程和一個監聽線程,該監聽線程監聽接入請求并將其傳遞給服務線程處理和應答。Apache總是試圖維持一個備用(spare)或是空閑的服務線程池。這樣,客戶端無須等待新線程或新進程的建立即可得到處理。在Unix中,為了能夠綁定80端口,父進程一般都是以root身份啟動,隨后,Apache以較低權限的用戶建立子進程和線程。User和Group指令用于設置Apache子進程的權限。雖然子進程必須對其提供的內容擁有讀權限,但應該盡可能給予它較少的特權。另外,除非使用了suexec ,否則,這些指令設置的權限將被CGI腳本所繼承。


          公式:
          ThreadLimit >= ThreadsPerChild
          MaxClients  <= ServerLimit * ThreadsPerChild  必須是ThreadsPerChild的倍數
          MaxSpareThreads >= MinSpareThreads+ThreadsPerChild

          硬限制:

          ServerLimi和ThreadLimit這兩個指令決定了活動子進程數量和每個子進程中線程數量的硬限制。要想改變這個硬限制必須完全停止服務器然后再啟動服務器(直接重啟是不行的)。

          Apache在編譯ServerLimit時內部有一個硬性的限制,你不能超越這個限制。
          prefork MPM最大為"ServerLimit 200000"
          其它MPM(包括work MPM)最大為"ServerLimit 20000

          Apache在編譯ThreadLimit時內部有一個硬性的限制,你不能超越這個限制。
          mpm_winnt是"ThreadLimit 15000"
          其它MPM(包括work prefork)為"ThreadLimit 20000

          注意
          使用ServerLimit和ThreadLimit時要特別當心。如果將ServerLimit和ThreadLimit設置成一個高出實際需要許多的值,將會有過多的共享內存被分配。當設置成超過系統的處理能力,Apache可能無法啟動,或者系統將變得不穩定。

          posted @ 2007-11-13 10:44 不需要解釋 閱讀(1745) | 評論 (0)編輯 收藏

          僅列出標題
          共4頁: 上一頁 1 2 3 4 
          我實話告訴你們,我可是身經百戰了.bbs我見的多了,哪個版我沒灌過?你們要知道, 一塌糊 涂的triangle,PIC,SEX版,那比你們不知道厲害到哪里去了,我在那談笑風聲.你 們有一好就是無論在哪個版,什么話題都灌,但是灌來灌去的問題,都too simple, sometimes naive!你 們懂不懂呀?啊?所以說灌水啊,關鍵是要提高自己的知識水平.你 們啊,不要總想著弄個大坑,然后灌上十大,再把我羞辱一番……你們啊,naive!你們這 樣灌是不行地!~那你問我支持 不支持灌水,我說支持,我常來這裡灌,你說支持不支持?
          主站蜘蛛池模板: 永城市| 青河县| 延吉市| 吉水县| 泸州市| 南阳市| 利川市| 福建省| 河源市| 彩票| 酒泉市| 沈丘县| 夹江县| 望都县| 张家港市| 蚌埠市| 栾川县| 泰和县| 阿巴嘎旗| 习水县| 鲁山县| 辉县市| 南宁市| 海阳市| 昌图县| 门源| 册亨县| 清远市| 玉山县| 武宁县| 瓦房店市| 聂荣县| 阜宁县| 北京市| 方城县| 华宁县| 旬邑县| 绥芬河市| 广汉市| 浪卡子县| 柯坪县|