阿里云主機推薦碼,可以打九折8C0BAY 有效期 11-30號
posted @
2015-10-15 18:13 hellxoul 閱讀(205) |
評論 (0) |
編輯 收藏
摘要:
閱讀全文
posted @
2015-01-05 11:52 hellxoul 閱讀(328) |
評論 (0) |
編輯 收藏
1 <!-- 配置路徑擴展名映射的媒體類型 -->
2 <bean name="pathExtensionContentNegotiationStrategy"
3 class="org.springframework.web.accept.PathExtensionContentNegotiationStrategy">
4 <constructor-arg>
5 <props>
6 <!-- if romePresent -->
7 <prop key="atom">application/atom+xml</prop>
8 <prop key="rss">application/rss+xml</prop>
9 <!-- endif -->
10 <!-- if jackson2Present || jacksonPresent -->
11 <prop key="json">application/json</prop>
12 <!-- endif -->
13 <!-- if jaxb2Present -->
14 <prop key="xml">application/xml</prop>
15 <!-- endif -->
16 </props>
17 </constructor-arg>
18 </bean>
19
20 <!-- 配置映射媒體類型的策略 -->
21 <bean name="mvcContentNegotiationManager"
22 class="org.springframework.web.accept.ContentNegotiationManager">
23 <constructor-arg>
24 <list>
25 <ref bean="pathExtensionContentNegotiationStrategy" />
26 </list>
27 </constructor-arg>
28 </bean>
29
30 <bean class="org.springframework.web.servlet.mvc.method.annotation.RequestMappingHandlerMapping">
31 <property name="order" value="0"/>
32 <property name="removeSemicolonContent" value="false"/>
33 <property name="contentNegotiationManager" ref="mvcContentNegotiationManager"/>
34 </bean>
35
36 <!-- 配置數據轉換服務,默認使用格式化數據轉換服務,可以對日期和數字進行格式化 -->
37 <bean name="conversionService"
38 class="org.springframework.format.support.DefaultFormattingConversionService">
39 <constructor-arg index="0">
40 <null/>
41 </constructor-arg>
42 <constructor-arg index="1" value="true"/>
43 </bean>
44
45 <bean name="validator"
46 class="org.springframework.validation.beanvalidation.LocalValidatorFactoryBean"/>
47
48 <!-- 配置數據綁定,通過轉換服務實現綁定,如果包含jsr303實現還將進行校驗 -->
49 <bean name="webBindingInitializer"
50 class="org.springframework.web.bind.support.ConfigurableWebBindingInitializer">
51 <property name="conversionService" ref="conversionService" />
52 <!-- if jsr303Present -->
53 <property name="validator" ref="validator" />
54 <!-- endif -->
55 </bean>
56
57 <bean name="byteArrayHttpMessageConverter"
58 class="org.springframework.http.converter.ByteArrayHttpMessageConverter"/>
59
60 <bean name="stringHttpMessageConverter"
61 class="org.springframework.http.converter.StringHttpMessageConverter">
62 <property name="writeAcceptCharset" value="false" />
63 </bean>
64
65 <bean name="resourceHttpMessageConverter"
66 class="org.springframework.http.converter.ResourceHttpMessageConverter"/>
67 <bean name="sourceHttpMessageConverter"
68 class="org.springframework.http.converter.xml.SourceHttpMessageConverter"/>
69 <bean name="allEncompassingFormHttpMessageConverter"
70 class="org.springframework.http.converter.support.AllEncompassingFormHttpMessageConverter"/>
71 <bean name="atomFeedHttpMessageConverter"
72 class="org.springframework.http.converter.feed.AtomFeedHttpMessageConverter"/>
73 <bean name="rssChannelHttpMessageConverter"
74 class="org.springframework.http.converter.feed.RssChannelHttpMessageConverter"/>
75 <bean name="jaxb2RootElementHttpMessageConverter"
76 class="org.springframework.http.converter.xml.Jaxb2RootElementHttpMessageConverter"/>
77 <bean name="mappingJacksonHttpMessageConverter"
78 class="org.springframework.http.converter.json.MappingJacksonHttpMessageConverter"/>
79
80 <!-- 配置@RequestBody,@ResponseBody注解可用的轉換器 -->
81 <util:list id="messageConverters"
82 list-class="org.springframework.beans.factory.support.ManagedList">
83 <ref bean="byteArrayHttpMessageConverter" />
84 <ref bean="stringHttpMessageConverter" />
85 <ref bean="resourceHttpMessageConverter" />
86 <ref bean="sourceHttpMessageConverter" />
87 <ref bean="allEncompassingFormHttpMessageConverter" />
88 <!-- if romePresent -->
89 <ref bean="atomFeedHttpMessageConverter" />
90 <ref bean="rssChannelHttpMessageConverter" />
91 <!-- endif -->
92 <!-- if jaxb2Present -->
93 <ref bean="jaxb2RootElementHttpMessageConverter" />
94 <!-- endif -->
95 <!-- if jacksonPresent -->
96 <ref bean="mappingJacksonHttpMessageConverter" />
97 <!-- endif -->
98 </util:list>
99
100 <!-- 將任意類型的Controller適配為Handler -->
101 <bean name="requestMappingHandlerAdapter"
102 class="org.springframework.web.servlet.mvc.method.annotation.RequestMappingHandlerAdapter">
103 <property name="contentNegotiationManager" ref="mvcContentNegotiationManager" />
104 <property name="webBindingInitializer" ref="webBindingInitializer" />
105 <property name="messageConverters" ref="messageConverters" />
106 </bean>
107
108 <!-- 這個攔截器暴露轉換器服務讓spring:bind和spring:eval標簽可用 -->
109 <bean name="csInterceptor"
110 class="org.springframework.web.servlet.handler.ConversionServiceExposingInterceptor">
111 <constructor-arg index="0" ref="conversionService"/>
112 </bean>
113
114 <!-- 現在所有攔截器都必須設定響應的路徑映射 -->
115 <bean name="mappedCsInterceptor"
116 class="org.springframework.web.servlet.handler.MappedInterceptor">
117 <constructor-arg index="0">
118 <null/>
119 </constructor-arg>
120 <constructor-arg index="1" ref="csInterceptor"/>
121 </bean>
122
123 <!-- 使用@ExceptionHandler注解的方法來處理Exception,優先級為0(最高) -->
124 <bean name="exceptionHandlerExceptionResolver"
125 class="org.springframework.web.servlet.mvc.method.annotation.ExceptionHandlerExceptionResolver">
126 <property name="contentNegotiationManager" ref="mvcContentNegotiationManager" />
127 <property name="messageConverters" ref="messageConverters" />
128 <property name="order" value="0" />
129 </bean>
130
131 <!-- 如果拋出的Exception類帶有@ResponseStatus注解,響應返回該注解的Http狀態碼,優先級為1 -->
132 <bean name="responseStatusExceptionResolver"
133 class="org.springframework.web.servlet.mvc.annotation.ResponseStatusExceptionResolver">
134 <property name="order" value="1" />
135 </bean>
136
137 <!-- SpringMvc內部異常處理 -->
138 <bean name="defaultExceptionResolver"
139 class="org.springframework.web.servlet.mvc.support.DefaultHandlerExceptionResolver">
140 <property name="order" value="2" />
141 </bean>
142
posted @
2014-08-03 22:35 hellxoul 閱讀(2910) |
評論 (1) |
編輯 收藏
HeadFirst Servlet/JSP 學習筆記
1.容器加載類,調用servlet的無參構造方法,并調用servlet的init()方法,從而初始化servlet。
2.init()在servlet一生中只調用一次,往往在servlet為客戶請求提供服務之前調用。
3.init()方法使servlet可以訪問ServletConfig和ServletContext對象,servlet需要從這些對象得到有關servlet配置和web應用的信息。
4.容器通過調用servlet的destroy()方法來結束servlet的生命
5.servlet一生的大多時間都是在為某個客戶端請求運行service()方法
6.對servlet的每個請求都在一個單獨的線程中運行,任何特定servlet類都只有一個實例。
posted @
2014-07-05 15:21 hellxoul 閱讀(280) |
評論 (0) |
編輯 收藏
轉自:
http://www.cnblogs.com/peida/p/Guava_Ordering.html
Ordering是Guava類庫提供的一個犀利強大的比較器工具,Guava的Ordering和JDK Comparator相比功能更強。它非常容易擴展,可以輕松構造復雜的comparator,然后用在容器的比較、排序等操作中。
本質上來說,Ordering 實例無非就是一個特殊的Comparator 實例。Ordering只是需要依賴于一個比較器(例如,Collections.max)的方法,并使其可作為實例方法。另外,Ordering提供了鏈式方法調用和加強現有的比較器。
下面我們看看Ordering中的一些具體方法和簡單的使用實例。
常見的靜態方法:
natural():使用Comparable類型的自然順序, 例如:整數從小到大,字符串是按字典順序;
usingToString() :使用toString()返回的字符串按字典順序進行排序;
arbitrary() :返回一個所有對象的任意順序, 即compare(a, b) == 0 就是 a == b (identity equality)。 本身的排序是沒有任何含義, 但是在VM的生命周期是一個常量。
簡單實例:
import java.util.List;
import org.junit.Test;
import com.google.common.collect.Lists;
import com.google.common.collect.Ordering;

public class OrderingTest {

    @Test
    public void testStaticOrdering(){
        List<String> list = Lists.newArrayList();
        list.add("peida");
        list.add("jerry");
        list.add("harry");
        list.add("eva");
        list.add("jhon");
        list.add("neron");

        System.out.println("list:"+ list);

        Ordering<String> naturalOrdering = Ordering.natural();
        Ordering<Object> usingToStringOrdering = Ordering.usingToString();
        Ordering<Object> arbitraryOrdering = Ordering.arbitrary();

        System.out.println("naturalOrdering:"+ naturalOrdering.sortedCopy(list));
        System.out.println("usingToStringOrdering:"+ usingToStringOrdering.sortedCopy(list));
        System.out.println("arbitraryOrdering:"+ arbitraryOrdering.sortedCopy(list));
    }
}
輸出:
list:[peida, jerry, harry, eva, jhon, neron]
naturalOrdering:[eva, harry, jerry, jhon, neron, peida]
usingToStringOrdering:[eva, harry, jerry, jhon, neron, peida]
arbitraryOrdering:[neron, harry, eva, jerry, peida, jhon]
操作方法:
reverse(): 返回與當前Ordering相反的排序:
nullsFirst(): 返回一個將null放在non-null元素之前的Ordering,其他的和原始的Ordering一樣;
nullsLast():返回一個將null放在non-null元素之后的Ordering,其他的和原始的Ordering一樣;
compound(Comparator):返回一個使用Comparator的Ordering,Comparator作為第二排序元素,例如對bug列表進行排序,先根據bug的級別,再根據優先級進行排序;
lexicographical():返回一個按照字典元素迭代的Ordering;
onResultOf(Function):將function應用在各個元素上之后, 在使用原始ordering進行排序;
greatestOf(Iterable iterable, int k):返回指定的第k個可迭代的最大的元素,按照這個從最大到最小的順序。是不穩定的。
leastOf(Iterable<E> iterable,int k):返回指定的第k個可迭代的最小的元素,按照這個從最小到最大的順序。是不穩定的。
isOrdered(Iterable):是否有序,Iterable不能少于2個元素。
isStrictlyOrdered(Iterable):是否嚴格有序。請注意,Iterable不能少于兩個元素。
sortedCopy(Iterable):返回指定的元素作為一個列表的排序副本。

package com.peidasoft.guava.base;

import java.util.List;

import org.junit.Test;

import com.google.common.collect.ImmutableList;
import com.google.common.collect.Lists;
import com.google.common.collect.Ordering;

public class OrderingTest {

    @Test
    public void testOrdering(){
        List<String> list = Lists.newArrayList();
        list.add("peida");
        list.add("jerry");
        list.add("harry");
        list.add("eva");
        list.add("jhon");
        list.add("neron");

        System.out.println("list:"+ list);

        Ordering<String> naturalOrdering = Ordering.natural();
        System.out.println("naturalOrdering:"+ naturalOrdering.sortedCopy(list));

        List<Integer> listReduce= Lists.newArrayList();
        for(int i=9;i>0;i--){
            listReduce.add(i);
        }

        List<Integer> listtest= Lists.newArrayList();
        listtest.add(1);
        listtest.add(1);
        listtest.add(1);
        listtest.add(2);


        Ordering<Integer> naturalIntReduceOrdering = Ordering.natural();

        System.out.println("listtest:"+ listtest);
        System.out.println(naturalIntReduceOrdering.isOrdered(listtest));
        System.out.println(naturalIntReduceOrdering.isStrictlyOrdered(listtest));


        System.out.println("naturalIntReduceOrdering:"+ naturalIntReduceOrdering.sortedCopy(listReduce));
        System.out.println("listReduce:"+ listReduce);


        System.out.println(naturalIntReduceOrdering.isOrdered(naturalIntReduceOrdering.sortedCopy(listReduce)));
        System.out.println(naturalIntReduceOrdering.isStrictlyOrdered(naturalIntReduceOrdering.sortedCopy(listReduce)));


        Ordering<String> natural = Ordering.natural();

        List<String> abc = ImmutableList.of("a", "b", "c");
        System.out.println(natural.isOrdered(abc));
        System.out.println(natural.isStrictlyOrdered(abc));

        System.out.println("isOrdered reverse :"+ natural.reverse().isOrdered(abc));

        List<String> cba = ImmutableList.of("c", "b", "a");
        System.out.println(natural.isOrdered(cba));
        System.out.println(natural.isStrictlyOrdered(cba));
        System.out.println(cba = natural.sortedCopy(cba));

        System.out.println("max:"+natural.max(cba));
        System.out.println("min:"+natural.min(cba));

        System.out.println("leastOf:"+natural.leastOf(cba, 2));
        System.out.println("naturalOrdering:"+ naturalOrdering.sortedCopy(list));
        System.out.println("leastOf list:"+naturalOrdering.leastOf(list, 3));
        System.out.println("greatestOf:"+naturalOrdering.greatestOf(list, 3));
        System.out.println("reverse list :"+ naturalOrdering.reverse().sortedCopy(list));
        System.out.println("isOrdered list :"+ naturalOrdering.isOrdered(list));
        System.out.println("isOrdered list :"+ naturalOrdering.reverse().isOrdered(list));
        list.add(null);
        System.out.println(" add null list:"+list);
        System.out.println("nullsFirst list :"+ naturalOrdering.nullsFirst().sortedCopy(list));
        System.out.println("nullsLast list :"+ naturalOrdering.nullsLast().sortedCopy(list));
    }

}

//============輸出==============
list:[peida, jerry, harry, eva, jhon, neron]
naturalOrdering:[eva, harry, jerry, jhon, neron, peida]
listtest:[1, 1, 1, 2]
true
false
naturalIntReduceOrdering:[1, 2, 3, 4, 5, 6, 7, 8, 9]
listReduce:[9, 8, 7, 6, 5, 4, 3, 2, 1]
true
true
true
true
isOrdered reverse :false
false
false
[a, b, c]
max:c
min:a
leastOf:[a, b]
naturalOrdering:[eva, harry, jerry, jhon, neron, peida]
leastOf list:[eva, harry, jerry]
greatestOf:[peida, neron, jhon]
reverse list :[peida, neron, jhon, jerry, harry, eva]
isOrdered list :false
isOrdered list :false
 add null list:[peida, jerry, harry, eva, jhon, neron, null]
nullsFirst list :[null, eva, harry, jerry, jhon, neron, peida]
nullsLast list :[eva, harry, jerry, jhon, neron, peida, null]
posted @
2014-07-03 10:48 hellxoul 閱讀(402) |
評論 (0) |
編輯 收藏
摘要: centos 6.5 安裝rabbitmq
閱讀全文
posted @
2014-06-25 22:23 hellxoul 閱讀(2269) |
評論 (0) |
編輯 收藏轉自:http://singo107.iteye.com/blog/1175084
數據庫事務的隔離級別有4個,由低到高依次為Read uncommitted 、Read committed 、Repeatable read 、Serializable ,這四個級別可以逐個解決臟讀 、不可重復讀 、幻讀 這幾類問題。
√: 可能出現 ×: 不會出現
| 臟讀 | 不可重復讀 | 幻讀 |
| Read uncommitted | √ | √ | √ |
| Read committed | × | √ | √ |
| Repeatable read | × | × | √ |
| Serializable | × | × | × |
注意:我們討論隔離級別的場景,主要是在多個事務并發 的情況下,因此,接下來的講解都圍繞事務并發。
Read uncommitted 讀未提交
公司發工資了,領導把5000元打到singo的賬號上,但是該事務并未提交,而singo正好去查看賬戶,發現工資已經到賬,是5000元整,非常高 興。可是不幸的是,領導發現發給singo的工資金額不對,是2000元,于是迅速回滾了事務,修改金額后,將事務提交,最后singo實際的工資只有 2000元,singo空歡喜一場。

出現上述情況,即我們所說的臟讀 ,兩個并發的事務,“事務A:領導給singo發工資”、“事務B:singo查詢工資賬戶”,事務B讀取了事務A尚未提交的數據。
當隔離級別設置為Read uncommitted 時,就可能出現臟讀,如何避免臟讀,請看下一個隔離級別。
Read committed 讀提交
singo拿著工資卡去消費,系統讀取到卡里確實有2000元,而此時她的老婆也正好在網上轉賬,把singo工資卡的2000元轉到另一賬戶,并在 singo之前提交了事務,當singo扣款時,系統檢查到singo的工資卡已經沒有錢,扣款失敗,singo十分納悶,明明卡里有錢,為 何......
出現上述情況,即我們所說的不可重復讀 ,兩個并發的事務,“事務A:singo消費”、“事務B:singo的老婆網上轉賬”,事務A事先讀取了數據,事務B緊接了更新了數據,并提交了事務,而事務A再次讀取該數據時,數據已經發生了改變。
當隔離級別設置為Read committed 時,避免了臟讀,但是可能會造成不可重復讀。
大多數數據庫的默認級別就是Read committed,比如Sql Server , Oracle。如何解決不可重復讀這一問題,請看下一個隔離級別。
Repeatable read 重復讀
當隔離級別設置為Repeatable read 時,可以避免不可重復讀。當singo拿著工資卡去消費時,一旦系統開始讀取工資卡信息(即事務開始),singo的老婆就不可能對該記錄進行修改,也就是singo的老婆不能在此時轉賬。
雖然Repeatable read避免了不可重復讀,但還有可能出現幻讀 。
singo的老婆工作在銀行部門,她時常通過銀行內部系統查看singo的信用卡消費記錄。有一天,她正在查詢到singo當月信用卡的總消費金額 (select sum(amount) from transaction where month = 本月)為80元,而singo此時正好在外面胡吃海塞后在收銀臺買單,消費1000元,即新增了一條1000元的消費記錄(insert transaction ... ),并提交了事務,隨后singo的老婆將singo當月信用卡消費的明細打印到A4紙上,卻發現消費總額為1080元,singo的老婆很詫異,以為出 現了幻覺,幻讀就這樣產生了。
注:Mysql的默認隔離級別就是Repeatable read。
Serializable 序列化
Serializable 是最高的事務隔離級別,同時代價也花費最高,性能很低,一般很少使用,在該級別下,事務順序執行,不僅可以避免臟讀、不可重復讀,還避免了幻像讀。
posted @
2014-06-15 15:15 hellxoul 閱讀(246) |
評論 (0) |
編輯 收藏Google是一個非常優秀的公司。他們做出了很多令人稱贊的東西—既是公司外部,人們可以看到的東西,也是公司內部。有一些在公司內部并不屬于保密的事情,在外部并沒有給予足夠廣泛的討論。這就是我今天要說的。
讓Google的程序如此優秀的一個最重要的事情看起來是非常的簡單:代碼審查。并不是只有Google做這個事情—代碼審查已經被廣泛的認可為一種非常好的做法,很多人都在這樣做。但我還沒有看到第二家這樣大的公司能把這種事情運用的如此普遍。在Google,沒有程序,任何產品、任何項目的程序代碼,可以在沒有經過有效的代碼審查前提交到代碼庫里的。
所有人都要經過代碼審查。并且很正規的:這種事情應該成為任何重要的軟件開發工作中一個基本制度。并不單指產品程序——所有東西。它不需要很多的工作,但它的效果是巨大的。
從代碼審查里能得到什么?
很顯然:在代碼提交前,用第二群眼睛檢查一遍,防止bug混入。這是對其最常見的理解,是對代碼審查的好處的最廣泛的認識。但是,依我的經驗來看,這反倒是它最不重要的一點。人們確實在代碼審查中找到了bug。可是,這些在代碼審查中能發現的絕大部分bug,很顯然,都是微不足道的bug,程序的作者花幾分鐘的時間就能發現它們。真正需要花時間去發現的bug不是在代碼審查里能找到的。
代碼審查的最大的功用是純社會性的。如果你在編程,而且知道將會有同事檢查你的代碼,你編程態度就完全不一樣了。你寫出的代碼將更加整潔,有更好的注釋,更好的程序結構——因為你知道,那個你很在意的人將會查看你的程序。沒有代碼審查,你知道人們最終還是會看你的程序。但這種事情不是立即發生的事,它不會給你帶來同等的緊迫感,它不會給你相同的個人評判的那種感受。
還有一個非常重要的好處。代碼審查能傳播知識。在很多的開發團隊里,經常每一個人負責一個核心模塊,每個人都只關注他自己的那個模塊。除非是同事的模塊影響了自己的程序,他們從不相互交流。這種情況的后果是,每個模塊只有一個人熟悉里面的代碼。如果這個人休假或——但愿不是——辭職了,其他人則束手無策。通過代碼審查,至少會有兩個人熟悉這些程序——作者,以及審查者。審查者并不能像程序的作者一樣對程序十分了解——但他會熟悉程序的設計和架構,這是極其重要的。
當然,沒有什么事情能簡單的做下來的。依我的經驗,在你能正確的進行代碼審查前,你需要花時間鍛煉學習。我發現人們在代碼審查時經常會犯一些錯誤,導致不少麻煩——尤其在一些缺乏經驗的審查者中經常的出現,他們給了人們一個很遭的代碼審查的體驗,成為了人們接受代碼審查制度的一個障礙。
最重要的一個原則:代碼審查用意是在代碼提交前找到其中的問題——你要發現是它的正確。在代碼審查中最常犯的錯誤——幾乎每個新手都會犯的錯誤——是,審查者根據自己的編程習慣來評判別人的代碼。
對于一個問題,通常我們能找出十幾種方法去解決。對于一種解決方案,我們能有百萬種編碼方案來實現它。作為一個審查者,你的任務不是來確保被審查的代碼都采用的是你的編碼風格——因為它不可能跟你寫的一樣。作為一段代碼的審查者的任務是確保由作者自己寫出的代碼是正確的。一旦這個原則被打破,你最終將會倍感折磨,深受挫折——這可不是我們想要的結果。
問題在于,這種錯誤是如此的普遍而易犯。如果你是個程序員,當你遇到一個問題,你能想到一種解決方案——你就把你想到的方案作為標準答案。但事情不是這樣的——作為一個好的審查者,你需要明白這個道理。
代碼審查的第二個易犯的毛病是,人們覺得有壓力,感覺非要說點什么才好。你知道作者用了大量的時間和精力來實現這些程序——不該說點什么嗎?
不,你不需要。
只說一句“哇,不錯呀”,任何時候都不會不合適。如果你總是力圖找出一點什么東西來批評,你這樣做的結果只會損害自己的威望。當你不厭其煩的找出一些東西來,只是為了說些什么,被審查人就會知道,你說這些話只是為了填補寂靜。你的評論將不再被人重視。
第三是速度。你不能匆匆忙忙的進行一次代碼審查——但你也要能迅速的完成。你的同伴在等你。如果你和你的同事并不想花太多時間進行代碼復查,你們很快的完成,那被審查者會覺得很沮喪,這種代碼審查帶來的只有失望的感覺。就好象是打攪了大家,使大家放下手頭的工作來進行審查。事情不該是這樣。你并不需要推掉手頭上的任何事情來做代碼審查。但如果中途耽誤了幾個小時,你中間還要休息一會,喝杯茶,沖個澡,或談會兒閑話。當你回到審查現場,你可以繼續下去,把事情做完。如果你真是這樣,我想沒有人愿意在那干等著你。
posted @
2014-06-06 10:04 hellxoul 閱讀(225) |
評論 (0) |
編輯 收藏
wps只有32位的,因此要安裝wps必須安裝32位的支持庫,按照網上的教程先安裝32位的一些依賴庫
因為已經安裝了libfreetype,網上也說64位的安裝32位的libfreetype 會有問題,同時,自己系統也裝不上32位的libfreetype 總是提示沖突。
沒辦法強制安裝
sudo dpkg -i --force-all --ignore-depends=libfreetype6:i386 --ignore-depends=libfontconfig1:i386 wps-office_8.1.0.3724~b1p2_i386.deb
搞定
posted @
2014-04-20 21:40 hellxoul 閱讀(1506) |
評論 (0) |
編輯 收藏
使用win8.1系統盤啟動,進入系統修復-高級-命令行,使用bcdboot 命令復制啟動盤的啟動到現有系統中去
bcdboot h:\windows \s c:
h:為系統啟動盤所在的盤符
posted @
2014-04-19 20:41 hellxoul 閱讀(222) |
評論 (0) |
編輯 收藏基于云的應用與運行在私有數據中心的應用之間最大的差別就是可擴展性。云提供了按需擴展的能力,能夠根據負載的波動對應用進行擴展和收縮。但是傳統應用要充分發揮云的優勢,并不是簡單地將應用部署到云上就萬事大吉,而是需要根據云的特點圍繞可擴展性重新進行架構設計,近日AppDynamics的開發布道者Dustin.Whittle撰文闡述了適合云端部署的應用架構,對我們傳統應用往云端部署有很大的啟發和借鑒意義。
應用的架構
Dustin.Whittle給出了云應用的示例架構,它具有高度的可擴展性,如下圖所示:

在這個圖中,應用按照分層的理念進行了拆分,分別介紹如下:
客戶端層:客戶端層包含了針對目標平臺的用戶界面,可能會包括基于Web的、移動端的甚至是胖客戶端的用戶界面。一般來講,這可能會是Web應用,包含諸如用戶管理、會話管理、頁面構建等功能,但是其他客戶端所發起的交互都需要以RESTful服務的形式調用服務器。
服務:服務器包含了緩存服務以及聚合(aggregate)服務,其中緩存服務中持有記錄系統(system of record)中最新的已知狀態,而聚集服務會直接與記錄系統交互,并且會執行一些破壞性的操作(會改變記錄系統中的狀態)。
記錄系統:記錄系統是領域特定的服務端,它會驅動業務功能,可能會包括客戶管理系統、采購系統、預定系統等等,這些很可能是遺留系統,你的應用需要與其進行交互。聚集服務要負責將你的應用從這些特有的記錄系統中抽象出來,并為你的應用提供一致的前端接口。
ESB:當記錄系統發生數據變化的時候,它需要觸發到指定主題(topic)的事件,這就是事件驅動架構(event-driven architecture,EDA)能夠影響應用的地方了:當記錄系統進行了一項其他系統可能感興趣的變更時,它會觸發一個事件,任何關注記錄系統的其他系統會監聽到這個事件,并作出對應的響應。這也是使用使用主題(topic)而不是隊列(queue)的原因:隊列支持點對點(point-to-point)的消息,而主題支持發布-訂閱(publish-subscribe)的消息或事件。當與遺留系統進行集成時,我們很期望這些遺留的系統能夠免遭負載的影響。因此,我們實現了一個緩存系統,這個緩存系統維持了記錄系統中所有最新的已知狀態。緩存系統會使用EDA的規則監聽記錄系統的變化,它會更新自己所保存數據的版本,從而保證與記錄系統中的數據相匹配。這是一個很強大的策略,不過會將一致性模型變為最終一致性,也就是說如果你在社交媒體上發布一條狀態的話,你的朋友可能在幾秒鐘甚至幾分鐘之后才能看到,數據最終是一致的,但有時你所看到的與你的朋友所看到的并不一致。如果能接受這種一致性的話,就能在很大程度上實現可擴展性的收益。
NoSQL:在數據存儲方面,有很多的可選方案,但如果要存儲大量數據的話,使用NoSQL存儲能夠更容易地擴展。有多種NoSQL存儲可供選擇,不過這要匹配所存儲數據的特點,如MongoDB適合存儲可搜索的數據,Neo4j適合存儲高度互相關聯的數據,而Cassandra適合存儲鍵/值對,像Solr這樣的搜索索引有利于加速對經常訪問數據的查詢。
將應用拆分為多個層的時候,最好的模式就是使用面向服務架構(service-oriented architecture,SOA)。要實現這一點,可以使用SOAP,也可以使用REST,但是REST更為合適,因為它可擴展性更強。作者接下來對REST的理念進行了深入的闡述,InfoQ上關于REST已有很多相關的文章,如這里和這里,甚至包括Roy Fielding經典博士論文的中譯本,所以這里不再贅述。不過,作者在這里特別強調了RESTful Web服務能夠保持無狀態性(stateless)。無狀態是實現可擴展性的關鍵需求,因為無狀態,所以請求可以由任何一個服務器響應。如果你在服務層上需要更多的容量時,只需要為該層添加虛擬機即可,而不需關注客戶端狀態保持的問題,負載可以很容易地重新分配。
部署到云端
前面介紹了基于云的應用架構,接下來作者闡述了這樣的應用該如何部署到云端。
RESTful Web服務要部署到Web容器中,并且要位于數據存儲之前。這些Web服務是沒有狀態的,只會反映其暴露的底層數據的狀態,因此可以根據需要部署任意數量的服務器。在基于云的部署中,開始時可以開啟足夠的實例以應對日常的需求,然后配置彈性策略,從而根據負載增加或減少服務器的數量。衡量飽和度的最好指標就是服務的響應時間。另外還需要考慮這些服務所使用的底層數據存儲的性能。示例的部署圖如下所示:

如果在云部署時有EDA的需求,那么就需要部署ESB,作者給出的建議是根據功能對ESB進行分區(partitioning),這樣一個segment的過大負載不會影響到其他的segment。如下圖所示:

這種分離使System 1的負載與System 2的負載實現了隔離。如果System 1產生的負載拖慢了ESB,它只會影響到自己的segment,并不會影響到System 2的segment,因為它部署在其他硬件上。如果ESB產品支持的話,我們還可以給指定的segment添加服務器來實現擴展。
基于云的應用與傳統應用有著很大的差別,因為它有著不同的擴展性需求。基于云的應用必須有足夠的彈性以應對服務器的添加與移除,必須松耦合,必須盡可能的無狀態,必須預先規劃失敗的情況,并且必須能夠從幾臺服務器擴展到成千上萬臺服務器。
針對云應用并沒有唯一正確的架構,但是本文所闡述的RESTful服務以及事件驅動架構卻是經過實踐檢驗有效的架構。作者認為REST和EDA是實現云端可擴展應用的基本工具。
目前,國內許多傳統的軟件廠商正在逐漸往云端遷移,希望本文所闡述的架構理念能夠為讀者提供一些借鑒。
posted @
2014-03-25 09:18 hellxoul 閱讀(376) |
評論 (0) |
編輯 收藏
收集帖: node.js 中文api (開放版) :http://nodeapi.ucdok.com/ node.js 中文api :http://jsfuns.com/ebook/#30d25070-118c-11e3-bc83-47c9e4e1d529 node.js入門中文版: http://nodebeginner.org/index-zh-cn.html express3.*中文API: http://expressjs.jser.us/ koa 中文文檔:https://github.com/turingou/koa-guide //Express 原班人馬打造的 比express更輕更富有表現力的web框架 深入理解Express: http://xvfeng.me/posts/understanding-expressjs/ meteor中文文檔:http://d0cs.meteor.com/ NodeJS 和 Socket.io 中文入門教程:http://t.cn/zOMwxCg jade中文文檔: http://expressjs.jser.us/jade.html Juicer 中文文檔:http://juicer.name/docs/docs_zh_cn.html Mongoose 基本功能使用:http://t.cn/zOIKPeB 以下是一些blog教程系列: 讓我們基于Node.js創建一個Web應用系列(5篇):http://t.cn/z8JnzkA 一周node.js系列(7篇) :http://t.cn/zOKuc9D 從零開始nodejs系列: http://blog.fens.me/series-nodejs/ 一起學node.js (薦): http://t.cn/zHxNXXt Node.js高級編程(薦): http://t.cn/zYmuqaH 深入淺出Node.js http://www.infoq.com/cn/master-nodejs Node.js零起點開發:http://blog.csdn.net/kaosini/article/details/8084268 node.js入門(共13篇)http://www.cnblogs.com/softlover/category/406516.html snoopyxdy的博客(大量node及express api的解讀及進階內容):http://t.cn/zQuKMKH 用node.js寫web框架系列:http://my.oschina.net/Jeky/blog?catalog=262655 Luics的node.js系列: http://t.cn/zjATQlf 使用node.js建博客:http://witcheryne.iteye.com/blog/1172069 nodejs相關: 用socket.io 搭建聊天室: https://github.com/nswbmw/N-chat/wiki/_pages nodejs實體中文圖書: 了不起的node.js: http://book.douban.com/subject/25767596/ 2014年1月 node.js高級編程: http://book.douban.com/subject/25799431/ 2013年12月 深入淺出nodejs: http://book.douban.com/subject/25768396/ 2013年12月 node.js入門經典: http://book.douban.com/subject/23780706/ 2013年4月 node.js開發指南: http://book.douban.com/subject/10789820/ 2012年7月 Node Web開發: http://book.douban.com/subject/10586326/ 2012年4月
posted @
2014-02-25 15:13 hellxoul 閱讀(1105) |
評論 (0) |
編輯 收藏 mosquito 是一個MQTT 服務器。MQTT協議可用來做Android消息推送,服務器端采用mosquito+PhpMQTTClient(這個php用來做實驗)
自己不會java,不會Android開發,推送的開發部分是同事做的。使用情況表明,單臺服務器能滿足幾萬的穩定的連接數,擴展起來也不難,加機器即可。
下載最新版的mosquitto
cd /usr/local/src
wget http://mosquitto.org/files/source/mosquitto-1.1.2.tar.gz
tar zxvf mosquitto-1.1.2.tar.gz
cd mosquitto-1.1.2
如果當前openssl版本低于1.0,修改config.mk中的WITH_TLS_PSK:=no
make
make install prefix=/usr/local/mosquitto
為方便管理,添加下面至/etc/profile
export PATH=”$PATH:/usr/local/mosquitto/bin”
export PATH=”$PATH:/usr/local/mosquitto/sbin”
source /etc/profile
[root@mysql230 mosquitto]# mosquitto #tab補全,四個命令
mosquitto mosquitto_passwd mosquitto_pub mosquitto_sub
mosquitto服務器主程序,實現了MQTT協議
mosquitto_pub mosquitto發布消息的命令行程序
mosquitto_sub mosquitto訂閱消息的命令行程序
默認的配置文件在 /etc/mosquitto/里
將/usr/local/mosquitto/lib/添加至/etc/ld.so.conf
執行 ldconfig -f /etc/ld.so.conf 可能需要等待數秒
啟動
mosquitto (-d后臺啟動)
可能提示沒有用戶 mosquitto,useradd mosquitto
終端測試
客戶端 mosquitto_sub -h 192.168.1.230 -t test
另起命令行mosquitto_pub -t test -m ’123′
PhpMQTTClient安裝
去https://github.com/tokudu/PhpMQTTClient 下載程序包,放置到服務器目錄
可能需要結合實際情況,要修改的地方
index.php
$result = $conn->connect(SAM_MQTT, array(‘SAM_HOST’ => ’127.0.0.1′, ‘SAM_PORT’ => 1883));
SAM/MQTT/sam_mqtt.php
$this->port = 1883;
啟動mosquitto在前臺運行,以方便獲取連接客戶端的信息
mosquitto
在服務器另外一終端上啟動訂閱消息的進程,訂閱所有tokudu開頭topic
mosquitto_sub –t tokudu /+
注意,此處之所以要使用tokudu,可以看index.php的182行 var target = ‘tokudu/’ + $(‘#messageTarget’).val();
在mosquitto的終端獲得mosquitto_sub客戶端的id
1350006978: New client connected from 127.0.0.1 as mosqsub/8491-localhost..
訪問http://host:port/ ,push notification target字段填寫8491-localhost,push notification text填寫需要推送的測試消息
在mosquitto的終端查看是否收到了推送的消息,如果收到,說明phpmqttclient已經安裝配置成功
解決mosquitto占有cpu進程過高的問題 https://answers.launchpad.net/mosquitto/+question/189612
ulimit -u 4096
ulimit -n 4096
附:
配置文件
# =================================================================
# General configuration
# =================================================================
# 客戶端心跳的間隔時間
#retry_interval 20
# 系統狀態的刷新時間
#sys_interval 10
# 系統資源的回收時間,0表示盡快處理
#store_clean_interval 10
# 服務進程的PID
#pid_file /var/run/mosquitto.pid
# 服務進程的系統用戶
#user mosquitto
# 客戶端心跳消息的最大并發數
#max_inflight_messages 10
# 客戶端心跳消息緩存隊列
#max_queued_messages 100
# 用于設置客戶端長連接的過期時間,默認永不過期
#persistent_client_expiration
# =================================================================
# Default listener
# =================================================================
# 服務綁定的IP地址
#bind_address
# 服務綁定的端口號
#port 1883
# 允許的最大連接數,-1表示沒有限制
#max_connections -1
# cafile:CA證書文件
# capath:CA證書目錄
# certfile:PEM證書文件
# keyfile:PEM密鑰文件
#cafile
#capath
#certfile
#keyfile
# 必須提供證書以保證數據安全性
#require_certificate false
# 若require_certificate值為true,use_identity_as_username也必須為true
#use_identity_as_username false
# 啟用PSK(Pre-shared-key)支持
#psk_hint
# SSL/TSL加密算法,可以使用“openssl ciphers”命令獲取
# as the output of that command.
#ciphers
# =================================================================
# Persistence
# =================================================================
# 消息自動保存的間隔時間
#autosave_interval 1800
# 消息自動保存功能的開關
#autosave_on_changes false
# 持久化功能的開關
persistence true
# 持久化DB文件
#persistence_file mosquitto.db
# 持久化DB文件目錄
#persistence_location /var/lib/mosquitto/
# =================================================================
# Logging
# =================================================================
# 4種日志模式:stdout、stderr、syslog、topic
# none 則表示不記日志,此配置可以提升些許性能
log_dest none
# 選擇日志的級別(可設置多項)
#log_type error
#log_type warning
#log_type notice
#log_type information
# 是否記錄客戶端連接信息
#connection_messages true
# 是否記錄日志時間
#log_timestamp true
# =================================================================
# Security
# =================================================================
# 客戶端ID的前綴限制,可用于保證安全性
#clientid_prefixes
# 允許匿名用戶
#allow_anonymous true
# 用戶/密碼文件,默認格式:username:password
#password_file
# PSK格式密碼文件,默認格式:identity:key
#psk_file
# pattern write sensor/%u/data
# ACL權限配置,常用語法如下:
# 用戶限制:user <username>
# 話題限制:topic [read|write] <topic>
# 正則限制:pattern write sensor/%u/data
#acl_file
# =================================================================
# Bridges
# =================================================================
# 允許服務之間使用“橋接”模式(可用于分布式部署)
#connection <name>
#address <host>[:<port>]
#topic <topic> [[[out | in | both] qos-level] local-prefix remote-prefix]
# 設置橋接的客戶端ID
#clientid
# 橋接斷開時,是否清除遠程服務器中的消息
#cleansession false
# 是否發布橋接的狀態信息
#notifications true
# 設置橋接模式下,消息將會發布到的話題地址
# $SYS/broker/connection/<clientid>/state
#notification_topic
# 設置橋接的keepalive數值
#keepalive_interval 60
# 橋接模式,目前有三種:automatic、lazy、once
#start_type automatic
# 橋接模式automatic的超時時間
#restart_timeout 30
# 橋接模式lazy的超時時間
#idle_timeout 60
# 橋接客戶端的用戶名
#username
# 橋接客戶端的密碼
#password
# bridge_cafile:橋接客戶端的CA證書文件
# bridge_capath:橋接客戶端的CA證書目錄
# bridge_certfile:橋接客戶端的PEM證書文件
# bridge_keyfile:橋接客戶端的PEM密鑰文件
#bridge_cafile
#bridge_capath
#bridge_certfile
#bridge_keyfile
# 自己的配置可以放到以下目錄中
include_dir /etc/mosquitto/conf.d
本文出自 “Cooke Chen 我愛小貝” 博客,請務必保留此出處http://cswei.blog.51cto.com/3443978/1225617
posted @
2013-12-12 21:54 hellxoul 閱讀(8976) |
評論 (0) |
編輯 收藏Sublime Text 2
---------------
非常好用的文本編輯器,雖是收費的,但是現在可以免費不限時間試用。
Shell代碼

- sudo add-apt-repository ppa:webupd8team/sublime-text-2
- sudo apt-get update
- sudo apt-get install sublime-text-2
將 sublime 作為默認的文本編輯器
sudo subl /usr/share/applications/defaults.list
把所有的 gedit.desktop 替換為 sublime-text-2.desktop
Jupiter
----------------
據說可以讓 Ubuntu 不那么耗電.... 我的本子跑的時候比較燙,權且相信了。這個工具還可以關閉觸摸屏,這點比較實用。
Shell代碼
- sudo add-apt-repository ppa:webupd8team/jupiter
- sudo apt-get update
- sudo apt-get install jupiter
Tweak
----------------
使用過后才發現確實比 MyUnity 要好用,功能也更多。
去官方網站下載吧:
網址代碼
- http://ubuntu-tweak.com/
MyUnity
----------------
自 Ubuntu 轉用 Unity 后就一直褒貶不一,我個人還是比較喜歡這種設計的,比較前衛,很漂亮;還把菜單欄和頂部欄合為一體,比較節省本子本來已經很小的垂直視野;但是也有些東西 很惱人,比如左側欄總是會彈出,非常影響體驗。有了這個工具就可以很方便的定制界面了。比如我就把左側欄縮小到 40,然后固定,還是比較 Nice 的。
Shell代碼
- sudo add-apt-repository ppa:myunity/ppa
- sudo apt-get update
- sudo apt-get install myunity
Guake
----------------------------------
非常好用的 Terminator,可以在 Ubuntu 軟件中心安裝。
Fish (Friendly Interactive Shell)
-----------------------------------
正如其名字,比默認的 shell terminate 更加友好,更加方便使用。添加的語法高亮,用下劃線標出存在的地址,等等。
Shell代碼
- sudo apt-get install fish
如果你和我一樣喜歡把他作為默認的 shell 的話,可以按下面方法做:
1. 確定 fish 安裝路徑:
Shell代碼
- whereis fish
2. 添加為默認:
Shell代碼
- chsh -s /usr/local/bin/fish(注,這個地址由上面的命令得到)
dnsmasq
-------------------------
DNS 緩存,加速訪問網站
1. 安裝
Shell代碼
- sudo apt-get install dnsmasq
2. 配置 dnsmasq.conf
Shell代碼
- sudo vim /etc/dnsmasq.conf
- 查找 #listen-address=
- 修改為 listen-address=127.0.0.1
3. 配置 dhclient.conf
有些網站修改的是 /etc/dhcp3/dhclient.conf,我用的是 ubuntu 11.10,沒有找到這個文件,修改的是 /etc/dhcp/dhclient.conf
Shell代碼
- sudo vim /etc/dhcp/dhclient.conf
- 查找 #prepend domain-name-servers 127.0.0.1;
- 刪除注釋符號 #
- 變成 prepend domain-name-servers 127.0.0.1;
4. 配置 resolv.conf
Shell代碼
- sudo vim /etc/resolv.conf
- 修改為:
- # Local Cached DNS
- nameserver 127.0.0.1
- # Google DNS
- nameserver 8.8.8.8
- nameserver 8.8.4.4
- # OpenDNS
- nameserver 208.67.220.220
- nameserver 208.67.222.222
5. 重啟 dnsmasq
Shell代碼
- sudo /etc/init.d/networking restart
posted @
2013-11-19 20:53 hellxoul 閱讀(254) |
評論 (0) |
編輯 收藏
摘要: 【51CTO精選譯文】Rsnapshot是一款開源本地/遠程文件系統備份實用工具,它采用Perl語言編寫而成,充分利用了Rsync和SSH程序的功能,可以針對Linux/Unix文件系統創建預定的增量備份,同時只占用了一套單個完全備份的空間(外加變化的數據),并將本地驅動器上的那些備份存放到不同的硬盤驅動器、外置USB驅動器、NFS掛載驅動器上,或者干脆經由SSH,通過網絡存放到另一臺機器上。安裝...
閱讀全文
posted @
2013-11-15 09:34 hellxoul 閱讀(651) |
評論 (0) |
編輯 收藏TDDL動態數據源基本說明
總體描述
TDDL動態數據源主要分為2層,每一層都實現了jdbc規范,以方便地集成到各種orm框架或者直接使用.每一層都各司其職.

整體結構如上圖,TGroupDataSource(tddl group ds)默認情況下依賴TAtomDataSource(tddl atom ds),但是可以擴展依賴普通數據源.這一層主要的職責是解決讀寫分離以及主備切換的問題,當然是在線執行這些動作,無需重啟.一個TGroupDataSource底下會掛多個TAtomDataSource,每個TAtomDataSource都有相對應的讀寫權重.
TAtomDataSource(tddl atom ds)這一層并沒有實現真正的數據源邏輯,而是依賴了一個近似第三方的包-我們從jboss剝離出來的datasource,這一層的職責主要是將單個數據源的配置放置到diamond服務器中,實現數據源配置的集中管理和動態變更.減少運維成本. TAtomDataSource實際對應了一個真正的數據源.
Tddl動態數據源暫時支持mysql和oracle ,但是因為每一層都是jdbc的實現,所以很容易擴展支持其他實現jdbc規范的數據源.
TGroupDataSource
- 基本功能
(1) 主備數據庫動態容災切換
支持進行主備的對調切換,狀態對調后備庫變為主庫,主庫變為備庫
(2) 相同數據分片讀寫分離
針對mysql replication機制進行的數據主備復制,可以直接使用group datasource來支持讀寫分離。讀寫分離支持權重設置,允許對不同庫使用不同的權重。
(3) 讀重試
一臺數據庫掛掉后,如果是個fatal exception(有定義),那么會進入讀重試,以確保盡可能多的數據訪問可以在正常數據庫中訪問。
(4) 數據庫掛掉排除,單線程重試
使用try – lock機制來進行線程保護,在第一次捕捉到fatal exception以后,只允許一個線程進入數據庫進行數據訪問,直到數據庫可以正常的工作為止
(5) 流量控制,數據庫保護
- 延展性功能
(1) 指定數據庫訪問(ThreadLocal)
一組對等數據庫中,寫庫一般只配置一個,其余數據庫都為備庫,因為通過復制機制,所以主備主鍵有延遲,對于各種類型的讀(實時讀和延遲讀),可以使用GroupDataSourceRouteHelper.executeByGroupDataSourceIndex(int dataSourceIndex)指定需要訪問的數據庫.
(2) 指定數據庫訪問(Hint)
這是指定數據庫訪問的另外一種方式. 這種方式是在sql之前加注釋,告知tddl動態數據源該選擇第幾個數據庫.類似: /*+TDDL_GROUP({groupIndex:0})*/select * from normaltbl_0001 where pk = ? 變幻groupIndex的數字即可指定具體的第幾個庫,從0開始.
TAtomDataSource
- 基本功能
(1) 數據源配置集中管控
(2) 定期密碼變更
(3) Jboss數據源連接池的配置管理和推送
- 延展性功能
(1) 動態創建,添加,減少數據源
(2) 數據庫R,W,NA狀態通知,以及讀寫訪問控制,如置為NA則數據庫所有訪問會直接拋出SQLException
(3) 數據庫保護
Diamond中配置說明.
Tddl的動態數據源配置都放置在diamond配置中心,而一條diamond配置包括一個全局唯一的dataId和GROUP, tddl的配置數據也不例外,以下主要說明tddl動態數據源的dataId拼寫以及每一個dataId下數據的內容.(詳細示例請參考示例使用說明文檔)
- 1. TGroupDataSource的配置
Group中的配置主要是配置一組對等的數據的讀寫權重
dataId組成規范:“com.taobao.tddl.jdbc.group_V2.4.1_”+dbGroupKey
配置內容(示例):tddl_sample_0:r10w10p0,tddl_sample_0_bac:r10w0p0
其中tddl_sample_0和tddl_sample_0_bak就是下一層需要的dbKey,后面r為讀權重,w為寫權重
- 2. TAtomDataSource的配置
atom ds中的配置分為了3部分(global,app,user),配置內容全部為java的properties格式
Global
dataId組成規范: “com.taobao.tddl.atom.global.”+dbKey
配置內容:
| 屬性key | 說明 |
| ip | 數據實例的ip |
| port | 數據實例的端口 |
| dbname | 數據庫名稱 |
| dbType | MYSQL,ORACLE |
| dbStatus | RW,NA |
App
dataId組成規范: “com.taobao.tddl.atom.app.”+appName+”.”+dbKey
配置內容:
| 屬性key | 說明 |
| username | 該應用使用的用戶名 |
| oracleConType | oci,thin,如果db為mysql,則不用理會 |
| minPoolSize | 最小連接池 |
| maxPoolSize | 最大連接池 |
| idleTimeout | 連接的最大空閑時間 |
| blockingTimeout | 等待連接的最大時間 |
| preparedStatementCacheSize | Oracle專用 |
| writeRestrictTimes | 單位timeSliceInMillis寫限制,默認空不限制 |
| readRestrictTimes | 單位timeSliceInMillis讀限制,默認空不限制 |
| threadCountRestrict | 并發線程限制,默認空不限制 |
| timeSliceInMillis | 限制的時間單位 |
| connectionProperties | 連接參數 |
User
dataId組成規范: “com.taobao.tddl.atom.passwd.”+dbName+”.”+dbType+”.”+userName
配置內容:
| 屬性key | 說明 |
| encPasswd | 密碼 |
| encKey | 密鑰 |
posted @
2013-11-10 11:13 hellxoul 閱讀(1744) |
評論 (0) |
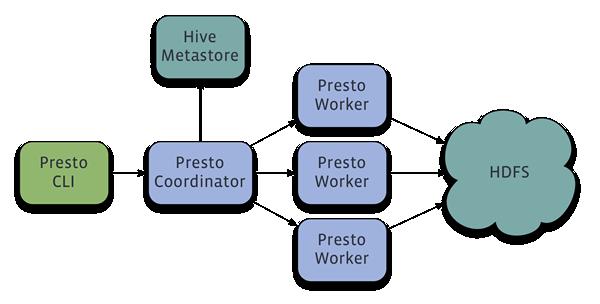
編輯 收藏Facebook 正式宣布開源 Presto —— 數據查詢引擎,可對250PB以上的數據進行快速地交互式分析。該項目始于 2012 年秋季開始開發,目前該項目已經在超過 1000 名 Facebook 雇員中使用,運行超過 30000 個查詢,每日數據在 1PB 級別。Facebook 稱 Presto 的性能比諸如 Hive 和 Map*Reduce 要好上 10 倍有多。
Presto 當前支持 ANSI SQL 的大多數特效,包括聯合查詢、左右聯接、子查詢以及一些聚合和計算函數;支持近似截然不同的計數(DISTINCT COUNT)等。
你可以通過下面地址了解該項目詳情和獲取代碼:
Documentation | Code
原文鏈接:http://www.oschina.net/news/45706/facebook-open-sources-presto-homegrown-sql-query-engine
posted @
2013-11-07 23:15 hellxoul 閱讀(386) |
評論 (1) |
編輯 收藏
摘要: 一款功能強大且實用的開發工具可以為開發者簡化開發流程,提高工作效率,允許開發者在應用開發本身投入更多的時間和精力,從而提高作品質量。本文就為大家分享4款實用的Android應用架構工具。
閱讀全文
posted @
2013-11-07 23:09 hellxoul 閱讀(284) |
評論 (0) |
編輯 收藏
摘要: 首先先介紹一款知名的網站壓力測試工具:webbench.Webbench能測試處在相同硬件上,不同服務的性能以及不同硬件上同一個服務的運行狀況。webbench的標準測試可以向我們展示服務器的兩項內容:每分鐘相應請求數和每秒鐘傳輸數據量。webbench不但能具有便準靜態頁面的測試能力,還能對動態頁面(ASP,PHP,JAVA,CGI)進 行測試的能力。還有就是他支持對含有SSL的安全網站例如電子...
閱讀全文
posted @
2013-11-07 23:06 hellxoul 閱讀(3529) |
評論 (0) |
編輯 收藏轉自:http://elf8848.iteye.com/blog/455676
如何修改Centos yum源
--------------------------------------
國內yum源: 163和搜狐的yum源。
本文章介紹的yum源支持的版本是CentOS 5系列,理論上支持RHEL5系列。
更新方法如下:
先進入yum源配置目錄
cd /etc/yum.repos.d
備份系統自帶的yum源
mv CentOS-Base.repo CentOS-Base.repo.save
下載其他更快的yum源
中科大的yum源:(現在打不開了 )
wget http://centos.ustc.edu.cn/CentOS-Base.repo
163的yum源:
wget http://mirrors.163.com/.help/CentOS-Base-163.repo
修改CentOS-Base.repo (不修改會報錯),下載到本地把“$releasever”,替換成“5”
sohu的yum源
wget http://mirrors.sohu.com/help/CentOS-Base-sohu.repo
更新玩yum源后,建議更新一下,使操作立即生效
yum makecache
RedHat5.6使用CentOS yum源更新的方法
================================================================================
由于RedHat的yum在線更新是收費的,我們的RedHat沒有注冊,不能在線更新下載rpm包。
需將RedHat的yum卸載后,重啟安裝Centos的yum,再配置其他yum源。
一、確認RedHat的版本
cat /etc/redhat-release
uname -m
二、刪除redhat原有的yum源
rpm -aq|grep yum|xargs rpm -e --nodeps
三、下載CentOS的yum安裝包(163源) (可以在這里手工找rpm包:http://mirrors.163.com/centos/)
32位系統:
wget http://mirrors.163.com/centos/5/os/i386/CentOS/yum-metadata-parser-1.1.2-3.el5.centos.i386.rpm
wget http://mirrors.163.com/centos/5/os/i386/CentOS/yum-3.2.22-39.el5.centos.noarch.rpm
wget http://mirrors.163.com/centos/5/os/i386/CentOS/yum-fastestmirror-1.1.16-21.el5.centos.noarch.rpm
64位系統:
wget http://mirrors.163.com/centos/5/os/x86_64/CentOS/yum-metadata-parser-1.1.2-3.el5.centos.x86_64.rpm
wget http://mirrors.163.com/centos/5/os/x86_64/CentOS/yum-3.2.22-39.el5.centos.noarch.rpm
wget http://mirrors.163.com/centos/5/os/x86_64/CentOS/yum-fastestmirror-1.1.16-21.el5.centos.noarch.rpm
還依賴python-iniparse-0.2.3-4.el5.noarch.rpm,
但我的系統里已安裝了,是系統默認Python2.4中自帶的。
如果你的系統沒有安裝,請安裝吧。
四、安裝yum軟件包
32位系統:
rpm -ivh yum-metadata-parser-1.1.2-3.el5.centos.i386.rpm
rpm -ivh yum-3.2.22-39.el5.centos.noarch.rpm yum-fastestmirror-1.1.16-21.el5.centos.noarch.rpm
注意:最后兩個安裝包要放在一起同時安裝,否則會提示相互依賴,安裝失敗。
64位系統:
rpm -ivh yum-metadata-parser-1.1.2-3.el5.centos.x86_64.rpm
rpm -ivh yum-3.2.22-39.el5.centos.noarch.rpm yum-fastestmirror-1.1.16-21.el5.centos.noarch.rpm
注意:最后兩個安裝包要放在一起同時安裝,否則會提示相互依賴,安裝失敗。
五、更改yum源 #我們使用網易的CentOS鏡像源
cd /etc/yum.repos.d/
vi CentOS6-Base-163.repo
# CentOS-Base.repo
#
# The mirror system uses the connecting IP address of the client and the
# update status of each mirror to pick mirrors that are updated to and
# geographically close to the client. You should use this for CentOS updates
# unless you are manually picking other mirrors.
#
# If the mirrorlist= does not work for you, as a fall back you can try the
# remarked out baseurl= line instead.
#
#
[base]
name=CentOS-5 - Base - 163.com
mirrorlist=http://mirrorlist.centos.org/?release=5&arch=$basearch&repo=os
baseurl=http://mirrors.163.com/centos/5/os/$basearch/
gpgcheck=1
gpgkey=file:///etc/pki/rpm-gpg/RPM-GPG-KEY-CentOS-5
#released updates
[updates]
name=CentOS-5 - Updates - 163.com
mirrorlist=http://mirrorlist.centos.org/?release=5&arch=$basearch&repo=updates
baseurl=http://mirrors.163.com/centos/5/updates/$basearch/
gpgcheck=1
gpgkey=file:///etc/pki/rpm-gpg/RPM-GPG-KEY-CentOS-5
#packages used/produced in the build but not released
[addons]
name=CentOS-5 - Addons - 163.com
mirrorlist=http://mirrorlist.centos.org/?release=5&arch=$basearch&repo=addons
baseurl=http://mirrors.163.com/centos/5/addons/$basearch/
gpgcheck=1
gpgkey=file:///etc/pki/rpm-gpg/RPM-GPG-KEY-CentOS-5
#additional packages that may be useful
[extras]
name=CentOS-5 - Extras - 163.com
mirrorlist=http://mirrorlist.centos.org/?release=5&arch=$basearch&repo=extras
baseurl=http://mirrors.163.com/centos/5/extras/$basearch/
gpgcheck=1
gpgkey=file:///etc/pki/rpm-gpg/RPM-GPG-KEY-CentOS-5
#additional packages that extend functionality of existing packages
[centosplus]
name=CentOS-5 - Plus - 163.com
mirrorlist=http://mirrorlist.centos.org/?release=5&arch=$basearch&repo=centosplus
baseurl=http://mirrors.163.com/centos/5/centosplus/$basearch/
gpgcheck=1
enabled=0
gpgkey=file:///etc/pki/rpm-gpg/RPM-GPG-KEY-CentOS-5
#contrib - packages by Centos Users
[contrib]
name=CentOS-5 - Contrib - 163.com
mirrorlist=http://mirrorlist.centos.org/?release=5&arch=$basearch&repo=contrib
baseurl=http://mirrors.163.com/centos/5/contrib/$basearch/
gpgcheck=1
enabled=0
gpgkey=file:///etc/pki/rpm-gpg/RPM-GPG-KEY-CentOS-5
六、清理
yum clean all
yum makecache
如果報錯:imary.sqlite.bz2 from base: [Errno 256] No more mirrors to try.
執行:yum makecache
七、更新
cd /etc/pki/rpm-gpg
wget http://mirror.centos.org/centos/RPM-GPG-KEY-CentOS-5
yum update
很長時間的下載后,報錯:
warning: rpmts_HdrFromFdno: Header V3 DSA signature: NOKEY, key ID e8562897
GPG key retrieval failed: [Errno 5] OSError: [Errno 2] No such file or directory: '/etc/pki/rpm-gpg/RPM-GPG-KEY-CentOS-5'
這是因為:指定的文件/etc/pki/rpm-gpg/RPM-GPG-KEY-CentOS-5在本地不存在導致的。
解決:
去官網http://mirror.centos.org/centos/下載相應文件
cd /etc/pki/rpm-gpg
wget http://mirror.centos.org/centos/RPM-GPG-KEY-CentOS-5
================================================================================
RedHat6.0使用CentOS yum源更新的方法
--------------------------------------------------------------------
由于RedHat的yum在線更新是收費的,我們的RedHat沒有注冊,不能在線更新下載rpm包。
需將RedHat的yum卸載后,重啟安裝Centos的yum,再配置其他yum源。
一、確認RedHat的版本
cat /etc/redhat-release
uname -m
二、刪除redhat原有的yum源
rpm -aq|grep yum|xargs rpm -e --nodeps
三、下載CentOS的yum安裝包(163源)
32位系統 :
wget http://mirrors.163.com/centos/6/os/i386/Packages/yum-3.2.29-22.el6.centos.noarch.rpm
wget http://mirrors.163.com/centos/6/os/i386/Packages/yum-metadata-parser-1.1.2-16.el6.i686.rpm
wget http://mirrors.163.com/centos/6/os/i386/Packages/yum-plugin-fastestmirror-1.1.30-10.el6.noarch.rpm
wget http://mirrors.163.com/centos/6/os/i386/Packages/python-iniparse-0.3.1-2.1.el6.noarch.rpm
四、安裝yum軟件包
rpm -ivh python-iniparse-0.3.1-2.1.el6.noarch.rpm
rpm -ivh yum-metadata-parser-1.1.2-16.el6.i686.rpm
rpm -ivh yum-3.2.29-22.el6.centos.noarch.rpm yum-plugin-fastestmirror-1.1.30-10.el6.noarch.rpm
注意:最后兩個安裝包要放在一起同時安裝,否則會提示相互依賴,安裝失敗。
五、更改yum源 #我們使用網易的CentOS鏡像源
cd /etc/yum.repos.d/
vi CentOS6-Base-163.repo
# CentOS-Base.repo
#
# The mirror system uses the connecting IP address of the client and the
# update status of each mirror to pick mirrors that are updated to and
# geographically close to the client. You should use this for CentOS updates
# unless you are manually picking other mirrors.
#
# If the mirrorlist= does not work for you, as a fall back you can try the
# remarked out baseurl= line instead.
#
#
[base]
name=CentOS-6 - Base - 163.com
baseurl=http://mirrors.163.com/centos/6/os/$basearch/
#mirrorlist=http://mirrorlist.centos.org/?release=6&arch=$basearch&repo=os
gpgcheck=1
gpgkey=http://mirror.centos.org/centos/RPM-GPG-KEY-CentOS-6
#released updates
[updates]
name=CentOS-6 - Updates - 163.com
baseurl=http://mirrors.163.com/centos/6/updates/$basearch/
#mirrorlist=http://mirrorlist.centos.org/?release=6&arch=$basearch&repo=updates
gpgcheck=1
gpgkey=http://mirror.centos.org/centos/RPM-GPG-KEY-CentOS-6
#additional packages that may be useful
[extras]
name=CentOS-6 - Extras - 163.com
baseurl=http://mirrors.163.com/centos/6/extras/$basearch/
#mirrorlist=http://mirrorlist.centos.org/?release=6&arch=$basearch&repo=extras
gpgcheck=1
gpgkey=http://mirror.centos.org/centos/RPM-GPG-KEY-CentOS-6
#additional packages that extend functionality of existing packages
[centosplus]
name=CentOS-6 - Plus - 163.com
baseurl=http://mirrors.163.com/centos/6/centosplus/$basearch/
#mirrorlist=http://mirrorlist.centos.org/?release=6&arch=$basearch&repo=centosplus
gpgcheck=1
enabled=0
gpgkey=http://mirror.centos.org/centos/RPM-GPG-KEY-CentOS-6
#contrib - packages by Centos Users
[contrib]
name=CentOS-6 - Contrib - 163.com
baseurl=http://mirrors.163.com/centos/6/contrib/$basearch/
#mirrorlist=http://mirrorlist.centos.org/?release=6&arch=$basearch&repo=contrib
gpgcheck=1
enabled=0
gpgkey=http://mirror.centos.org/centos/RPM-GPG-KEY-CentOS-6
六、清理
yum clean all
yum makecache
如果報錯:imary.sqlite.bz2 from base: [Errno 256] No more mirrors to try.
執行:yum makecache
至此,Redhat6可以使用CentOS的yum源在線安裝軟件了!
posted @
2013-10-23 13:39 hellxoul 閱讀(1017) |
評論 (0) |
編輯 收藏one js validation framework
http://niceue.com/validator/demo/twitter-js.php?theme=yellow_right_effect
posted @
2013-10-10 10:37 hellxoul 閱讀(367) |
評論 (0) |
編輯 收藏Linux操作系統:CentOS 6.3
1:下載:當前mysql版本到了5.6.10
下載地址:http://dev.mysql.com/downloads/mysql/5.6.html#downloads
選擇“Source Code”
在此之前最好注冊一個Oracle賬號
2:必要軟件包
yum -y install gcc gcc-c++ gcc-g77 autoconf automake zlib* fiex* libxml* ncurses-devel libmcrypt* libtool-ltdl-devel* make cmake
3:編譯安裝
[root@server182 ~]# groupadd mysql
[root@server182 ~]# useradd -r -g mysql mysql
[root@server182 ~]# tar -zxvf mysql-5.6.10.tar.gz
[root@server182 ~]# cd mysql-5.6.10
[root@server182 mysql-5.6.10]# cmake .
[root@server182 mysql-5.6.10]# make && make install
-------------------------默認情況下是安裝在/usr/local/mysql
[root@server182 ~]# chown -R mysql.mysql /usr/local/mysql
[root@server182 ~]# cd /usr/local/mysql/scripts
[root@server182 ~]# ./mysql_install_db --user=mysql --basedir=/usr/local/mysql --datadir=/usr/local/mysql/data
[root@server182 ~]# cd /usr/local/mysql/support-files
[root@server182 support-files]# cp mysql.server /etc/rc.d/init.d/mysql
[root@server182 support-files]# cp my-default.cnf /etc/my.cnf
[root@server182 ~]# chkconfig -add mysql
[root@server182 ~]# chkconfig mysql on
[root@server182 ~]# service mysql start
Starting MySQL SUCCESS!
[root@server182 support-files]# mysql
Welcome to the MySQL monitor. Commands end with ; or \g.
Your MySQL connection id is 1
Server version: 5.6.10 Source distribution
Copyright (c) 2000, 2013, Oracle and/or its affiliates. All rights reserved.
Oracle is a registered trademark of Oracle Corporation and/or its
affiliates. Other names may be trademarks of their respective
owners.
Type 'help;' or '\h' for help. Type '\c' to clear the current input statement.
mysql>
mysql> status;
--------------
mysql Ver 14.14 Distrib 5.6.10, for Linux (i686) using EditLine wrapper
Connection id: 1
Current database:
Current user: root@localhost
SSL: Not in use
Current pager: stdout
Using outfile: ''
Using delimiter: ;
Server version: 5.6.10 Source distribution
Protocol version: 10
Connection: Localhost via UNIX socket
Server characterset: utf8
Db characterset: utf8
Client characterset: utf8
Conn. characterset: utf8
UNIX socket: /tmp/mysql.sock
Uptime: 5 min 45 sec
Threads: 1 Questions: 5 Slow queries: 0 Opens: 70 Flush tables: 1 Open tables: 63 Queries per second avg: 0.014
-------------
mysql>
安裝完畢。
原文鏈接:http://www.linuxidc.com/Linux/2013-02/79791.htm
posted @
2013-05-17 15:20 hellxoul 閱讀(266) |
評論 (0) |
編輯 收藏MySQL 5.6正式版發布了,相對于5.5版本作出了不少改進,其源碼安裝配置方式也有所變化,本文根據實際操作,不斷嘗試,精確還原了安裝的具體步驟。
環境:CentOS 6.3/6.4 最小化缺省安裝,配置好網卡。
安裝MySQL前,確認Internet連接正常,以便下載安裝文件。
先使用 yum -y update 指令升級系統到最新版本。
本安裝將MySQL的數據文件與執行文件分離,如果你打算設置到不同的路徑,注意修改對應的執行命令和數據庫初始化腳本。
# 修改防火墻設置,打開3306端口
vi /etc/sysconfig/iptables
-A INPUT -m state --state NEW -m tcp -p tcp --dport 3306 -j ACCEPT
# 重啟防火墻使新設置生效
service iptables restart
# 新增用戶組
groupadd mysql
# 新增用戶
useradd mysql -g mysql
# 新建數據庫執行文件目錄
mkdir -p /usr/local/mysql
# 新建數據庫數據文件目錄
mkdir -p /db/mysql/data
# 編輯PATH搜索路徑
vi /etc/profile
Append these 2 lines to the end of the file:
PATH=/usr/local/mysql/bin:/usr/local/mysql/lib:$PATH
export PATH
# 生效PATH搜索路徑
source /etc/profile
# 編輯hosts文件,加入本機IP和主機名
vi /etc/hosts
192.168.211.100 centhost.centdomain
# 安裝編譯源碼所需的工具和庫
yum -y install wget gcc-c++ ncurses-devel cmake make perl
# 進入源碼壓縮包下載目錄
cd /usr/local/src
# 下載源碼壓縮包,下載包34M大小,有點慢,等吧。
wget http://dev.mysql.com/get/Downloads/MySQL-5.6/mysql-5.6.10.tar.gz/from/http://cdn.mysql.com/
# 解壓縮源碼包
tar -zxvf mysql-5.6.10.tar.gz
# 進入解壓縮源碼目錄
cd mysql-5.6.10
# 從mysql5.5起,mysql源碼安裝開始使用cmake了,執行源碼編譯配置腳本。
cmake \
-DCMAKE_INSTALL_PREFIX=/usr/local/mysql \
-DMYSQL_UNIX_ADDR=/usr/local/mysql/mysql.sock \
-DDEFAULT_CHARSET=utf8 \
-DDEFAULT_COLLATION=utf8_general_ci \
-DWITH_MYISAM_STORAGE_ENGINE=1 \
-DWITH_INNOBASE_STORAGE_ENGINE=1 \
-DWITH_ARCHIVE_STORAGE_ENGINE=1 \
-DWITH_BLACKHOLE_STORAGE_ENGINE=1 \
-DWITH_MEMORY_STORAGE_ENGINE=1 \
-DWITH_READLINE=1 \
-DENABLED_LOCAL_INFILE=1 \
-DMYSQL_DATADIR=/db/mysql/data \
-DMYSQL_USER=mysql \
-DMYSQL_TCP_PORT=3306
# 編譯源碼,這一步時間會較長,耐心等待。
make
# 安裝
make install
# 清除安裝臨時文件
make clean
# 修改目錄擁有者
chown -R mysql:mysql /usr/local/mysql
chown -R mysql:mysql /db/mysql/data
# 進入安裝路徑
cd /usr/local/mysql
# 執行初始化配置腳本,創建系統自帶的數據庫和表。
scripts/mysql_install_db --user=mysql --datadir=/db/mysql/data
初始化腳本在 /usr/local/mysql/my.cnf 生成了配置文件。需要更改該配置文件的所有者:
chown -R mysql:mysql /usr/local/mysql
多說兩句:在啟動MySQL服務時,會按照一定次序搜索my.cnf,先在/etc目錄下找,找不到則會搜索"$basedir/my.cnf",在本例中就是 /usr/local/mysql/my.cnf,這是新版MySQL的配置文件的默認位置!注意:在CentOS 6.4版操作系統的最小安裝完成后,在/etc目錄下會存在一個my.cnf,需要將此文件更名為其他的名字,如:/etc/my.cnf.bak,否則,該文件會干擾源碼安裝的MySQL的正確配置,造成無法啟動。
# 復制服務啟動腳本
cp /usr/local/mysql/support-files/mysql.server /etc/init.d/mysql
# 啟動MySQL服務
service mysql start
# 設置開機自動啟動服務
chkconfig mysql on
# 修改MySQL用戶root的密碼
mysql -u root
mysql>use mysql;
mysql>GRANT ALL PRIVILEGES ON *.* TO root@"%" IDENTIFIED BY "root";
mysql>update user set Password = password('123456') where User='root';
mysql>flush privileges;
mysql>exit;
# 可選:運行安全設置腳本,修改MySQL用戶root(不是系統的root!)的密碼,禁止root遠程連接(防止破解密碼),移除test數據庫和匿名用戶,強烈建議生產服務器使用:
/usr/local/mysql/bin/mysql_secure_installation
后記:
2013年3月18日更新:
如果要使Windows平臺下的MySQL和Linux平臺下的MySQL協同工作,你需要設置Linux平臺下的全局變量lower_case_table_names=1,強制將數據表名稱轉換為小寫(大小寫不敏感)。參考我另一篇博文:http://www.cnblogs.com/jlzhou/archive/2013/03/18/2966106.html
>>>>> 版權沒有 >>>>> 歡迎轉載 >>>>> 原文地址 >>>>> http://www.cnblogs.com/jlzhou >>>>> 雄鷹在雞窩里長大,就會失去飛翔的本領,野狼在羊群里成長,也會愛上羊而喪失狼性。人生的奧妙就在于與人相處。生活的美好則在于送人玫瑰。和聰明的人在一起,你才會更加睿智。和優秀的人在一起,你才會出類拔萃。所以,你是誰并不重要,重要的是,你和誰在一起。
posted @
2013-05-17 15:18 hellxoul 閱讀(293) |
評論 (0) |
編輯 收藏
摘要: Code highlighting produced by Actipro CodeHighlighter (freeware)
http://www.CodeHighlighter.com/
--> 1 <project xmlns="http://maven.apache.org/POM/4.0.0 " &...
閱讀全文
posted @
2013-05-16 11:26 hellxoul 閱讀(14022) |
評論 (0) |
編輯 收藏
生成javadoc時,亂碼問題要注意兩個參數的設置
-encoding utf-8 -charset utf-8
前面的是文件編碼,后面的是生成的javadoc的編碼
例如用IntelliJ IDEA 6.0.1 生成javadoc時,在"Tools->Gerenate JavaDoc"面版的
"Other command line arguments:"欄里輸入"-encoding utf-8 -charset utf-8",
就是以utf-8編碼讀取文件和生成javadoc
posted @
2013-05-01 12:24 hellxoul 閱讀(513) |
評論 (0) |
編輯 收藏CREATE TABLE `config_info` (
`id` BIGINT(64) UNSIGNED NOT NULL AUTO_INCREMENT,
`data_id` VARCHAR(255) NOT NULL DEFAULT '',
`group_id` VARCHAR(128) NOT NULL DEFAULT '',
`content` LONGTEXT NOT NULL,
`md5` VARCHAR(32) NOT NULL DEFAULT '',
`gmt_create` DATETIME NOT NULL DEFAULT '2010-05-05 00:00:00',
`gmt_modified` DATETIME NOT NULL DEFAULT '2010-05-05 00:00:00',
PRIMARY KEY (`id`),
UNIQUE KEY `uk_config_datagroup` (`data_id`,`group_id`)
);
posted @
2013-04-25 14:43 hellxoul 閱讀(339) |
評論 (0) |
編輯 收藏
通過java client鏈接server@import url(http://www.aygfsteel.com/CuteSoft_Client/CuteEditor/Load.ashx?type=style&file=SyntaxHighlighter.css);@import url(/css/cuteeditor.css);
1. 通過設置參數
1 ConnectionFactory factory = new ConnectionFactory();
2 factory.setUsername(userName);
3 factory.setPassword(password);
4 factory.setVirtualHost(virtualHost);
5 factory.setHost(hostName);
6 factory.setPort(portNumber);
7 Connection conn = factory.newConnection();
1 ConnectionFactory factory = new ConnectionFactory();
2 factory.setUri("amqp://userName:password@hostName:portNumber/virtualHost");
3 Connection conn = factory.newConnection();
3.多地址
1 Address[] addrArr = new Address[]{ new Address(hostname1, portnumber1)
2 , new Address(hostname2, portnumber2)};
3 Connection conn = factory.newConnection(addrArr);
posted @
2013-04-11 10:27 hellxoul 閱讀(378) |
評論 (0) |
編輯 收藏在CentOS下,源碼安裝Erlang:
下載Erlang源碼
安裝:官網地址,http://www.erlang.org
Java代碼
# cd /opt/
# wget http://www.erlang.org/download/otp_src_R15B01.tar.gz
解壓:
Java代碼
# tar -zxvf otp_src_R15B01.tar.gz
# cd otp_src_R15B01
安裝依賴:
Java代碼
# yum install build-essential m4
# yum install openssl
# yum install openssl-devel
# yum install unixODBC
# yum install unixODBC-devel
# yum -y install make gcc gcc-c++ kernel-devel m4 ncurses-devel openssl-devel
配置configure
Java代碼
# ./configure --prefix=/usr/local/erlang --enable-hipe --enable-threads --enable-smp-support --enable-kernel-poll
make
make install
完成之后,設置環境變量
Java代碼
vim /etc/profile
ERL_HOME=/usr/local/erlang
PATH=$ERL_HOME/bin:$PATH
export ERL_HOME PATH
完成后保存
Java代碼
source /etc/profile
讓環境變量立即生效
然后輸入erl,出現erlang shell,如下:
Java代碼
Erlang R15B01 (erts-5.9.1) [source] [64-bit] [smp:4:4] [async-threads:0] [hipe] [kernel-poll:false]
Eshell V5.9.1 (abort with ^G)
1>
hipe:支持Erlang編譯成本地代碼。好處:提高Erlang虛擬機執行代碼性能。
參考文獻:
[1] http://jinghong.iteye.com/blog/1075165
[2] http://my.oschina.net/hanyu363/blog/29727
[3] http://www.linuxidc.com/Linux/2011-07/39156.htm
rabbitmq啟動:
sbin/rabbitmq-server
rabbitmq-server -detached
停止 rabbitmqctl stop
查看狀態:rabbitmqctl status
插件安裝rabbitmq-plugins enable rabbitmq_management 監控使用
http://www.rabbitmq.com/management.html
@import url(http://www.aygfsteel.com/CuteSoft_Client/CuteEditor/Load.ashx?type=style&file=SyntaxHighlighter.css);@import url(/css/cuteeditor.css);
posted @
2013-04-09 15:20 hellxoul 閱讀(265) |
評論 (0) |
編輯 收藏
只有注冊用戶登錄后才能閱讀該文。
閱讀全文
posted @
2013-04-02 14:28 hellxoul|
編輯 收藏
1.下載MySQL
我下載的版本:mysql-5.5.22.tar.gz
2.安裝之前先卸載CentOS自帶的MySQL
[root@localhost ~]# yum remove mysql
3.編譯安裝Cmake
下載cmake源碼包:http://www.cmake.org/files/v2.8/cmake-2.8.4.tar.gz
從共享目錄移至usr目錄
[root@localhost ~]# mv /mnt/hgfs/Share-CentOS/cmake-2.8.4.tar.gz /usr/cmake-2.8.4.tar.gz
[root@localhost ~]# cd /usr
解壓并安裝cmake
[root@localhost usr]# tar xzvf cmake-2.8.4.tar.gz
[root@localhost usr]# cd cmake-2.8.4
[root@localhost cmake-2.8.4]# ./bootstrap
---------------------------------------------
CMake 2.8.4, Copyright 2000-2009 Kitware, Inc.
---------------------------------------------
Error when bootstrapping CMake:
Cannot find appropriate C compiler on this system.
Please specify one using environment variable CC.
See cmake_bootstrap.log for compilers attempted.
---------------------------------------------
Log of errors: /usr/local/src/cmake-2.8.4/Bootstrap.cmk/cmake_bootstrap.log
---------------------------------------------
報錯:缺少C的編譯器
解決辦法:安裝gcc編譯器
[root@localhost ~]# yum install gcc
繼續安裝Cmake
[root@localhost cmake-2.8.4]# ./bootstrap
---------------------------------------------
CMake 2.8.4, Copyright 2000-2009 Kitware, Inc.
C compiler on this system is: cc
---------------------------------------------
Error when bootstrapping CMake:
Cannot find appropriate C++ compiler on this system.
Please specify one using environment variable CXX.
See cmake_bootstrap.log for compilers attempted.
---------------------------------------------
Log of errors: /usr/local/src/cmake-2.8.4/Bootstrap.cmk/cmake_bootstrap.log
---------------------------------------------
報錯:缺少C++編譯器
解決辦法:安裝gcc-c++編譯器
[root@localhost ~]# yum install gcc-c++
再次安裝
[root@localhost cmake-2.8.4]# ./bootstrap
沒有報錯,編譯安裝
[root@localhost cmake-2.8.4]# gmake
[root@localhost cmake-2.8.4]# gmake install
4.正式開始安裝MySQL
添加MySQL用戶和用戶組
[root@localhost ~]# groupadd mysql
[root@localhost ~]# useradd -g mysql mysql
MySQL源碼包從共享文件夾移至/usr并解壓
[root@localhost ~]mv /mnt/hgfs/Share-CentOS/mysql-5.5.22.tar.gz /usr/mysql-5.5.22.tar.gz
[root@localhost usr]# tar xzvf mysql-5.5.22.tar.gz
[root@localhost usr]# cd mysql-5.5.22
Cmake運行
[root@localhost mysql-5.5.22]# cmake .
開始編譯安裝
[root@localhost mysql-5.5.22]# make && make install
進入安裝目錄,將程序二進制的所有權改為root,數據目錄的說有權改為mysql用戶,更新授權表
[root@localhost mysql-5.5.22]# cd /usr/local/mysql/
[root@localhost mysql]# chown -R root .
[root@localhost mysql]# chown -R mysql .
[root@localhost mysql]# chgrp -R mysql .
[root@localhost mysql]# scripts/mysql_install_db --user=mysql
安全啟動MySQL(默認密碼為空)
[root@localhost mysql]#./bin/mysqld_safe --user=mysql&
報錯:
120908 00:16:25 mysqld_safe Logging to '/usr/local/mysql/data/CentOS.err'.
120908 00:16:26 mysqld_safe Starting mysqld daemon with databases from /usr/local/mysql/data
解決方法:
[root@CentOS ~]# cd /usr/local/mysql/data
[root@CentOS data]# ls -l
總用量 29744
-rw-rw---- 1 mysql root 1585 9月 8 00:16 CentOS.err
-rw-rw---- 1 mysql mysql 6 9月 8 00:16 CentOS.pid
-rw-rw---- 1 mysql mysql 18874368 9月 8 00:16 ibdata1
-rw-rw---- 1 mysql mysql 5242880 9月 8 00:16 ib_logfile0
-rw-rw---- 1 mysql mysql 5242880 9月 8 00:16 ib_logfile1
drwxr-xr-x 2 mysql mysql 4096 9月 8 00:14 mysql
-rw-rw---- 1 mysql mysql 27293 9月 8 00:14 mysql-bin.000001
-rw-rw---- 1 mysql mysql 1031892 9月 8 00:14 mysql-bin.000002
-rw-rw---- 1 mysql mysql 107 9月 8 00:16 mysql-bin.000003
-rw-rw---- 1 mysql mysql 57 9月 8 00:16 mysql-bin.index
drwx------ 2 mysql mysql 4096 9月 8 00:14 performance_schema
drwxr-xr-x 2 mysql mysql 4096 9月 8 00:08 test
[root@CentOS data]# chgrp -R mysql CentOS.err
[root@CentOS data]# ls -l
總用量 29736
-rw-rw---- 1 mysql mysql 1585 9月 8 00:16 CentOS.err
-rw-rw---- 1 mysql mysql 6 9月 8 00:16 CentOS.pid
-rw-rw---- 1 mysql mysql 18874368 9月 8 00:16 ibdata1
-rw-rw---- 1 mysql mysql 5242880 9月 8 00:16 ib_logfile0
-rw-rw---- 1 mysql mysql 5242880 9月 8 00:16 ib_logfile1
drwxr-xr-x 2 mysql mysql 4096 9月 8 00:14 mysql
-rw-rw---- 1 mysql mysql 27293 9月 8 00:14 mysql-bin.000001
-rw-rw---- 1 mysql mysql 1031892 9月 8 00:14 mysql-bin.000002
-rw-rw---- 1 mysql mysql 107 9月 8 00:16 mysql-bin.000003
-rw-rw---- 1 mysql mysql 57 9月 8 00:16 mysql-bin.index
drwx------ 2 mysql mysql 4096 9月 8 00:14 performance_schema
drwxr-xr-x 2 mysql mysql 4096 9月 8 00:08 test
連接本機MySQL
[root@localhost mysql]#mysql –u root –p
提示輸入password,默認為空,按Enter即可
斷開連接
mysql>exit;
為root賬戶設置密碼
[root@localhost ~]# cd /usr/local/mysql/bin
[root@localhost mysql]# ./bin/mysqladmin -u root password 123456
Enter Password:123456
設置選項文件,將配置文件拷貝到/etc下
[root@localhost mysql]# cp support-files/my-medium.cnf /etc/mysql.cnf
設置開機自啟動
[root@localhost mysql]# cp support-files/mysql.server /etc/init.d/mysql
[root@localhost mysql]# chmod +x /etc/init.d/mysql
[root@localhost mysql]# chkconfig mysql on
通過服務來啟動和關閉Mysql
[root@localhost ~]# service mysql start
[root@localhost ~]# service mysql stop
5.安裝設置完畢,之后使用只需啟動-連接-斷開-關閉,命令如下:
[root@CentOS mysql]# service mysql start
Starting MySQL.. [確定]
[root@CentOS mysql]# mysql -u root -p
Enter password:
Welcome to the MySQL monitor. Commands end with ; or \g.
Your MySQL connection id is 1
Server version: 5.5.22 Source distribution
Copyright (c) 2000, 2011, Oracle and/or its affiliates. All rights reserved.
Oracle is a registered trademark of Oracle Corporation and/or its
affiliates. Other names may be trademarks of their respective
owners.
Type 'help;' or '\h' for help. Type '\c' to clear the current input statement.
mysql> show databases;
+--------------------+
| Database |
+--------------------+
| information_schema |
| mysql |
| performance_schema |
| test |
+--------------------+
4 rows in set (0.07 sec)
mysql> exit;
Bye
[root@CentOS mysql]# service mysql stop
Shutting down MySQL. [確定]
6.其它:
查看進程命令 ps –ef|grep mysqld
kill進程命令 kill –9 進程號
posted @
2013-02-24 00:31 hellxoul 閱讀(5513) |
評論 (1) |
編輯 收藏
摘要: Servlet 3.0作為Java EE6規范體系中一員,隨著Java EE6規范一起發布。該版本在前一版本(Servlet 2.5)的基礎上提供了若干新特性用于簡化Web應用的開發和部署。
閱讀全文
posted @
2013-01-16 11:08 hellxoul 閱讀(52) |
評論 (0) |
編輯 收藏
摘要:
n 可以用來改變根據自己需要改變加載的優先級!
閱讀全文
posted @
2013-01-16 10:50 hellxoul 閱讀(66) |
評論 (0) |
編輯 收藏
只有注冊用戶登錄后才能閱讀該文。
閱讀全文
posted @
2013-01-16 10:46 hellxoul 閱讀(72) |
評論 (0) |
編輯 收藏
只有注冊用戶登錄后才能閱讀該文。
閱讀全文
posted @
2013-01-16 10:44 hellxoul 閱讀(64) |
評論 (0) |
編輯 收藏
只有注冊用戶登錄后才能閱讀該文。
閱讀全文
posted @
2012-12-21 11:03 hellxoul 閱讀(80) |
評論 (0) |
編輯 收藏