今天參照Android Api里的Hello Views來學習GMap,不想,Api里好多錯誤,囧
so,我在這里貼出正確的代碼,供大家參考
TODO(1):顯示Map(Creating a Map Activity)
step1:創建一個新的工程
step2:由于Maps library不是標準庫里的東東,SO,要在AndroidManifest.xml文件中加上一個library:
<uses-library android:name="com.google.android.maps" />
step3:Map功能需要有網絡連接,SO,權限不能少:
<uses-permission android:name="android.permission.INTERNET" />
step4:隱藏titleBar(隨意):
<activity android:name=".GMapTest" android:label="@string/app_name"
android:theme="@android:style/Theme.NoTitleBar">
step5:在res/layout/main.xml里加一個MapView控件:
<?xml version="1.0" encoding="utf-8"?>
<com.google.android.maps.MapView
xmlns:android="http://schemas.android.com/apk/res/android"
android:id="@+id/mapview"
android:layout_width="fill_parent"
android:layout_height="fill_parent"
android:clickable="true"
android:apiKey="Your Maps API Key goes here"
/>
PS:關于如何得到Key,請參看
http://www.aygfsteel.com/crazycoding/archive/2011/10/11/360937.html
step6:打開自動創建的Activity (GMap.java)文件
修改之,使其繼承自MapActivity
public class GMapTest extends MapActivity {
step7:實現相應方法:
@Override
protected boolean isRouteDisplayed() {
// TODO Auto-generated method stub
return false;
}
step8:完善onCreate方法:
setContentView(R.layout.main);
此時,地圖已經可以顯示出來了,不過,我們可以給它加上縮放按鈕:
MapView mapView = (MapView) findViewById(R.id.mapview);
mapView.setBuiltInZoomControls(true);
哦了。
現整理相關文件完整代碼如下:
AndroidManifest.xml:
<?xml version="1.0" encoding="utf-8"?>
<manifest xmlns:android="http://schemas.android.com/apk/res/android"
package="com.yinger"
android:versionCode="1"
android:versionName="1.0">
<uses-sdk android:minSdkVersion="7" />
<application android:icon="@drawable/icon" android:label="@string/app_name">
<activity android:name=".GMapTest"
android:label="@string/app_name">
<intent-filter>
<action android:name="android.intent.action.MAIN" />
<category android:name="android.intent.category.LAUNCHER" />
</intent-filter>
</activity>
<uses-library android:name = "com.google.android.maps"/>
</application>
<uses-permission android:name="android.permission.INTERNET" />
</manifest>
main.xml:
<?xml version="1.0" encoding="utf-8"?>
<LinearLayout xmlns:android="http://schemas.android.com/apk/res/android"
android:orientation="vertical"
android:layout_width="fill_parent"
android:layout_height="fill_parent"
>
<com.google.android.maps.MapView
android:layout_width="fill_parent"
android:layout_height="fill_parent"
android:enabled = "true"
android:clickable = "true"
android:apiKey="055ZV_999VhK6Zcr-8P7tyGzeRwTnWV_JET9kKg"
/>
</LinearLayout>
GMapTest.java:
package com.yinger;
import com.google.android.maps.MapActivity;
import android.os.Bundle;
/**
* HelloWorld Google Map
*
* @author Ying_er
* @Email melody.crazycoding@gmail.com
* @time 2011/10/11 14:12:15
* @version 1.00
*/
public class GMapTest extends MapActivity {
/** Called when the activity is first created. */
@Override
public void onCreate(Bundle savedInstanceState) {
super.onCreate(savedInstanceState);
setContentView(R.layout.main);
}
@Override
protected boolean isRouteDisplayed() {
// TODO Auto-generated method stub
return false;
}
}
首先,我先簡單的說一嘴在Map上顯示標記的基本原理:一個圖層顯示地圖,一個圖層顯示標記,然后兩個圖層羅列。
SO,也就是Adding Overlay Items
(假設已經按TODO(1)的步驟完成了相應代碼)
step1:創建一個新的Java類:HelloItemizedOverlay,讓他繼承ItemizedOverlay<OverlayItem>:
public class HelloItemizedOverlay extends ItemizedOverlay<OverlayItem> {
step2:創建一個List對象,存儲該圖層中所有的標記對象
private ArrayList<OverlayItem> mOverlays = new ArrayList<OverlayItem>();
step3:構造方法:
/**
* 參數用于指定顯示標記的默認圖片
* @param arg0
*/
public HelloItemizedOverlay(Drawable arg0) {
super(boundCenterBottom(arg0));
// TODO Auto-generated constructor stub
}
step4:定義方法,將生成好的OverlayItem對象添加到List當中
public void addOverlay(OverlayItem overlay) {
mOverlays.add(overlay);
populate();
}
step5:執行populate方法時,會執行createItem方法,來創建一個OverlayItem對象
protected OverlayItem createItem(int i) {
// TODO Auto-generated method stub
return mOverlays.get(i);
}
step6:重寫方法,返回當前Overlay中的OverlayItem對象個數
@Override
public int size() {
// TODO Auto-generated method stub
return mOverlays.size();
}
step7:為了能相應點擊事件,需要一個Context的引用,SO,增加如下構造函數:
public HelloItemizedOverlay(Drawable arg0, Context context) {
super(boundCenterBottom(arg0));
// TODO Auto-generated constructor stub
this.context = context;
}
當用戶點擊標記時所執行的操作:
@Override
protected boolean onTap(int index) {
OverlayItem item = mOverlays.get(index);
AlertDialog.Builder dialog = new AlertDialog.Builder(context);
dialog.setTitle(item.getTitle());
dialog.setMessage(item.getSnippet());
dialog.show();
return true;
}
step8:回到MapActivity的onCreate方法
得到所有圖層對象:
List<Overlay> mapOverlays = mapView.getOverlays();
Drawable drawable = this.getResources().getDrawable(
R.drawable.androidmarker);
HelloItemizedOverlay itemizedoverlay = new HelloItemizedOverlay(
drawable, this);
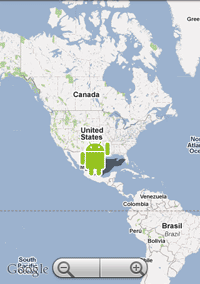
創建GeoPoint對象,通過經緯度,指定地圖上的一個點
GeoPoint point = new GeoPoint(19240001, -99120000);
創建一個OverlayItem對象
OverlayItem overlayitem = new OverlayItem(point, "Hola, Mundo!",
"I'm in Mexico City!");
將創建好的OverlayItem對象放到HelloItemizedOverlay當中
itemizedoverlay.addOverlay(overlayitem);
將HelloItemizedOverlay放到mapOverlays當中
mapOverlays.add(itemizedoverlay);
當然,也可以多創建幾個標記。
部分文件完整代碼:
MarkPoint.java
package com.yinger;
import java.util.List;
import android.graphics.drawable.Drawable;
import android.os.Bundle;
import com.google.android.maps.GeoPoint;
import com.google.android.maps.MapActivity;
import com.google.android.maps.MapView;
import com.google.android.maps.Overlay;
import com.google.android.maps.OverlayItem;
/**
* 顯示標記
*
* @author Ying_er
* @Email melody.crazycoding@gmail.com
* @time 2011/10/12 15:23:42
* @version 1.00
*/
public class MarkPoint extends MapActivity {
MapView mapView = null;
/** Called when the activity is first created. */
@Override
public void onCreate(Bundle savedInstanceState) {
super.onCreate(savedInstanceState);
setContentView(R.layout.main);
mapView = (MapView) findViewById(R.id.mapview);
mapView.setBuiltInZoomControls(true);
/**
* 得到所有圖層對象
*/
List<Overlay> mapOverlays = mapView.getOverlays();
Drawable drawable = this.getResources().getDrawable(
R.drawable.androidmarker);
HelloItemizedOverlay itemizedoverlay = new HelloItemizedOverlay(
drawable, this);
/**
* 創建GeoPoint對象,通過經緯度,指定地圖上的一個點
*/
GeoPoint point = new GeoPoint(19240001, -99120000);
/**
* 創建一個OverlayItem對象
*/
OverlayItem overlayitem = new OverlayItem(point, "Hola, Mundo!",
"I'm in Mexico City!");
GeoPoint point2 = new GeoPoint(35410000, 139460000);
OverlayItem overlayitem2 = new OverlayItem(point2, "Sekai, konichiwa!", "I'm in Japan!");
/**
* 將創建好的OverlayItem對象放到HelloItemizedOverlay當中
*/
itemizedoverlay.addOverlay(overlayitem);
itemizedoverlay.addOverlay(overlayitem2);
/**
* 將HelloItemizedOverlay放到mapOverlays當中
*/
mapOverlays.add(itemizedoverlay);
}
@Override
protected boolean isRouteDisplayed() {
// TODO Auto-generated method stub
return false;
}
}
HelloItemizedOverlay.java:
package com.yinger;
import java.util.ArrayList;
import android.app.AlertDialog;
import android.content.Context;
import android.graphics.drawable.Drawable;
import com.google.android.maps.ItemizedOverlay;
import com.google.android.maps.OverlayItem;
/**
* 在MapView之上,創建一個圖層(OverlayItem) 生成該類對象,并將該對象添加到MapView.getOverlays()里
* 一個OverlayItem對象就代表了一個在地圖上顯示的標記
*
* @author Ying_er
* @Email melody.crazycoding@gmail.com
* @time 2011/10/12 14:53:17
* @version 1.00
*/
public class HelloItemizedOverlay extends ItemizedOverlay<OverlayItem> {
/**
* 創建一個List對象,存儲該圖層中所有的標記對象
*/
private ArrayList<OverlayItem> mOverlays = new ArrayList<OverlayItem>();
private Context context;
/**
* 參數用于指定顯示標記的默認圖片
*
* @param arg0
*/
public HelloItemizedOverlay(Drawable arg0) {
super(boundCenterBottom(arg0));
// TODO Auto-generated constructor stub
}
public HelloItemizedOverlay(Drawable arg0, Context context) {
super(boundCenterBottom(arg0));
// TODO Auto-generated constructor stub
this.context = context;
}
/**
* 創建一個OverlayItem對象
*/
@Override
protected OverlayItem createItem(int i) {
// TODO Auto-generated method stub
return mOverlays.get(i);
}
/**
* 返回當前Overlay中的OverlayItem對象個數
*/
@Override
public int size() {
// TODO Auto-generated method stub
return mOverlays.size();
}
/**
* 將生成好的OverlayItem對象添加到List當中
*
* @param overlay
*/
public void addOverlay(OverlayItem overlay) {
mOverlays.add(overlay);
populate();
}
/**
* 當用戶點擊標記時所執行的操作
*/
@Override
protected boolean onTap(int index) {
OverlayItem item = mOverlays.get(index);
AlertDialog.Builder dialog = new AlertDialog.Builder(context);
dialog.setTitle(item.getTitle());
dialog.setMessage(item.getSnippet());
dialog.show();
return true;
}
}
posted on 2011-10-12 15:47
Ying-er 閱讀(1935)
評論(1) 編輯 收藏 所屬分類:
Google Map 、
Android