Java 學(xué)習(xí)

          堅(jiān)持不懈,打通-->軟件—控制—機(jī)械
          posts - 5, comments - 3, trackbacks - 0, articles - 0
            BlogJava :: 首頁 :: 新隨筆 :: 聯(lián)系 :: 聚合  :: 管理

          2006年6月30日

          上一篇詳細(xì)介紹了一個(gè)SWT實(shí)例,這一篇接下來介紹SWT組件的生命周期
          本文地址:
          http://www.aygfsteel.com/cpenet/archive/2006/07/04/56539.html

          本篇譯自《 Eclipse.Building.Commercial.Quality.Plug.ins.2nd.Edition 》第四章第二節(jié),希望對入門者有所幫助。

          ?

          組件的生命周期

          設(shè)計(jì) SWT 的一個(gè)目標(biāo)就是小而靈巧。為了達(dá)到這個(gè)目標(biāo),一個(gè)基本的設(shè)計(jì)策略,就是盡可能的使組件的狀態(tài)存儲(chǔ)在平臺(tái)組件中而不是存儲(chǔ)在 SWT 組件中 ( 這句話,我不理解,也翻譯的不明白,附原文: To achieve this, a basic design decision was made that as much widget state as possible would be stored in the platform widget rather than in the SWT widget.) 。這與 Swing 形成顯著的對比, Swing Swing 組件中維護(hù)了所有的組件狀態(tài)。 ( 可能是這樣: SWT 把各個(gè)組件的狀態(tài)交給系統(tǒng)平臺(tái)來管理,而 Swing 自己管理各個(gè) Swing 組件的狀態(tài),這樣 Swing 就復(fù)雜,耗費(fèi)的資源,內(nèi)存的需求也多,不知道是不是 J ) 。通過不把系統(tǒng)平臺(tái)級(jí)別的組件信息復(fù)制過來自己維護(hù), SWT 就非常的小巧而且對內(nèi)存的需求也相應(yīng)少。

          達(dá)到這個(gè)目的所付出的代價(jià)就是 SWT 的組件不能夠自己獨(dú)立存在。當(dāng)一個(gè) SWT 組件被創(chuàng)建時(shí),同時(shí)立即在系統(tǒng)平臺(tái)下也創(chuàng)建了該組件的對應(yīng)體。接下來,幾乎所有對該組件的信息狀態(tài)請求都會(huì)由平臺(tái)來處理。

          大部分的系統(tǒng)平臺(tái)在創(chuàng)建一個(gè)組件時(shí),需要該組件明確的父組件的上下文,所以 SWT 需要一個(gè)父組件來最為它的構(gòu)造聲明。許多平臺(tái)在創(chuàng)建組件時(shí)還需要該組件的特定風(fēng)格參數(shù)的設(shè)定。例如:按鈕有復(fù)選框,單選框,簡單按鈕和文本域有單行和多行之分。

          SWT 類中,風(fēng)格位段用整數(shù)類型來定義且不會(huì)更改。風(fēng)格參數(shù)被組織在一起,其它各種構(gòu)造器傳遞著這些參數(shù)來創(chuàng)建一個(gè)組件的初始風(fēng)格。注意到,所有的平臺(tái)并不支持所有的風(fēng)格,所以在很多情況下,被請求的風(fēng)格被認(rèn)為是一種提示,它或許會(huì)或許不會(huì)對一個(gè)特殊的平臺(tái)產(chǎn)生影響。

          當(dāng) SWT 組件不在需要時(shí),一些平臺(tái)要求作出明確的釋放。對于組件本身和一些資源 ( 例如:圖形,字體,顏色 ) 而言,他們已經(jīng)具備了系統(tǒng)的這個(gè)要求。基本的規(guī)則是:如果你創(chuàng)建了一個(gè)組件,就要使用 dispose() 方法來撤銷這個(gè)組件。如果你使用了一些系統(tǒng)資源,例如系統(tǒng)顏色,你就不需要釋放他們。

          幸運(yùn)的,當(dāng)一個(gè)組件被釋放的,它的所有子組件會(huì)自動(dòng)地被釋放。這意味著,如果你釋放了一個(gè) shell ,那么所有 shell 包含的組件都會(huì)被自動(dòng)釋放。

          posted @ 2006-07-04 14:52 燕然 閱讀(995) | 評(píng)論 (1)編輯 收藏

          本文譯自《 Eclipse.Building.Commercial.Quality.Plug.ins.2nd.Edition 》第四章第二節(jié),詳細(xì)解釋了 SWT 程序的語句,希望對入門者有所幫助。

          ? 本文地址:http://www.aygfsteel.com/cpenet/archive/2006/07/03/56407.html

          讓我們從簡單的 HelloWorld 應(yīng)用程序開始。

          ?一、SWT添加到工程的類路徑中

          首先建立一個(gè)java工程。在開始使用SWT之前,需要將SWT庫文件添加到工程的類路徑中。步驟如下:

          1.??? 下載SWT。在Eclipse SDK的下載頁面中,提供了獨(dú)立版本的SWT下載。找到標(biāo)有SWT Binary and Source的欄目。下載適合你操作系統(tǒng)的版本,不用解壓,直接保存到硬盤中。

          2.??? Eclipse菜單欄,選擇File-Import...打開導(dǎo)入向?qū)?

          3.??? 選擇Existing Projects into Workspace,點(diǎn)擊Next按鈕

          4.??? 選擇 Select archive file并使用 Browse...按鈕來找到你剛才下載的SWT文件。

          ?5.??? 點(diǎn)擊Finish按鈕,完成SWT導(dǎo)入。

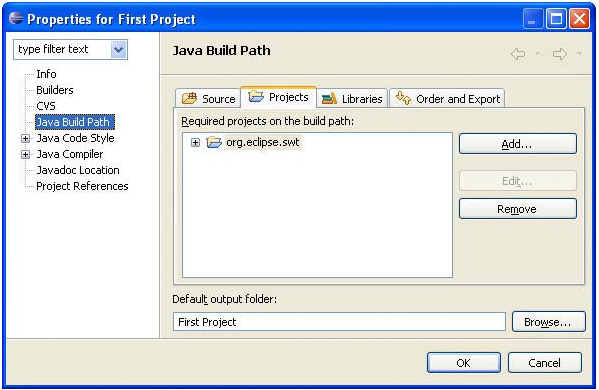
          ?6.??? 右鍵點(diǎn)擊你建立的工程,選擇Properties 來打開Properties對話框。

          ?7.??? 選擇 Java Build Path -> Projects tab并點(diǎn)擊Add按鈕.

          ?8.??? 選擇 org.eclipse.swt工程, 點(diǎn)擊 OK,完成添加SWT庫到你的工程中(見圖1).

          {26F7CFAE-1A69-42BA-A826-4576DB987FD5}.BMP?

          ????????????????????????????? 1

          二、 SWT 代碼

          現(xiàn)在在你建立的java工程中,新建一個(gè)java文件,取名為 HelloWorld。在HelloWorld.java文件中把main()方法覆蓋為以下代碼:??

          1 ??? public ? static ? void ?main(String[]?args)?{
          2 ??????Display?display? = ? new
          ?Display();
          3 ??????Shell?shell? = ? new
          ?Shell(display);
          4 ??????shell.setText( " Hello?World "
          );
          5 ??????shell.setBounds( 100 ,? 100 ,? 200 ,? 50
          );
          6 ??????shell.setLayout( new
          ?FillLayout());
          7 ??????Label?label? = ? new
          ?Label(shell,?SWT.CENTER);
          8 ??????label.setText( " Hello?World "
          );
          9 ??????Color?red? = ? new ?Color(display,? 255 ,? 0 ,? 0
          );
          10
          ?????label.setForeground(red);
          11
          ?????shell.open();
          12 ????? while ?( !
          shell.isDisposed())?{
          13 ???????? if ?( !
          display.readAndDispatch())?display.sleep();
          14
          ?????}
          15
          ?????red.dispose();
          16
          ?????display.dispose();
          17
          ??}

          注:

          在覆蓋了上述代碼后, 選擇菜單欄中的 Source -> Organize Imports命令 (或者按Ctrl+Shift+O) 來把需要引用的SWT包導(dǎo)入到HelloWorld.java文件中

          以下是對各行代碼的詳細(xì)解釋:

          2行:每個(gè)基于SWT的應(yīng)用程序都有一個(gè)Display類的實(shí)例。用來將低層平臺(tái)和SWT進(jìn)行鏈接。除了管理SWT的事件循環(huán),還能訪問SWT需要的平臺(tái)資源。在16行,display實(shí)例將會(huì)提交給垃圾收集器。

          3行:每一個(gè)窗口都有一個(gè)Shell窗口框架,來與用戶進(jìn)行交互。Shell像所有的windows系統(tǒng)一樣來處理動(dòng)作行為,并作為窗口控件的放置場所。

          4行: setText()方法設(shè)置窗口的標(biāo)題.

          5行: setBounds() 方法設(shè)置窗口的大小和放置的位置. 在這個(gè)例子中, 設(shè)置窗口為200個(gè)像素寬,50個(gè)像素高,并放在離屏幕的左上角100x100像素的位置上。

          6行: setLayout()方法 設(shè)置窗口框架的布局. FillLayout,充滿式布局管理器,使得組件大小會(huì)盡量的充滿整個(gè)容器.SWT的布局管理器會(huì)在以后詳細(xì)介紹。

          7行:在shell上新建一個(gè)簡單的label組件并居中顯示label的文本內(nèi)容。

          8行: setText() 方法 設(shè)置label的文本內(nèi)容。

          9行:創(chuàng)建一個(gè)紅色的顏色類的實(shí)例。你也可以使用以下語句獲得系統(tǒng)紅色的實(shí)例:

          Color red = display.getSystemColor(SWT.COLOR_RED);

          10行: setForeground() 方法 ?設(shè)置label的前景色

          11行:到目前為止,窗口框架還是不可見的。通過open()方法使得窗口可見。

          12行: while語句循環(huán)檢測窗口有沒有關(guān)閉。

          13行:display 控制事件的循環(huán). readAndDispatch() 方法從平臺(tái)的事件隊(duì)列中讀取事件,并分配他們到合適的處理程序(接收者)。只要隊(duì)列中一直有事件可以處理,這個(gè)方法一直返回true,當(dāng)事件隊(duì)列為空時(shí),則返回false(因此允許用戶界面UI線程出于sleep狀態(tài)直到事件隊(duì)列不為空)

          15,16行:當(dāng)循環(huán)檢測到窗口被關(guān)閉時(shí),需要將colordisplay和一些相關(guān)聯(lián)的平臺(tái)資源釋放。注意到系統(tǒng)顏色實(shí)例(colors)將會(huì)被提交釋放。
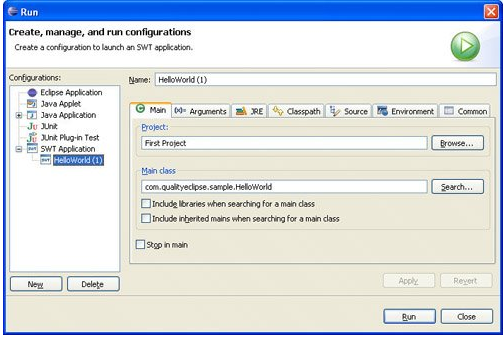
          二、??????????? 運(yùn)行這個(gè)例子

          通常情況下,為了啟動(dòng)一個(gè)java應(yīng)用程序,會(huì)使用Run As - Java Application 命令。在這里,如此運(yùn)行將會(huì)拋出 UnsatisfiedLinkError 異常,說明沒有找到 SWT 的本地庫。如果運(yùn)行 Run As > SWT Application 命令,將會(huì)彈出 SWT 啟動(dòng)配置窗口,見圖 2 ,在圖 2 中可以點(diǎn)擊 run 按鈕。

          ?{3717602A-4D02-4E2D-A913-A6BC4E1289A8}.BMP

          ??????????????????????????????? 2

          點(diǎn)擊 run ,運(yùn)行結(jié)果圖 3

          ?{978DFCF8-658E-40EC-80D4-3DD5D8FACF1F}.BMP

          ????????? 3

          (以后繼續(xù))

          posted @ 2006-07-03 20:09 燕然 閱讀(800) | 評(píng)論 (0)編輯 收藏

          org.eclipse.ui包是應(yīng)用程序界面的包, Eclipse的平臺(tái)的界面也是使用了這個(gè)包.
          包中有接口IWorkbenchWindow,API中的說明

          A workbench window is a top level window in a workbench. Visually, a workbench window has a menubar, a toolbar, a status bar, and a main area for displaying a single page consisting of a collection of views and editors.

          Each workbench window has a collection of 0 or more pages; the active page is the one that is being presented to the end user; at most one page is active in a window at a time.

          This interface is not intended to be implemented by clients.

          一個(gè)工作臺(tái)窗口是一個(gè)工作臺(tái)的頂層窗口.從視覺上看,一個(gè)工作臺(tái)窗口擁有一個(gè)菜單欄,工具欄,狀態(tài)欄和一個(gè)主區(qū)域,用來顯示包括顯示和編輯的一個(gè)頁面.

          每個(gè)工作臺(tái)窗口有0個(gè)或者更多的頁面.活動(dòng)的頁面是一種顯示給當(dāng)前使用者的頁面.大多數(shù)情況下,在一個(gè)時(shí)刻只有一個(gè)頁面處于活動(dòng)狀態(tài).

          這個(gè)接口不打算由用戶來實(shí)現(xiàn).

          (to more)

          posted @ 2006-06-30 20:10 燕然 閱讀(3618) | 評(píng)論 (0)編輯 收藏

          Rich Client Tutorial是Eclipse官方網(wǎng)站的RCP開發(fā)指南。原文地址為: http://www.eclipse.org/articles/Article-RCP-1/tutorial1.html
          第一次翻譯,有錯(cuò)誤,歡迎指正。

          Rich Client Tutorial Part 1

          The Rich Client Platform (RCP) is an exciting new way to build Java applications that can compete with native applications on any platform. This tutorial is designed to get you started building RCP applications quickly. It has been updated for Eclipse 3.1.2

          富客戶端平臺(tái)( RCP )是一個(gè)令人興奮的創(chuàng)建 java 應(yīng)用程序的新方式,她可以與任何平臺(tái)下的本地應(yīng)用程序相媲美。這份指南目的在于讓你快速的構(gòu)建 rcp 應(yīng)用程序。本指南已更新,適用于 Eclipse 3.1.2

          Introduction

          Try this experiment: Show Eclipse to some friends or co-workers who haven't seen it before and ask them to guess what language it is written in. Chances are, they'll guess VB, C++, or C#, because those languages are used most often for high quality client side applications. Then watch the look on their faces when you tell them it was created in Java, especially if they are Java programmers.

          Because of its unique open source license, you can use the technologies that went into Eclipse to create your own commercial quality programs. Before version 3.0, this was possible but difficult, especially when you wanted to heavily customize the menus, layouts, and other user interface elements. That was because the "IDE-ness" of Eclipse was hard-wired into it. Version 3.0 introduced the Rich Client Platform (RCP), which is basically a refactoring of the fundamental parts of Eclipse's UI, allowing it to be used for non-IDE applications. Version 3.1 updated RCP with new capabilities, and, most importantly, new tooling support to make it easier to create than before.

          If you want to cut to the chase and look at the code for this part you can find it in the accompanying zip file . Otherwise, let's take a look at how to construct an RCP application.

          引言

          嘗試做這個(gè)實(shí)驗(yàn):把 Eclipse 展示給你的那些以前沒見過 Eclipse 的朋友或合作伙伴,讓他們猜猜這是用何種語言編寫的。很有可能,他們會(huì)說是 VB C++ 或者 C# ,因?yàn)檫@些語言經(jīng)常被用來作為高質(zhì)量客戶端方面的應(yīng)用程序。當(dāng)你告訴他們是用 java 編寫時(shí),察看他們臉上的表情,尤其當(dāng)他們是 java 程序員的話。

          因?yàn)?/span> Eclipse 是唯一 開放源代碼許可的,你可以用 Eclipse 這個(gè)技術(shù)來創(chuàng)建你自己商業(yè)質(zhì)量的程序。在 3.0 版本以前,這是可能的,但也是困難的,尤其當(dāng)你想要訂制菜單,多層和其他用戶界面元素時(shí)。那是因?yàn)楹茈y接觸到 Eclipse IDE 核心。 3.0 版本的 Eclipse 引入了富客戶端編程( RCP ),這基本上是 Eclipse UI 的重新構(gòu)建,也就允許 Eclipse UI 被應(yīng)用到非 Eclipse IDE 的應(yīng)用程序中。 3.1 版本的 Eclipse 用新特性升級(jí)了 RCP ,最重要的是,新的工具使的創(chuàng)建 RCP 應(yīng)用程序比以前更加容易。

          如果你想要研究 Rich Client Tutorial Part 1 的代碼,你可以到 accompanying zip file 下載。另外,讓我們一步步來看看如何創(chuàng)建一個(gè) RCP 應(yīng)用程序。

          Getting started

          開始

          RCP applications are based on the familiar Eclipse plug-in architecture, (if it's not familiar to you, see the references section). Therefore, you'll need to create a plug-in to be your main program. Eclipse's Plug-in Development Environment (PDE) provides a number of wizards and editors that take some of the drudgery out of the process. PDE is included with the Eclipse SDK download so that is the package you should be using. Here are the steps you should follow to get started.

          RCP 應(yīng)用程序基于熟悉的 Eclipse 插件機(jī)制,(如果你不熟悉,請查看參考書目部分)。因此,你要?jiǎng)?chuàng)建一個(gè)插件來作為你的主程序。 Eclipse 的插件開發(fā)環(huán)境( PDE )提供了大量的控件和編輯器來使得開發(fā)過程脫離苦海。 PDE 包括在了 Eclipse SDK ,所以 PDE 開發(fā)包你可以直接使用。以下是開始開發(fā)的步驟:

          First, bring up Eclipse and select File > New > Project, then expand Plug-in Development and double-click Plug-in Project to bring up the Plug-in Project wizard. On the subsequent pages, enter a Project name such as org.eclipse.ui.tutorials.rcp.part1, indicate you want a Java project, select the version of Eclipse you're targeting (at least 3.1), and enable the option to Create an OSGi bundle manifest. Then click Next >.

          首先,啟動(dòng) Eclipse ,選擇File > New > Project接下來選中 Plug-in Development雙擊來打開插件工程向?qū)АT趶棾龅捻撁嬷校I入工程名(例如: org.eclipse.ui.tutorials.rcp.part1),指明你要一個(gè) java工程,選擇你想創(chuàng)建適用的 Eclise的版本,并選中使用 OSGI包。接下來點(diǎn)擊 Next>

          note:Beginning in Eclipse 3.1 you will get best results by using the OSGi bundle manifest. In contrast to previous versions, this is now the default.

          In the next page of the Wizard you can change the Plug-in ID and other parameters. Of particular importance is the question, "Would you like to create a rich client application?". Select Yes. The generated plug-in class is optional but for this example just leave all the other options at their default values. Click Next > to continue.

          注: 通過使用 Eclipse 3.1 OSGI 包,你會(huì)獲得很好的結(jié)果。與以前的版本相比, OSGi 現(xiàn)在是默認(rèn)的了。

          在下一頁向?qū)е校憧梢愿牟寮?/span> ID 號(hào)和其他參數(shù)。尤其要關(guān)注一個(gè)問題:“你想要?jiǎng)?chuàng)建一個(gè)富客戶端的應(yīng)用程序嗎?”,選擇“是”。生成的插件類是可選的,但對于這個(gè)例子,一切其他的可選項(xiàng)都設(shè)為默認(rèn)值。單擊Next >到下一頁

          note: If you get a dialog asking if Eclipse can switch to the Plug-in Development Perspective click Remember my decision and select Yes (this is optional).

          注:如果你得到一個(gè)對話框,詢問 Eclipse 是否切換到插件開發(fā)透視圖。這時(shí)單擊記住我的選擇并選擇“是”(這是可選的)。

          Starting with Eclipse 3.1, several templates have been provided to make creating an RCP application a breeze. We'll use the simplest one available and see how it works. Make sure the option to Create a plug-in using one of the templates is enabled, then select the Hello RCP template. This is RCP's equivalent of "Hello, world". Click Finish to accept all the defaults and generate the project (see Figure 1). Eclipse will open the Plug-in Manifest Editor. The Plug-in Manifest editor puts a friendly face on the various configuration files that control your RCP application.

          Eclipse 3.1 開始,提供了幾個(gè)模板使得創(chuàng)建 RCP 應(yīng)用程序相當(dāng)容易。我們使用最簡單的一個(gè)模板來觀察這是如何工作的。確保創(chuàng)建一個(gè)插件使用模板之一是允許的,接著選擇“ Hello RCP ”模板。這是 RCP 應(yīng)用程序中的“ Hello, world ”。選擇“完成”來創(chuàng)建工程(見圖一)。 Eclipse 將會(huì)打開插件編輯器。插件編輯器提供了友好的界面,擁有多樣的配置文件來控制你的RCP應(yīng)用程序。


          Figure 1. The Hello World RCP project was created by a PDE wizard.

          圖一,PDE向?qū)?chuàng)建的Hello World工程

          (未完,待續(xù))

          posted @ 2006-06-30 18:27 燕然 閱讀(997) | 評(píng)論 (1)編輯 收藏

          這個(gè)RCP的開發(fā)怎么感覺轉(zhuǎn)來轉(zhuǎn)去,轉(zhuǎn)暈了。。唉,對eclipse的開發(fā)api又很不熟悉,感覺無從下手。

          posted @ 2006-06-30 18:16 燕然 閱讀(960) | 評(píng)論 (1)編輯 收藏

          主站蜘蛛池模板: 赣州市| 云林县| 阳高县| 四平市| 灯塔市| 呈贡县| 酉阳| 时尚| 乳山市| 上高县| 盐城市| 浏阳市| 鄂州市| 荣成市| 交口县| 河西区| 梁河县| 稻城县| 桂林市| 奉贤区| 台北市| 松滋市| 洮南市| 安顺市| 顺昌县| 浑源县| 南江县| 阿拉善盟| 凉山| 五原县| 卢氏县| 云浮市| 喀什市| 景谷| 迁西县| 苏尼特右旗| 增城市| 天峨县| 鹿邑县| 宜章县| 丹江口市|