摘要: 注釋配置相對于 XML 配置具有很多的優勢:
它可以充分利用 Java 的反射機制獲取類結構信息,這些信息可以有效減少配置的工作。如使用 JPA 注釋配置 ORM 映射時,我們就不需要指定 PO 的屬性名、類型等信息,如果關系表字段和 PO 屬性名、類型都一致,您甚至無需編寫任務屬性映射信息——因為這些信息都可以通過 Java 反射機制獲取。
注釋和 Java 代碼位于一個...
閱讀全文
研究了很久新出的 Spring 2.5, 總算大致明白了如何用標注定義 Bean, 但是如何定義和注入類型為 java.lang.String 的 bean 仍然未解決, 希望得到高人幫助.
總的來看 Java EE 5 的標注開發方式開來是得到了大家的認可了.
@Service 相當于定義 bean, 自動根據 bean 的類名生成一個首字母小寫的 bean
@Autowired 則是自動注入依賴的類, 它會在類路徑中找成員對應的類/接口的實現類, 如果找到多個, 需要用 @Qualifier("chineseMan") 來指定對應的 bean 的 ID.
一定程度上大大簡化了代碼的編寫, 例如一對一的 bean 映射現在完全不需要寫任何額外的 bean 定義了.
下面是代碼的運行結果:
man.sayHello()=你好
SimpleMan said: Hi
org.example.EnglishMan@12bcd4b said: Hello
代碼:
beans.xml
<?xml version="1.0" encoding="UTF-8"?>
<beans xmlns="http://www.springframework.org/schema/beans"
xmlns:xsi="http://www.w3.org/2001/XMLSchema-instance"
xmlns:context="http://www.springframework.org/schema/context"
xsi:schemaLocation="http://www.springframework.org/schema/beans
http://www.springframework.org/schema/beans/spring-beans-2.5.xsd
http://www.springframework.org/schema/context
http://www.springframework.org/schema/context/spring-context-2.5.xsd">
<context:annotation-config/>
<context:component-scan base-package="org.example"/>
</beans>
測試類:
import org.example.IMan;
import org.example.SimpleMan;
import org.springframework.context.ApplicationContext;
import org.springframework.context.support.ClassPathXmlApplicationContext;
public class SpringTest {
public static void main(String[] args) {
ApplicationContext ctx = new ClassPathXmlApplicationContext("beans.xml");
SimpleMan dao = (SimpleMan) ctx.getBean("simpleMan");
System.out.println(dao.hello());
IMan man = (IMan) ctx.getBean("usMan");
System.out.println(man.sayHello());
}
}
自動探測和注入bean的類:
package org.example;
import org.springframework.beans.factory.annotation.Autowired;
import org.springframework.beans.factory.annotation.Qualifier;
import org.springframework.stereotype.Service;
@Service
public class SimpleMan {
// 自動注入名稱為 Man 的 Bean
@Autowired(required = false)
@Qualifier("chineseMan")
//@Qualifier("usMan")
private IMan man;
/**
* @return the man
*/
public IMan getMan() {
return man;
}
/**
* @param man the man to set
*/
public void setMan(IMan man) {
this.man = man;
}
public String hello() {
System.out.println("man.sayHello()=" + man.sayHello());
return "SimpleMan said: Hi";
}
}
一個接口和兩個實現類:
package org.example;
/**
* 抽象的人接口.
* @author BeanSoft
* @version 1.0
*/
public interface IMan {
/**
* 打招呼的抽象定義.
* @return 招呼的內容字符串
*/
public String sayHello();
}
package org.example;
import org.springframework.stereotype.Service;
/**
* 中國人的實現.
* @author BeanSoft
*/
@Service
public class ChineseMan implements IMan {
public String sayHello() {
return "你好";
}
}
package org.example;
import org.springframework.stereotype.Service;
/**
* @author BeanSoft
*
*/
@Service("usMan")
// 這里定義了一個 id 為 usMan 的 Bean, 標注里面的屬性是 bean 的 id
public class EnglishMan implements IMan {
public String sayHello() {
return this + " said: Hello!";
}
}
IoC與DI
首先想說說IoC(Inversion of Control,控制倒轉)。這是spring的核心,貫穿始終。所謂IoC,對于spring框架來說,就是由spring來負責控制對象的生命周期和對象間的關系。這是什么意思呢,舉個簡單的例子,我們是如何找女朋友的?常見的情況是,我們到處去看哪里有長得漂亮身材又好的mm,然后打聽她們的興趣愛好、qq號、電話號、ip號、iq號………,想辦法認識她們,投其所好送其所要,然后嘿嘿……這個過程是復雜深奧的,我們必須自己設計和面對每個環節。傳統的程序開發也是如此,在一個對象中,如果要使用另外的對象,就必須得到它(自己new一個,或者從JNDI中查詢一個),使用完之后還要將對象銷毀(比如Connection等),對象始終會和其他的接口或類藕合起來。
那么IoC是如何做的呢?有點像通過婚介找女朋友,在我和女朋友之間引入了一個第三者:婚姻介紹所。婚介管理了很多男男女女的資料,我可以向婚介提出一個列表,告訴它我想找個什么樣的女朋友,比如長得像李嘉欣,身材像林熙雷,唱歌像周杰倫,速度像卡洛斯,技術像齊達內之類的,然后婚介就會按照我們的要求,提供一個mm,我們只需要去和她談戀愛、結婚就行了。簡單明了,如果婚介給我們的人選不符合要求,我們就會拋出異常。整個過程不再由我自己控制,而是有婚介這樣一個類似容器的機構來控制。Spring所倡導的開發方式就是如此,所有的類都會在spring容器中登記,告訴spring你是個什么東西,你需要什么東西,然后spring會在系統運行到適當的時候,把你要的東西主動給你,同時也把你交給其他需要你的東西。所有的類的創建、銷毀都由 spring來控制,也就是說控制對象生存周期的不再是引用它的對象,而是spring。對于某個具體的對象而言,以前是它控制其他對象,現在是所有對象都被spring控制,所以這叫控制反轉。如果你還不明白的話,我決定放棄。
IoC的一個重點是在系統運行中,動態的向某個對象提供它所需要的其他對象。這一點是通過DI(Dependency Injection,依賴注入)來實現的。比如對象A需要操作數據庫,以前我們總是要在A中自己編寫代碼來獲得一個Connection對象,有了 spring我們就只需要告訴spring,A中需要一個Connection,至于這個Connection怎么構造,何時構造,A不需要知道。在系統運行時,spring會在適當的時候制造一個Connection,然后像打針一樣,注射到A當中,這樣就完成了對各個對象之間關系的控制。A需要依賴 Connection才能正常運行,而這個Connection是由spring注入到A中的,依賴注入的名字就這么來的。那么DI是如何實現的呢? Java 1.3之后一個重要特征是反射(reflection),它允許程序在運行的時候動態的生成對象、執行對象的方法、改變對象的屬性,spring就是通過反射來實現注入的。關于反射的相關資料請查閱java doc。
我想通過Bromon的介紹,大家對IoC和DI都有了比較生動的理解了。再來看看《expert one-on-one J2EE Development without EJB中文版》是怎么解釋這兩個概念的。書上是這么說的:
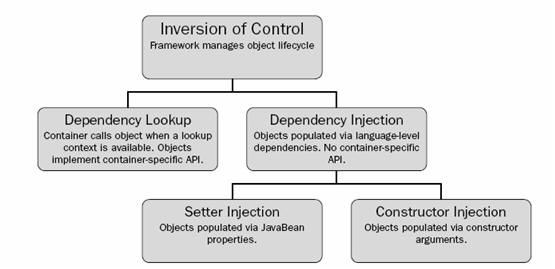
IoC是一個很大的概念,可以用不同的方式來實現。主要的實現形式有兩種:
依賴查找:容器提供回調接口和上下文環境給組件。EJB和Apache Avalon都是使用這種方式。
依賴注入:組件不做定位查詢,只是提供普通的Java方法讓容器去決定依賴關系。容器全權負責組件的裝配,它會把符合依賴關系的對象通過JavaBean屬性或者構造子傳遞給需要的對象。通過JavaBean屬性注射依賴關系的做法稱為設值方法注入(Setter Injection);將依賴關系作為構造子參數傳入的做法稱為構造子注入(Constructor Injection)。
附圖說明:
到這里,大家應該對IoC與DI都有了初步的認識了。其實就Spring來說,就是JavaBean由Spring來管理組裝,表面上看就少了幾個new字,其實就是為了降低耦合度,這也是我們做軟件的目標之一。
至于Spring是怎樣實現IoC的,《expert one-on-one J2EE Development without EJB中文版》第七章“Spring框架介紹”很詳細的列舉了多種方法。說實在,一下子看這么多,我真有點糊涂了。我還是自己寫個Demo熟悉一下大名鼎鼎的Spring吧。
首先得下載Spring。Spring網上有兩種Spring 包一種是spring-framework-1.2.6-with-dependencies.zip,另一種是spring-framework-1.2.6.zip。當然最好是下載spring-framework-1.2.6-with-dependencies.zip形式的,因為里面包括了更多的東東。spring-framework-1.2.6-with-dependencies.zip的下載地址是:http://prdownloads.sourceforge.net/springframework/spring-framework-1.2.6-with-dependencies.zip。
下載下來,解壓后,你會發現里面有很多jar文件。因為剛剛接觸Spring,因此我只需要spring-core.jar(spring-framework-1.2.6"dist),將其導入eclipse的構建路徑中。另外,log日志是需要的,這也是為了養成良好的編程習慣。將log4j-1.2.9.jar(spring-framework-1.2.6"lib"log4j)和commons-logging.jar(spring-framework-1.2.6"lib"jakarta-commons)導入到構建路徑中。
準備就緒,開始寫Demo了。
我的工程的結構是:

<!--[if !supportLists]-->1、<!--[endif]-->log4j.properties代碼:
log4j.rootLogger=Debug, stdout
log4j.appender.stdout=org.apache.log4j.ConsoleAppender
log4j.appender.stdout.layout=org.apache.log4j.PatternLayout
log4j.appender.stdout.layout.ConversionPattern=%c{1} - %m%n
如何使用Log4j,請看我的另一篇轉貼的文章:如何使用Log4J。
<!--[if !supportLists]-->2、<!--[endif]-->HelloBean的代碼:
package com;
public class HelloBean {
private String helloworld="Hello!World!";
public String getHelloworld() {
return helloworld;
}
public void setHelloworld(String helloworld) {
this.helloworld = helloworld;
}
}
這是一個簡單的JavaBean,有個String類型的helloworld屬性,初始值是"Hello!World!"。
<!--[if !supportLists]-->3、<!--[endif]-->Bean.xml代碼:
<?xml version="1.0" encoding="GBK"?>
<!DOCTYPE beans PUBLIC "-//SPRING/DTD BEAN/EN"
"http://www.springframework.org/dtd/spring-beans.dtd">
<beans>
<bean id="helloBean" class="com.HelloBean">
<property name="helloworld">
<value>Hello!Rick</value>
</property>
</bean>
</beans>
Spirng重點之一就是配置文件,上面是個相當簡單的配置文件,我想大家都應該看得懂。最后就是寫應用程序了。
4、<!--[endif]-->Test的代碼:
package com;
import org.springframework.beans.factory.*;
import org.springframework.beans.factory.xml.XmlBeanFactory;
import org.springframework.core.io.ClassPathResource;
import org.springframework.core.io.Resource;
public class Test {
public static void main(String[] args) {
//實例化JavaBean,主要是為了比較new對象和依賴注入兩者的區別
HelloBean hellobean=new HelloBean();
System.out.println(hellobean.getHelloworld());
//通過Spring訪問JavaBean組件
Resource resource=new ClassPathResource("com/bean.xml");
BeanFactory factory=new XmlBeanFactory(resource);
hellobean=(HelloBean)factory.getBean("helloBean");
System.out.println(hellobean.getHelloworld());
}
}
這個Demo很好的闡述了Spring的Ioc,其實就Spring而言,就是通過配置文件,讓Spring如同一個管家一樣來管理所有的Bean類。
Spring的依賴注入相對復雜一點,主要是明白調用別的Bean,不是通過實例化對象來調用,而是告訴Spring,我需要什么Bean,然后Spring再向你的Bean里面注入你所需要的Bean對象。
接下來說說代碼實現,我只是在剛剛的例子上再添加一點東東。
首先要增加一個HelloImp的接口,這是問什么呢,那你得問Spring,它定的規矩:JavaBean的實現要有兩個部分,一個接口,一個默認實現。你不照做就不行。
HelloImp代碼:
package com;
public interface HelloImp {
public void getName();
}
實現HelloImp的Hello代碼:
package com;
public class Hello implements HelloImp {
public void getName(){
System.out.println("Jack");
}
}
接著就是在HelloBean中調用Hello了。Spring的不同之處也在這體現出來。
package com;
public class HelloBean {
private String helloworld="Hello!World!";
private HelloImp hello; //注意這個私有對象是借口
public String getHelloworld() {
return helloworld;
}
public void setHelloworld(String helloworld) {
this.helloworld = helloworld;
}
public void setHello(HelloImp hello) {
this.hello = hello;
}
public void get(){
this.hello.getName();
}
}
注意字體加粗的地方。
配置文件也需要增加一點東西:
<?xml version="1.0" encoding="GBK"?>
<!DOCTYPE beans PUBLIC "-//SPRING/DTD BEAN/EN"
"http://www.springframework.org/dtd/spring-beans.dtd">
<beans>
<!—注意引用的類是具體的類Hello-->
<bean id="myHello" class="com.Hello">
</bean>
<bean id="helloBean" class="com.HelloBean">
<property name="helloworld">
<value>Hello!Rick</value>
</property>
<property name="hello">
<ref bean="myHello"></ref>
</property>
</bean>
</beans>
注意字體加粗的部分。
最后在Test中添加一句hellobean.get();就可以看到結果了。
package com;
import org.springframework.beans.factory.*;
import org.springframework.beans.factory.xml.XmlBeanFactory;
import org.springframework.core.io.ClassPathResource;
import org.springframework.core.io.Resource;
public class Test {
public static void main(String[] args) {
HelloBean hellobean=new HelloBean();
System.out.println(hellobean.getHelloworld());
Resource resource=new ClassPathResource("com/bean.xml");
BeanFactory factory=new XmlBeanFactory(resource);
hellobean=(HelloBean)factory.getBean("helloBean");
System.out.println(hellobean.getHelloworld());
hellobean.get();
}
}
到這,Spring的IoC和DI總算有了一定的認識,也算是敲開了Spring的大門了。